はじめに
僕はそこまでJavaScriptは得意ではありませんよー。
そんな中で本業とは別件のプロジェクトでFirebase authentication用いてのSNS認証、詳しくはFacebook、Twitter、InstagramのSNS認証を実装しました。
Facebook、Twitterでの認証はFirebase authenticationでポップアップ、リダイレクトどちらも用意されており、簡単に実装できますが、InstagramのみFirebase authenticationで用意されていません。なので、Instagram認証フローのみ自作しました。
そのフロー内での、Instagramログイン認証をポップアップでやった方が色々楽かなと考え、ポップアップで書きましたのでその知見を書きます。
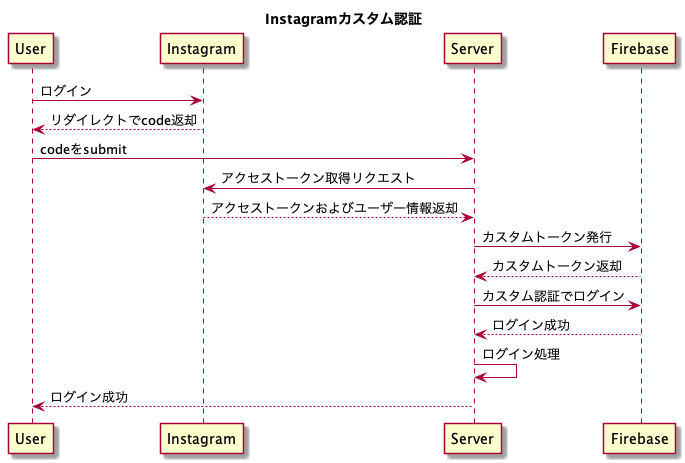
Instagram認証フロー
サーバー側ではInstagramアクセストークン取得やFirebaseカスタム認証やログイン処理などもっと複雑な処理を行っていますが、今回は表題とは違うので割愛しますw
Instagram APIの設定やFirebaseカスタム認証は以下公式を参考に設定してください。
フローとしては以下です。
- Instagram APIを用いてログインを行い、codeを返却。→今回はここをポップアップにしただけのお話
- サーバーに2の情報をsubmit
- 3の情報を用いて、Instagramアクセストークンおよびユーザー情報を取得
- 4のユーザーIDを用いて、Firebaseカスタムトークン発行
- 5の情報を用いて、Firebaseカスタム認証実行
- ログイン!!
(*1) Instagram APIは2020年で終了してしまう恐れがあるので、お気をつけください。その際はFacebook Graph APIをご利用ください。
ソースコード
実際に該当ソースですが、単純にポップアップウィンドウを作成し、その中でリダイレクトさせているだけですね。
import * as oauth2lib from 'simple-oauth2';

/**
 * 色々な処理
 */

function loginInstagram() {
    // oauth2のクライアント作成
    var oauth2 = oauth2lib.create({
        client: {
            id: /* CLIENT_ID */,
            secret: /* SECRET */,
        },
        auth: {
            tokenHost: 'https://api.instagram.com',
            tokenPath: '/oauth/access_token',
        },
    });
    // envに埋め込んだリダイレクト
    var redirectPath = /* 許可リダイレクトPATH */;

    // 大きさ適当に
    var width = 500;
    var height = 700;
    var left = (screen.width / 2) - (width / 2);
    var top = (screen.height / 2) - (height / 2);

    // ポップアップwindowを作成し、そちら側でリダイレクト
    var popupInstagramWindow = window.open(oauth2.authorizationCode.authorizeURL({
        redirect_uri: location.protocol + "//" + location.host + redirectPath,
        scope: [
            'basic',
        ],
    }), 'Instagram', "menubar=no,location=no,resizable=no,scrollbars=no,status=no,width=" + width + ", height=" + height + ", top=" + top + ", left=" + left);

    // Intervalで監視
    var instagramCodeObserver = setInterval(function () {
        try {
            var params = new URLSearchParams(popupInstagramWindow.location.search);
            // リダイレクトしたかどうか確認
            if (redirectPath === popupInstagramWindow.location.pathname) {
                if (params.has('code')) {
                    /* params.get('code')で何かしらの処理 */
                }
                else {
                    /* alert */
                }
                // 用済みですので、ポップアップクローズしてIntervalクリア
                popupInstagramWindow.close();
                clearInterval(instagramCodeObserver);
            }
        }
        catch (e) {
            /* alert */
        }
    }, 100);

    // 一旦、5分で監視消すか
    setTimeout(function () {
        clearInterval(instagramCodeObserver);
    }, 300000);
}
参考ページ
まとめ
JavaScript初心者みたいなコードだなぁ。
もっといい書き方があるんだろうなぁw
リダイレクトでの方法はネットでちらほら見かけはするのですが、ポップアップでの方法が意外に見かけませんでしたので、今後誰かが組み込む時に、参考になればと思います。
ちなみにサーバー側はPHPで書いているのですが、そちらの方が得意ですので、サーバー側での処理も記事で書けたらなーと思います。
Instagram APIは2020年で終了になるのにゴリゴリ扱ってる記事ですが、ご容赦ください。
