はじめに
本記事はCiscoの有志による Cisco Systems Japan Advent Calendar 2020 (一枚目) の 8日目として投稿しています。
- 2020年版(一枚目): https://qiita.com/advent-calendar/2020/cisco
- 2020年版(二枚目): https://qiita.com/advent-calendar/2020/cisco2
- 2019年版: https://qiita.com/advent-calendar/2019/cisco
- 2018年版: https://qiita.com/advent-calendar/2018/cisco
目次
1.はじめに
2.NetDevOpsとは
3.取り組み内容
4.全体の構成
4.1.CMLを用いたネットワーク構成とデバイスコンフィグの検証
4.2.pyATSを用いたテスト自動化
4.3.NSOを用いたデバイスの管理
4.4.Gitによる全ファイルの管理
[4.5.Network CI/CD](##4.5-Network CI/CD)
5.まとめ
ご挨拶
こんにちは。2020年度にCisco Japanに新卒入社した @dnozaki と申します。
大学・大学院では機械学習を用いた画像認識や、5G関連の研究開発をしていました。
現在はCiscoのプリセールスエンジニアとしてお客様への提案活動や技術的課題のサポートをするべく、日々新しいことを学んでいます。
入社後は自動化系のソリューションを中心に、ネットワーク製品の知識をキャッチアップしてきました。
今回は自動化を含む**「NetDevOps」**をテーマに、Cisco製品を交えてAutomationのデモをご紹介していきたいと思います。
NetDevOpsとは
まず、昨今話題のDevOpsとは何かをご説明致します。
DevOpsとは、ソフトウェア開発(Dev)と運用(Ops)を組み合わせた一連のプラクティスで、システム開発のライフサイクルを短縮し、品質の高い継続的デリバリーの実現を目指す概念のことです。
開発チームと運用チームが行動を共にし、開発の速度や正確性を高めることを目指す流れはネットワーク業界も例外ではありません。
そして、DevOpsの手法をネットワーク運用に取り入れる**「NetDevOps」**は、下記のような点を目指しています。
- ネットワーク運用をプログラム可能にすること
- ネットワーク運用のアジリティ(敏捷性)を向上させること
- ネットワーク運用に自動化と仮想化の手法を取り入れること
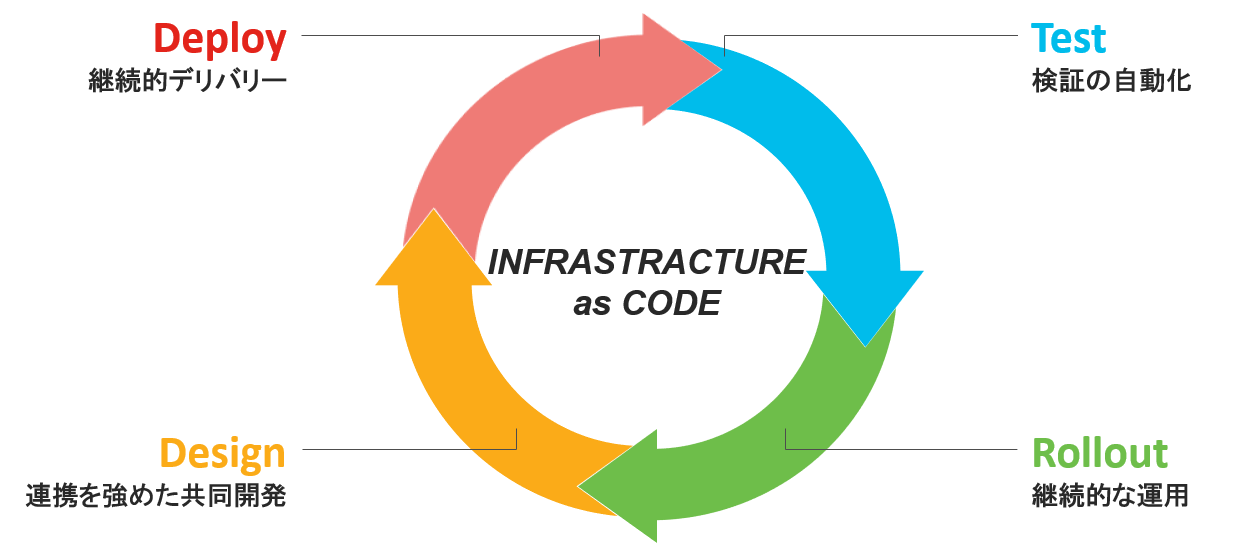
今回はこのようなNetDevOpsの実現に向けた一歩目として、CML・NSO・pyATS・Gitlabを用いたテスト試験の自動化に取り組んでみました。
取り組み内容
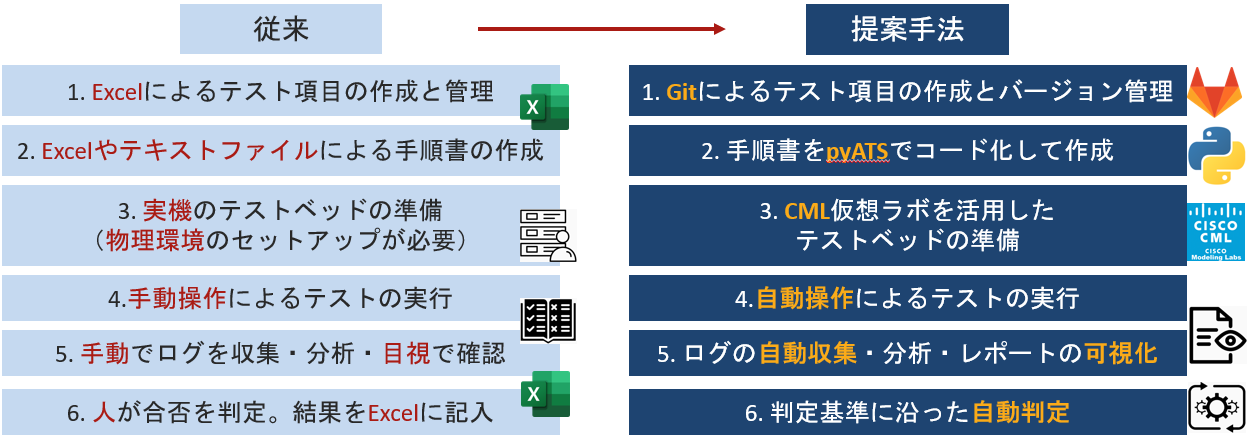
今回はネットワークテストの自動化に取り組みます。
従来までのテストは、下記フロー図の左のようなプロセスで行われていました。
それを今回の提案手法では、下記フロー図の右のプロセスで行うことを可能にします。
全体の構成
それでは、全体の構成を見ていきましょう。
出来上がった構成図は下記のようになっています。
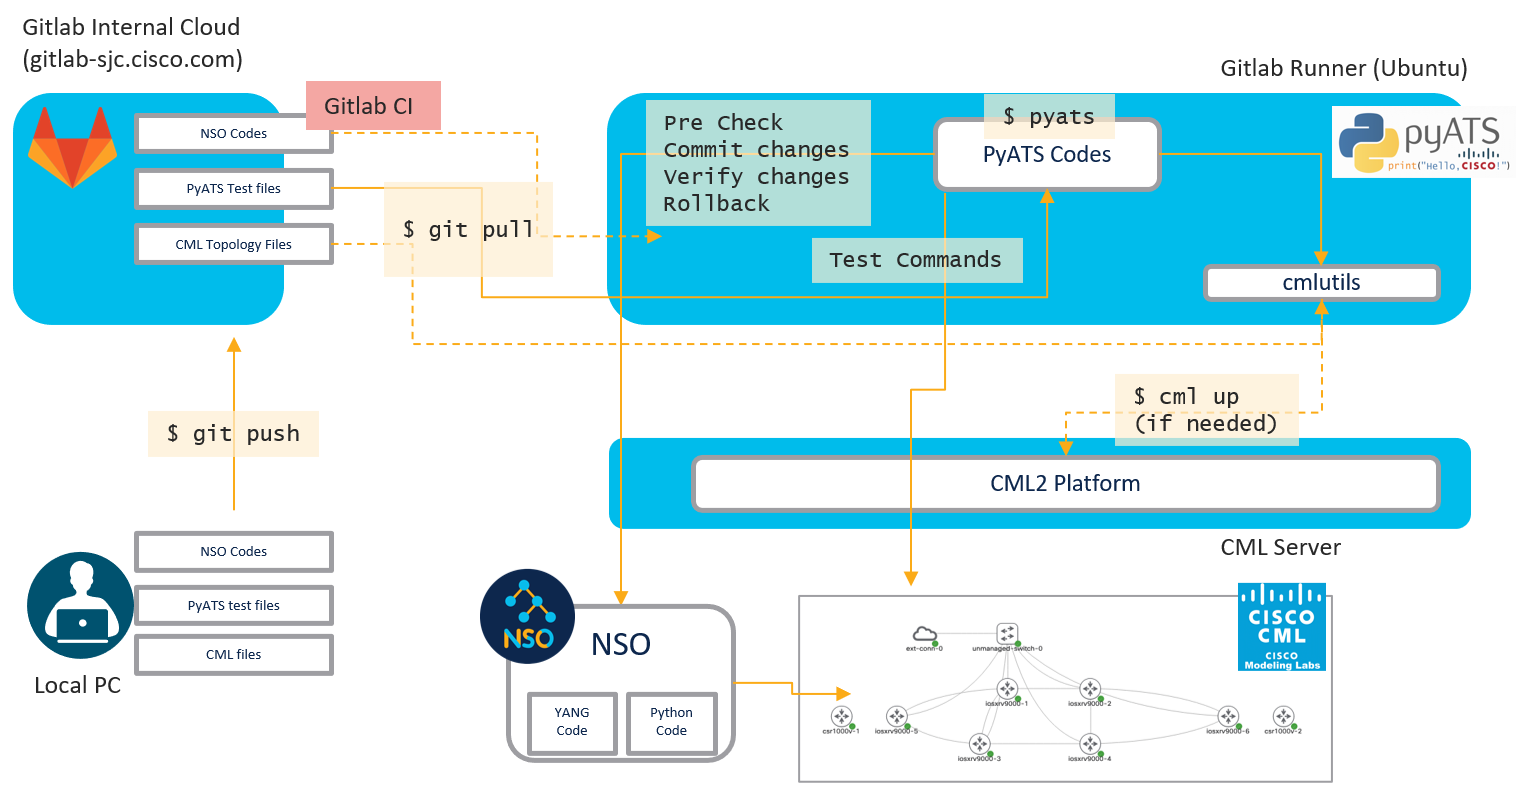
今回は上記の提案手法であるテストプロセスを実現するために、4つの核となるソリューションを採用しました。
”CML、NSO、pyATS、Gitlab”の4つです。
- まず、CMLで仮想的なネットワーク構成を作成し、ここでネットワーク構成とデバイスコンフィグが正しく動作するかどうかを確認します。後で詳しく見ていきますが、CMLでは実機を立てる必要がないため、手軽にラボでの検証を行うことができます。
- 次に、コンフィグの投入に関してはpyATSというテストフレームワークを使い、NSOを経由して、CML上のトポロジに設定を入れていきます。
- コンフィグを投入後、ネットワークが正常に動作しているかどうかをpyATSでのテストコマンドを用いて検証していきます。
- このようなテスト手順やログなどのファイルは全てGitで管理することで、今後の試験でも繰り返し使えるようになっています。
以上が全体の構成です。
それでは、それぞれのパートを詳しく見ていきましょう。
CMLを用いたネットワーク構成とデバイスコンフィグの検証
CMLとは
まず、CMLとは、Ciscoが提供するテスト用の仮想ネットワーク環境を構築できるネットワークシミュレーションプラットフォームです。
今回はこのCMLを用いて、商用環境と同じ構成を仮想的に再現することで検証を行いました。
CMLのブラウザ上でのGUI操作
CMLでは、以下のようなことが実現できます。
- GUI 上でのノードやインターフェイスの追加
- GUI 上のコンソールから OS の操作
- OS イメージの追加(OS の種類やバージョンも商用環境に合わせた検証が可能)
こちらは実際にCMLを動作させている画面です。

cmlutilsを用いたコマンドライン操作
また、CMLではブラウザ上のGUIでの操作だけではなく、cmlutilsというツールを使うことでコマンドラインで自在に操作することも可能になっています。
cmlutilsでは、**"cml ls"コマンドでラボの一覧を表示したり、"cml nodes"**コマンドでシミュレーション中のノードを一覧表示することができます。
詳しいcmlutilsの使い方は、ぜひCiscoDevNetのGitHubをご覧ください。
pyATSを用いたテスト自動化
pyATSとは
pyATSとは、pythonベースのテストフレームワークです。
次のような動作がコードベースで可能になります。
- トポロジ管理
- ネットワーク機器へのコンフィグ投入&コマンド実行
- テストトリガーの設定
- 結果のログを整形しviewerで表示
今回は、テストトリガーとして、yamlベースで記述できるpyATS Blitzを使用しました。
pyATS Blitzの使い方は、昨年のAdvent Calendarに投稿されている@tahigashさんのこちらの記事を参考にさせていただきました。
・pyATS|Genieの隠れ必殺技Blitzを用いて高速自動化テスト作成
何を自動化したのか
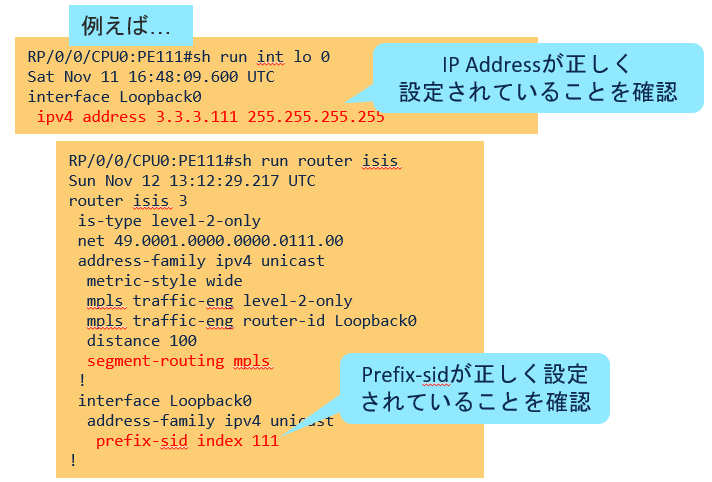
今回は、デバイスにConfigが正しく投入されていることを確認する手順を自動化しました。
例えば、DeviceのIP Addressや、Segment RoutingのPrefix-sidが正しく設定されているかといったことを一つずつshowコマンドを叩かずに確認します。
実際には、pyATSのテストスクリプトであるblitz.ymlには次のように記載することで判定しています。
対象デバイスを"device"に入力し、"command"にて実行したいコマンドを設定、"include"で正しい結果が表示されていることを確認します。
実際にblitz.yamlを実行すると、ターミナル上でテストが順番に実行されます。
また、pyATSではテストの実行内容をターミナル上に出力するだけではなく、自動的にレポートにして表示することも可能です。
テストが問題なく通れば、このようにPassedと表示されます。一方、問題があればFailedと表示され、該当箇所をGUIで確認することが可能です。

NSOを用いたデバイスの管理
pyATSでは、Cisco IOS XR以外の OS も多くサポートしており、NSO も設定することができます。
NSOとは、Ciscoが提供しているマルチベンダ対応の商用ネットワーク自動化ソフトウェアであり、次のようなことが実現できます。
- マルチベンダ ネットワーク デバイスに対するコンフィギュレーションを YANG モデリング言語で抽象化
- マルチベンダ ネットワーク デバイスに対するプロビジョニング操作を自動化
- 管理デバイスへの API(REST、RESTCONF、NETCONF等)を自動生成
例えば、blitz.ymlに下記のように記載することでNSOからデバイスの管理(Configの追加など)を行うことが可能になります。
        #NSOによる制御
        - NSO:
            - execute:    #任意のNSOコマンドを実行
                description: NSO test
                banner: NSO test
                device: nso
                command: show devices list
            - configure:    #Configも追加できる
                description: NSO test
                banner: NSO test
                device: nso
                command: |
                    devices device R1 config
                      Interface loopback 80
Gitによる全ファイルの管理
今回、ファイルは全て Git で管理することを徹底しました。こうすることで、履歴変更や差分の確認もGit上で簡単に行うことができます。コードやログなども含めて一元管理でき、さらにbranch 機能を使うことで、複数人が共同作業すること可能になります。
今回のようなネットワーク運用においても、デバイスのConfigを誰がいつどのように変更したのかがすぐに分かるというメリットがあります。
下記の画面のように、Config変更の差分が一目で分かるようになり、同時にバックアップとしての機能も果たせるようになります。

Network CI/CD
Gitを使うメリットはファイルの整理だけではありません。
テスト手順やコンフィグに更新があるたびに自動でテストを走らせて、**「ネットワーク CI/CD」**を実現することもできるようになります。
CI/CD とは、**「Continuous Integration/Continuous Delivery」**の略で、継続的インティグレーション/継続的デリバリーのことを指します。ソフトウェアの変更を常にテストして自動で本番環境にリリース可能な状態にしておく、最近主流になってきたソフトウェア開発の手法であり、まさにDevOpsの一環です。
このCI/CDを、ネットワークに応用したものがNetwork CI/CDということになります。
今回は、Gitlabサーバの機能の一部である Gitlab CI/CD という支援ツールを使うことでNetwork CI/CDを実現しました。
具体的には、Gitlab RunnerというCI/CDツールを導入することで各種ジョブを実行できます。
やり方は、実行したい環境にRunnerを導入、連携するだけで可能です。
Runnerの導入により、commitに変更があったらそれをトリガーにジョブ(下記:gitlab-ci.yml)に記載のある内容を自動的に実行してくれるようになります。
テストコードを準備しているときには何度もTry and Errorを繰り返して試行錯誤していきますが、自分でわざわざテストコードを実行しなくても最新のコードが自動でテストできるようになるのです。
今回は実行したいジョブとして、下記のように記載しています。
test:
  tags:
    - dnozaki
  only:
    - dnozaki
  script:
    - echo "===== test started ====="
    - echo /home/admin/
    - cd /home/admin/workspace/network-cicd
    - source virlrc
    - echo ${VIRL_HOST}
    - echo ${http_proxy}
    - echo ${https_proxy}
    - echo ${no_proxy}
    - which cml    #試験対象のcmlが正しく指定されていることを確認
    - time ./run.sh    #run.shはテストスクリプトblitz.ymlを実行させるシェルスクリプト
実際にGitlab CIが動作する様子がこちらです。
commitに変更を加えた後、pushすることでジョブが自動的に実行されています。
実行中の様子や結果は、GitlabのCI/CDタブから確認することができます。
御覧の通り、テストが自動実行され、逐一手動で行わずに済むことがお分かり頂けますでしょうか。

これを使えば、例えば設計チームが自分たちの branch で設計コンフィグを変更してコミットしたら、即座に新しいコンフィグでの動作が自動的にテストできるようになります。
設計チームと運用チームが時間を合わせて検証ルームに籠もる必要もないので、働き方改革や生産性向上、COVID-19の対策にも一役買ってくれることでしょう。
以上が、今回取り組んだNetDevOpsの一連の流れです。
まとめ
本記事では、CML+NSO+pyATS+Gitlabを用いたテスト検証の自動化を行いました。
今回行った自動化により、下記の3つのメリットが実現できます。
- テスト前から商用に近い環境が用意できること
- 事前にテストを楽に行うことで、バク探しや確認コマンドをスムーズに行えること
- コードでGitlabで管理しているので、今回の商用利用だけではなく、今後の試験にも活用できること
これにより、部門間が横断的に連携して開発を効率的に進めることができ、NetDevOpsのサイクルを迅速に回していくことが可能になります。

最後に
今回の取り組みで、今まで以上にネットワークの面白みや可能性を感じることができました。
ネットワークや、業界の発展を期待しながら本記事を終えると共に、私もそこに貢献していきたいと思います。
最後までお読みいただき、ありがとうございました。
またどこかの記事でお会いするのを楽しみにしています!
御礼
本記事を作成するにあたり、先輩社員である@radiantmarch さんの記事を大変参考させていただきました。
この場を借りて御礼申し上げます。
自動化に関する分かりやすい記事を多数投稿されておりますので、本記事に興味を持った方はぜひご覧いただければと思います。
おまけ
最後におまけとして、今回のテスト自動化に用いたスクリプトを記載致します。
分量が多いため、表示の際はご注意下さい。
・自動化したいテスト内容を書くトリガーデータファイル
blitz.yml
Test:
# groups: ['bgp']
source:
pkg: genie.libs.sdk
class: triggers.blitz.blitz.Blitz
test_sections:
#インターフェースの設定を確認
- Check_Current_Interface_Configuration:
- parallel:
- execute:
device: iosxrv9000-1
command: show ipv4 interface brief
include:
- 'GigabitEthernet0/0/0/0'
- execute:
device: iosxrv9000-2
command: show ipv4 interface brief
include:
- 'GigabitEthernet0/0/0/0'
- execute:
device: iosxrv9000-3
command: show ipv4 interface brief
include:
- 'GigabitEthernet0/0/0/0'
- execute:
device: iosxrv9000-4
command: show ipv4 interface brief
include:
- 'GigabitEthernet0/0/0/0'
- execute:
device: iosxrv9000-5
command: show ipv4 interface brief
include:
- 'GigabitEthernet0/0/0/0'
- execute:
device: iosxrv9000-6
command: show ipv4 interface brief
include:
- 'GigabitEthernet0/0/0/0'
#ISISの設定を確認
- Check_Current_ISIS_Configuration:
- parallel:
- execute:
device: iosxrv9000-1
command: show run router isis
include:
- 'net 49.0000.0000.0000.0001.00'
- 'interface Loopback0'
- 'prefix-sid absolute 17001'
- execute:
device: iosxrv9000-2
command: show run router isis
include:
- 'net 49.0000.0000.0000.0002.00'
- 'interface Loopback0'
- 'prefix-sid absolute 17002'
- execute:
device: iosxrv9000-3
command: show run router isis
include:
- 'net 49.0000.0000.0000.0003.00'
- 'interface Loopback0'
- 'prefix-sid absolute 17003'
- execute:
device: iosxrv9000-4
command: show run router isis
include:
- 'net 49.0000.0000.0000.0004.00'
- 'interface Loopback0'
- 'prefix-sid absolute 17004'
- execute:
device: iosxrv9000-5
command: show run router isis
include:
- 'net 49.0000.0000.0000.0005.00'
- 'interface Loopback0'
- 'prefix-sid absolute 17005'
- execute:
device: iosxrv9000-6
command: show run router isis
include:
- 'net 49.0000.0000.0000.0006.00'
- 'interface Loopback0'
- 'prefix-sid absolute 17006'
#Segment-Routingの設定を確認
#Prefix-sidが正しく設定されていることを確認
- Check_Current_SR_Configuration_Prefix-sid:
- parallel:
- execute:
device: iosxrv9000-1
command: show run router isis
include:
- 'segment-routing mpls'
- 'prefix-sid absolute 17001'
- execute:
device: iosxrv9000-2
command: show run router isis
include:
- 'segment-routing mpls'
- 'prefix-sid absolute 17002'
- execute:
device: iosxrv9000-3
command: show run router isis
include:
- 'segment-routing mpls'
- 'prefix-sid absolute 17003'
- execute:
device: iosxrv9000-4
command: show run router isis
include:
- 'segment-routing mpls'
- 'prefix-sid absolute 17004'
- execute:
device: iosxrv9000-5
command: show run router isis
include:
- 'segment-routing mpls'
- 'prefix-sid absolute 17005'
- execute:
device: iosxrv9000-6
command: show run router isis
include:
- 'segment-routing mpls'
- 'prefix-sid absolute 17006'
#Segment-Routingの設定を確認
#SRGBが正しく設定されていることを確認
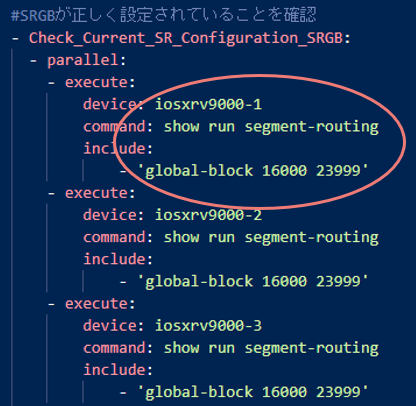
- Check_Current_SR_Configuration_SRGB:
- parallel:
- execute:
device: iosxrv9000-1
command: show run segment-routing
include:
- 'global-block 16000 23999'
- execute:
device: iosxrv9000-2
command: show run segment-routing
include:
- 'global-block 16000 23999'
- execute:
device: iosxrv9000-3
command: show run segment-routing
include:
- 'global-block 16000 23999'
- execute:
device: iosxrv9000-4
command: show run segment-routing
include:
- 'global-block 16000 23999'
- execute:
device: iosxrv9000-5
command: show run segment-routing
include:
- 'global-block 16000 23999'
- execute:
device: iosxrv9000-6
command: show run segment-routing
include:
- 'global-block 16000 23999'
#インターフェースでMPLSがEnableであることを確認
- Check_Current_SR_Configuration_MPLS-Enable:
- parallel:
- execute:
device: iosxrv9000-1
command: show mpls interfaces
include:
- 'GigabitEthernet0/0/0/0'
- 'Yes'
- execute:
device: iosxrv9000-2
command: show mpls interfaces
include:
- 'GigabitEthernet0/0/0/0'
- 'Yes'
- execute:
device: iosxrv9000-3
command: show mpls interfaces
include:
- 'GigabitEthernet0/0/0/0'
- 'Yes'
- execute:
device: iosxrv9000-4
command: show mpls interfaces
include:
- 'GigabitEthernet0/0/0/0'
- 'Yes'
- execute:
device: iosxrv9000-5
command: show mpls interfaces
include:
- 'GigabitEthernet0/0/0/0'
- 'Yes'
- execute:
device: iosxrv9000-6
command: show mpls interfaces
include:
- 'GigabitEthernet0/0/0/0'
- 'Yes'
#ラベルの開始値を確認
- Check_Current_SR_Configuration_Start-Label:
- parallel:
- execute:
device: iosxrv9000-1
command: show mpls label table label 16000 detail
include:
- 'Lbl-blk SRGB'
- 'start_label=16000'
- execute:
device: iosxrv9000-2
command: show mpls label table label 16000 detail
include:
- 'Lbl-blk SRGB'
- 'start_label=16000'
- execute:
device: iosxrv9000-3
command: show mpls label table label 16000 detail
include:
- 'Lbl-blk SRGB'
- 'start_label=16000'
device: iosxrv9000-4
command: show mpls label table label 16000 detail
include:
- 'Lbl-blk SRGB'
- 'start_label=16000'
- execute:
device: iosxrv9000-5
command: show mpls label table label 16000 detail
include:
- 'Lbl-blk SRGB'
- 'start_label=16000'
- execute:
device: iosxrv9000-6
command: show mpls label table label 16000 detail
include:
- 'Lbl-blk SRGB'
- 'start_label=16000'
#Count値を確認
- Check_Current_SR_Configuration_Count:
- parallel:
- execute:
device: iosxrv9000-1
command: show mpls label table summary
include:
- 'ISIS'
- '8006'
- execute:
device: iosxrv9000-2
command: show mpls label table summary
include:
- 'ISIS'
- '8006'
- execute:
device: iosxrv9000-3
command: show mpls label table summary
include:
- 'ISIS'
- '8006'
- execute:
device: iosxrv9000-4
command: show mpls label table summary
include:
- 'ISIS'
- '8006'
- execute:
device: iosxrv9000-5
command: show mpls label table summary
include:
- 'ISIS'
- '8004'
- execute:
device: iosxrv9000-6
command: show mpls label table summary
include:
- 'ISIS'
- '8004'
#フォワーディングを確認
- Check_Current_SR_Configuration_Forwarding:
- parallel:
- execute:
device: iosxrv9000-1
command: show mpls forwarding
include:
- '17002'
- 'Pop'
- 'SR Pfx'
- execute:
device: iosxrv9000-2
command: show mpls forwarding
include:
- '17001'
- 'Pop'
- 'SR Pfx'
- execute:
device: iosxrv9000-3
command: show mpls forwarding
include:
- '17004'
- 'Pop'
- 'SR Pfx'
- execute:
device: iosxrv9000-4
command: show mpls forwarding
include:
- '17006'
- 'Pop'
- 'SR Pfx'
- execute:
device: iosxrv9000-5
command: show mpls forwarding
include:
- '17001'
- 'Pop'
- 'SR Pfx'
- execute:
device: iosxrv9000-6
command: show mpls forwarding
include:
- '17002'
- 'Pop'
- 'SR Pfx'
#疎通性の確認
#Mgmtの疎通性を確認
- Verify_Connection_Mgmt:
- parallel:
- execute:
device: iosxrv9000-1
command: ping 192.168.254.2 vrf Mgmt-intf
include:
- 'Success rate is 100 percent'
- execute:
device: iosxrv9000-2
command: ping 192.168.254.3 vrf Mgmt-intf
include:
- 'Success rate is 100 percent'
- execute:
device: iosxrv9000-3
command: ping 192.168.254.4 vrf Mgmt-intf
include:
- 'Success rate is 100 percent'
- execute:
device: iosxrv9000-4
command: ping 192.168.254.5 vrf Mgmt-intf
include:
- 'Success rate is 100 percent'
- execute:
device: iosxrv9000-5
command: ping 192.168.254.6 vrf Mgmt-intf
include:
- 'Success rate is 100 percent'
- execute:
device: iosxrv9000-6
command: ping 192.168.254.1 vrf Mgmt-intf
include:
- 'Success rate is 100 percent'
#Loopbackの疎通性を確認
- Verify_Connection_Loopback:
- parallel:
- execute:
device: iosxrv9000-1
command: ping 100.100.100.6
include:
- 'Success rate is 100 percent'
- execute:
device: iosxrv9000-2
command: ping 100.100.100.1
include:
- 'Success rate is 100 percent'
- execute:
device: iosxrv9000-3
command: ping 100.100.100.2
include:
- 'Success rate is 100 percent'
- execute:
device: iosxrv9000-4
command: ping 100.100.100.3
include:
- 'Success rate is 100 percent'
- execute:
device: iosxrv9000-5
command: ping 100.100.100.4
include:
- 'Success rate is 100 percent'
- execute:
device: iosxrv9000-6
command: ping 100.100.100.5
include:
- 'Success rate is 100 percent'
#NSOによる制御
- NSO:
- execute:
description: NSO test
banner: NSO test
device: nso
command: show devices list
- configure: #Configを追加
description: NSO test
banner: NSO test
device: nso
command: |
devices device R1 config
Interface loopback 80
・ネットワーク機器に接続するために必要なネットワーク構成ファイル
testbed.yml
testbed:
  name: Network-CICD.yaml

devices:
  terminal_server:
    alias: uut
    os: linux
    type: linux
    connections:
      defaults:
        class: unicon.Unicon
        via: cli
      cli:
        protocol: ssh
        ip: '%ENV{VIRL_HOST}'
        username: '%ENV{VIRL_USERNAME}'
        password: '%ENV{VIRL_PASSWORD}'

  code_server:
    alias: code
    os: linux
    type: linux
    connections:
      defaults:
        class: unicon.Unicon
        via: cli
      cli:
        protocol: ssh
        ip: '%ENV{CODE_SERVER}'
        username: '%ENV{CODE_SERVER_USERNAME}'
        password: '%ENV{CODE_SERVER_PASSWORD}'

  nso:
    alias: nso
    os: nso
    type: nso
    credentials:
      default:
        username: admin
        password: admin
    connections:
      defaults:
        class: unicon.Unicon
        via: cli
      cli:
        protocol: ssh
        ip: '%ENV{NSO_HOST}'
        port: 2024

  nso_ssh:
    alias: nso_ssh
    os: linux
    type: linux
    connections:
      defaults:
        class: unicon.Unicon
        via: cli
      cli:
        protocol: ssh
        ip: '%ENV{NSO_HOST}'
        username: '%ENV{NSO_SSH_USERNAME}'
        password: '%ENV{NSO_SSH_PASSWORD}'

  iosxrv9000-1:
    alias: r1
    os: iosxr
    type: router
    series: iosxrv
    connections:
      defaults:
        class: unicon.Unicon
        via: a
      a:
        protocol: telnet
        proxy: terminal_server
        command: open /%ENV{VIRL_LAB_ID}/n0/0
        arguments:
          learn_hostname: True
          prompt_recovery: True
          init_exec_commands: []
          init_config_commands: []
      cli:
        protocol: ssh
        # proxy: code_server
        proxy: nso_ssh
        command: ssh %ENV{OPS} r1
        arguments:
          learn_hostname: True
          prompt_recovery: True
          init_exec_commands: []
          init_config_commands: []
    credentials:
      default:
        username: '%ENV{XR_USERNAME}'
        password: '%ENV{XR_PASSWORD}'

  iosxrv9000-2:
    alias: r2
    os: iosxr
    type: router
    series: iosxrv
    connections:
      defaults:
        class: unicon.Unicon
        via: a
      a:
        protocol: telnet
        proxy: terminal_server
        command: open /%ENV{VIRL_LAB_ID}/n1/0
        arguments:
          learn_hostname: True
          prompt_recovery: True
          init_exec_commands: []
          init_config_commands: []
      cli:
        protocol: ssh
        # proxy: code_server
        proxy: nso_ssh
        command: ssh %ENV{OPS} r2
        arguments:
          learn_hostname: True
          prompt_recovery: True
          init_exec_commands: []
          init_config_commands: []
    credentials:
      default:
        username: '%ENV{XR_USERNAME}'
        password: '%ENV{XR_PASSWORD}'

  iosxrv9000-3:
    alias: r3
    os: iosxr
    type: router
    series: iosxrv
    connections:
      defaults:
        class: unicon.Unicon
        via: a
      a:
        protocol: telnet
        proxy: terminal_server
        command: open /%ENV{VIRL_LAB_ID}/n2/0
        arguments:
          learn_hostname: True
          prompt_recovery: True
          init_exec_commands: []
          init_config_commands: []
      cli:
        protocol: ssh
        # proxy: code_server
        proxy: nso_ssh
        command: ssh %ENV{OPS} r3
        arguments:
          learn_hostname: True
          prompt_recovery: True
          init_exec_commands: []
          init_config_commands: []
    credentials:
      default:
        username: '%ENV{XR_USERNAME}'
        password: '%ENV{XR_PASSWORD}'

  iosxrv9000-4:
    alias: r4
    os: iosxr
    type: router
    series: iosxrv
    connections:
      defaults:
        class: unicon.Unicon
        via: a
      a:
        protocol: telnet
        proxy: terminal_server
        command: open /%ENV{VIRL_LAB_ID}/n3/0
        arguments:
          learn_hostname: True
          prompt_recovery: True
          init_exec_commands: []
          init_config_commands: []
      cli:
        protocol: ssh
        # proxy: code_server
        proxy: nso_ssh
        command: ssh %ENV{OPS} r4
        arguments:
          learn_hostname: True
          prompt_recovery: True
          init_exec_commands: []
          init_config_commands: []
    credentials:
      default:
        username: '%ENV{XR_USERNAME}'
        password: '%ENV{XR_PASSWORD}'

  iosxrv9000-5:
    alias: r5
    os: iosxr
    type: router
    series: iosxrv
    connections:
      defaults:
        class: unicon.Unicon
        via: a
      a:
        protocol: telnet
        proxy: terminal_server
        command: open /%ENV{VIRL_LAB_ID}/n4/0
        arguments:
          learn_hostname: True
          prompt_recovery: True
          init_exec_commands: []
          init_config_commands: []
      cli:
        protocol: ssh
        # proxy: code_server
        proxy: nso_ssh
        command: ssh %ENV{OPS} r5
        arguments:
          learn_hostname: True
          prompt_recovery: True
          init_exec_commands: []
          init_config_commands: []
    credentials:
      default:
        username: '%ENV{XR_USERNAME}'
        password: '%ENV{XR_PASSWORD}'

  iosxrv9000-6:
    alias: r6
    os: iosxr
    type: router
    series: iosxrv
    connections:
      defaults:
        class: unicon.Unicon
        via: a
      a:
        protocol: telnet
        proxy: terminal_server
        command: open /%ENV{VIRL_LAB_ID}/n5/0
        arguments:
          learn_hostname: True
          prompt_recovery: True
          init_exec_commands: []
          init_config_commands: []
      cli:
        protocol: ssh
        # proxy: code_server
        proxy: nso_ssh
        command: ssh %ENV{OPS} r6
        arguments:
          learn_hostname: True
          prompt_recovery: True
          init_exec_commands: []
          init_config_commands: []
    credentials:
      default:
        username: '%ENV{XR_USERNAME}'
        password: '%ENV{XR_PASSWORD}'

  csr1000v-1:
    alias: cpe1
    os: iosxe
    type: router
    series: csr1000v
    connections:
      defaults:
        class: unicon.Unicon
      a:
        protocol: telnet
        proxy: terminal_server
        command: open /%ENV{VIRL_LAB_ID}/n6/0
        arguments:
          learn_hostname: True
          prompt_recovery: True
          init_exec_commands: []
          init_config_commands: []
    credentials:
      default:
        username: '%ENV{IOS_USERNAME}'
        password: '%ENV{IOS_PASSWORD}'

  csr1000v-2:
    alias: cpe2
    os: iosxe
    type: router
    series: csr1000v
    connections:
      defaults:
        class: unicon.Unicon
      a:
        protocol: telnet
        proxy: terminal_server
        command: open /%ENV{VIRL_LAB_ID}/n7/0
        arguments:
          learn_hostname: True
          prompt_recovery: True
          init_exec_commands: []
          init_config_commands: []
    credentials:
      default:
        username: '%ENV{IOS_USERNAME}'
        password: '%ENV{IOS_PASSWORD}'
        enable_password: '%ENV{IOS_ENABLE}'

topology:
  iosxrv9000-1:
    interfaces:
      MgmtEth0/RP0/CPU0/0:
        link: l9
        type: ethernet
      donotuse1:
        type: ethernet
      donotuse2:
        type: ethernet
      GigabitEthernet0/0/0/0:
        link: l0
        type: ethernet
      GigabitEthernet0/0/0/1:
        link: l1
        type: ethernet
      GigabitEthernet0/0/0/2:
        link: l2
        type: ethernet
  iosxrv9000-2:
    interfaces:
      MgmtEth0/RP0/CPU0/0:
        link: l10
        type: ethernet
      donotuse1:
        type: ethernet
      donotuse2:
        type: ethernet
      GigabitEthernet0/0/0/0:
        link: l2
        type: ethernet
      GigabitEthernet0/0/0/1:
        link: l3
        type: ethernet
      GigabitEthernet0/0/0/2:
        link: l7
        type: ethernet
  iosxrv9000-3:
    interfaces:
      MgmtEth0/RP0/CPU0/0:
        link: l11
        type: ethernet
      donotuse1:
        type: ethernet
      donotuse2:
        type: ethernet
      GigabitEthernet0/0/0/0:
        link: l1
        type: ethernet
      GigabitEthernet0/0/0/1:
        link: l4
        type: ethernet
      GigabitEthernet0/0/0/2:
        link: l5
        type: ethernet
  iosxrv9000-4:
    interfaces:
      MgmtEth0/RP0/CPU0/0:
        link: l12
        type: ethernet
      donotuse1:
        type: ethernet
      donotuse2:
        type: ethernet
      GigabitEthernet0/0/0/0:
        link: l3
        type: ethernet
      GigabitEthernet0/0/0/1:
        link: l4
        type: ethernet
      GigabitEthernet0/0/0/2:
        link: l6
        type: ethernet
  iosxrv9000-5:
    interfaces:
      MgmtEth0/RP0/CPU0/0:
        link: l13
        type: ethernet
      donotuse1:
        type: ethernet
      donotuse2:
        type: ethernet
      GigabitEthernet0/0/0/0:
        link: l0
        type: ethernet
      GigabitEthernet0/0/0/1:
        link: l5
        type: ethernet
      GigabitEthernet0/0/0/2:
        type: ethernet
      GigabitEthernet0/0/0/3:
        type: ethernet
  iosxrv9000-6:
    interfaces:
      MgmtEth0/RP0/CPU0/0:
        link: l14
        type: ethernet
      donotuse1:
        type: ethernet
      donotuse2:
        type: ethernet
      GigabitEthernet0/0/0/0:
        link: l6
        type: ethernet
      GigabitEthernet0/0/0/1:
        link: l7
        type: ethernet
      GigabitEthernet0/0/0/2:
        type: ethernet
      GigabitEthernet0/0/0/3:
        type: ethernet
  csr1000v-1:
    interfaces:
      GigabitEthernet1:
        type: ethernet
      GigabitEthernet2:
        type: ethernet
  csr1000v-2:
    interfaces:
      GigabitEthernet1:
        type: ethernet
      GigabitEthernet2:
        type: ethernet
免責事項
本サイトおよび対応するコメントにおいて表明される意見は、投稿者本人の個人的意見であり、シスコの意見ではありません。本サイトの内容は、情報の提供のみを目的として掲載されており、シスコや他の関係者による推奨や表明を目的としたものではありません。各利用者は、本Webサイトへの掲載により、投稿、リンクその他の方法でアップロードした全ての情報の内容に対して全責任を負い、本Web サイトの利用に関するあらゆる責任からシスコを免責することに同意したものとします。