この記事では、Power Systems Virtual Server上にOpenshift 4.6をデプロイする手順をまとめます。元になる手順はこちらのTutorialです。
ここでは、PowerVSへのデプロイを自動化するopenshift-install-powerを利用します。
デプロイのツールもOpenShiftも双方頻繁にアップデートが提供されます。
特定のversionの組み合わせの動作の記録と、自動化ツールを利用した場合特有の、「中で何が行われているか分からなくて辛い」を緩和するために構成内容や処理の中身の解説が目的です。
デプロイする環境
論理構成
下図のような環境をデプロイしていきます。
ノードの数やリソースは対話的に調整することができますが、Bastion NodeはRHEL8で決め打ちです。

Version類は以下の組み合わせで試しています。
- OpenShift 4.6.9
- RHEL 8.3
- CoreOS 4.6.8
- openshift-install-power(powervs):1.0.2
- Terraform v0.13.5(openshift-install-powerに含まれる)
ネットワークについて
図中のPrivate Networkはインスタンス間の内部通信を担います。
デプロイの指示や、OpenShiftのポータルにアクセスすることをインターネット経由で行う場合は、パブリック・ネットワークから操作します。
この記事では扱いませんが、OpenShift上でサービスをその他のIBM Networkと接続して利用する場合は、このPrivateネットワークからProxyを構成するなどの方法で接続をするデザインになっています。具体的な構成例は別のチュートリアルに記載があるので機会があればこちらもまとめたいと思います。
デプロイのステップ
事前準備
事前に必要なものは以下の通りです。
またこちらの記事でまとめているこちらの記事で必要になるカスタム・イメージの作成方法をまとめていますので事前準備として実行しておく必要があります。
-
IBM Cloud アカウントのAPIキー
- 作成方法はこちらです。
-
Red Hat Network(RHN)のアカウントとサブスクリプション
- Bastion Nodeの展開に必要です。OpenShift自体は60日間の評価用のサブスクリプションで起動します。
-
OpenShift pull secret
- Openshiftのイントールイメージの入手に必要です。こちらから入手します。
-
PowerVSのブート・イメージへのRHEL8、CoreOSの登録
- OVAに変換するOSイメージは、RHEL8.3用、CoreOS4.6.8用から入手します。
- この変換のためにPower Server上のLinux環境が1つ必要になります。
- OVAに変換するOSイメージは、RHEL8.3用、CoreOS4.6.8用から入手します。
プライベートネットワークの作成
事前準備が完了すると、PowerVSのサービスがIBM Cloud上で利用できる状態になっていると思います。
ここでは、以下の「powervs-ja」にOpenshiftをデプロイしていきます。

OpenShiftのデプロイメントに利用するPrivate Networkを作成し定期ます。
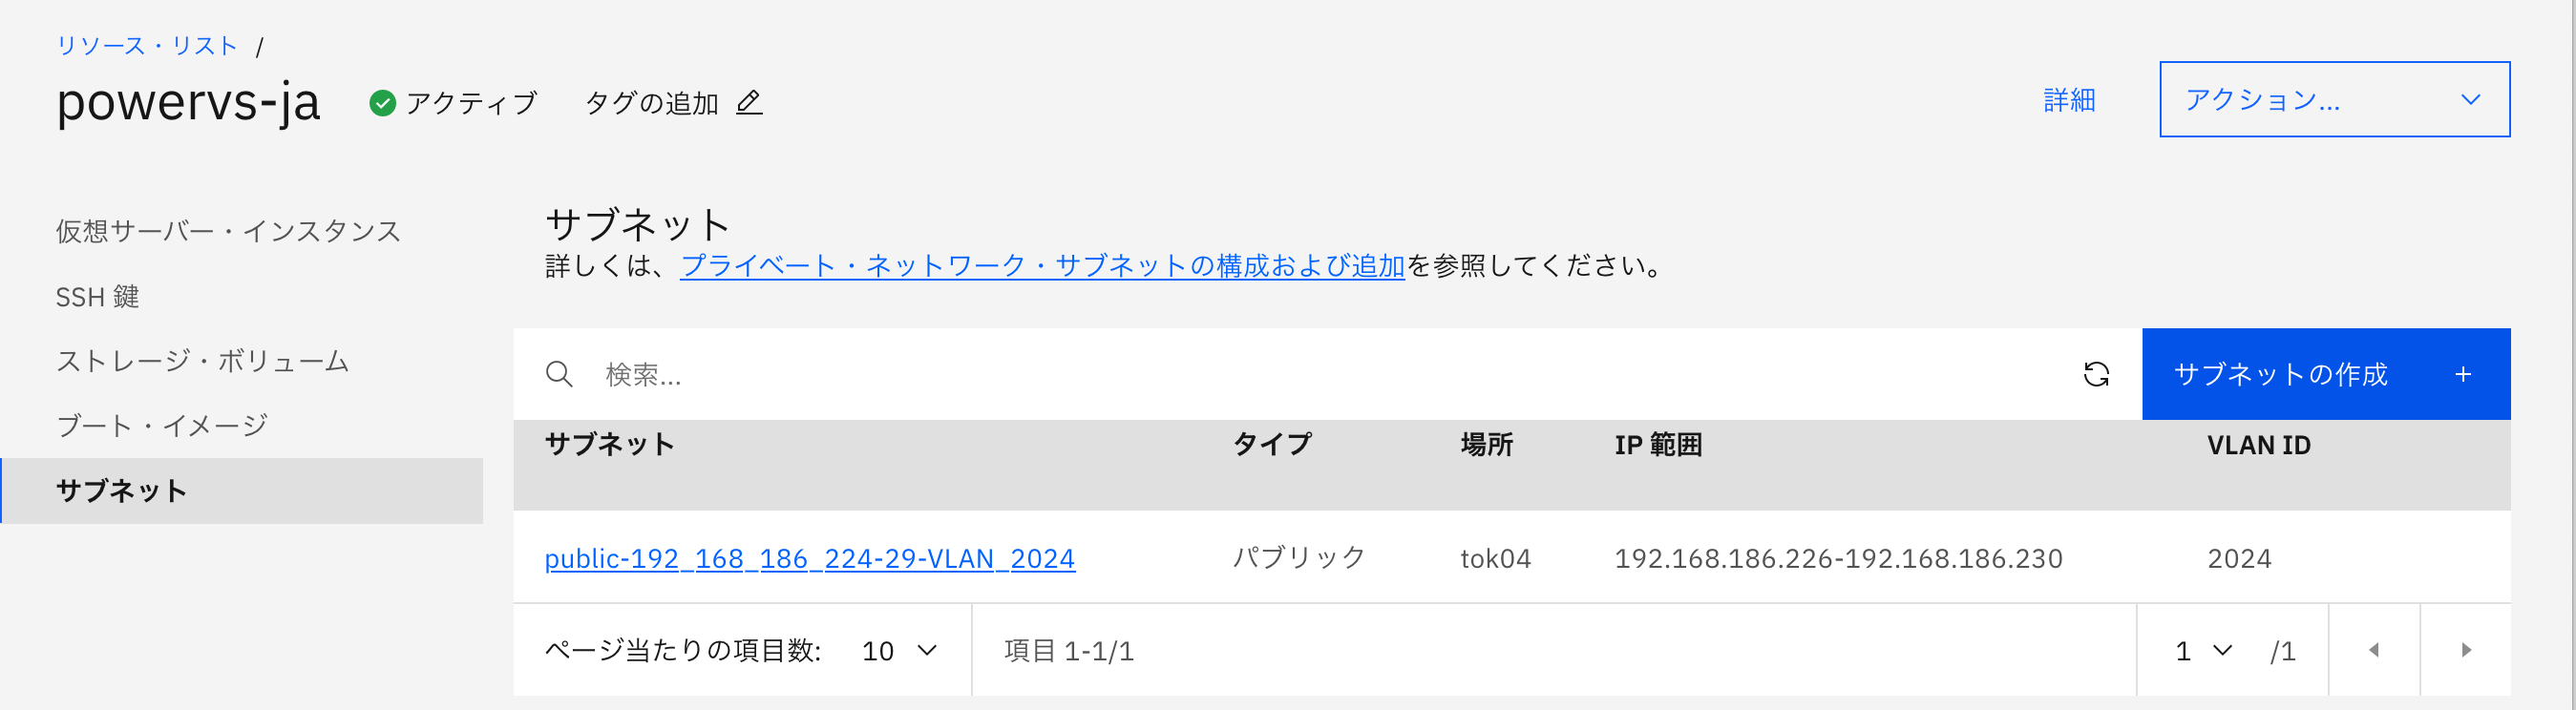
PowerVSのサービスを選択し、リソース・リストからサブネット>>「サブネットの作成」を選択します。
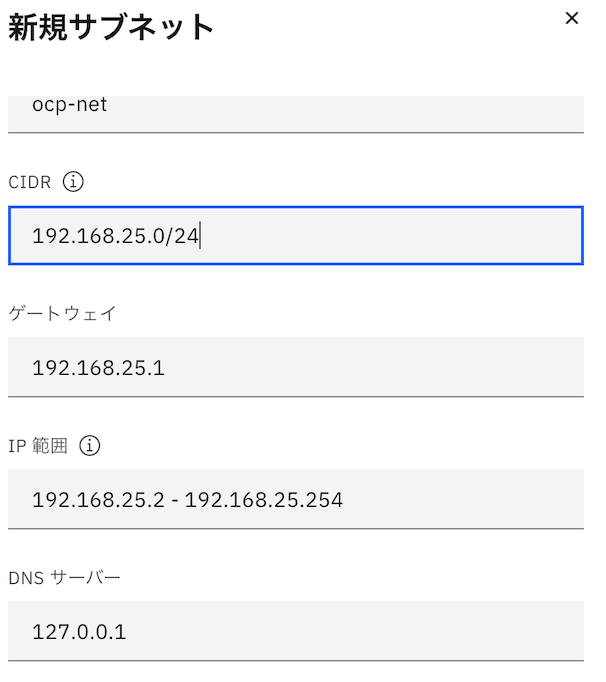
続いてこのネットワークに任意の名前をつけて、利用するCIDR(IPレンジ)を指定します。
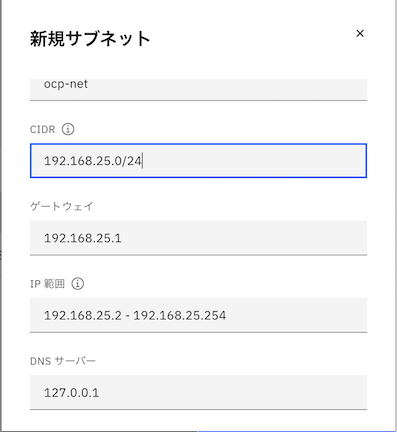
正常に作成が完了すると、サブネットの一覧に今作成したネットワークが追加されます。
作成直後の状態では、VM間の通信は許可されない状態になっています。
このため、VM間の通信を許可させるために、サービスリクエストを作成します。
IBM Cloudのコンソールの上部の「サポート」>>「Caseの作成」をクリックしてサービスリクエストを起票します。

リソースから、「Power Virtual Server」を選択し、今利用しているPowerVSのサービス名を選択し次へを選択すると、サービス・リクエストの入力画面に切り替わります。

タイトル、説明欄に以下の書式で、今作成したサブネット内の通信の許可する内容の文面を記載してサービス・リクエストを起票します。<>内の記載を作成している環境のものに置き換えます。
  [Subject:] Enable communication between PowerVS instances on private network
  [Description:]
  Please enable IP communication between PowerVS instances for the following private network:
  Name: <your-subnet-name-from-above>
  Type: Private
  CIDR: <your ip subnet-from-above>
  VLAN ID: <your-vlan-id> (listed in your subnet details post-creation)
  Location: <your-location> (listed in your subnet details post-creation)
  Service Instance: <your-service-name>
起票後、IBM IDを登録したEメール及びコンソール上にサポートからケースの受領と対応完了の旨の連絡が送られます。(私が試した時は1時間程度で対応がされましたが、紹介しているTotorialでは1日程度かかる場合があるようです。)
OpenShiftのデプロイ
インストールスクリプトのダウンロードと展開
インターネットに出られるLinuxやMacでopenshift-install-powervsツールを入手して実行権を付与します。
$ mkdir ocp-install-dir && cd ocp-install-dir
$ curl -sL https://raw.githubusercontent.com/ocp-power-automation/openshift-install-power/master/openshift-install-powervs -o openshift-install-powervs  && chmod +x openshift-install-powervs
$ export PATH=$PATH:$(pwd)
pull secretをファイルで入手している場合、pull-secret.txtという名称で、ダウンロードディレクトリの直下に配置しておきます。
IBM CloudのAPIキーとRHNのアカウントのパスワードを環境変数として保存しておきます。
set +o history
export IBMCLOUD_API_KEY="<YOUR_IBM_CLOUD_API_KEY>"
export RHEL_SUBS_PASSWORD="<YOUR_RHEL_SUBSCRIPTION_PASSWORD>"
set -o history
最後に以下のコマンドを実行すると、導入が自動的に進みます、1-2時間程度の所要時間です。
$ ./openshift-install-powervs -all-images create
:
(省略)
[question] > Enter a domain name for the cluster (ibm.com)
? ibm.com
無事にOpenshiftの展開が完了すると、以下の様に接続情報が表示されます。
:
Apply complete! Resources: 19 added, 0 changed, 0 destroyed.
Outputs:

bastion_private_ip = <private_ip>
bastion_public_ip = <public_ip>
bastion_ssh_command = ssh -i /path/to/id_rsa root@<public_ip>
bootstrap_ip = *****
cluster_authentication_details = Cluster authentication details are available in ***** under ~/openstack-upi/auth
api.test-ocp-e5d3.ibm.com.  IN  A  *****
*.apps.test-ocp-e5d3.ibm.com.  IN  A  ****

etc_hosts_entries =
**** api.test-ocp-e5d3.ibm.com console-openshift-console.apps.test-ocp-e5d3.ibm.com integrated-oauth-server-openshift##
-authentication.apps.test-ocp-e5d3.ibm.com oauth-openshift.apps.test-ocp-e5d3.ibm.com prometheus-k8s-openshift-monitoring.apps.test-ocp-e5d3.ibm.com grafana-openshift-monitoring.apps.test-ocp-e5d3.ibm.com example.apps.test-ocp-e5d3.ibm.com

install_status = COMPLETED
master_ips = [
  "*****",
  "*****",
  "*****",
]
oc_server_url = https://api.test-ocp-e5d3.ibm.com:6443
storageclass_name = nfs-storage-provisioner
web_console_url = https://console-openshift-console.apps.test-ocp-e5d3.ibm.com
worker_ips = [
  "*****",
  "*****",
]
接続情報はデプロイの完了後、以下でも確認ができます。
$ openshift-install-powervs access-info

Login to bastion: 'ssh -i /path/to/.ssh/id_rsa root@<bastion_public_ip>' and start using the 'oc' command.
To access the cluster on local system when using 'oc' run: 'export KUBECONFIG=/path/to/ocp-install-dir/automation/kubeconfig'
Access the OpenShift web-console here: https://console-openshift-console.apps.test-ocp-e5d3.ibm.com
Login to the console with user: "kubeadmin", and password: "complex_password"

Add the following records to your DNS server:
api.test-ocp-e5d3.ibm.com.  IN  A  ******
*.apps.test-ocp-e5d3.ibm.com.  IN  A  *******

Alternatively, you can add the line on local system 'hosts' file:
***** api.test-ocp-e5d3.ibm.com console-openshift-console.apps.test-ocp-e5d3.ibm.com integrated-oauth-server-openshift-authentication.apps.test-ocp-e5d3.ibm.com oauth-openshift.apps.test-ocp-e5d3.ibm.com prometheus-k8s-openshift-monitoring.apps.test-ocp-e5d3.ibm.com grafana-openshift-monitoring.apps.test-ocp-e5d3.ibm.com example.apps.test-ocp-e5d3.ibm.com
プロンプトの指示に従い、環境変数KUBECONFIGを定義しておくことでocコマンドで、端末からクラスターの状況が確認できます。OpenShift WebUIを利用する場合は、表示されるエントリをhostsファイルに書き込むなどの方法で名前解決できる様にしておきます。
export KUBECONFIG=/path/to/ocp-install-dir/automation/kubeconfig
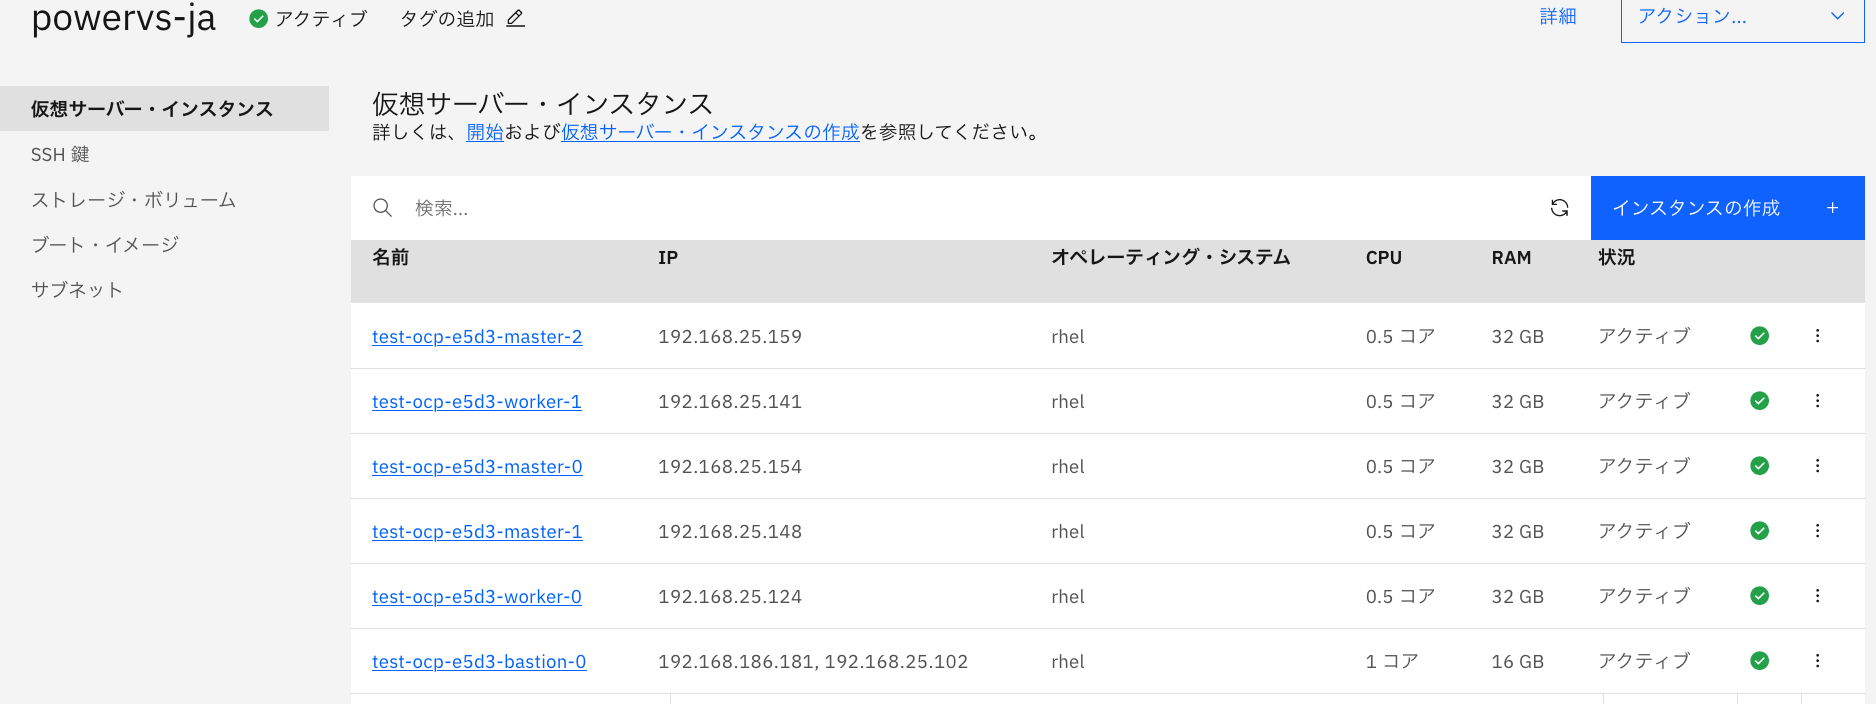
IBM Cloud Console上のPowerVSのリソースリストでも作成されたVMやストレージボリュームの一覧が確認できます
接続する
冒頭の図に表示された5nodeのクラスターが確認できます。
$ oc get node
NAME       STATUS                     ROLES    AGE   VERSION
master-0   Ready                      master   27h   v1.19.0+7070803
master-1   Ready                      master   27h   v1.19.0+7070803
master-2   Ready                      master   27h   v1.19.0+7070803
worker-0   Ready,SchedulingDisabled   worker   26h   v1.19.0+7070803
worker-1   Ready                      worker   26h   v1.19.0+7070803
以上でデプロイは完了です。
補足
設定類
"openshift-install-powervs create"を初回実行すると、設定ファイルvar.tfvarsが自動的に生成されます。
% pwd
/path/to/ocp-install-dir

% cat var.tfvars
ibmcloud_region = "tok" #powervsの稼働するリージョン
ibmcloud_zone = "tok04" #powervsの稼働するゾーン
service_instance_id = "<pwervs上のインスタンスID>" #powervsのサービス名
rhel_image_name =  "rhel83" #bastionに利用するRHELのイメージ名
rhcos_image_name =  "rhcos461" #Opehishiftのデプロイに利用するRHELのイメージ名
network_name =  "ocp-net" #Opehishiftのデプロイに利用するRHELのイメージ名
openshift_install_tarball =  "https://mirror.openshift.com/pub/openshift-v4/ppc64le/clients/ocp/4.6.9/openshift-install-linux.tar.gz" # 導入するOpenShiftのversion
openshift_client_tarball =  "https://mirror.openshift.com/pub/openshift-v4/ppc64le/clients/ocp/4.6.9/openshift-client-linux.tar.gz"
cluster_id_prefix = "test-ocp" #作成するノード名のprefix
cluster_domain = "ibm.com" "
storage_type = "nfs" #(オプション)NFSストレージの作成を有無を指定できます。指定すると、PowerVS上にストレージボリュームが切り出され、bastion上でNFSDが起動します。
volume_size = "300" #NFSを立てる場合の容量
## ここから:デプロイするノードのスペックです。boot領域は50GBで決め打ちです。
bastion = {memory = "16", processors = "1", "count" = 1}
bootstrap = {memory = "32", processors = "0.5", "count" = 1}
master = {memory = "32", processors = "0.5", "count" = 3}
worker = {memory = "32", processors = "0.5", "count" = 2}
##
rhel_subscription_username = "username" #RHNのユーザー名です。(メールアドレスでなく)
pull_secret_file = "/pass/to/ocp-install-dir/automation/data/pull-secret.txt"
private_key_file = "/pass/to/.ssh/id_rsa"
public_key_file = "/pass/to/.ssh/id_rsa.pub"``` #sshのキーペアです。公開鍵はbastion上に配置されます。
デプロイ中の状況確認
デプロイは約1-2時間かかり、標準出力とログファイルにはその時実行されている処理の内容が記述されます。
% pwd
/pass/to/ocp-install-dir
% tail -f  logs/ocp4-upi-powervs_20201222142529_apply_1.log

module.install.null_resource.install (remote-exec): TASK [ocp-config : Allow local stratum in chrony.conf on bastion] **************
module.install.null_resource.install: Still creating... [20s elapsed]
module.install.null_resource.install (remote-exec): ok: [test-ocp-d172-bastion-0] => {"backup": "", "changed": false, "msg": ""}
上は、ocp-configというタスクの内、時刻同期の設定がbastion上でされています。
この実態は、ansible上のplaybookで内容はこのリポジトリでメンテナンスされています。もしうまく行かない場合や、全体の処理のどこを実行しているのかを確認したい場合は、上のリポジトリから処理の詳細を確認していくことができます。
処理が失敗する場合は何度かくりかえされ状況が改善しない場合、以下の様な失敗のレポートが表示されます。
デプロイが失敗します。
% pwd
/pass/to/ocp-install-dir
% tail -f  logs/ocp4-upi-powervs_20201222142529_apply_1.log

module.install.null_resource.install (remote-exec): PLAY RECAP *********************************************************************
module.install.null_resource.install (remote-exec): bootstrap                  : ok=0    changed=0    unreachable=0    failed=1    skipped=0    rescued=0    ignored=0
module.install.null_resource.install (remote-exec): test-ocp-d172-bastion-0    : ok=11   changed=1    unreachable=0    failed=0    skipped=12   rescued=0    ignored=1