はじめに
差動対回路(Differential Pair Circuit)は、アナログ回路設計において基本中の基本となる構成要素です。
主にオペアンプやコンパレータ、電圧制御増幅器などに用いられ、差動入力に応じた電流分配の動作が特徴です。
本記事では、差動入力電圧 vin に対して、各トランジスタを流れる電流 I1, I2 がどのように変化するかを理論的に説明し、
その挙動を Python による数値計算とグラフ描画を通して可視化していきます。
参考リンクまとめ
低電源電圧で動作する 全差動増幅器
情報デバイス特論
Pythonコード

from IPython.display import display, Math, Markdown

# タイトルと概要
display(Markdown("## 差動対回路の数式と解説"))
display(Markdown("差動対回路では、入力電圧の差に応じてトランジスタの電流が分配され、出力が変化します。以下に、その主要な数式をまとめます。"))

# 総電流
display(Math(r"I_{SS} = I_1 + I_2"))

# 入力端子の電圧
display(Math(r"V_{in+} = V_T + \sqrt{\frac{2I_1}{\beta}}, \quad V_{in-} = V_T + \sqrt{\frac{2I_2}{\beta}}"))

# 差動入力
display(Math(r"v_{in} = V_{in+} - V_{in-}"))

# 電流分配の式
display(Math(r"I_{1,2} = \frac{I_{SS}}{2} \pm \frac{I_{SS}}{2} \sqrt{ \frac{\beta v_{in}^2}{I_{SS}} - \frac{\beta^2 v_{in}^4}{4 I_{SS}^2} }"))

# 相互コンダクタンス
display(Markdown("### 相互コンダクタンス(Mutual Transconductance)"))
display(Math(r"g_{md} = \left. \frac{\partial(I_1 - I_2)}{\partial v_{in}} \right|_{v_{in}=0} = \sqrt{\beta I_{SS}}"))

# 出力抵抗と電圧利得
display(Markdown("### 出力抵抗と電圧利得"))
display(Math(r"R_O = r_{o4} \parallel r_{o2}"))
display(Math(r"A = g_{md} \left( r_{o4} \parallel r_{o2} \right)"))
import numpy as np
import matplotlib.pyplot as plt

# パラメータ設定
beta = 200e-6      # 200 µA/V²
I_SS = 100e-6      # 100 µA
vin = np.linspace(-0.05, 0.05, 500)  # -50 mV 〜 50 mV

# I1, I2 計算
term = (beta * vin**2) / I_SS - (beta**2 * vin**4) / (4 * I_SS**2)
sqrt_term = np.sqrt(np.maximum(term, 0))  # 負にならないよう制限
I1 = I_SS / 2 + I_SS / 2 * sqrt_term
I2 = I_SS - I1

# 相互コンダクタンス g_md(vin=0 のとき)
g_md = np.sqrt(beta * I_SS)

# 出力抵抗と電圧利得
ro4 = 200e3  # 200 kΩ
ro2 = 200e3
Ro = 1 / (1 / ro4 + 1 / ro2)  # 並列合成
A = g_md * Ro

# 結果表示
print(f"g_md = {g_md:.3e} S")
print(f"Ro = {Ro:.3e} Ω")
print(f"Voltage Gain A = {A:.2f} V/V")

# プロット
plt.plot(vin * 1e3, I1 * 1e6, label='I1 (µA)')
plt.plot(vin * 1e3, I2 * 1e6, label='I2 (µA)')
plt.xlabel('Input Differential Voltage $v_{in}$ [mV]')
plt.ylabel('Drain Current [µA]')
plt.title('Differential Pair Current vs. $v_{in}$')
plt.grid(True)
plt.legend()
plt.show()

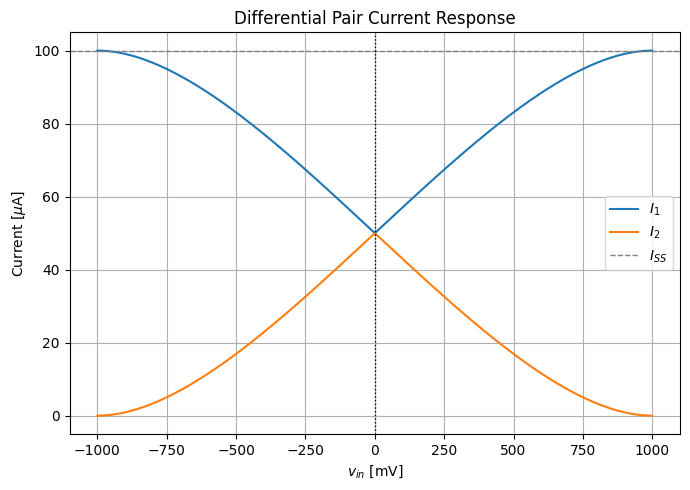
import numpy as np
import matplotlib.pyplot as plt

# パラメータ設定
ISS = 100e-6      # 定電流源の電流 [A]
beta = 200e-6     # トランジスタ係数 [A/V^2]
vin = np.linspace(-np.sqrt(2 * ISS / beta), np.sqrt(2 * ISS / beta), 500)  # 入力電圧範囲

# 安全にsqrtの中身を計算
term = (beta * vin**2) / ISS - (beta**2 * vin**4) / (4 * ISS**2)
sqrt_term = np.sqrt(np.maximum(term, 0))  # 負にならないように制限

# 電流計算
I1 = ISS / 2 + (ISS / 2) * sqrt_term
I2 = ISS - I1  # I1 + I2 = ISS

# プロット
plt.figure(figsize=(7, 5))
plt.plot(vin * 1e3, I1 * 1e6, label='$I_1$')
plt.plot(vin * 1e3, I2 * 1e6, label='$I_2$')
plt.axhline(ISS * 1e6, color='gray', linestyle='--', linewidth=1, label='$I_{SS}$')
plt.axvline(0, color='black', linestyle=':', linewidth=1)

# 軸とラベル
plt.xlabel('$v_{in}$ [mV]')
plt.ylabel('Current [$\mu$A]')
plt.title('Differential Pair Current Response')
plt.grid(True)
plt.legend()
plt.tight_layout()
plt.show()

import numpy as np

# パラメータ設定
VDD = 2.0               # 電源電圧 [V]
Vth = 0.9               # しきい値電圧 [V]
headroom = 0.2          # マージン [V]
beta = 200e-6           # β = 200 µA/V²
ISS = 100e-6            # ISS = 100 µA
ro2 = 200e3             # 出力抵抗 [Ω]
ro4 = 200e3             # 出力抵抗 [Ω]

# 1. 許容入力電圧範囲の変数
vin_margin = VDD - headroom - Vth  # = 2 - 0.2 - 0.9 = 0.9 V
vin_min = Vth                      # 0.9 V
vin_max = Vth + vin_margin         # 1.8 V

# 2. 相互コンダクタンス(小信号)
gm1 = np.sqrt(beta * ISS)
gm2 = gm1 / 2  # 微小入力時の近似

# 3. 合成抵抗
Ro = 1 / (1 / ro2 + 1 / ro4)

# 4. 電圧利得とdB換算
A = gm1 * Ro
AdB = 20 * np.log10(A)

# 結果の表示
print(f"許容入力電圧範囲: {vin_min:.2f} V ~ {vin_max:.2f} V")
print(f"相互コンダクタンス g_m (√(β×ISS)) = {gm1:.3e} S")
print(f"相互コンダクタンス g_m/2 = {gm2:.3e} S")
print(f"出力合成抵抗 Ro = {Ro:.2e} Ω")
print(f"差動信号の電圧利得 A = {A:.2f} V/V")
print(f"差動信号の電圧利得 [dB] = {AdB:.2f} dB")
