超楽ちんだった。
自身の備忘録として残しておく。
前書き
AWSでSSHDのポート替えたりFail2Ban設定や、AWSのセキュリティグループこねたりするのは嫌だなーということで、ここ最近流行りのWireGuardを使ってみました。
これ、まじに楽でした。
環境
- Amazon Linux の マイクロインスタンス1つ
- VPCで設定したサブネット
- 172.31.0.0/20
- 172.31.16.0/20
- 172.31.32.0/20
- WireGuardのポート (51820/udp)
- DDNSは hoge.example.jp
- 俺ん家のPCはWindows10
- WireGuardのネットワークは 192.168.90.0/24
- WireGuardサーバーのVPN上のIPは 192.168.90.1
- WireGuardクライアントのVPN上のIPは 192.168.90.10
ざっくりネットワーク
WireGuardで俺ん家からAWSにアクセスするざっくりイメージのネットワーク図。

サーバー側
EC2インスタンス
ここでは Amazon Linux 2 のマイクロインスタンスを利用。
$ cat /etc/os-release
NAME="Amazon Linux"
VERSION="2"
ID="amzn"
ID_LIKE="centos rhel fedora"
VERSION_ID="2"
PRETTY_NAME="Amazon Linux 2"
ANSI_COLOR="0;33"
CPE_NAME="cpe:2.3:o:amazon:amazon_linux:2"
HOME_URL="https://amazonlinux.com/"
AWSのセキュリティグループ
AWSのセキュリティグループを1つ作成して、WireGuardのEC2インスタンスに割り当てておきます。
しばらくはSSHアクセスをして作業します。
WireGuardが使えるようになったらSSHの項目は削除します。
| タイプ | プロトコル | ポート範囲 | ソース | 説明 |
|---|---|---|---|---|
| SSH | TCP | 22 | 0.0.0.0/0 | |
| カスタム UDP ルール | UDP | 51820 | 0.0.0.0/0 | wireguard-port |
DDNSを設定
先にno-ipを取得してDDNSのドメインを作成しておきます。
DDNSドメイン取得後、yumでnoipをインストールしてnoip2 -Cでユーザーとパスワードを設定します。
https://docs.aws.amazon.com/ja_jp/AWSEC2/latest/UserGuide/dynamic-dns.html
$ yum install https://dl.fedoraproject.org/pub/epel/epel-release-latest-7.noarch.rpm
$ yum install -y noip
$ /usr/sbin/noip2 -C
$ systemctl enable noip
WareGuardインストール
公式サイトのRHEL7用のリポジトリを利用。
https://www.wireguard.com/install/
$ curl -o /etc/yum.repos.d/jdoss-wireguard-epel-7.repo https://copr.fedorainfracloud.org/coprs/jdoss/wireguard/repo/epel-7/jdoss-wireguard-epel-7.repo
$ yum install wireguard-dkms wireguard-tools
念の為、一回再起動しておく。
$ reboot
ipforwardの設定
フォワーディングを有効にします。
$ cat /etc/sysctl.conf | grep -v ^#
net.ipv4.ip_forward = 1
net.ipv6.conf.all.forwarding = 1

$ sysctl -w net.ipv4.ip_forward=1
$ sysctl -w net.ipv6.conf.all.forwarding=1
etckeeperインストール
/etc以下の設定ファイルをこねるのでetckeeper入れておく。
$ yum install etckeeter
$ etckeeper  init
Initialized empty Git repository in /etc/.git/
サーバー用秘密鍵公開鍵作成
サーバー用秘密鍵作成
$ wg genkey | tee /etc/wireguard/server.key
aaaaaaaaaaaaaaaaaaaaaaaaaaaaaaaaaaaaaaaaaaa=
$ chmod 600 /etc/wireguard/server.key
サーバー用公開鍵作成
$ cat /etc/wireguard/server.key | wg pubkey | tee /etc/wireguard/server.pub
AAAAAAAAAAAAAAAAAAAAAAAAAAAAAAAAAAAAAAAAAAA=
$ chmod 600 /etc/wireguard/server.pub
クライアント用秘密鍵公開鍵作成
クライアント用秘密鍵作成
$ wg genkey | tee /etc/wireguard/client.key
xxxxxxxxxxxxxxxxxxxxxxxxxxxxxxxxxxxxxxxxxxx=
クライアント用公開鍵作成
$ cat /etc/wireguard/client.key | wg pubkey | tee /etc/wireguard/client.pub
XXXXXXXXXXXXXXXXXXXXXXXXXXXXXXXXXXXXXXXXXXX=
WireGuardサーバーの設定
まず最初に ip addr コマンドでNICを確認しておきます。
NICはeth0というの覚えておきます。
$ ip addr
1: lo: <LOOPBACK,UP,LOWER_UP> mtu 65536 qdisc noqueue state UNKNOWN group default qlen 1000
    link/loopback 00:00:00:00:00:00 brd 00:00:00:00:00:00
    inet 127.0.0.1/8 scope host lo
       valid_lft forever preferred_lft forever
    inet6 ::1/128 scope host
       valid_lft forever preferred_lft forever
2: eth0: <BROADCAST,MULTICAST,PROMISC,UP,LOWER_UP> mtu 9001 qdisc mq state UP group default qlen 1000
    link/ether 06:9a:51:f1:23:ca brd ff:ff:ff:ff:ff:ff
    inet 172.31.45.164/20 brd 172.31.47.255 scope global dynamic eth0
       valid_lft 2382sec preferred_lft 2382sec
    inet6 fe80::49a:51ff:fef1:23ca/64 scope link
       valid_lft forever preferred_lft forever
/etc/wireguard/wg0.confを作成をします。
$ cat /etc/wireguard/wg0.conf
[Interface]
# server-private-key
PrivateKey = aaaaaaaaaaaaaaaaaaaaaaaaaaaaaaaaaaaaaaaaaaa=
Address = 192.168.90.1
ListenPort = 51820
PostUp = iptables -A FORWARD -i wg0 -j ACCEPT; iptables -t nat -A POSTROUTING -o eth0 -j MASQUERADE
PostDown = iptables -D FORWARD -i wg0 -j ACCEPT; iptables -t nat -D POSTROUTING -o eth0 -j MASQUERADE

[Peer]
# clients-public-key
PublicKey = XXXXXXXXXXXXXXXXXXXXXXXXXXXXXXXXXXXXXXXXXXX=
AllowedIPs = 192.168.90.0/24
設定の項目の意味はこんなかんじ。
-
[Interace]
- PrivateKey: サーバー用の秘密鍵
- Address: WireGuardサーバーのIPアドレスを指定
- ListenPort: WireGuardのポートを指定
- PostUp: IPマスカレードができるようにiptablesコマンドでルールを追加 先ほど確認したNICを指定すること
- PostDown: 停止時にPostUpで設定したiptablesのルールを削除するように設定
-
[Peer]
- PublicKey: クライアント用の公開鍵
- AllowedIPs: WireGuardで利用するネットワークアドレス
設定が終わったらWireGuardを起動+自動起動します。
$ systemctl enable --now wg-quick@wg0
WireGuard用のDNSサーバー
AWSのip-172-31-47-99.ap-northeast-1.compute.internalのこんなFQDNを解決したいのでunboundをインストールしておく。
$ yum install unbound
AWSのnameserverのIPを覚えておく。
$ cat /etc/resolv.conf | grep ^namese
nameserver 172.31.0.2
/etc/unbound/unbound.confをこんな感じにしておく。
$ cat /etc/unbound/unbound.conf | grep -v ^$
server:
        interface: 0.0.0.0
        interface-automatic: yes
        do-ip4: yes
        do-ip6: no
        access-control: 0.0.0.0/0 allow
        access-control: 127.0.0.1 allow
        #verbosity: 5
        verbosity: 1
        private-domain: "hoge.example.jp"
remote-control:
        control-enable: yes
        # control-port: 8953
        server-key-file: "/etc/unbound/unbound_server.key"
        # unbound server certificate file.
        server-cert-file: "/etc/unbound/unbound_server.pem"
        # unbound-control key file.
        control-key-file: "/etc/unbound/unbound_control.key"
        # unbound-control certificate file.
        control-cert-file: "/etc/unbound/unbound_control.pem"
# Stub and Forward zones
include: /etc/unbound/conf.d/*.conf
forward-zone:
        name: "."
        forward-addr: 172.31.0.2
unboundを起動+自動起動。
$ systemctl enable --now unbound
クライアント側
WindowsのWireGuardクライアントをインストール
ここからWindowsのインストーラをダウンロードしてインストール。
https://www.wireguard.com/install/
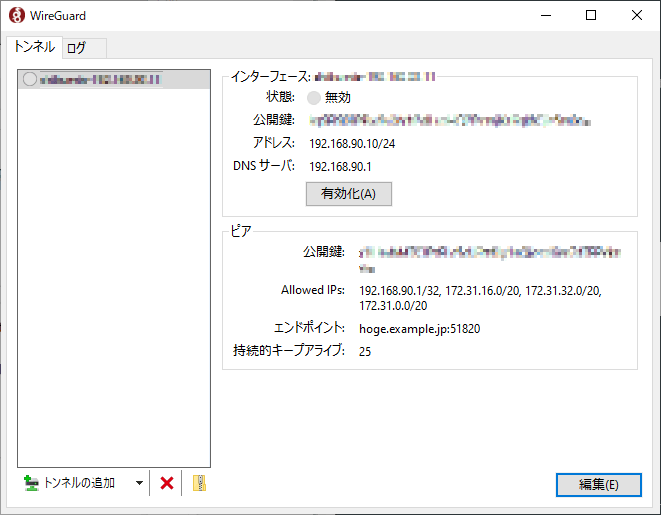
WireGuardクライアントの設定
WireGuardクライアントを立ち上げ、左下の「トンネルの追加」-> 「空のトンネルを追加」にて以下の設定を行う。
[Interface]
# client-private-key
PrivateKey = xxxxxxxxxxxxxxxxxxxxxxxxxxxxxxxxxxxxxxxxxxx=
Address = 192.168.90.10/32
DNS = 192.168.90.1

[Peer]
# server-public-key
PublicKey = AAAAAAAAAAAAAAAAAAAAAAAAAAAAAAAAAAAAAAAAAAA=
AllowedIPs = 192.168.90.1/32, 172.31.16.0/20, 172.31.32.0/20, 172.31.0.0/20
Endpoint = hoge.example.jp:51820
PersistentKeepalive = 25
設定の項目の意味はこんなかんじ。
- [Interface]
- PrivateKey: クライアント用の秘密鍵
- Address: クライアントのIPアドレス
- DNS: DNSサーバー (ここでは192.168.90.1を指定. unboundが面倒ならAWSのnameserverを指定してもよい)
- [Peer]
- PublicKey: サーバー用の公開鍵
- AllowedIPs = アクセスを許可するネットワーク
- Endpoint: WireGuardサーバーを指定(取得したDDNSのドメインを指定するのが便利)
- PersistentKeepalive: NATを保持する時間
接続確認
GUIで「有効化」をクリックして接続。
コマンドプロンプトで名前解決やルーティングを確認。
>nslookup ip-172-31-47-99.ap-northeast-1.compute.internal
サーバー:  UnKnown
Address:  192.168.90.1

権限のない回答:
名前:    ip-172-31-47-99.ap-northeast-1.compute.internal
Address:  172.31.47.99

>route print -4 | findstr /i 172.31
       172.31.0.0    255.255.240.0            リンク上     192.168.80.11      5
    172.31.15.255  255.255.255.255            リンク上     192.168.80.11    261
      172.31.16.0    255.255.240.0            リンク上     192.168.80.11      5
    172.31.31.255  255.255.255.255            リンク上     192.168.80.11    261
      172.31.32.0    255.255.240.0            リンク上     192.168.80.11      5
    172.31.47.255  255.255.255.255            リンク上     192.168.80.11    261