概要
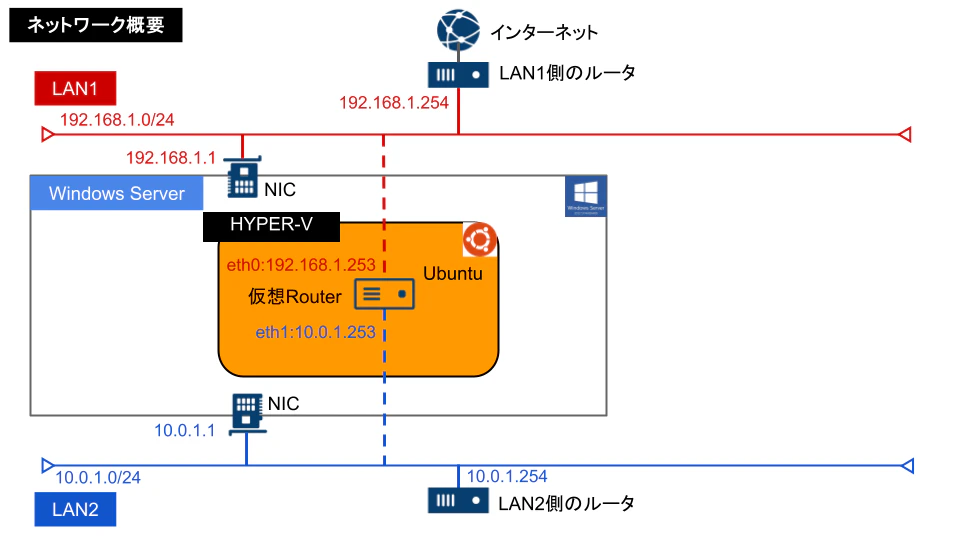
図のような2つの独立したネットワークがある。
・LAN1:192.168.1.0/24
・LAN2:10.0.1.0/24
この間にNIC2枚挿しのWindows Serverがあり以下のIPが割り当てられている。
・NIC1(LAN1側):192.168.1.1
・NIC2(LAN2側):10.0.1.1
Windows ServerのHyper-V内でUbuntu Server(24.04 LTS)を構築し、
簡易ルータとして動作させる。
ここまでのHyper-Vで仮想マシンを作成する手順は割愛。
Ubuntuの設定
netplanのyamlファイルを編集
$ cd /etc/netplan
$ ls
50-cloud-init.yaml
netplanには以下のようなことがあるので、
50より大きな値のファイル名のyamlを複製。
# cp 50-cloud-init.yaml 99-localnw-init.yaml
このファイルを編集し、設定する。
# pico 99-localnw-init.yaml
固定IP設定とルーティング
netplanでルーティングが設定できる。
・デフォルトルートはLAN1側のルータ(192.168.1.254)に問い合わせる
・LAN2側の経路はLAN2側のルータ(10.0.1.254)に問い合わせる
network:
    version: 2
    ethernets:
        eth0:
          dhcp4: false
          dhcp6: false
          addresses: [192.168.1.253/24]
          #デフォルトルートはLAN1側のルータに問い合わせる
          routes:
          - to: default
            via: 192.168.1.254
          #DNSもLAN1のルータ
          nameservers:
            addresses: [128.20.1.254, 8.8.8.8]
        eth1:
          dhcp4: false
          dhcp6: false
          addresses: [10.0.1.253/24]
          #LAN2側の10.0.0.0/8のルーティングはLAN2側のルータに問い合わせる
          routes:
          - to: 10.0.0.0/8
            via: 10.0.1.254
yamlファイルを変更したら、以下のコマンドで反映させる。
# netplan apply
ipv4パケット転送を許可する。
カーネルパラメータを変更し、パケット転送を許可する。
# pico /etc/sysctl.conf
#デフォルトはコメントになっているので外す
net.ipv4.ip_forward = 1
sysctl -pで反映させる。変更された部分が表示される
$ sudo sysctl -p
net.ipv4.ip_forward = 1
ちなみに確認は以下
$ sysctl -a | grep net.ipv4.ip_forward
iptablesでIPマスカレード設定
iptablesはNATなどの設定を行うが、ここではLAN1側からLAN2側へのパケットをLAN2側のIPでMASQUERADE(NAPT)する。
まず確認。何も設定が入っていない。
# iptables -L -t nat
Chain PREROUTING (policy ACCEPT)
num  target     prot opt source               destination

Chain INPUT (policy ACCEPT)
num  target     prot opt source               destination

Chain OUTPUT (policy ACCEPT)
num  target     prot opt source               destination

Chain POSTROUTING (policy ACCEPT)
num  target     prot opt source               destination
追加。ソースがLAN1側(192.168.1.0/24)をマスカレードする
# iptables -t nat -A POSTROUTING -s 192.168.1.0/24 -j MASQUERADE
再度確認。 --line-numbersをつけると設定番号が表示される。
# iptables -t nat -L --line-numbers
Chain PREROUTING (policy ACCEPT)
num  target     prot opt source               destination

Chain INPUT (policy ACCEPT)
num  target     prot opt source               destination

Chain OUTPUT (policy ACCEPT)
num  target     prot opt source               destination

Chain POSTROUTING (policy ACCEPT)
num  target     prot opt source               destination
1    MASQUERADE  all  --  192.168.1.0/24       anywhere
ちなみに間違えて設定した場合に行番号で指定する
# iptables -t nat -D POSTROUTING 1
iptablesの永続化
ubuntuのiptablesの設定はデフォルトだと再起動で消えてしまう。
iptables-persistentをインストールして設定を保存する。
# apt install iptables-persistent
設定ファイルは以下
/etc/iptables/rules.v4
再起動しても消えていないことを確認する。
完了!
ここまでやれば、ubuntuが簡易ルータとして機能し、LAN1からLAN2への通信が通るはず。
【余談】ufwはiptablesのラッパー
ufwでもできちゃうみたい。
参考