この記事の内容を行うとできること
- SSH/RDP接続時に、Google Authenticatorのワンタイムパスワード(以後OTP)が求められ、OTP認証後にアカウントのパスワード認証でログインできるようになります。
前提条件
Ubuntu Desktopがイントールされていること
環境情報
Ubuntu Desktop VERSION="24.04.2 LTS (Noble Numbat)"
作業手順/正常性確認手順
OpenSSHサーバの導入
※OpenSSHサーバ導入済みの場合はスキップしてください。
Ubuntu Desktopはインストール時点でOpenSSHサーバが導入されていません。
以下のコマンドでインストールを行います。
sudo apt update && sudo apt -y install openssh-server
Google Authenticator PAM モジュールの導入
以下のコマンドで、Google AuthenticatorのPAMモジュールをインストールします。
sudo apt install libpam-google-authenticator -y
余談:PAMとは
PAM(Pluggable Authentication Module)とは、Linuxにおいてユーザー認証方式を柔軟に定義できる仕組みです。
各サービスごとに /etc/pam.d/ 配下の設定ファイルを通じて、「何の認証をどう行うか」を定義可能になります。
今回は pam_google_authenticator.so モジュールを用いて、パスワード認証に加えOTPを組み込みます。
各ユーザでOTPの初期設定を実施
以下の手順は、ユーザごと個別に実施する必要があるため注意してください。
コマンド実行後、GoogleAuthenticatorアプリに読み込ませるQRコードが表示されます。
※GUI接続でなくともQRコードって表示されるんですね…すごい。
whoami
# 対象ユーザが想定どおりであること
google-authenticator -t -d -f -r 3 -R 30 -W
オプションの意味は以下です。
※google-authenticator単体で実行すれば、オプションで設定している内容を対話式で設定可能です。
-
-t:時間ベースのトークン使用 -
-d:コードの再利用を防止 -
-f:対話プロンプトなしで設定ファイルを強制作成 -
-rと-R:30秒間に最大3回の試行を許可 -
-W:rate limiting 有効化
余談:QRコードを再表示させる方法
QRコードを再表示させるには、head -n 1 ~/.google_authenticatorで秘密鍵を特定し、
https://www.qr-code-generator.com/ などを利用して以下をQRコード化すればOK。
otpauth://totp/ユーザー名@ホスト名?secret=ここに秘密鍵を入力&issuer=任意の識別名
(試しにGoogleAuthenticatorアプリで読み込みましたが、初期設定時と同じ数字が表示されました。)
SSH接続時にOTPが求められるように設定
SSHのPAM設定変更
以下のコマンドで、設定ファイルのバックアップを取得します。
sudo cp -ip /etc/pam.d/sshd /etc/pam.d/sshd.bak
バックアップしたファイルと、設定ファイルに差分がないことを確認します。
diff /etc/pam.d/sshd.bak /etc/pam.d/sshd
# 差分が表示されないこと
auth required pam_google_authenticator.soを先頭に追加します。
(nullokを付けず、未設定ユーザーは接続拒否しています。auth required pam_google_authenticator.so nullokにすればOTP未設定ユーザは通常通りPW認証で入れるようです。)
sudo sed -i '1i auth required pam_google_authenticator.so' /etc/pam.d/sshd
設定が追加されていることを確認します。
diff /etc/pam.d/sshd.bak /etc/pam.d/sshd
# 出力例
# 0a1
# > auth required pam_google_authenticator.so
SSH設定ファイルの編集
sshdの設定ファイルをバックアップします。
sudo cp -ip /etc/ssh/sshd_config /etc/ssh/sshd_config.bak
diff /etc/ssh/sshd_config /etc/ssh/sshd_config.bak
# 差分が表示されないこと
設定変更するパラメータの状態確認をします。
# 該当行の現状確認
grep -E '^(#\s*)?(ChallengeResponseAuthentication|UsePAM|KbdInteractiveAuthentication)' /etc/ssh/sshd_config
# 出力例
# KbdInteractiveAuthentication no
# UsePAM yes
普通にnanoやviで編集しても良いですが、あえてコマンドラインから設定ファイルを編集していきます。
# ChallengeResponseAuthentication を追記
echo 'ChallengeResponseAuthentication yes' | sudo tee -a /etc/ssh/sshd_config

# UsePAM は編集(存在する前提)
sudo sed -i 's/^#*\s*UsePAM.*/UsePAM yes/' /etc/ssh/sshd_config

# KbdInteractiveAuthenticationをYesに変更
sudo sed -i 's/^#*\s*KbdInteractiveAuthentication.*/KbdInteractiveAuthentication yes/' /etc/ssh/sshd_config
設定変更が正常に行えていることを確認します。
grep -E '^(#\s*)?(ChallengeResponseAuthentication|UsePAM|KbdInteractiveAuthentication)' /etc/ssh/sshd_config
# 出力例
# KbdInteractiveAuthentication yes
# UsePAM yes
# ChallengeResponseAuthentication yes
また、余計な場所が編集されていないか、差分も確認します。
diff /etc/ssh/sshd_config /etc/ssh/sshd_config.bak
# 出力例
# 62c62
# < KbdInteractiveAuthentication yes
# ---
# > KbdInteractiveAuthentication no
# 123d122
# < ChallengeResponseAuthentication yes
SSHサービスを再起動します。
sudo systemctl restart ssh
サーバから自分自身にSSH接続確認
以下のコマンドで、自分自身にSSHできるかチェックします。
ssh <設定したユーザ名>@localhost
# 出力例
# (<設定したユーザ名>@localhost) Verification code:<ここにGoogle AuthenticatorアプリのOTPを入力>
# (<設定したユーザ名>@localhost) Password:<ユーザのPWを入力>
他端末から接続確認
今回はWindows10端末からTeratermを利用して接続します。
ここで注意が必要なのは、通常のパスワード認証ではなく、キーボードインタラクティブ認証を利用することです。
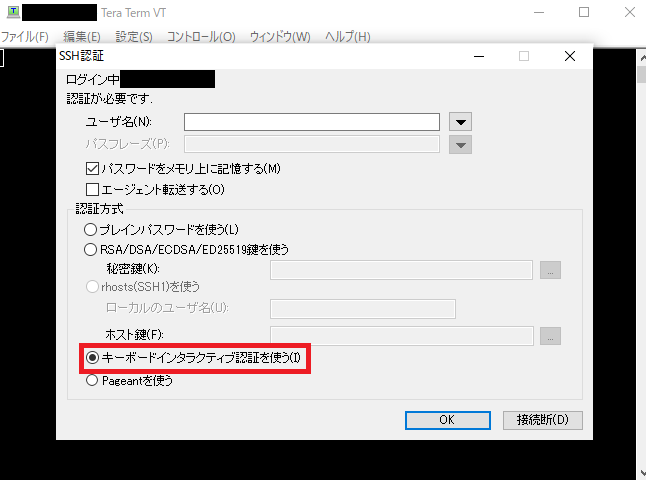
ユーザ名を入力し、キーボードインタラクティブ認証で接続します。
以下のような画面が表示され、OTPの入力ができます。その後、ユーザのパスワードも確認されます。

正常にログインできればSSHのOTP化は完了です。
GUIログイン時にOTPが求められるように設定
Ubuntu DesktopのGDM(GNOME Display Manager)を使っていることが前提です。
GUIログインのPAM設定変更
# PAM設定ファイルをバックアップ
sudo cp /etc/pam.d/gdm-password /etc/pam.d/gdm-password.bak
diff /etc/pam.d/gdm-password.bak /etc/pam.d/gdm-password
# 差分が表示されないこと
先頭行に PAM モジュールを追加します。(nullok なし)
sudo sed -i '1i auth required pam_google_authenticator.so' /etc/pam.d/gdm-password
設定が追加されたことを確認します。
diff /etc/pam.d/gdm-password.bak /etc/pam.d/gdm-password
# 出力例
# 0a1
# > auth required pam_google_authenticator.so
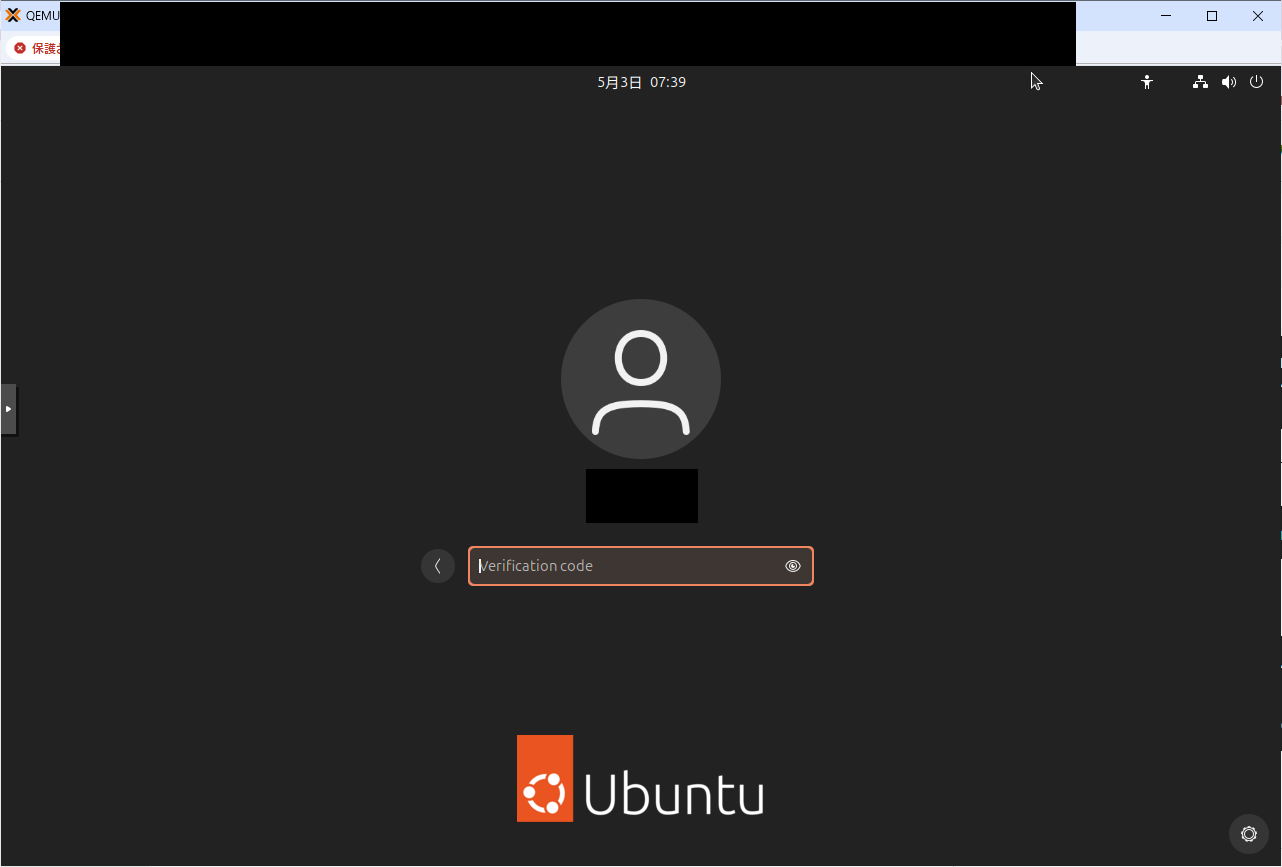
GUIログイン時にOTPが求められるか確認
コンソール画面を開き、ログイン時に以下のようにOTPが求められることを確認します。
RDP設定有効化
UbuntuのRemote Desktop有効化
Ubuntuの設定を開き、システム>Remote Desktopを開きます。

リモートログイン>ロックの解除>リモートログインを有効化します。
また、RDP接続時のユーザ名とPWを設定します。(強固なPWにしましょう)

Windows10端末から接続確認
サーバのIPアドレスと前項で指定したポート番号を入力して、接続を試行します。
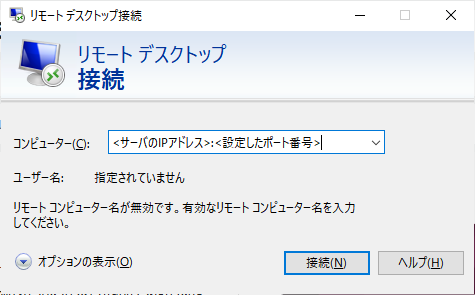
前項で指定したユーザ名/PWを指定してログインします。

赤枠のワーニングメッセージが出ますが、接続できたことを確認できました。

ワーニングを消したい場合は、以下の記事を参考にRDPクライアント側の設定変更をすれば解決します。
https://blog.treedown.net/entry/2024/10/31/010000
以上で、RDP(GUIログイン)/SSH接続時にOTP認証が求められる状態になりました。
nullokも入れていないので、比較的強固な端末になった…はず…
内容に不備・不足・誤記などございましたら、気兼ねなくご指摘ください。