仕事で開発中のプロジェクト内で、MVC?->MVVMへの移行を少しづつ進めています。まだ、絶賛移行中ですが、MVVMの実装にも慣れてきたところなのでここで一度分かったことを整理してみようと思います。サンプルで作ったコードも載せているので見てもらえるとうれしいです。
MVVMとは?
この記事ではModel-View-ViewModelという3つの概念とレイヤード(layered)アーキテクチャを組み合わせたアプリ設計とします。
Model
データの構造体(もしくはデータ構造)のことです。Kotlinであれば data class で実装することが多い印象です。データをモデル化することでデータのまとまりやデータそのものに意味を持たせることができて理解しやすいです。永続モデルを構築するためにRoomというSQLiteを扱うためのライブラリを使うこともあります。
//こんなやつ
data class User(
    val name: String,
    val age: Int
)
View
ここではユーザーに見えるもの、ユーザーと相互作用するものとします。具体的には、Activity,Fragment(UIコンポーネント),XML(ビューファイル)などです。
ViewModel
ここでは「UI層とData層間で相互作用するもの」とします。Kotlin,JavaなどではViewModelを継承しているクラスが一般的です。
class SampleViewModel: ViewModel {
//省略
}
レイヤードアーキテクチャ
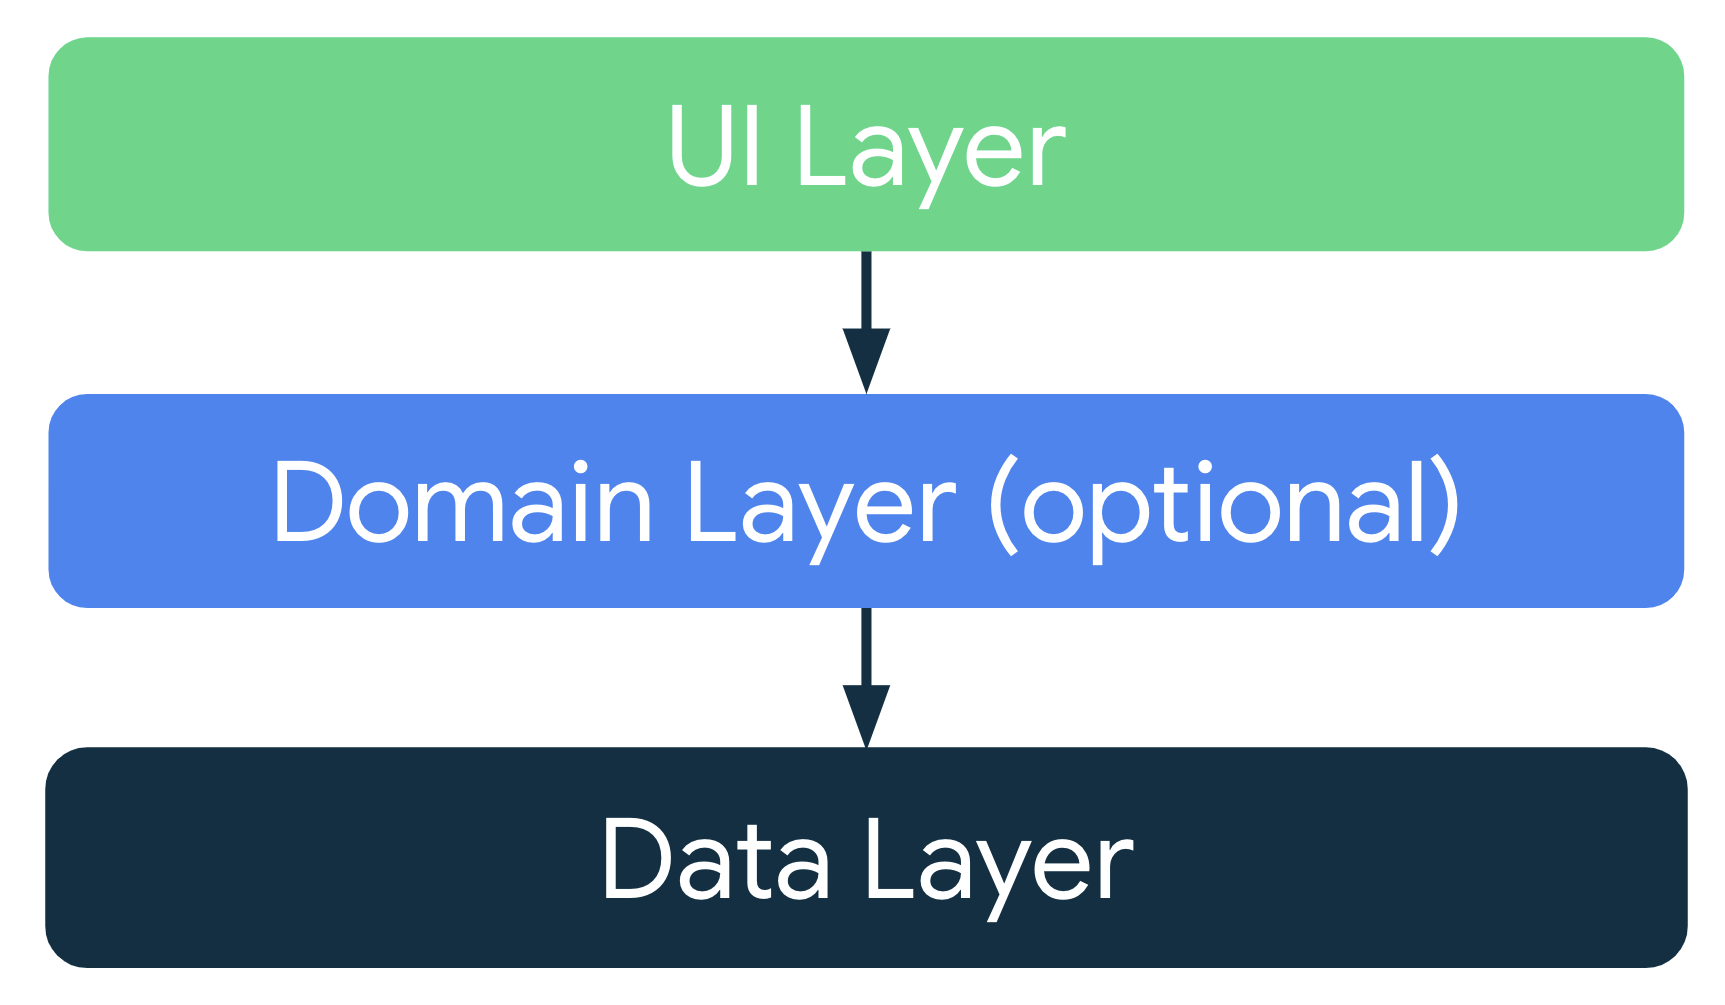
大きく、UI層・ドメイン層(オプショナル)・データ層に分けてアプリを設計する方針のことです。MVVMもこの概念の中に含まれると思っているのですが、MVVMとレイヤードアーキテクチャの明確な関係性(どちらがより大きな概念?それとも独立した概念?)は筆者もまだ分かっていません...。
よく目にするのはAndroid公式のこの画像です。この画像は各層(レイヤー)の位置関係・依存関係をよく表しています。
実装に必要なもの
ここで最低限実装に必要なものをまとめます。
step1: MVVMで整理する
Model -> ***Model(データ構造を表すクラス)
View -> ***Activity(***Fragment), xmlファイル
ViewModel -> ***ViewModel
step2: step1をレイヤードアーキテクチャに当てはめて補足する
UI層 -> View, ViewModel, Model
ドメイン層 -> (オプショナル), Model
データ層 -> Repository, Datasource, Model
具体的な実装
データ層(Datasource)
実現したいこと:外部のDBなどから加工されていない純粋なデータを取得する。
ここでは単純にHTTP通信などを行い外部のDBからデータを取得しています(例ではローカルに持っているJSONデータを読み込んでいるだけです)。重要なことは取得したデータの加工などは絶対に行わないことです。それはRepositoryの役割です。また、注意点としてDatasourceはどのクラスにも依存していません(Contextに依存していますが、Contextはアプリのどの箇所からも呼び出せます)。言い方を変えるとアプリのどのクラスからも呼び出すことが可能な便利なやつです。ですが、原則としてDatasourceを呼び出せるのはRepositoryからのみです。この原則を破るとレイヤードアーキテクチャが破綻してしまいます。
/**
 * Remote weather datasource
 * datasource store data from api
 * @property context
 * @constructor Create empty Remote weather datasource
 */
class RemoteWeatherDatasource(
    private val context: Context
) {

    /**
     * Fetch remote weather data flow
     * function return [Flow<RemoteWeatherModel>]
     * @return [Flow<RemoteWeatherModel>]
     */
    fun fetchRemoteWeatherDataFlow(): Flow<RemoteWeatherModel> = flow {
        val remoteWeatherDataList: List<RemoteWeatherModel>
        lateinit var jsonAdapter: JsonAdapter<List<RemoteWeatherModel>>
        val jsonString = context.assets.open("getweathers.json")
            .bufferedReader()
            .use {
                it.readText()
            }
        val moshi = Moshi.Builder().add(KotlinJsonAdapterFactory()).build()
        val parameterizedType =
            Types.newParameterizedType(List::class.java, RemoteWeatherModel::class.java)
        jsonAdapter = moshi.adapter(parameterizedType)
        remoteWeatherDataList = jsonString.let { jsonAdapter.fromJson(it)!! }
        for (remoteWeather in remoteWeatherDataList) {
            emit(remoteWeather)
        }
    }.flowOn(Dispatchers.Default)

    /**
     * Fetch remote weather data coroutine
     * function return [List<RemoteWeatherModel>]
     * @return [List<RemoteWeatherModel>]
     */
    suspend fun fetchRemoteWeatherDataCoroutine(): List<RemoteWeatherModel> {
        lateinit var remoteWeatherDataList: List<RemoteWeatherModel>
        coroutineScope {
            val differ = async {
                lateinit var jsonAdapter: JsonAdapter<List<RemoteWeatherModel>>
                val jsonString = context.assets.open("getweathers.json")
                    .bufferedReader()
                    .use {
                        it.readText()
                    }
                val moshi = Moshi.Builder().add(KotlinJsonAdapterFactory()).build()
                val parameterizedType =
                    Types.newParameterizedType(List::class.java, RemoteWeatherModel::class.java)
                jsonAdapter = moshi.adapter(parameterizedType)
                remoteWeatherDataList = jsonString.let { jsonAdapter.fromJson(it)!! }
            }
            differ.await()
        }
        return remoteWeatherDataList
    }

}
データ層(Repository)
実現したいこと:Datasourceから取得したデータの(比較的単純な)加工
RepositoryではDatasourceから取得したデータの加工を行います。ロジックが肥大化する・再利用可能なロジックの場合はドメイン層にその役割を譲ることもあります。
/**
 * Remote weather repository
 * class modify data or open remote data to domain layer or ui layer
 * @property remoteWeatherDatasource
 * @constructor Create empty Remote weather repository
 */
class RemoteWeatherRepository(
    private val remoteWeatherDatasource: RemoteWeatherDatasource
) {

    /**
     * Get remote weather data flow
     * function get data from remote datasource with Flow
     * @return [Flow<RemoteWeatherModel>]
     */
    suspend fun getRemoteWeatherDataFlow(): Flow<RemoteWeatherModel> = flow {
        val list: MutableList<RemoteWeatherModel> = mutableListOf()
        var count = 1
        remoteWeatherDatasource.fetchRemoteWeatherDataFlow().collect { remoteWeatherModel ->
            remoteWeatherModel.id = count
            list.add(remoteWeatherModel)
            count++
        }
        for (remoteWeatherModel in list) {
            emit(remoteWeatherModel)
        }
    }.flowOn(Dispatchers.Default)

    /**
     * Get remote weather model list
     * function get data from remote datasource with List
     * @return [Flow<RemoteWeatherModel>]
     */
    suspend fun getRemoteWeatherModelList(): List<RemoteWeatherModel> {
        lateinit var list: List<RemoteWeatherModel>
        coroutineScope {
            val differ = async {
                list = remoteWeatherDatasource.fetchRemoteWeatherDataCoroutine()
                var count = 1
                list.forEach { value ->
                    value.id = count
                    count++
                }
            }
            differ.await()
        }
        return list
    }
}
データ層(Manager)
実現したいこと:複数のRepositoryをマネジメントする
複数のRepositoryから取得したデータを統合させたい場合などにはManagerというクラスを使用することがあります。より複雑なロジックが必要な時に使用するため必須ではありません。
/**
 * Weather data manager
 * class control or integrate multiple repository class
 * @property [remoteWeatherRepository] class control remote data
 * @property [localWeatherRepository] class control local data
 * @constructor Create empty Weather data manager
 */
class WeatherDataManager(
    private val remoteWeatherRepository: RemoteWeatherRepository,
    private val localWeatherRepository: LocalWeatherRepository
) {

    private val TAG = WeatherDataManager::class.simpleName

    /**
     * Get all weather data flow
     * function retrun [Flow<List<LocalWeatherModel>>]
     * @return [Flow<List<LocalWeatherModel>>]
     */
    fun getAllWeatherDataFlow(): Flow<List<LocalWeatherModel>> = flow {
        localWeatherRepository.allLocalWeatherData.collect { data ->
            emit(data)
            Log.d(TAG, "getAllWeatherDataFlow: $data")
        }
    }

    /**
     * Get integrated weather data flow
     * function convert remote data to local data and pass local data to local repository
     */
    suspend fun convertRemoteDataToLocalDataFromFlow() {
        remoteWeatherRepository.getRemoteWeatherDataFlow().collect { remoteWeatherModel ->
            val localWeatherModel =
                LocalWeatherModel(
                    remoteWeatherModel.id,
                    0,
                    0,
                    remoteWeatherModel.city_code,
                    remoteWeatherModel.hour
                )
            localWeatherRepository.insert(localWeatherModel)
        }
    }

    /**
     * Get integrated weather data flow
     * function convert remote data to local data and pass local data to local repository
     */
    suspend fun convertRemoteDataToLocalDataFromList() {
        val remoteList = remoteWeatherRepository.getRemoteWeatherModelList()
        remoteList.forEach { value ->
            val localWeatherModel =
                LocalWeatherModel(value.id, 0, 0, value.city_code, value.hour)
            localWeatherRepository.insert(localWeatherModel)
        }
    }
}
UI層(ViewModel)
実現したいこと:データ層から取得したデータをUI層(View)に公開する
ViewModelは主にデータ層とUI層(View)との橋渡し的な役割です。加工されたデータをViewModelを通してViewに公開します。気をつけることは、ViewModelでは極力ビジネスロジックを持たないことです。データ層(Repository)から取得したデータをそのままUI層(View)に公開することが望ましいです。
/**
 * Weather data view model
 * class open data to ui layer or store ui state
 * @property weatherDataManager
 * @constructor Create empty Weather data view model
 */
class WeatherDataViewModel(
    private val weatherDataManager: WeatherDataManager
) : ViewModel() {

    /**
     * Insert
     * function call manager function with List
     */
    fun insert() = viewModelScope.launch {
        weatherDataManager.convertRemoteDataToLocalDataFromList()
    }

    /**
     * Insert flow
     * function call manager function with Flow
     */
    fun insertFlow() = viewModelScope.launch {
        weatherDataManager.convertRemoteDataToLocalDataFromFlow()
    }

    /**
     * Weather data live data
     * variable open data to ui layer
     */
    val weatherDataLiveData = weatherDataManager.getAllWeatherDataFlow().asLiveData()

    /** Button のクリック回数 */
    private val _count = MutableStateFlow(0)
    val count = _count.asStateFlow()

    /** クリック回数をカウントアップする。 */
    fun countUp() {
        _count.value = count.value + 1
    }
}

/**
 * Weather view model factory
 * class for view model instance with dependency
 * @property [weatherDataManager] repository integrate multiple repository
 * @constructor Create empty Weather view model factory
 */
class WeatherViewModelFactory(private val weatherDataManager: WeatherDataManager) :
    ViewModelProvider.Factory {
    override fun <T : ViewModel> create(modelClass: Class<T>): T {
        if (modelClass.isAssignableFrom(WeatherDataViewModel::class.java)) {
            @Suppress("UNCHECKED_CAST")
            return WeatherDataViewModel(weatherDataManager) as T
        }
        throw IllegalArgumentException("Unknown ViewModel class")
    }
}
UI層(View)
実現したいこと:ユーザーにビジネスロジックの結果(状態)をUIで表現する。
Viewでは言わずもがな、ユーザーにビジネスロジックの結果をUIで表現することが求められます。重要なことは、ここではビジネスロジックの実装は極力行わず、ViewModelから公開されたデータをUIで表現することに集中します。
class MainActivity : AppCompatActivity() {
    private val TAG = MainActivity::class.simpleName

    //ViewModelの初期化。依存関係がある場合は、ViewModelFactoryクラスを使用する
    private val weatherDataViewModel: WeatherDataViewModel by viewModels {
        WeatherViewModelFactory((application as MainApplication).weatherDataManager)
    }


    override fun onCreate(savedInstanceState: Bundle?) {
        super.onCreate(savedInstanceState)
        setContentView(R.layout.activity_main)

        val recyclerView = findViewById<RecyclerView>(R.id.recyclerview)
        val adapter = WeatherDataListAdapter().apply {
            onItemClickListener = { _ ->
                Log.d(TAG, "onCreate: click!")
            }
        }
        recyclerView.adapter = adapter
        recyclerView.layoutManager = LinearLayoutManager(this)

        weatherDataViewModel.insertFlow()

        weatherDataViewModel.weatherDataLiveData.observe(this) { data ->
            Log.d(TAG, "onCreate: $data")
            data.let { adapter.submitList(it) }
        }
    }
}
まとめ
以上、「MVVMとは何か」「MVVMの具体的な実装」を示しました。抜けている部分やあえて単純化した部分もありますが、概観や雰囲気を掴んでいただけたら幸いです。また、実際に実装した中で下記のようなメリット・デメリットを感じたので、共有します。
メリット
・関心の分離ができている
->各々のクラス(層)で明確に依存関係を引いているため、不要なクラス間の依存・参照が生まれず、スッキリしている印象を受けました。
・バグを特定しやすい(メンテナンス性が高い)
->各々のクラス(層)で明確に役割が決まっているので、バグが発生した時に当たりをつけやすいと思いました。
・Kotlin Flowの恩恵を受けやすい
->Flowを使用することでシーケンシャルなデータを扱えるようになるので層毎のデータのハンドリングで応用を効かせやすいかなと思いました。
・リアクティブプログラミングに慣れている人なら導入コストは低い(かも?)
->これは感覚です(笑)
デメリット
・リファクタリングコストが高い
->肥大化したプロジェクトでMVVMに移管することは中々コストが高そうです。
・学習コストが高い
->MVC,MVPに慣れている人が実装すると少し違和感を感じることがあるかも知れません。そのため、慣れに時間を要する気がしていません(自分もでした...)