はじめに
「C言語でトライ! デザインパターン」。今回はDecoratorパターン。最初にサラっと概要をなめていた時はちょっとしたラッパーを作るだけかなと思ったんですが、そんなことはなかった。
デザインパターン一覧
作成したライブラリパッケージの説明
公開ライブラリコードはこちら
ライブラリにしていないコードはこちら
Decoratorパターン
Wikipediaより抜粋。
Decorator パターン(デコレータ・パターン)とは、GoF(Gang of Four; 4人のギャングたち)によって定義されたデザインパターンの1つである。 このパターンは、既存のオブジェクトに新しい機能や振る舞いを動的に追加することを可能にする。

この文章とクラス図だけ見ると、唯のラッパーを作って単純に拡張したい時にやりやすいってだけかと思ったら、使い勝手の柔軟性も意識した作りになるんですね。
デザインパターン学習メモ:「Decorator」で説明されていた図式がわかりやすかったです。
[:Decorator1]-->[:Decorator2]-->[Decorator3]-->[:ConcreteComponent]
「オブジェクトの連鎖」がポイントになる。ここが、オブジェクトを多重に修飾している箇所だ。
オブジェクトを動的に流し込むことで連鎖を作り、順々に装飾していくような振る舞いが出来るようにする。
流し込み方を変えることで装飾方法も変わる。といった感じでしょうか。
要はChain Of Responsibilityの全員が仕事をするバージョンって感じかな。
その責務に関わるオブジェクトを簡単に追加・削除できるので拡張が楽!といった感じですかね。
サンプルコード
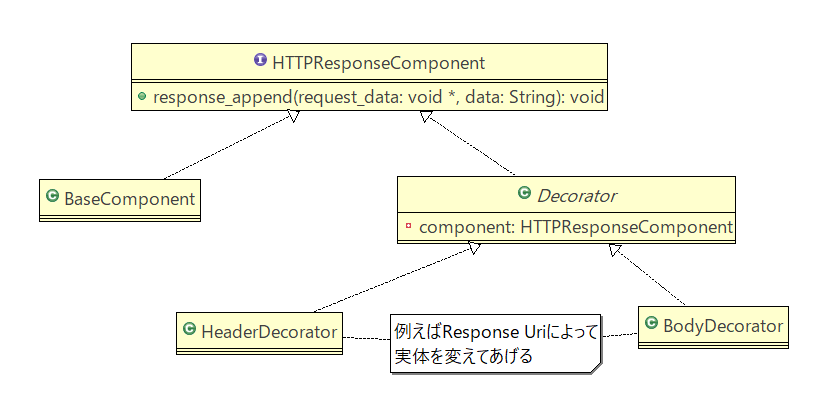
どんな構成で考えると馴染み深いかなと考えた結果、HTTPレスポンスデータを詰める為の処理を同クラス表現で書いてみました。
クラス図はこんな感じ。

BaseはURLに関わらず立てているサーバーで固定の情報を詰める。
DecoratorはRequest毎に生成して、Response内容を詰めていく。みたいな感じ(サンプルでは固定)といったイメージで設計しました。
サンプルコードは以下に格納しています。
https://github.com/developer-kikikaikai/design_patter_for_c_appendix/tree/master/decorator
コードの中身はこんな感じ。まずはComponentの定義。
サンプル作るのに各インスタンスをfreeするのが面倒だったのでインターフェースのメソッドにfreeをぶち込んでいます。
/*共通インターフェースクラス定義*/
struct http_response_component_t;
typedef struct http_response_component_t http_response_component_t, *HTTPResponseComponent;
struct http_response_component_t {
    void (*response_append)(HTTPResponseComponent this, char *request_uri, char *header, char *body);
    void (*free)(HTTPResponseComponent this);
};

# define HTTP_RESPONSE_COMPONENT_IF \
    void (*response_append)(HTTPResponseComponent this, char *request_uri, char *header, char *body);\
    void (*free)(HTTPResponseComponent this);
そしてDecoratorと、インスタンス生成API定義。
# include "http_response_component.h"
/*BaseComponentの生成API*/
HTTPResponseComponent base_component_new(void);

/*Decorator定義*/
typedef struct decorator_t {
    HTTP_RESPONSE_COMPONENT_IF
    HTTPResponseComponent component;
} *Decorator;

/*Decorator各実体生成API*/
Decorator header_decorator_new(HTTPResponseComponent component);
Decorator body_decorator_new(HTTPResponseComponent component);
これらを使ってのメイン処理はこんな感じ。
# include <stdio.h>
# include "component_imple.h"

int main(int argc, char **argv) {
    if(argc<2) {
        return -1;
    }

    char *uri = argv[1];
    char header[8192]={0};
    char body[8192]={0};

    /*まずはBaseComponentを生成*/
    HTTPResponseComponent component = base_component_new();
    /*BaseComponentを引数にしてHeaderDecoratorを生成。*/
    component = (HTTPResponseComponent)header_decorator_new(component);
    /*HeaderDecoratorを引数にしてBodyDecoratorを生成。*/
    component = (HTTPResponseComponent)body_decorator_new(component);

    /*response_appendを実行。[:BodyDecorator]-->[:HeaderDecorator]-->[BaseComponent]の順でresponse_appendが実行される。*/
    component->response_append(component, uri, header, body);
    printf("## request uri\n%s\n", uri);
    printf("## response\n");
    printf("%s\r\n%s", header, body);
    component->free(component);
    return 0;
}
実行結果はこんな感じになります。
$ ./test sample_uri
## request uri
sample_uri
## response
server: sample_server
referer: sample_uri
status:200
content_length: 15

Hello World!!
各種生成処理も抜粋して紹介。BaseComponentから。
/*BaseComponentではheaderにserver: sample_serverを詰め込む*/
# define FIXED_HEADER "server: sample_server\r\n"
# define FIXED_HEADER_LEN (strlen(FIXED_HEADER))

static void fixed_response_append_imple(HTTPResponseComponent this, char *request_uri, char *header, char *body) {
        memmove(&header[FIXED_HEADER_LEN], header, strlen(header));
        memcpy(header, FIXED_HEADER, FIXED_HEADER_LEN);
};

static void base_component_free(HTTPResponseComponent this) {
        free(this);
}

HTTPResponseComponent base_component_new(void) {
        HTTPResponseComponent instance = calloc(1, sizeof(*instance));
        if(!instance) return NULL;

        instance->response_append = fixed_response_append_imple;
        instance->free = base_component_free;
        return instance;
}
BodyDecoratorComponentはこんな感じ。(Headerは省略)
/*append, BodyにHello World、headerにstatusとlengthを詰め込む*/
# define RESPONSE_BODY "Hello World!!\r\n"
# define RESPONSE_BODY_LEN (strlen(RESPONSE_BODY))
static void body_response_append(HTTPResponseComponent this, char *request_uri, char *header, char *body) {
        char response[256]={0};
        snprintf(response, sizeof(response), "status:200\r\ncontent_length: %lu\r\n", RESPONSE_BODY_LEN);
        memmove(&header[strlen(response)], header, strlen(header));
        memcpy(header, response, strlen(response));
        /*body*/
        memmove(&body[RESPONSE_BODY_LEN], body, strlen(body));
        memcpy(body, RESPONSE_BODY, RESPONSE_BODY_LEN);

        Decorator decorator = (Decorator)this;
        decorator->component->response_append(decorator->component, request_uri, header, body);
}

static void decorator_free(HTTPResponseComponent this) {
        Decorator instance = (Decorator)this;
        instance->component->free(instance->component);
        free(instance);
}

/*生成API*/
static Decorator decorator_initialize(HTTPResponseComponent component, void (*response_append)(HTTPResponseComponent this, char *request_uri, char *header, char *body)) {
        Decorator instance = calloc(1, sizeof(*instance));
        if(!instance) return NULL;

        instance->component = component;
        instance->response_append = response_append;
        instance->free = decorator_free;
        return instance;
}

Decorator body_decorator_new(HTTPResponseComponent component) {
        return decorator_initialize(component, body_response_append);
}
感想
Decoratorパターン、構造的には追加・削除のしやすい構成ですね。各Componentのインターフェースが綺麗に定義出来れば凄く便利なデザインですね。
柔軟な拡張性が売りということは、Wikipediaのクラス図だけではなくBaseComponent, Decoratorの各実体が分かるような情報共有が必要そう。
こういったクラス設計を取り入れる際は、やっぱりthis参照が出来ると便利なんですけどね。(じゃあC++でやれよって感じですね(笑))