仕事で任されてる環境でリバースプロキシがあります。まだ触ってません。いつか触るかもしれません。
なにで構築されているのかは知らないが、Nginx が一般的になってきているらしいので、これで検証します。
概要
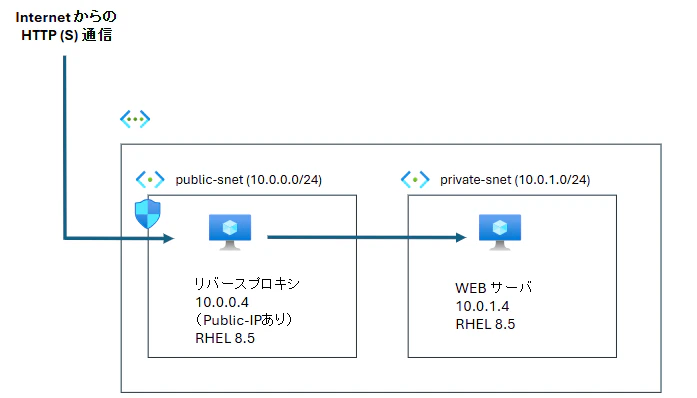
図の通り、WEB サーバへのインターネットからのHTTP の通信をリバースプロキシが中継する構成を実現します。
リバースプロキシでの作業
リバースプロキシにNginx をインストール
最初にNginx のインストールです。
作業のためにパブリックIP を与えているので適当にSSH でつなぎます。ネットワークセキュリティグループの設定をお忘れなく。
yum install -y nginx   #いきなりインストールでいけました。
・・・・
systemctl start nginx
systemctl start nginx が失敗するときもあった。
エラー文を見て対処すること(出た時の記録を失くした)
groupadd nginx
useradd -g nginx nginx
でユーザー作成すればうまくいった場合と、
SELinux の無効化でうまくいった場合があった。
ネットワーク設定
Nginx がリクエストを待ち受けるのは8888 番ポートにします。バックエンドのWEB サーバの80 ポートとわかりやすくしたいので。
しかしNginx のデフォルトのポート番号は80 なので、そちらも空けておきます。
# ファイアウォール穴あけ
firewall-cmd --permanent --add-port=8888/tcp
firewall-cmd --permanent --add-port=80/tcp
firewall-cmd --reload
# 確認コマンド
firewall-cmd --list-ports
ここまでやってブラウザにリバースプロキシのパブリックIP を入れてやると、こんな風な画面が見えるようになります。
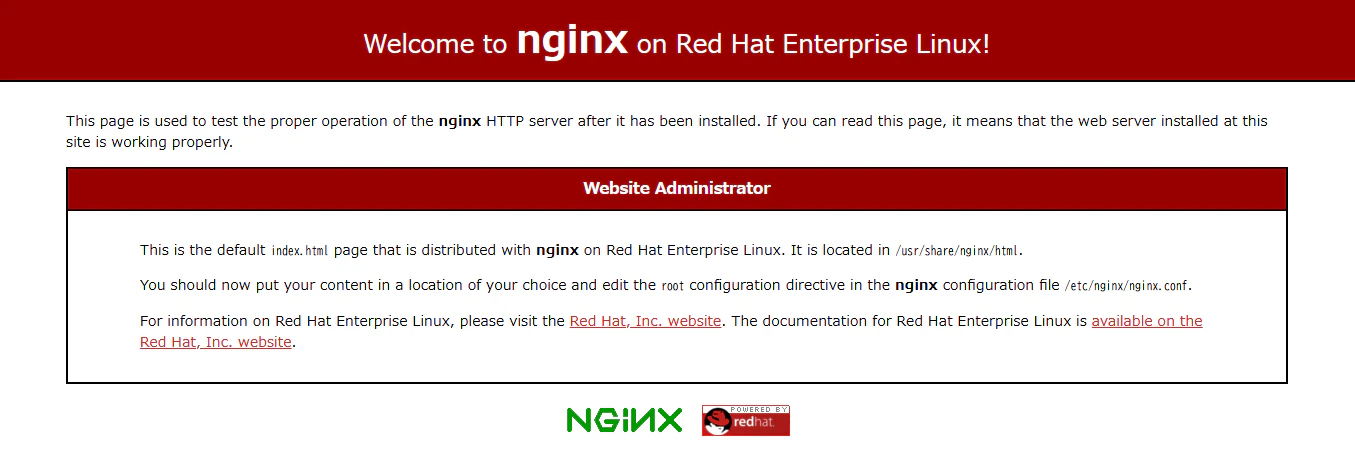
とりあえずNginx のページです。
Nginx 構成
Nginx の構成は、/etc/nginx/nginx.conf をいじります。主要な箇所だけ挙げます。
 upstream backend {
     server 10.0.1.4; # WEBサーバのアドレス
 }

 server {
        listen       8888 default_server;
        listen       [::]:8888 default_server;
        server_name  _;
        root         /usr/share/nginx/html;

        # Load configuration files for the default server block.
        include /etc/nginx/default.d/*.conf;

        location / {
    	    proxy_pass http://backend;
  	}
- upstream はリダイレクト先を書く。backend という名前のグループをつくりその中にWEB サーバのIP アドレスを記載。後のlocation でbackend を指定する。
- server はリバースプロキシの中身を書く。8888 ポートで待ち受けたいので8888 を書く。
- root にはNginx にアクセスしたときのページファイルが入っている。さっき見たNginx のページ。
nginx.conf のなかにinclude という記述があるが、nginx.conf 以外のファイルに分けた構成を参照しろという意味。高度な構成をしたい場合向け。別に使わなくてもいい。
いじったあとは、次のコマンドでNginx に構成ファイルを読み込ませます。
nginx -s reload
さて、新しい構成ファイルを読み込んだNginx にブラウザで同様にアクセスすると失敗するのかなと思ったら、特に問題なく先ほどのページが開きます。
ポートの状態を見ると、80 でNginx が待っている。あれ、逆に8888 では待ち受けてない??
# lsof -i:80
COMMAND   PID  USER   FD   TYPE DEVICE SIZE/OFF NODE NAME
nginx   27582  root    8u  IPv4  80689      0t0  TCP *:http (LISTEN)
nginx   27582  root    9u  IPv6  80690      0t0  TCP *:http (LISTEN)
nginx   27591 nginx    8u  IPv4  80689      0t0  TCP *:http (LISTEN)
nginx   27591 nginx    9u  IPv6  80690      0t0  TCP *:http (LISTEN)
nginx   27591 nginx   17u  IPv4  85387      0t0  TCP revproxy.internal.cloudapp.net:http->softbank126063254171.bbtec.net:51498 (ESTABLISHED)
nginx   27591 nginx   18u  IPv4  85388      0t0  TCP revproxy.internal.cloudapp.net:http->softbank126063254171.bbtec.net:51499 (ESTABLISHED)


#lsof -i:8888
#
サービスの再起動をしないといけないかと思ってsystemctl restart したら、SELinux がうんたらかんたらで失敗したので、無効化してから再起動すると8888 番で立ち上がりました。
[root@RevProxy testuser]# lsof -i:8888
COMMAND  PID  USER   FD   TYPE DEVICE SIZE/OFF NODE NAME
nginx   1912  root    8u  IPv4  34581      0t0  TCP *:ddi-tcp-1 (LISTEN)
nginx   1912  root    9u  IPv6  34582      0t0  TCP *:ddi-tcp-1 (LISTEN)
nginx   1913 nginx    8u  IPv4  34581      0t0  TCP *:ddi-tcp-1 (LISTEN)
nginx   1913 nginx    9u  IPv6  34582      0t0  TCP *:ddi-tcp-1 (LISTEN)
[root@RevProxy testuser]#
そこからブラウザで"リバースプロキシのパブリックIP:8888" でアクセスするとエラーページが見えました。
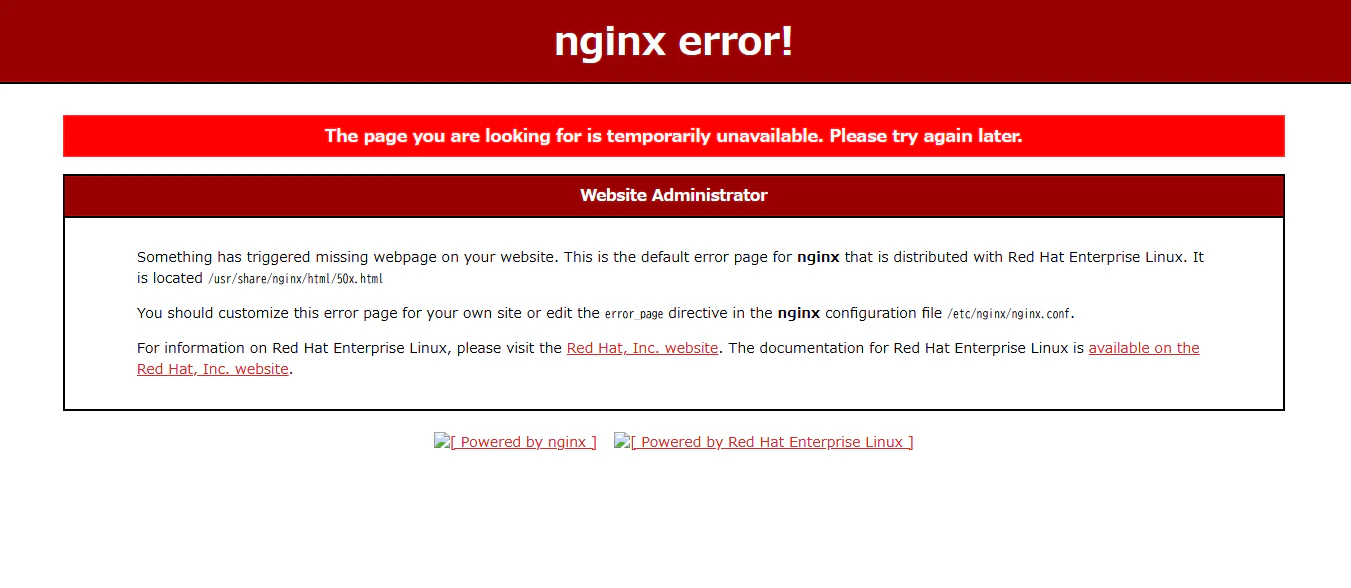
リダイレクトの設定を入れたのにリダイレクト先でWEBサーバは待ってないし、そもそも通信できるようにしていないです。
WEB サーバでの作業
firewall 穴あけ
WEB サーバは80 番ポートを空けて待ち受けます。
firewall-cmd --add-port=80/tcp
なんでもいいので何かしらの方法でweb サーバを立てます。
mkdir /var/www/html/
cd /var/www/html/
vi index.html
でhtml ファイルを作成します。
自分用
mkdir しないとsudo vi しようがCant open file for writing エラーが出て作成できない
続いて次のコマンドでWEB サーバを立ち上げます。
[root@Backend html]# python3 -m http.server 80
Serving HTTP on 0.0.0.0 port 80 (http://0.0.0.0:80/) ...
リバースプロキシの作業
リバースプロキシからWEB サーバへの通信ができているかを確認します。
[testuser@RevProxy ~]$ curl http://10.0.1.4
<h2>Hello,World</h2>
<body>This is a test page.</body>
</html>
[testuser@RevProxy ~]$
これで先ほど作成したhtml ファイルが返っているので、リバースプロキシとWEB サーバ間の通信は大丈夫です。
もう一度ブラウザで、リバースプロキシのパブリックIP:8888 をたたいてみるとどうでしょうか。

はい、これでリバースプロキシへのリクエストがリダイレクトされてWEB サーバに行きました。