はじめに
こんにちは、もちもちMAXです。
今回はReactでMPAを作成し、Amazon S3で公開する手順について解説していきたいと思います。
- reactでビルドしたけど、エントリーポイント1個しかないぞ?
- MPAをAmazon S3で公開ってどうやるの?
という人は見て頂ければと思います。
React環境構築
ReactでMPAを作成するので、まずはReact環境を構築していきます。
有名どころではcreate-react-appコマンドがありますがこのコマンドで環境構築した場合、デフォルトでwebpackというビルドツールが使用されます。しかし、今回はviteというビルドツールを使いますのでnpm create viteコマンドで環境を作成していきます。
まず、適当なディレクトリで下記コマンドを実行します。
npm create vite
いくつか入力が求められるので入力していきます。私は以下の通りとしました。
Project name : test
Selcet a framework : React
Select a variant : JavaScript
次に、作成されたディレクトリに移動してコマンドを実行します。
cd test
npm install
npm run dev
表示されたurlにアクセスし、viteの画面が表示されれば完了です。

作業ディレクトリの作成
先ほど作成されたtestディレクトリの構成をMPA用に変えていきます。MPAとしてブログを想定しているため、ホーム、記事一覧、記事の3階層を用意しています。
具体的には作業ディレクトリは下記のようにしました。
各階層にエントリーポイントとなるhtmlファイルとhtmlファイル内のscriptタグで読み込むためのjsxファイルを配置しています。
test
 ├─node_modulesとかREADME.mdとか色々
 └─home
   ├─index.html
   ├─index.jsx
   ├─components
   ├─public  // 画像リソースなどはここに配置する
   └─article_list
      ├─index.html
      ├─index.jsx
      └─article
         ├─index.html
         └─index.jsx
コンテンツ作成
各階層のindex.htmlとindex.jsxを作成します。
今回はサンプルとして各階層へ遷移する機能だけを書いています。
- test/home/index.html
<!doctype html>
<html lang="en">
  <head>
    <meta charset="UTF-8" />
    <link rel="icon" type="image/svg+xml" href="/vite.svg" />
    <meta name="viewport" content="width=device-width, initial-scale=1.0" />
    <title>ブログホーム</title>
  </head>
  <body>
    <div id="root"></div>
    <script type="module" src="/index.jsx"></script>
  </body>
</html>
- test/home/article_list/index.html
<!doctype html>
<html lang="en">
  <head>
    <meta charset="UTF-8" />
    <link rel="icon" type="image/svg+xml" href="/vite.svg" />
    <meta name="viewport" content="width=device-width, initial-scale=1.0" />
    <title>記事一覧</title>
  </head>
  <body>
    <div id="root"></div>
    <script type="module" src="/article_list/index.jsx"></script>
  </body>
</html>
- test/home/article_list/article/index.html
<!doctype html>
<html lang="en">
  <head>
    <meta charset="UTF-8" />
    <link rel="icon" type="image/svg+xml" href="/vite.svg" />
    <meta name="viewport" content="width=device-width, initial-scale=1.0" />
    <title>記事</title>
  </head>
  <body>
    <div id="root"></div>
    <script type="module" src="/article_list/index.jsx"></script>
  </body>
</html>
- test/home/index.jsx
import React from 'react';
import ReactDOM from 'react-dom/client';

ReactDOM.createRoot(document.getElementById('root')).render(
  <div>
      <p>ブログホーム</p>
      <a href="/article_list/index.html">記事一覧へ</a>
      <br />
      <a href="/article_list/article/index.html">記事へ</a>
  </div>
);
- test/home/article_list/index.jsx
import React from 'react';
import ReactDOM from 'react-dom/client';

ReactDOM.createRoot(document.getElementById('root')).render(
  <div>
      <p>記事一覧</p>
      <a href="/index.html">ブログホームへ</a>
      <br />
      <a href="/article_list/article/index.html">記事へ</a>
  </div>
);
- test/home/article_list/article/index.jsx
import React from 'react';
import ReactDOM from 'react-dom/client';

ReactDOM.createRoot(document.getElementById('root')).render(
  <div>
      <p>記事</p>
      <a href="/index.html">ホームへ</a>
      <br />
      <a href="/article_list/index.html">記事一覧へ</a>
  </div>
);
起動したローカルホストで各ページへ遷移できることが確認できればOKです。
また、urlがディレクトリ構成に合わせて変化していると思います。
- ブログホーム

- 記事一覧

- 記事

ビルド設定&ビルド
これまでの手順でローカル環境でMPAを構築することができました。
後はビルドしてAmazon S3に配置するだけです。
MPAをビルドするために、testディレクトリ内にあるvite.config.jsを編集します。
- vite.config.js
import { defineConfig } from 'vite'
import react from '@vitejs/plugin-react'
import { resolve } from 'path';

const outDir = resolve(__dirname, 'dist');

export default defineConfig({
  plugins: [react()],
  server: {
    watch: {
      usePolling: true,
    },
  },
  root: 'home',
  build: {
    outDir,
    rollupOptions: {
      input: {
        home: resolve(__dirname, 'home/index.html'),
        article_list: resolve(__dirname, 'home/article_list/index.html'),
        article: resolve(__dirname, 'home/article_list/article/index.html'),
      },
    },
  },
});
設定ファイルについて説明します。
server設定はホットリロードを有効にするための設定です。
rootはルートディレクトリの設定で今回はhomeとしています。
build以下がビルド設定の箇所であり、input以下で各階層のindexファイルを指定しています。これによって複数のエントリーポイントが作成されます。また、homeやarticle_listといったキーはビルドで生成されるチャンクの名前となります。
ビルド設定が終わればtestディレクトリにてnpm run buildを実行します。
実行後、outDirで指定したフォルダにビルド結果が格納されていればOKです。
Amazon S3で公開
最後にS3での公開方法です。
まずはAWSのコンソールを開きS3でバケットを作成していきます。
-
AWSリージョンはユーザに近いところを選びます。
バケット名はreact-mpa-bucketとしています。

-
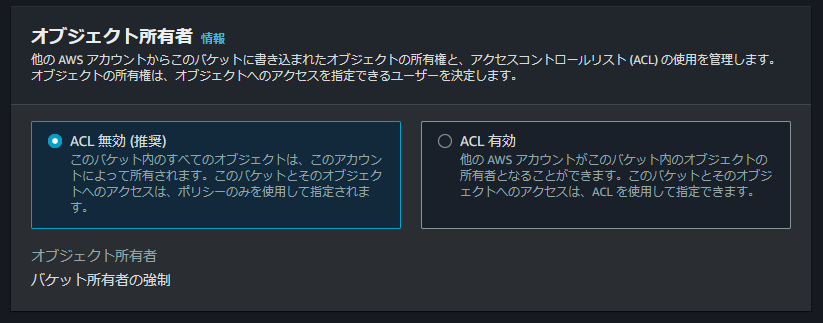
ACLは無効とします。
-
Web上で公開するため
パブリックアクセスを全てブロックのチェックは外します。
また、警告が表示されますがチェックマークを入れておきます。

-
バケットのバージョニングは無効にします。

-
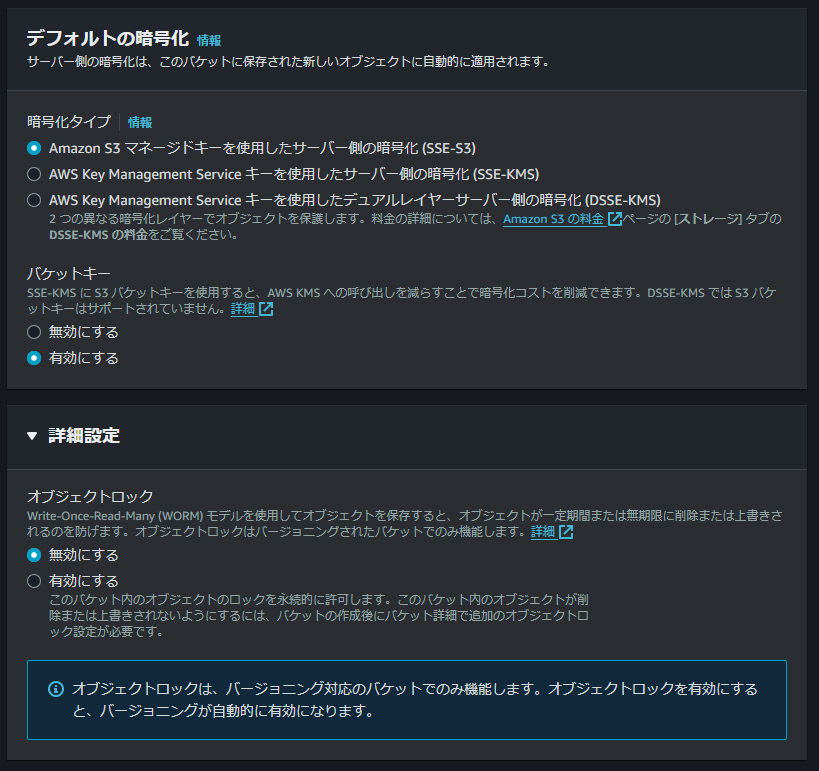
暗号化タイプはSSE-S3とします。
オブジェクトロックは無効にします。
-
作成されたバケットを開くとオブジェクトのアップロード画面が表示されるので、ビルド結果である
distディレクトリの中身を全てアップロードします。

アップロードが成功すると下記の画面が表示されます。

-
次に、Web上で公開するために
プロパティの最下部にある静的ウェブサイトホスティングを編集していきます。

静的ウェブホスティングを有効にし、インデックスドキュメントにindex.htmlを設定します。
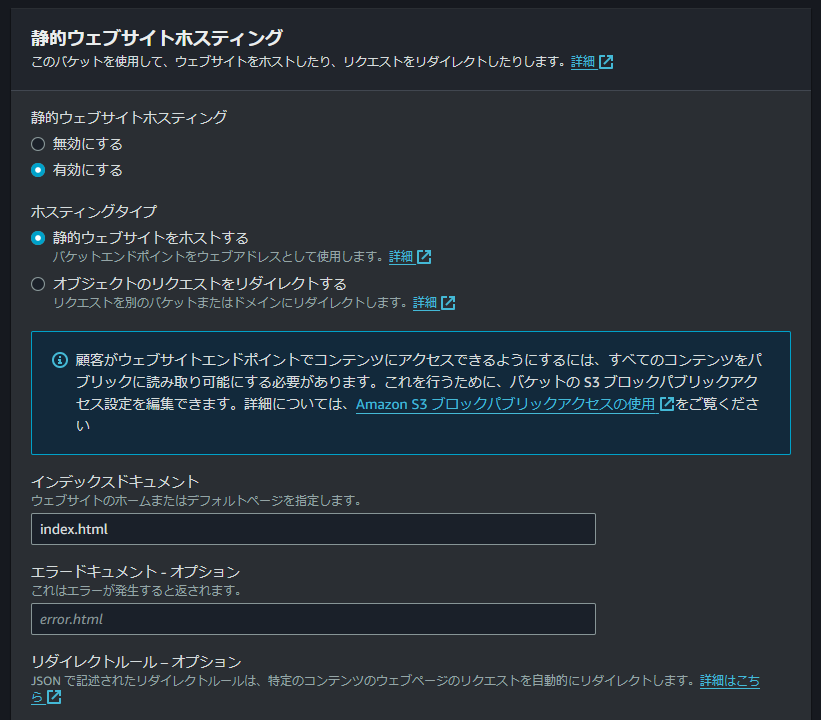
これによってバケットにアクセスするためのURLhttp://reract-mpa-bucket.s3-website-ap-northeast-1.amazonaws.comが取得できます。 -
最後にバケットポリシーを編集していきます。
アクセス許可のバケットポリシーの編集を選び下記のポリシーをペーストします。{ "Version": "2012-10-17", "Statement": [ { "Sid": "PublicReadGetObject", "Effect": "Allow", "Principal": "*", "Action": "s3:GetObject", "Resource": "arn:aws:s3:::reract-mpa-bucket/*" } ] }
以上で、Amazon S3での公開設定は終了です。
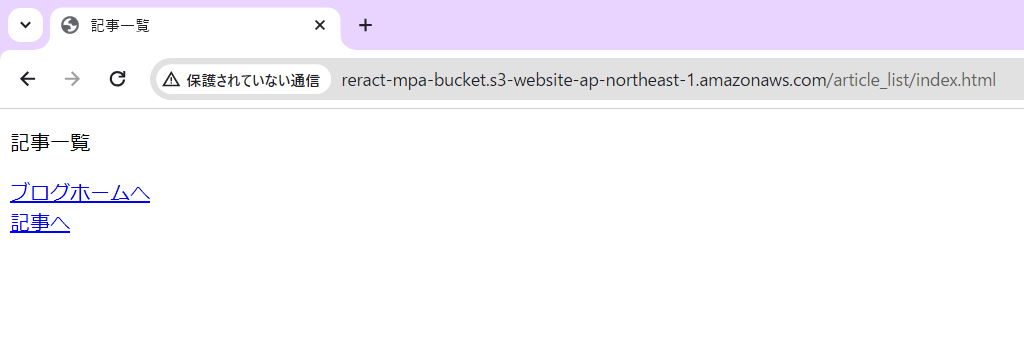
最後にhttp://reract-mpa-bucket.s3-website-ap-northeast-1.amazonaws.comにアクセスし、ローカルホストと同様にページが表示されたら完了です。

リンクをクリックすると、URLが変化していることが分かります。
最後に
本記事では、Reactを用いてMPAを構築しAmazon S3で公開する方法を説明しました。
ただし、現在の公開方法では、https通信や独自ドメインの利用ができないという制限があります。
次回の記事では、https化と独自ドメインの利用方法を解説する予定です。
最近、ブログと自作アプリのLPを立ち上げたので是非見てってください!
ブログ↓
https://mochinochikimchi.com
アプリLP↓
https://mochinochikimchi.com/applications/mealmotion/index.html