In this article, I will go through the process of deploying a web application on a Kubernetes cluster created with k3d, a tool to create clusters on Docker containers. There's a bit of background information, so please feel free proceed to guide itself if you want. Some experience with containers may help, as well as some basic idea about Kubernetes concepts, although I will try to briefly explain some concepts. I myself have not much actual experience with k8s, so please let me know about issues you find.
Background Information
Lately, I've been trying to learn Kubernetes little by little and I've been spending a bit of time researching about alternatives to provision a k8s cluster especially for learning purposes. When we talk about projects related to Kubernetes, the website below is a great resource on the subject.
https://ramitsurana.github.io/awesome-kubernetes/
The focus of this article is what we call installers, and the same website has a section dedicated to these.
According to the official documentation, this type of tool ranges from those targeting the production environment to options described as learning environments. The main tool representing the former category is kubeadm which allow us to bootstrap a Kubernetes cluster on top of existing infrastructure. Other tools such as kops and kubespray expand on that and provide functionality such as machine provisioning and installation of add-ons, and may or may not use kubeadm under the hood.
On the learning environments side of things, minikube is certainly the most popular option. It lets us run a single-node (although multi-node clusters are in experimental stage) Kubernetes cluster locally so that we can try out k8s or use it for local development. Another such tool is kind. It uses Docker containers as nodes and support multiple nodes.
No one will deny the value of creating a Kubernetes cluster "by hand" in terms of learning how things work under the hood. But, from my very limited knowledge, even for companies, in many cases running k8s on-premises will not be a viable solution and a managed solution will be recommended. The downsides of an on-premises solutions can be summarized by the paragraph below extracted from the source following it.
There is a downside, however, since Kubernetes is known for its steep learning curve and operational complexity. As opposed to using Kubernetes on AWS or Azure – where your public cloud provider essentially hides all the complexities from you – running Kubernetes on-prem means you’re on your own for managing these complexities – including etcd, load balancing, availability, auto-scaling, networking, roll-back on faulty deployments, persistent storage, and more.
Source: https://platform9.com/blog/kubernetes-on-premises-why-and-how
This should be even more true for someone who is just starting to learn Kubernetes and/or want to focus on learning how to deploy applications in this new environment. For such people, having a way to spin up a cluster as easily as possible may be the way to go and those simple installers provide just that. As we advance in the learning process, there's certainly intermediary solutions that provide increasingly greater control over our environment while still being easier than doing all by ourselves.
In this article, the focus will be on the installers for learning environments described above.
Experience with minikube and kind
I experimented a little bit with both minikube and kind, but ultimately chose another tool for my learning process.
Both tools seems to be great and my lack of knowledge probably played a major role in the impression about those. minikube is probably the most used tool for learning Kubernetes and its documentation is very detailed and well-written. I just decided to use another tool instead due to the lack of support for clusters with multiple nodes. Actually, it supports it as an experimental feature, but I had issues with running Kubernetes Dashboard in this mode, what reinforced by perception of "experimental" feature.
Do I think multiple nodes is such an important for running k8s locally? No, by any means. I just thought that it is nice to have an environment that is, at least a little, closer to something you would use in production and, at that point, I was only experimenting with these options, so I kept going.
I've also checked kind and, at that time, one of the problems was the poor documentation. I took a look at it now and it seems to be much better, but it still contains some pages suggesting the content is a bit incomplete or out of date. Also (it may be nit picking) the chosen name is not very friendly when it comes to searching online resources. Finally, I've also had some problems when trying to follow Kubernetes examples in a book.
I believe the issues I've faced are not a big deal; some were certainly due to my lack of knowledge and I also didn't try that hard to overcome those. It's been a while since I've tried them, so I may try them again in the future.
k3d
After all that said, let's enter k3d. As said before, it is a tool that allow us to create a Kubernetes cluster on Docker containers. Under the hood, it uses k3s, a k8s distribution created by Rancher, a very well-known vendor of products and services related to Kubernetes and recently acquired by SUSE. k3s is a fully conformant production-ready k8s distribution that is packaged as a single binary. As explained in its website, its name comes from its small size:
Kubernetes is a 10 letter word stylized as k8s. So something half as big as Kubernetes would be a 5 letter word stylized as K3s.
Web Application Deployment on a k3d Cluster
For the remaining of this article, we are going to deploy a web application to a Kubernetes cluster created with k3d. For the web application, we are going to use the demo app below:
https://github.com/gothinkster/realworld
I've got to know this awesome repository recently and it contains an application called Conduit, a Medium.com clone, implemented in as many languages/frameworks as you can imagine. There are many implementations for the backend (Node, Rails, etc) as well as for the frontend (React, Vue, etc) and you can mix and match them as you want since they all adhere to the same API specification.
Disclaimers
- I have almost no experience developing with Node / Express and React + Redux, just chose this combination because why not and because these were the most starred on GitHub
- The idea was to do the minimum to make the whole application work, so not only it lacks a lot of details, it's not necessarily following the best practices in subjects such as security
- I focused on trying as many subjects related to k8s as possible, but without going too deep into them. I myself want to use this article to help me going on with the studies and explore the details in each subject
Preparation
Requirements
All the steps below were executed by SSHing into an Ubuntu 18.04 LTS virtual machine on my local network. I've completed the following installations and did the necessary coding on VS Code with Remote-SSH.
- Install Docker: https://docs.docker.com/engine/install/ubuntu/#install-using-the-repository
- To run Docker without
sudo: https://docs.docker.com/engine/install/linux-postinstall/#manage-docker-as-a-non-root-user - Install kubectl: https://kubernetes.io/docs/tasks/tools/install-kubectl/
k3d Installation
From: https://github.com/rancher/k3d#get
Just execute the command below. Please refer to the link above for other installation options.
$ wget -q -O - https://raw.githubusercontent.com/rancher/k3d/main/install.sh | bash
This may take a couple of seconds. After which you can check the installation:
$ k3d --version
k3d version v3.4.0
k3s version v1.19.4-k3s1 (default)
Now, we are ready to create our k8s cluster.
Creating a New Cluster
The idea is to create a new cluster with 1 server and 2 agents. In k3s terms, the node that runs the control plane components along with the kubelet is called a server, while a node that only runs the kubelet is an agent.
https://thenewstack.io/how-rancher-labs-k3s-makes-it-easy-to-run-kubernetes-at-the-edge/
The following paragraph from the link above describes this difference from a traditional k8s cluster.
Compared to a traditional Kubernetes cluster, there is no clear distinction between the master nodes and worker nodes in K3s. Pods can be scheduled and managed on any node irrespective of the role they play. So, the nomenclature of master node and worker node is not applicable to a k3s cluster.
You can read more about the k3s architecture in the same link.
Before creating the cluster, let's create a folder we're going to need later on:
$ sudo mkdir /mnt/data
Now, we can run the command below to create the cluster:
$ k3d cluster create --agents 2 --port "8080:80@loadbalancer" --volume /mnt/data:/mnt/data
...
INFO[0039] Cluster 'k3s-default' created successfully!
INFO[0039] You can now use it like this:
kubectl cluster-info
The
--portand--volumeoptions will become clear later on.
One thing that immediately caught my attention was how fast the cluster is created. The process is significantly faster compared to minikube or kind.
Now, we can check the newly created cluster:
$ kubectl config get-contexts
CURRENT   NAME              CLUSTER           AUTHINFO                NAMESPACE
*         k3d-k3s-default   k3d-k3s-default   admin@k3d-k3s-default

$ kubectl cluster-info
Kubernetes control plane is running at https://0.0.0.0:33981
CoreDNS is running at https://0.0.0.0:33981/api/v1/namespaces/kube-system/services/kube-dns:dns/proxy
Metrics-server is running at https://0.0.0.0:33981/api/v1/namespaces/kube-system/services/https:metrics-server:/proxy

To further debug and diagnose cluster problems, use 'kubectl cluster-info dump'.
Now, our cluster is ready for use.
Containerization
As mentioned before, we are going to deploy the Conduit app, a Medium.com clone. For this example, I've chosen the Node / Express version for the backend and the React / Redux one for the frontend. The backend connects to a MongoDB database. In this step, these applications will be conteinerized, so they can be deployed into our cluster.
Let's start by creating the Dockerfile for the backend. The repository can be found in the link below:
https://github.com/gothinkster/node-express-realworld-example-app
$ mkdir realworld-example-app
$ cd realworld-example-app
$ git clone git@github.com:gothinkster/node-express-realworld-example-app.git
$ cd node-express-realworld-example-app
$ touch Dockerfile
Its contents will be as simple as it can be:
FROM node:lts-alpine

WORKDIR /usr/src/app

COPY package.json ./

RUN npm install

COPY . .

EXPOSE 3000
CMD [ "npm", "start" ]
Next, let's deal with the frontend. The repository is the following:
https://github.com/gothinkster/react-redux-realworld-example-app
In the same realworld-example-app folder:
$ git clone git@github.com:gothinkster/react-redux-realworld-example-app.git
$ cd react-redux-realworld-example-app
$ touch Dockerfile
This will be changed later but, for now, the Dockerfile will be mostly the same for a quick test:
FROM node:lts-alpine

WORKDIR /usr/src/app

COPY package.json ./

RUN npm install

COPY . .

EXPOSE 4100
CMD [ "npm", "start" ]
As explained in the README, the application points to a hosted API server by default. This can be changed in the src/agent.js file by changing the following line:
const API_ROOT = 'https://conduit.productionready.io/api';
If you are doing this on your local machine, most likely this will be changed to:
const API_ROOT = 'http://localhost:3000/api';
In my case, I was running this on a separate machine, so I set the corresponding IP address.
We can take a look at the application by testing it with docker-compose. Again, the docker-compose.yml is as minimal as possible and I didn't even bother setting volumes in it. I've just added the healthcheck because the backend initialization was failing as the MongoDB container was not ready to receive connections, so I was curious about how to solve it. Also, I'm running the backend in production mode so that MONGODB_URI doesn't default to localhost and I don't have to change the original application source. Finally, because of this, I had to provide a SECRET environment variable as well.
version: "3.9"
services:
  realworld-mongo:
    image: mongo
    ports:
      - "27017:27017"
    healthcheck:
      test: echo 'db.runCommand("ping").ok' | mongo localhost:27017/test --quiet
      interval: 2s
      timeout: 3s
      retries: 3
      start_period: 3s
  realworld-backend:
    build:
      context: ./node-express-realworld-example-app
    ports:
      - "3000:3000"
    environment:
      - NODE_ENV=production
      - SECRET=secret
      - MONGODB_URI=realworld-mongo
    links:
      - realworld-mongo
    depends_on:
      realworld-mongo:
        condition: service_healthy
  realworld-frontend:
    build:
      context: ./react-redux-realworld-example-app
    ports:
      - "4100:4100"
    links:
      - realworld-backend
    depends_on:
      - realworld-backend
Then we can start the application by doing:
$ docker-compose up
And check the application at http://ip-address:4100:

Building and Pushing the Images
Now, let's proceed to building the Docker images corresponding to the application components and pushing them to Docker Hub, so they become available to our deployment process.
First, the backend:
$ docker build -t conduit-express-backend .
$ docker tag conduit-express-backend <you_docker_hub_username>/conduit-express-backend
$ docker push <your_docker_hub_username>/conduit-express-backend
This example is using Docker Hub, but you can use the registry of preference, even spin up your own local registry as described in the following link:
https://k3d.io/usage/guides/registries/#using-the-k3d-registry
For the frontend, we are going to make some changes before doing the same. First, change the following line mentioned earlier in the src/agent.js from:
const API_ROOT = 'http://localhost:3000/api';
to:
const API_ROOT = '/api';
This will help us routing the requests to the API correctly later on.
Next, let's create a new separate Dockerfile for the frontend. In this case, the idea is to just serve the previously built files, so we are going to use a multi-stage build for that purpose. Create a file called Dockerfile.multistage:
FROM node:lts-alpine as frontend-build
WORKDIR /app
COPY package.json ./
RUN npm install
COPY . .
RUN npm run build

FROM nginx:stable-alpine
COPY --from=frontend-build /app/build /usr/share/nginx/html
EXPOSE 80
CMD ["nginx", "-g", "daemon off;"]
We can test the new image by changing docker-compose.yml as below:
...
  realworld-frontend:
    build:
      context: ./react-redux-realworld-example-app
      dockerfile: Dockerfile.multistage
    ports:
      - "4100:80"
    links:
      - realworld-backend
    depends_on:
      - realworld-backend
If everything looks fine, we can build and push the image:
$ docker build -t conduit-react-frontend -f Dockerfile.multistage .
$ docker tag conduit-react-frontend <you_docker_hub_username>/conduit-react-frontend
$ docker push <your_docker_hub_username>/conduit-react-frontend
The Deployment Itself
Now, after a lot of preparation, we have the necessary images in place, and we can finally proceed to the deployment itself, where we actually start communicating to our k8s cluster.
Goal
In this example, our goal is to create a structure like below composed of a single replica for the database, 3 replicas for the backend and 2 replicas for the frontend. In the case of the database, it is to keep things simple. For the other pods, it's arbitrary since we obviously don't have demand for that. Each of these pods contain only a single container.
What we are trying to achieve looks like this:

This is the state of the cluster in a specific moment. Since generally we don't have control over where the pods will be allocated, this may look different once a pod crashes, for example.
Database
First, we are going to deploy MongoDB to our cluster.
A pod is ephemeral, so its data is lost if the pod is destroyed. In this example, we are going to use a persistent volume (pv) to hold the application data so it persists beyond the lifetime of the pod.
Typically, a pv is backed by a network storage system such as EBS or NFS in the case of cloud provider. In our case, this will be backed by a folder in the host machine. You may recall the --volume /mnt/data:/mnt/data we used when creating the cluster. This will make a volume mapped to a folder in the host available to all the nodes in the cluster.
Let's create the definition for the persistent volume pv.yaml:
apiVersion: v1
kind: PersistentVolume
metadata:
  name: conduit-pv
  labels:
    type: local
spec:
  storageClassName: manual
  capacity:
    storage: 10Gi
  accessModes:
    - ReadWriteOnce
  hostPath:
    path: "/mnt/data"
Here, the ReadWriteOnce access mode means that it can only be mounted as read-write by a single node, what is fine in this use case. Create the pv with the command:
$ kubectl apply -f pv.yaml
persistentvolume/conduit-pv created

# check
$ kubectl get pv
NAME         CAPACITY   ACCESS MODES   RECLAIM POLICY   STATUS      CLAIM   STORAGECLASS   REASON   AGE
conduit-pv   10Gi       RWO            Retain           Available           manual                  3s
Great! We can now create a persistent volume claim (pvc). pvcs are used by pods to request physical storage. Create the file db-pv-claim.yaml:
apiVersion: v1
kind: PersistentVolumeClaim
metadata:
  name: conduit-db-pv-claim
spec:
  storageClassName: manual
  accessModes:
    - ReadWriteOnce
  resources:
    requests:
      storage: 3Gi
This will request a volume of at least three gibibytes that can provide read-write access for at least one Node. Again, we create it by applying the configuration:
$ kubectl apply -f db-pv-claim.yaml
persistentvolumeclaim/conduit-db-pv-claim created

# check
$ kubectl get pvc
NAME                  STATUS   VOLUME       CAPACITY   ACCESS MODES   STORAGECLASS   AGE
conduit-db-pv-claim   Bound    conduit-pv   10Gi       RWO            manual         3s

# now that we have a claim, we can see the pv is bound to it. A bound pv belongs to the user who claimed it as long as they need it
$ kubectl get pv
NAME         CAPACITY   ACCESS MODES   RECLAIM POLICY   STATUS   CLAIM                         STORAGECLASS   REASON   AGE
conduit-pv   10Gi       RWO            Retain           Bound    default/conduit-db-pv-claim   manual                  54s
Next, let's create a deployment for the database. A deployment defines the desired state for a component in our application. In this case, we are declaring the desired state of our database and Kubernetes takes care of sticking to this definition. Let's create a file called db-deployment.yaml:
apiVersion: apps/v1
kind: Deployment
metadata:
  name: conduit-db-deployment
spec:
  selector:
    matchLabels:
      app: conduit
      tier: db
  replicas: 1
  strategy:
    rollingUpdate:
      maxSurge: 1
      maxUnavailable: 1
    type: RollingUpdate
  # refers to the pod
  template:
    metadata:
      labels:
        app: conduit
        tier: db
    spec:
      containers:
      - name: conduit-db
        image: mongo:latest
        ports:
        - containerPort: 27017
        volumeMounts:
        - mountPath: /data/db
          name: conduit-db-volume
      volumes:
      - name: conduit-db-volume
        persistentVolumeClaim:
          claimName: conduit-db-pv-claim
Let's take a closer look at this file since we are going to create other deployments and they follow the same principles.
First, note the spec.template definition. In spec.tempolate.spec.containers we define the containers that will be managed by this deployment. In this case, we are specifying a MongoDB container using the persistent volume defined before. The following portion is particularly important because the deployment use this metadata to "select" the pods it needs to mantain.
...
  template:
	metadata:
      labels:
        app: conduit
        tier: db
...
In this case, we define replicas: 1, so the deployment needs to make sure that we always have a single replica of a pod which metadata matches app: conduit and tier: db as defined by spec.selector.matchLabels. If this single pod dies, k8s will automatically restart it. Finally, spec.strategy defines that rolling updates will be applied, so that Kubernetes guarantees there's always a pod available to handle requests.
With all that said, we can apply this definition as well:
$ kubectl apply -f db-deployment.yaml
deployment.apps/conduit-db-deployment created

# check - in this case, the pod is already up and our current state matches the desired state as shown by the READY column
$ kubectl get deployments
NAME                    READY   UP-TO-DATE   AVAILABLE   AGE
conduit-db-deployment   1/1     1            1           9s
It may take a while for the pod to start when first create especially because the corresponding Docker image needs to be downloaded. We can check the state of the pod by running the command below:
$ kubectl get pods -o wide
NAME                                     READY   STATUS    RESTARTS   AGE     IP          NODE                       NOMINATED NODE   READINESS GATES
conduit-db-deployment-5b67ff5dd8-pqrzd   1/1     Running   0          4m54s   10.42.2.6   k3d-k3s-default-server-0   <none>           <none>
The -o wide option shows additional information such as the node in which the pod is running on.
Now, we have our database running, but it's not accessible yet, so we need a service to change that. The real motivation for services will become clear when we deal with the backend so, for now, let's say we need a service to make the database available to the backend. Create the following file called db-service.yaml:
apiVersion: v1
kind: Service
metadata:
  name: conduit-db-service
spec:
  selector:
    app: conduit
    tier: db
  ports:
    - protocol: TCP
      port: 27017
      targetPort: 27017
Please note we are defining a spec.selector. Here, we are making a pod defined by app: conduit and tier: db accessible.
There are a couple of service types and, because we are not specifying any, the default is one called ClusterIP. This makes the database pod accessible only from within the cluster and the connection will target the port 27017 in the pod. Now, we can create it:
$ kubectl apply -f db-service.yaml
service/conduit-db-service created

# check
$ kubectl get services
NAME                 TYPE        CLUSTER-IP     EXTERNAL-IP   PORT(S)     AGE
kubernetes           ClusterIP   10.43.0.1      <none>        443/TCP     70m
conduit-db-service   ClusterIP   10.43.218.13   <none>        27017/TCP   7s
With our database in place, let's now deploy the backend.
Backend
For the backend, you may recall we needed to provide some environment variables to the container to make it work correctly when using docker-compose. Now, with Kubernetes, we are going to provide the same variables when creating the deployment for the backend. We can do so in a couple of different ways, such as:
- defining a variable value directly in the deployment definition
- get a variable's value from a separate configuration object called ConfigMap
- get a variable's value from a separate configuration object called Secret
ConfigMaps and Secrets
Let's first create the following backend-config.yaml file:
apiVersion: v1
kind: ConfigMap
metadata:
  name: backend-config
data:
  mongodb_uri: conduit-db-service
This creates a ConfigMap that is a mechanism to store non-confidential data in key-value pairs. As is typical, this decouple configuration from the applications so we can make them portable. In this example, the value of the environment variable corresponding to the MongoDB URI, used by the backend to connect to the database, will be retrieved from the ConfigMap. Please note, we provide the name of the service created before. That's because Kubernetes handles the name resolution so the requests will reach the database pod without problems.
As always:
$ kubectl apply -f backend-config.yaml
configmap/backend-config created

# check
$ kubectl get configmap
NAME             DATA   AGE
backend-config   1      34s

$ kubectl describe configmap backend-config
Name:         backend-config
Namespace:    default
Labels:       <none>
Annotations:  <none>

Data
====
mongodb_uri:
----
conduit-db-service
Events:  <none>
Next, let's create a Secret. This is an object used to store sensitive information, such as passwords and API keys.
In this case, we will use it to store the random string used by the backend to sign cookies. You may recall that, when we were testing the docker images, it was definied directly in docker-compose.yml, what should not be done. This time, we will store it in a Secret:
$ mkdir secrets
$ echo -n 'random_secret_for_the_backend' > secrets/backend_secret.txt
$ kubectl create secret generic backend-secrets --from-file=backend_secret=secrets/backend_secret.txt
From the Kubernetes documentation:
The
-nflag in the above two commands ensures that the generated files will not contain an extra newline character at the end of the text. This is important because whenkubectlreads a file and encode the content into base64 string, the extra newline character gets encoded too.
# check the new secret
$ kubectl get secrets
NAME                  TYPE                                  DATA   AGE
default-token-9xhzm   kubernetes.io/service-account-token   3      88m
backend-secrets       Opaque                                1      4s

$ kubectl describe secrets/backend-secrets
Name:         backend-secrets
Namespace:    default
Labels:       <none>
Annotations:  <none>

Type:  Opaque

Data
====
backend_secret:  29 bytes

# the commands above avoid showing the contents of a secret. To view its contents:
$ kubectl get secret backend-secrets -o jsonpath='{.data}'
{"backend_secret":"cmFuZG9tX3NlY3JldF9mb3JfdGhlX2JhY2tlbmQ="}

# this shows the base64 encoded value of the entry, so we can decode it:
$ echo "cmFuZG9tX3NlY3JldF9mb3JfdGhlX2JhY2tlbmQ=" | base64 --decode
random_secret_for_the_backend
The Deployment
Now, let's proceed to the deployment:
apiVersion: apps/v1
kind: Deployment
metadata:
  name: conduit-backend-deployment
spec:
  selector:
    matchLabels:
      app: conduit
      tier: backend
  replicas: 3
  # refers to the pod
  template:
    metadata:
      labels:
        app: conduit
        tier: backend
    spec:
      containers:
        - name: conduit-backend
          image: <your_docker_hub_username>/conduit-express-backend:latest
          env:
            - name: NODE_ENV
              value: "production"
            - name: MONGODB_URI
              valueFrom:
                configMapKeyRef:
                  name: backend-config
                  key: mongodb_uri
            - name: SECRET
              valueFrom:
                secretKeyRef:
                  name: backend-secrets
                  key: backend_secret
          resources:
            requests:
              cpu: "500m"
              memory: "512Mi"
            limits:
              cpu: "1000m"
              memory: "1024Mi"
          ports:
            - containerPort: 3000
We can see we have 3 replicas this time, so we're going to have 3 backend pods in our cluster. Another difference is that, this time, we define the CPU and memory resources required for our workload.
Regarding the environment variables, we define the NODE_ENV value directly, while we get the value from the ConfigMap for MONGODB_URI and from the Secret for SECRET. Apply this too:
$ kubectl apply -f backend-deployment.yaml
deployment.apps/conduit-backend-deployment created

# check - initially not ready
$ kubectl get deployments
NAME                         READY   UP-TO-DATE   AVAILABLE   AGE
conduit-db-deployment        1/1     1            1           48m
conduit-backend-deployment   0/3     3            0           4s

# we can check the variables are available by accessing a backend container
$ kubectl exec -it conduit-backend-deployment-689b476895-8dpfh /bin/ash
/usr/src/app # env
Finally, let's make the backend accessible through a service but, before that, let's check the backend pods:
$ kubectl get pods -o wide
NAME                                         READY   STATUS    RESTARTS   AGE   IP          NODE                       NOMINATED NODE   READINESS GATES
conduit-db-deployment-5b67ff5dd8-pqrzd       1/1     Running   0          49m   10.42.2.6   k3d-k3s-default-server-0   <none>           <none>
conduit-backend-deployment-96984dcc7-h5xx6   1/1     Running   0          57s   10.42.1.5   k3d-k3s-default-agent-1    <none>           <none>
conduit-backend-deployment-96984dcc7-kx4hk   1/1     Running   0          57s   10.42.2.7   k3d-k3s-default-server-0   <none>           <none>
conduit-backend-deployment-96984dcc7-h4n5g   1/1     Running   0          57s   10.42.0.4   k3d-k3s-default-agent-0    <none>           <none>
Please note that, this time, each pod was created in a different node, but this is something handled by Kubernetes. At another moment, it could have created two of the pods in the same node. Also, please remember pods are ephemeral. They can be destroyed or created at any time due to, for example, a crash or changes to the number of replicas. If we needed to connect to the backend pods directly, how could we find out and keep track of the IP addresses to connect to? Solving this is the big motivation for the existence of services.
Thanks to this abstraction, we don't need to worry about any of this. In this case, the service "knows" where to find all the pods that matches its selector and any request that reaches the service will reach one of those pods. Even if a pod dies or even a node crashes, Kubernetes will make sure to keep the desired number of pods and the service will allow us to reach the required pods.
So, back to our service (backend-service.yaml):
apiVersion: v1
kind: Service
metadata:
  name: conduit-backend-service
spec:
  selector:
    app: conduit
    tier: backend
  ports:
    - protocol: TCP
      port: 3000
      targetPort: 3000
Create it:
$ kubectl apply -f backend-service.yaml
service/conduit-backend-service created

# check
$ kubectl get services
NAME                      TYPE        CLUSTER-IP     EXTERNAL-IP   PORT(S)     AGE
kubernetes                ClusterIP   10.43.0.1      <none>        443/TCP     128m
conduit-db-service        ClusterIP   10.43.218.13   <none>        27017/TCP   57m
conduit-backend-service   ClusterIP   10.43.21.75    <none>        3000/TCP    9s
Frontend
Now, we are going to repeat the process for the frontend. There's nothing new here, so I will save on explanation.
frontend-deployment.yaml:
apiVersion: apps/v1
kind: Deployment
metadata:
  name: conduit-frontend-deployment
spec:
  selector:
    matchLabels:
      app: conduit
      tier: frontend
  replicas: 2
  # refers to the pod
  template:
    metadata:
      labels:
        app: conduit
        tier: frontend
    spec:
      containers:
        - name: conduit-frontend
          image: <your_docker_hub_username>/conduit-react-frontend:latest
          resources:
            requests:
              cpu: "500m"
              memory: "512Mi"
            limits:
              cpu: "1000m"
              memory: "1024Mi"
          ports:
            - containerPort: 80
frontend-service.yaml
apiVersion: v1
kind: Service
metadata:
  name: conduit-frontend-service
spec:
  selector:
    app: conduit
    tier: frontend
  ports:
    - protocol: TCP
      port: 80
      targetPort: 80
Apply and check:
$ kubectl apply -f frontend-deployment.yaml
deployment.apps/conduit-frontend-deployment created

$ kubectl get deployments
NAME                          READY   UP-TO-DATE   AVAILABLE   AGE
conduit-db-deployment         1/1     1            1           82m
conduit-backend-deployment    3/3     3            3           34m
conduit-frontend-deployment   0/2     2            0           5s

$ kubectl apply -f frontend-service.yaml
service/conduit-frontend-service created

$ kubectl get services
NAME                       TYPE        CLUSTER-IP     EXTERNAL-IP   PORT(S)     AGE
kubernetes                 ClusterIP   10.43.0.1      <none>        443/TCP     132m
conduit-db-service         ClusterIP   10.43.218.13   <none>        27017/TCP   61m
conduit-backend-service    ClusterIP   10.43.21.75    <none>        3000/TCP    4m38s
conduit-frontend-service   ClusterIP   10.43.81.135   <none>        80/TCP      3s
Ingress
The final piece in our deployment is the ingress. Until now, we have a couple of services accessible only from inside the cluster. So, how can we access the application from outside and make it sure the requests will reach teh correct destination. That is the problem solved by the ingress.
You may remember the option below we used when creating the k3d cluster:
--port "8080:80@loadbalancer"
This option exposes the internal port 80 to the port 8080 on the host so that any request to the port 8080 on the host maps to the port 80 in the cluster. And listening to the internal port 80 there's something called the ingress controller.
Requests from the outside will reach the ingress controller, but it "doesn't know" what to do with them unless we provide an ingress resource that specifies how the requests needed to the handled. So, we will now define the ingress (ingress.yaml):
apiVersion: networking.k8s.io/v1
kind: Ingress
metadata:
  name: conduit-ingress
  annotations:
    ingress.kubernetes.io/ssl-redirect: "false"
spec:
  rules:
  - http:
      paths:
      - path: /
        pathType: Prefix
        backend:
          service:
            name: conduit-frontend-service
            port:
              number: 80
      - path: /api/
        pathType: Prefix
        backend:
          service:
            name: conduit-backend-service
            port:
              number: 3000
Once we apply this definition, the ingress controller will start acting as a HTTP reverse proxy routing requests to /api to the backend service and other requests to the frontend service.
$ kubectl apply -f ingress.yaml
ingress.networking.k8s.io/conduit-ingress created

$ kubectl get ingress
NAME              CLASS    HOSTS   ADDRESS      PORTS   AGE
conduit-ingress   <none>   *       172.22.0.3   80      2s
Please note k3s uses Traefik as the default ingress controllers and there are other options to choose from, such as NGINX Ingress Controller.
More information at https://k3d.io/usage/guides/exposing_services/
With this, we can finally access our application at http://<ip_address>:8080

You can play with the application and then check the logs:
$ kubectl get pods

# get the name of a pod and:
$ kubectl logs conduit-backend-deployment-96984dcc7-vg79d
Finally, I've installed a program called stern that displays the logs for all the pods at once by running a command like this:
$ stern conduit

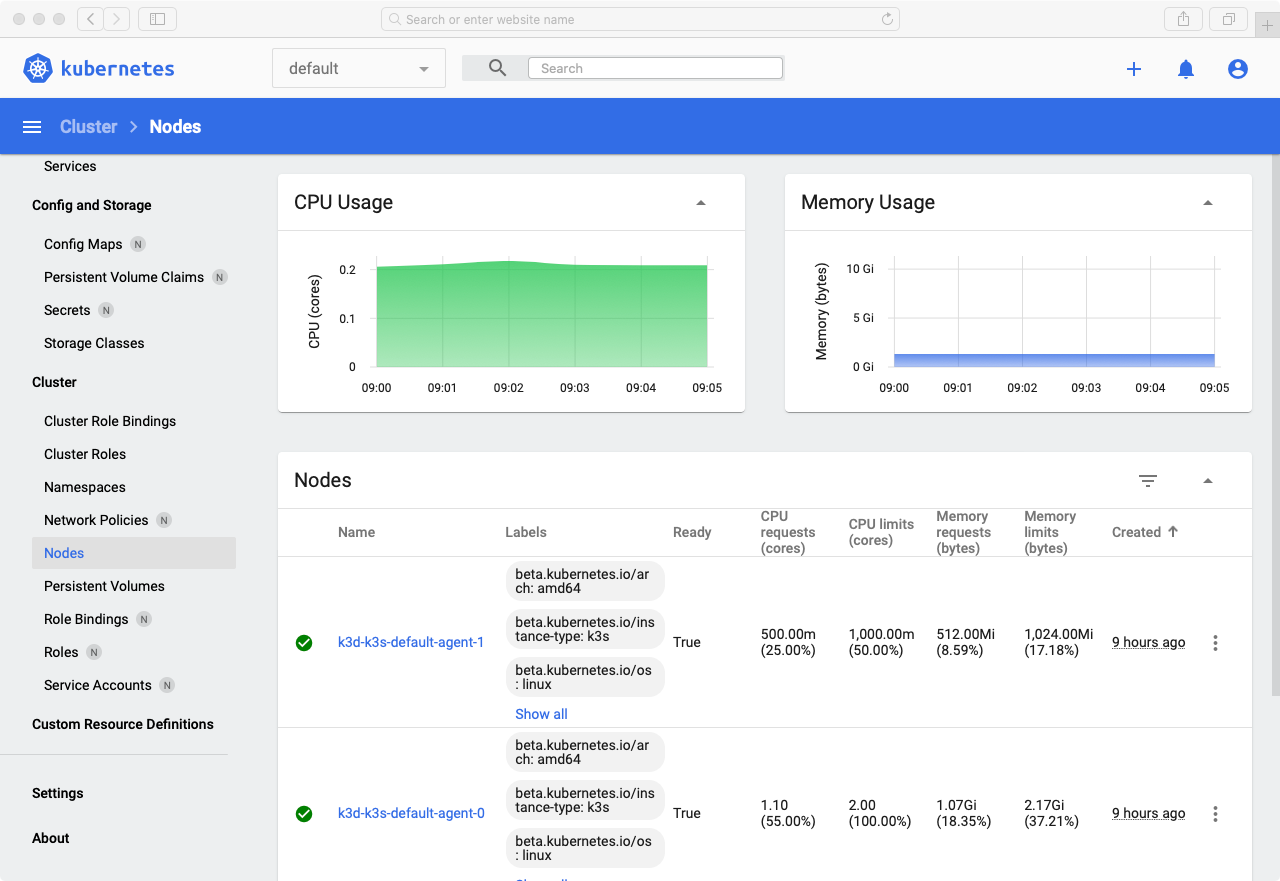
Kubernetes Dashboard
As an extra step, let's deploy the Kubernetes Dashboard to the new cluster. It is a web-based UI to manage our cluster and the applications in it. We can execute the deployment by running the command below:
$ kubectl apply -f https://raw.githubusercontent.com/kubernetes/dashboard/v2.1.0/aio/deploy/recommended.yaml
Please refer to the official repository for the updated version:
https://github.com/kubernetes/dashboard
We can access the Dashboard by creating a secure channel to the Kubernetes cluster:
$ kubectl proxy
Starting to serve on 127.0.0.1:8001
Please note the UI can only be accessed from the machine where the command is executed from the link below:
But, in my case, the command was executed in a VM in another machine on my local network. So, I needed to use SSH tunneling to access the Dashboard by running the following command on my local machine:
$ ssh -L 8001:localhost:8001 <remote_user>@<remote_host>
After that, I was able to access the Dashboard through the link above.
We need a Bearer Token to login and instructions to get this can be found in the link below:
https://github.com/kubernetes/dashboard/blob/master/docs/user/access-control/creating-sample-user.md
After which you will be able to access the dashboard:
Conclusion
In this article, we went through the process of deploying a web application to a Kubernetes cluster created with k3d. I believe it will be useful for me to continue learning about Kubernetes and hopefully it can be useful for someone as well. From here, we can start experimenting with scaling, with CI/CD pipelines or with new clusters, using VMs instead of containers or using a cloud provider.
k3d has been great for me. The underlying k3s is a production grade k8s distribution and it shows as I didn't face any issue with it until now.
References
- https://kubernetes.io/docs/home/
- https://medium.com/better-programming/a-practical-step-by-step-guide-to-understanding-kubernetes-d8be7f82e533
- https://mherman.org/blog/dockerizing-a-react-app/
- https://kubernetes.io/docs/tasks/configure-pod-container/configure-persistent-volume-storage/
- https://blog.ruanbekker.com/blog/2020/02/21/persistent-volumes-with-k3d-kubernetes/
- https://thenewstack.io/deploy-a-mean-web-app-with-google-kubernetes-engine-portworx/
- https://stackoverflow.com/questions/47173463/how-to-access-local-kubernetes-minikube-dashboard-remotely
- https://medium.com/@shubham.singh98/minikube-dashboard-in-aws-ec2-881143a2209e
- https://stackoverflow.com/questions/54384042/why-does-the-docker-compose-healthcheck-of-my-mongo-container-always-fail