目的
TerraformでECSサーバー+データベースのホスティングサービスであるRDSの環境(primary instaceとread only instanceそれぞれ一台)を作ってみます。
そして以下ことを検証してみます。
- primay instanceからreadとwrite両方できる
- read only instanceはreadしかできない。
- 自動分離のendpointからreadとwriteのリクエストを自動的に分離できる(つまりwriteのリクエストは必ずprimary instanceにforwardingさせて、readのリクエストは設定していた重みに応じて自動的に分散できること)
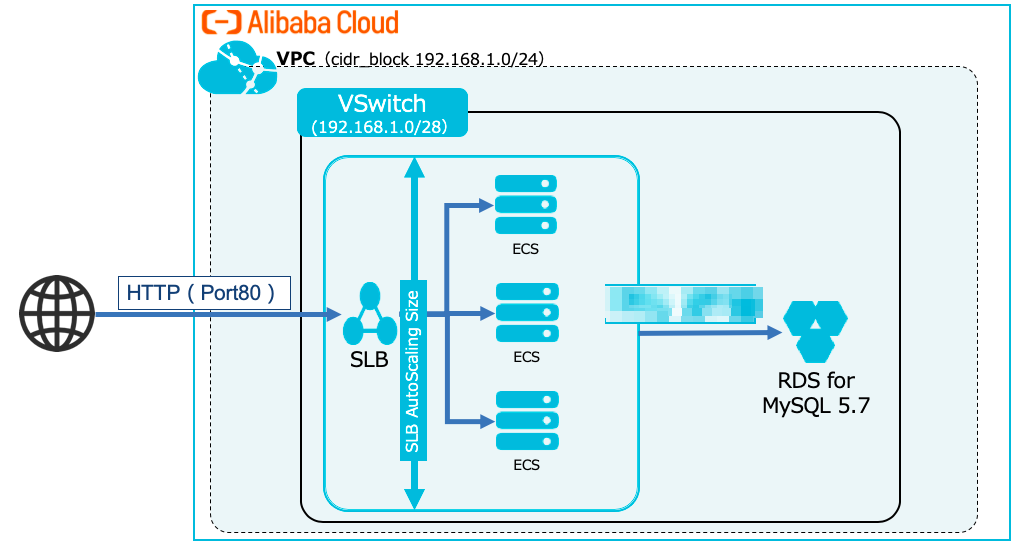
構成図は以下の通りです。
前提:
- アリババクラウドのアカウントはすでに持っている
- ローカルPCにすでにterraformインストール済みである
構築手順
- ソースコードをローカルにcloneする
$ git clone git@github.com:outan/alibabacloud_terraform.git

$ ls -al
-rw-r--r--   1 outan  staff     6  7 29 01:37 .terraform-version
-rw-r--r--   1 outan  staff  1982  7 29 01:37 .terraform.lock.hcl
-rw-r--r--   1 outan  staff  4543  7 29 02:56 main.tf
-rw-r--r--   1 outan  staff   525  7 29 01:37 output.tf
-rw-r--r--   1 outan  staff   218  7 29 03:09 terraform.tfvars
-rw-r--r--   1 outan  staff   218  7 29 03:02 terraform.tfvars.sample
-rw-r--r--   1 outan  staff   219  7 29 01:37 variables.tf
ファイルの構成
- main.tf:
- VPC
- VSwitch:AWSでいうとsubnetになる
- ECS: virtual machineであり、AWSでいうとEC2になる
-
alicloud_slb_load_balancer: ロードバランサー - RDS(MySQL): MySQLのhostingサービス
- primary instance 1台
- read-only instance 1台
-
alicloud_db_database:- databaseそのものの作成
- AWSではマネジメントコンソール上ではインスタンスしか作れなくて、databaseが作られないが、アリババクラウドではdatabaseまでもコンソールから作られる
-
alicloud_db_account:- databaseにアクセスでいるアカウント
- これもAWSのマネジメントコンソール上ではできないこと
-
alicloud_db_connection:- インターネットからアクセスできるendpointであり、VPCからアクセスするendpointと別物
- AWSではVPCからもインターネットからも同じエンドポイントです。
-
alicloud_db_read_write_splitting_connection:-
RDS Proxyというものを作成し、readとwriteのリクエストを自動的に分離させ、つまりwriteのリクエストは必ずprimary instanceにforwardingさせて、readのリクエストは設定していた重みに応じて自動的に分散させるという仕組み - AWSでは
RDS Proxyという機能もありますが、接続プーリングや認証や可用向上のための仕組みであり、readとwriteのリクエストの自動分離ができないようです。
-
- output.tf: 生成されるECS, RDSのエンドポイント情報をターミナル上で表示させるファイル
- terraform.tfvars.sample:認証情報などを保持するサンプルファイル
-
terraform.tfvars.sampleの中身:
access_key = "xxx"
secret_key = "xxx"
region = "ap-northeast-1"
zone = "ap-northeast-1a"
project_name = "RDS-Setting-Sample-for-Terraform"
database_name = "xxx"
ecs_password = "xxx"
db_user = "xxx"
db_password = "xxx"
- terraform.tfvars.sampleをコピーし、必要な認証情報を入力する
-
terraform.tfvarsはすでに.gitignoreファイルに入れているため、gitのバージョン管理から外されている。
-
cp terraform.tfvars.sample terraform.tfvars
- working directoryを準備する(Child ModuleやPluginなどのinstallation)
$ cd rds_ecs

$ terraform init

Initializing the backend...

Initializing provider plugins...
- Finding latest version of hashicorp/alicloud...
- Finding latest version of hashicorp/template...
- Installing hashicorp/alicloud v1.178.0...
- Installed hashicorp/alicloud v1.178.0 (signed by HashiCorp)
- Installing hashicorp/template v2.2.0...
- 同じフォルダの配下に
.terraformというフォルダが自動的に作られている。
$ tree .terraform
.terraform
└── providers
    └── registry.terraform.io
        └── hashicorp
            ├── alicloud
            │   └── 1.178.0
            │       └── darwin_amd64
            │           └── terraform-provider-alicloud_v1.178.0
            └── template
                └── 2.2.0
                    └── darwin_amd64
                        └── terraform-provider-template_v2.2.0_x4
-
terraform validateで構成ファイルの記述がすべて正常であることを検証
$ terraform validate
Success! The configuration is valid.
- 実行計画を確認する
$ terraform plan

Terraform used the selected providers to generate the following execution plan. Resource actions are indicated with the following symbols:
  + create

Terraform will perform the following actions:

  # alicloud_db_account.default will be created
  + resource "alicloud_db_account" "default" {
      + account_description = (known after apply)
      + account_name        = "xxx"
  ...
- 実行計画に特に問題なければ、alibaba cloudにデプロイする
- 最後にECSのIPやRDS instanceが出力される
$ terraform plan
...
Apply complete! Resources: 14 added, 0 changed, 0 destroyed.

Outputs:

ECS_instance_ip = [
  "**.**.**.**",
]
rds_primary_host = "**"
rds_readonly_host = "**"
rds_primary_host = "**"
rds_read_write_splitting_connection = "**.**.**.**"
ECSからRDSにログインしてみる
ECSインスタンスにsshログイン
- デフォルトのuserは
rootです。 - IPの部分は上記出力された
ECS_instance_ipを置き換えてください。
$ ssh root@**.**.**.**

...
Welcome to Alibaba Cloud Elastic Compute Service !
[root@RDS-Setting-Sample-for-Terraform-ECS-instance ~]#
RDSインスタンスにアクセス
primary インスタンスにアクセスしてみる
- ログイン情報は
terraform.tfvrsファイルをご確認ください。
# mysql -h *** -u ** -p
Enter password:
Welcome to the MariaDB monitor.  Commands end with ; or \g.
Your MySQL connection id is 25667951
Server version: 5.7.35 Source distribution

Copyright (c) 2000, 2018, Oracle, MariaDB Corporation Ab and others.

Type 'help;' or '\h' for help. Type '\c' to clear the current input statement.
- tabelの作成とrecordのinsert
MySQL [(none)]> show databases;
+--------------------+
| Database           |
+--------------------+
| information_schema |
| mysql              |
| rds_setting_sample |
+--------------------+


MySQL [(none)]> use rds_setting_sample;
Database changed

MySQL [rds_setting_sample]> show tables;
Empty set (0.00 sec)

MySQL [rds_setting_sample]> create table user (id int, name varchar(10), address varchar(10));

MySQL [rds_setting_sample]> insert into user values (1, 'Yamada', 'Tokyo');

MySQL [rds_setting_sample]> select * from user;
+------+--------+---------+
| id   | name   | address |
+------+--------+---------+
|    1 | Yamada | Tokyo   |
+------+--------+---------+
read-onlyインスタンスにアクセスしてみる
- 検索できるが、insertができないことが分かる。
MySQL [(none)]> show databases;
+--------------------+
| Database           |
+--------------------+
| information_schema |
| mysql              |
| rds_setting_sample |
+--------------------+

MySQL [(none)]> use rds_setting_sample;
Reading table information for completion of table and column names
You can turn off this feature to get a quicker startup with -A

Database changed

MySQL [rds_setting_sample]> show tables;
+------------------------------+
| Tables_in_rds_setting_sample |
+------------------------------+
| user                         |
+------------------------------+

MySQL [rds_setting_sample]> select * from user;
+------+--------+---------+
| id   | name   | address |
+------+--------+---------+
|    1 | Yamada | Tokyo   |
+------+--------+---------+

MySQL [rds_setting_sample]> insert into user values (2, 'Tanaka', 'Tokyo');
ERROR 1290 (HY000): The MySQL server is running with the --read-only option so it cannot execute this statement
read/write自動分離のendpointにアクセスしてみる
- readとwrite両方できることがわかる。
MySQL [(none)]> show databases;
+--------------------+
| Database           |
+--------------------+
| information_schema |
| mysql              |
| rds_setting_sample |
+--------------------+

MySQL [(none)]> use rds_setting_sample;

MySQL [rds_setting_sample]> show tables;
+------------------------------+
| Tables_in_rds_setting_sample |
+------------------------------+
| user                         |
+------------------------------+

MySQL [rds_setting_sample]> select * from user;
+------+--------+---------+
| id   | name   | address |
+------+--------+---------+
|    1 | Yamada | Tokyo   |
+------+--------+---------+

MySQL [rds_setting_sample]> insert into user values (2, 'Tanaka', 'Tokyo');

MySQL [rds_setting_sample]> select * from user;
+------+--------+---------+
| id   | name   | address |
+------+--------+---------+
|    1 | Yamada | Tokyo   |
|    2 | Tanaka | Tokyo   |
まとめ
- アリババクラウドはTerrformにも対応できて、VPC、virtual machine, databaseなどのリソースはかんたんに作れる。
- RDS primay instanceはreadとwrite両方できる
- RDS read only instanceはreadしかできない。
- RDSの自動分離のendpointからreadとwriteのリクエストを自動的に分離できる(つまりwriteのリクエストは必ずprimary instanceにforwardingさせて、readのリクエストは設定していた重みに応じて自動的に分散できること)