はじめに
昨今ゲームエンジンを使った映像制作が流行り始めたが、ゲームエンジンを使った映像制作をやってみて感じることは、とにかく「VRAMが足りない」であった。いろいろ考えてみた結果「ゲームエンジンに近いレンダリング方法だったら、CPUでラスタライズしてシェーディング、ポストエフェクトはGPUでやればいいんじゃね?」となったわけです。
という事で、intel Embreeを始めることにした。
intel Embreeは、ハイパフォーマンスのレイトレースライブラリです。

https://embree.github.io/index.html
参考モデルプロ生ちゃん
http://pronama.azurewebsites.net/pronama/download/
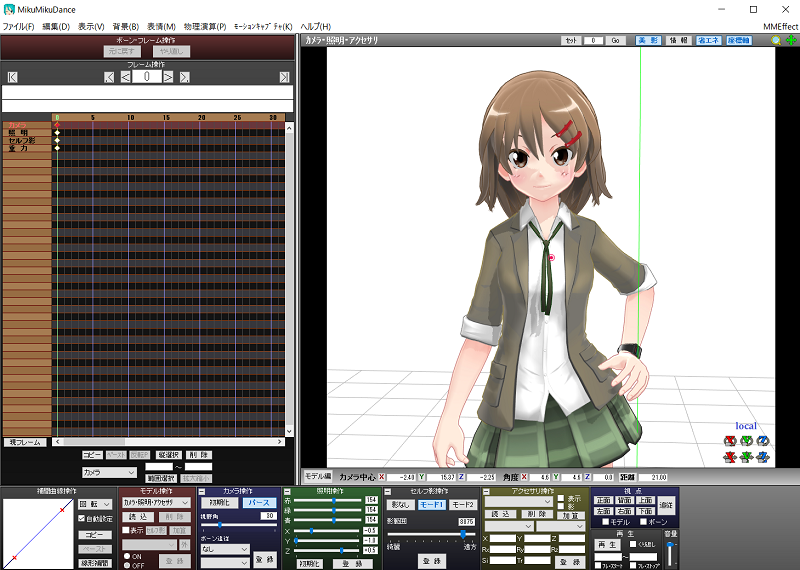
MikuMikuDanceでモデルをポージング

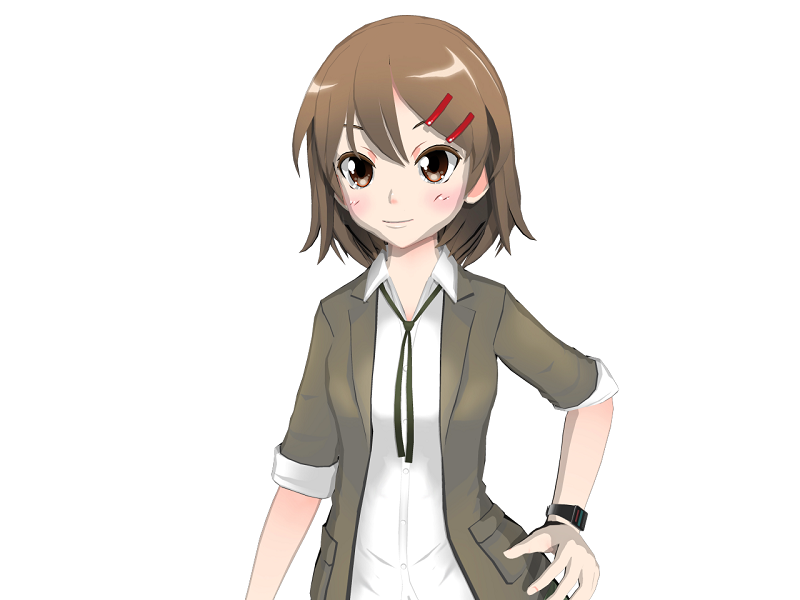
Embreeによるトゥーンレンダリングの結果

とりあえずこの絵が作れるところまでまとめて行こうかと考えています。
(その1ではシルエットの表示まで)
開発環境
intel Embree (Windows 64bitライブラリ version2.7.1)
Visual Studio 2015
DirectXMath (算術ライブラリ)
DirectXTex (テクスチャライブラリ)
libvpvl2 (PMX読み込みライブラリ)
開発環境はWindowsで説明します。MikuMikuDanceのPMXファイルの読み込み方法などについては割愛します。
実装
初期化
ヘッダファイルをインクルードします。
rtcore.h、rtcore_ray.hはEmbreeのレイトレライブラリ、DiretXMath.hはWindows Kitsに含まれている算術ライブラリ、DirectXTex.hはテクスチャライブラリです。DirectXTexは今回は画像の出力に使います。
# include <embree2\rtcore.h>
# include <embree2\rtcore_ray.h>
# include <DirectXMath.h>
# include <DirectXTex.h>
デバイスの初期化はrtcNewDeviceで行います。CPUで計算するライブラリなので初期化はDirectXやOpenGLに比べて非常に楽です。
   //Embreeのデバイスを作成
    RTCDevice hDev = rtcNewDevice(nullptr);
    //シーンを作成
	RTCScene hScene = rtcDeviceNewScene(hDev, RTC_SCENE_DYNAMIC, RTC_INTERSECT1);
rtcDeviceNewSceneでシーンを作成します。第二引数は、シーンが動的か静的かを記述し、第三引数は同時に何本のレイを飛ばすかを定義します。ただ同時にレイを飛ばせる本数の制限はCPUの種類によって違いがあります。
RTC_INTERSECT1 (1本だけ飛ばす、大抵のCPUで対応している)
RTC_INTERSECT4 (4本同時に飛ばす、SSE4に対応しているCPUで可能)
RTC_INTERSECT8 (8本同時に飛ばす、AVXに対応しているCPUで可能)
RTC_INTERSECT16 (16本同時に飛ばす、Xeon Phiで可能)
今回は、1本だけ飛ばすのでRTC_INTERSECT1を使用
ジオメトリメッシュの登録
Embreeのジオメトリはトライアングルメッシュ、サブディビジョンメッシュ、ヘアーなどがあります。今回はトライアングルメッシュについて解説します。
トライアングルメッシュの設定は2つあって、一つはEmbreeで確保したメモリをロックして登録する方法と、もう一つはユーザーが確保したメモリーにアクセスしてジオメトリを登録する方法があります。
Embreeが確保したメモリーにアクセスしてジオメトリメッシュを登録
rtcNewTriangleMeshで三角形の数、頂点数を登録し、rtcMapBufferでEmbreeが確保したメモリーにアクセスして、rtcUnmapBufferで登録する。
そしてrtcCommitで登録したジオメトリからVBHを構築する。
    int geomID = rtcNewTriangleMesh(hScene, flag, numTriangle, numPoint);
    DirectX::XMFLOAT4* VBs = (DirectX::XMFLOAT4*)rtcMapBuffer(hScene, geomID, RTC_VERTEX_BUFFER);
    ...
    頂点バッファを書き込む
    ...
    rtcUnmapBuffer(scene, geomID, RTC_VERTEX_BUFFER);
    DirectX::XMINT3* IBs = (DirectX::XMINT3*)rtcMapBuffer(hScene, geomID, RTC_INDEX_BUFFER);
    ...
    インデックスバッファを書き込む
    ...
    rtcUnmapBuffer(scene, geomID, RTC_INDEX_BUFFER);
	rtcCommit(hScene);
ユーザーが確保したメモリーにアクセスしてジオメトリメッシュの登録
rtcSetBufferでユーザーが定義したメモリーを指定します。第二引数にオフセット、第三引数に構造体のサイズを指定します。第三引数に構造体のサイズを指定するためユーザーが使う頂点の構造体を定義することができる。Embreeのライブラリが参照しているのは最初の位置情報のfloat4つ分だと思う。
    struct vertex_t
    {
	    DirectX::XMFLOAT4 position;  //位置
	    DirectX::XMFLOAT3 normal;    //法線
	    DirectX::XMFLOAT2 uv;        //テクスチャ座標
    };
    //三角形ポリゴンのジオメトリメッシュを作成する。
    int geomID = rtcNewTriangleMesh(hScene, flag, numTriangle, numPoint);

    vertex_t* VBs = new vertex_t[numPoint];
    ...
    頂点バッファを書き込む
    ...
    DirectX::XMINT3* IBs = new DirectX::XMINT3[numTriangle];
    ...
    インデックスバッファを書き込む
    ...
    rtcSetBuffer(hScene, geomID, RTC_VERTEX_BUFFER, VBs, 0, sizeof(vertex_t));
    rtcSetBuffer(hScene, geomID, RTC_INDEX_BUFFER, IBs, 0, sizeof(DirectX::XMINT3));
	rtcCommit(hScene);
レイを飛ばす
800x600の解像度のスクリーンに、画角45度のパースペクティブビューの視線ベクトルを作るコードです。
    int width = 800;
    int height = 600;
    float halfW = float(width) * 0.5f;
    float halfH = float(height) * 0.5f;
    float fov = 45.0f;
    fov = DirectX::XMConvertToRadians(fov * 0.5f);
	float aspect = float(width) / float(height);
	float    SinFov;
	float    CosFov;
	DirectX::XMScalarSinCos(&SinFov, &CosFov, fov);
	float H = SinFov * -1.0f;
    float W = SinFov * aspect * -1.0f;

	DirectX::XMVECTOR eye = DirectX::XMVectorSet(0, 170, 120, 1);
	DirectX::XMVECTOR at = DirectX::XMVectorSet(-30, 160, 0, 1);
	DirectX::XMVECTOR up = DirectX::XMVectorSet(0, 1, 0, 1);
	DirectX::XMMATRIX viewMatrix = DirectX::XMMatrixLookAtLH(eye, at, up);
    DirectX::XMVECTOR q = DirectX::XMQuaternionRotationMatrix(viewMatrix);

        for (int y = 0; y < height; y++)
	{
	        for (int x = 0; x < width; x++)
		{
			float u = (x - halfW) / width * W;
			float v = (y - halfH) / height * H;
			XMVECTOR dir = XMVectorSet(u, v, 1, 1.0f);

			dir = XMVector3Rotate(dir, q);
			dir = XMVector3Normalize(dir);

            DirectX::XMVECTOR color = PixelRender(hScene, eye, dir);
        }
	}
レイの当たりを取る
Embreeのrtcore_ray.hで定義されている、レイの構造体RTCRayはこんな感じです。
struct RTCORE_ALIGN(16)  RTCRay
{
  /* ray data */
public:
  float org[3];      //!< Ray origin
  float align0;

  float dir[3];      //!< Ray direction
  float align1;

  float tnear;       //!< Start of ray segment
  float tfar;        //!< End of ray segment (set to hit distance)

  float time;        //!< Time of this ray for motion blur
  int   mask;        //!< Used to mask out objects during traversal

  /* hit data */
public:
  float Ng[3];       //!< Unnormalized geometry normal
  float align2;

  float u;           //!< Barycentric u coordinate of hit
  float v;           //!< Barycentric v coordinate of hit

  int   geomID;        //!< geometry ID
  int   primID;        //!< primitive ID
  int   instID;        //!< instance ID
};
これをDirectXMathと絡めて改変してみました。
struct ray_t
{
public:
	DirectX::XMVECTOR org; //レイのスタート位置
	DirectX::XMVECTOR dir; //レイの方向
	float tnear;       //レイのスタート
	float tfar;        //レイの終端(ヒットした箇所との距離)
	float time;        //モーションブラー用
	int   mask;        //マスク
public:
	DirectX::XMVECTOR Ng; //ヒット面の方向
	float u; //ヒット面の座標U
	float v; //ヒット面の座標v
	int   geomID; //ヒットジオメトリID(当たっていなければ-1)
	int   primID; //ヒットジオメトリの面ID(当たっていなければ-1)
	int   instID; //ヒットしたインスタンスのID(当たっていなければ-1)
};
レイとメッシュオブジェクトとの交差判定はrtcIntersectで行えます。
オブジェクトと交差判定した場合geomIDにヒットしたオブジェクトのIDが割り当てられます。
ヒットしない場合は-1(RTC_INVALID_GEOMETRY_ID)のままです。
DirectX::XMVECTOR PixelRender(RTCScene hScene,  DirectX::XMVECTOR eye, DirectX::XMVECTOR dir)
{
    ray_t ray;
    ZeroMemory(&ray, sizeof(ray));
	ray.org = pos;
	ray.dir = dir;
	ray.geomID = RTC_INVALID_GEOMETRY_ID;
	ray.instID = RTC_INVALID_GEOMETRY_ID;
	ray.primID = RTC_INVALID_GEOMETRY_ID;
	ray.tnear = 0.01f;
	ray.tfar = 10000.0f;
	ray.mask = 0xFFFFFFFF;
	ray.time = 0.0f;
	rtcIntersect(hScene, *(RTCRay*)&ray);
    //ヒットしたら黒色、当たっていなければ白色を返す。
    return (ray.geomID != -1) ? DirectX::XMVectorSet(0,0,0,1) : DirectX::XMVectorSet(1,1,1,1);
}
結果の出力
    //画像書き出しのWICライブラリがCOMを使っているのでCOMの初期化必要
	CoInitialize(nullptr);
    DirectX::ScratchImage img;
	img.Initialize2D(DXGI_FORMAT_R8G8B8A8_UNORM, width, height, 1, 0);

	size_t rowPitch;
	size_t slicePitch;
	DirectX::ComputePitch(DXGI_FORMAT_R8G8B8A8_UNORM, width, height, rowPitch, slicePitch);
    uint8_t* p = img.GetPixels();

    for (int y = 0; y < height; y++)
    {
        for (int x = 0; x < width; x++)
        {
            ...
            視点と視線ベクトルなどなど
            ...
            DirectX::XMVECTOR colorV = PixelRender(hScene, eye, dir);
            size_t offset = rowPitch * y + x * 4;
            DirectX::XMFLOAT4 color;
            DirectX::XMStoreFloat4(&color, colorV);
            p[offset+0] = color.x;
            p[offset+1] = color.y;
            p[offset+2] = color.z;
            p[offset+3] = color.w;
        }
    }

    DirectX::SaveToWICFile(*img.GetImages(), 0, GUID_ContainerFormatPng, L"result.png");
出力結果
レイが当たった部分は黒く、外れた部分は白く塗られています。

レイが当たって黒シルエットの少女が姿を現したので、次回はシェーディングなどを紹介したいと思います。