きっかけ
最近よく名前を聞くViteです。
個人的に現在はNext.jsでCreate-next-appを使っていますが、一度試してみようと思ったので備忘録メモです。
構築環境
とりあえず大掛かりなものを作る予定ないので、下記の構成ではじめてみます。
- React 18.2.0
- typeScript 4.9.3
- vite 4.1.0
- eslint 8.34.0
- prettier 2.8.4
- tailwindcss 3.2.6
Viteのインストール
いつもnpmを使っているから気分を変えてyarnをインストールしてみる。
npm install yarn
viteのセットアップコマンド
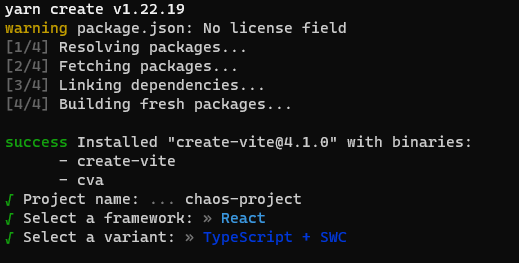
yarn create vite
successしたら、プロジェクト名と利用Frameworkと言語が対話形式で聞かれるので答えてく。
dev viewを立ち上げてみる
プロジェクトファイルに移動して
yarn
yarn dev
localhostのポートはデフォルトで5173のようです。
ここまで2、3分です。とても速い。
package.json
{
  "name": "sample-project",
  "private": true,
  "version": "0.0.0",
  "type": "module",
  "scripts": {
    "dev": "vite",
    "build": "tsc && vite build",
    "preview": "vite preview"
  },
  "dependencies": {
    "react": "^18.2.0",
    "react-dom": "^18.2.0"
  },
  "devDependencies": {
    "@types/react": "^18.0.27",
    "@types/react-dom": "^18.0.10",
    "@vitejs/plugin-react-swc": "^3.0.0",
    "typescript": "^4.9.3",
    "vite": "^4.1.0"
  }
}
ESlintとPrettierの設定
これに関してはeslintの設定コマンドが変わっていました。
yarn add eslint --save-dev

~~npx eslint --init~~

npm init @eslint/config  //上でも行けましたが、今はこっちに変わったそう
yarn add prettier --save-dev

yarn add eslint-config-prettier --save-dev
対話形式で初期設定の内容はほぼ変わっていなかったので下記の記事を参照
create-react-app(typescript)のプロジェクトでESlintの設定 | 田舎でのんびり書くテックブログ
.eslintrc.json
中身はこんな感じです。ほぼデフォルト。必要なものは適宜追加です。
{
  "env": {
    "browser": true,
    "es2021": true
  },
  "extends": [
    "plugin:react/recommended",
    "standard-with-typescript",
    "plugin:react-hooks/recommended",
    "prettier" //追加←最後に追加しないと機能しないので注意
  ],
  "overrides": [],
  "parserOptions": {
    "ecmaVersion": "latest", //デフォルトがlatestになってる
    "sourceType": "module",
    "project": "./tsconfig.json" //追加
  },
  "plugins": [
    "react",
    "react-hooks"//追加
  ],
  "rules": {
    "react/react-in-jsx-scope": "off" //追加
  }
}
react/react-in-jsx-scope
現在React17以降はReactのインポートが不要になっていますが、この設定が有効だとJSXではReactインポートしろと怒られるのでoffにしています
flat config
現在はCLIからデフォルトの利用はできませんが、flat configという概念が持ち込まれたようで、その場合は、設定はすべてeslint.cofig.jsで書くことができるようになる。
ignoreファイルも中に一緒になって、プラグインもインポートで利用するので自分で名前を付けられるようになる。結果メンテコストが下がるようになるそうです。
今回はViteが使いたい趣旨なのと、まだ安定版でないことからあまり深く踏み入らないことにしました。。。詳しい記事をいくつか読みましたがふわっとした理解しか出来なかった😢
ESLintのconfigがどのように変わり得るか(flat configとは何か)
Flat Config導入完了! 新しいESLintの設定フォーマットを使ってみた
どちらも記事内で公式ブログにも飛べます
そもそもESlintの設定も満足に理解できてないのにどんどん変わってくなぁ
Prettier
コード整形は人気のこちらに任せます。
.prettierrc
{
  "printWidth": 120,
  "tabWidth": 2,
  "useTabs": true,
  "semi": true,
  "singleQuote": false,
  "overrides": [{ "files": "*.js", "options": { "singleQuote": true } }],
  "bracketSpacing": true,
  "bracketSameLine": false,
  "arrowParens": "always",
  "trailingComma": "none",
  "embeddedLanguageFormatting": "off",
  "plugins": ["prettier-plugin-tailwindcss"], //tailwindcss設定時に追加
  "pluginSearchDirs": false
}
.eslintignoreと.prettierignore
それぞれ同じ内容です。
node_modules
yarn.lock
public
.setting.json
{
	"editor.defaultFormatter": "esbenp.prettier-vscode",
	"editor.codeActionsOnSave": {
		"source.fixAll.eslint": true
	},
	"editor.formatOnPaste": true,
	"editor.formatOnSave": true,
	"editor.minimap.enabled": false,
	"indentRainbow.colorOnWhiteSpaceOnly": true,
	"editor.quickSuggestions": {
		"comments": false,
		"strings": true,
		"other": true
	},
	"editor.guides.indentation": false,
	"editor.renderLineHighlight": "none",
	"editor.tabSize": 2,
	"editor.cursorBlinking": "expand",
	"files.associations": {
		"*.css": "tailwindcss"
	}
}
TailwindCSSの設定
人気があるのは知っていましたが、もっぱらChakraUIを利用していたのでこちらも試してみようと設定することにしました。公式にWith Viteのやり方があったのでそれで。
Install Tailwind CSS with Vite - Tailwind CSS
yarn add -D tailwindcss postcss autoprefixer

npx tailwindcss init -p
生成されたtailwind.config.cjsファイルを下記のように追記します
/** @type {import('tailwindcss').Config} */
module.exports = {
  content: [
    //この中の2行を追加
    "./index.html",
    "./src/**/*.{js,ts,jsx,tsx}",
  ],
  theme: {
    extend: {},
  },
  plugins: [],
}
index.cssを書き換えます
@tailwind base;
@tailwind components;
@tailwind utilities;
app.tsxも書き換えて試しにスタイルを当ててみます
const App :()=>JSX.Element= () =>{
  return (
    <h1 className="text-3xl font-bold underline">
      Hello world!
    </h1>
  )
}

export default App;
yarn devしてみると、ちゃんとスタイルが当たっているようです。
VScodeを使っている方は拡張機能を追加するとよい
拡張機能をインストール後VScodeの設定を書くsetting.jsonに下記を追加
{
//...
"editor.quickSuggestions": {
  "strings": true
},
"files.associations": {
		"*.css": "tailwindcss"
	}
// ...
}
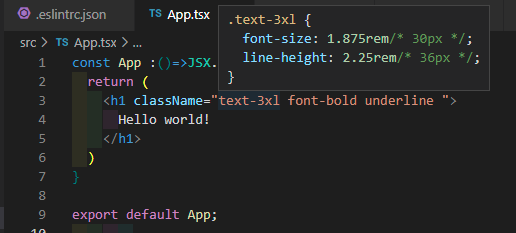
このようにホバーするとCSSを見れたり、utilityclassの補完が効きます。便利!
Prettierの公式プラグインも設定
こちらはclass属性を自動的にソートしてくれます。
順番がバラバラになりがちですが、自動で並び替えてくれるので可読性もアップ。
複数人で開発するときは、ルール決めなくても揃うので便利ですね。
yarn add -D prettier prettier-plugin-tailwindcss
こちらをインストールして設定に下記を追加
{
 // ...
 "plugins": ["prettier-plugin-tailwindcss"], //tailwindcss設定時に追加
  "pluginSearchDirs": false
 // ...
}
Prettierが動くと並び変わりました!
おわりに
次々に変わっていく技術に追いついていかないですが、Viteの設定は爆速ですし、ESlintやPrettierのルールも徐々に決めていくものなので、十数分もあれば「さぁ開発してこう」ってところまでできます。
ちょっとずつでも、足を止めずに新しい技術に触れる時間を作っていこうと思います。


