はじめに
前からずっと考えていた
「そろそろ家のサーバをクラウドに移そう」
を実行しよう。ということで始めます。。
やりたいこと
- 本番環境と開発環境を分けたい
- 家と本番環境と開発環境はVPNで接続する
- できる範囲で堅牢なファイルストレージがほしい
これらを、できるだけ、お安く。
VPNサーバを作る
まずはインフラを整えなきゃいけないよね。ということで。
構成
| ハードウェア | Raspberry pi 4 typeB |
|---|---|
| OS | Raspbian (Buster) |
| VPNソフト | OpenVPN |
| みんな大好きラズパイとみんな大好きOpenVPNの、そんなに差し障りのない構成です。ラズパイは4になってやっとGbEになってくれたのでかなりよさげになってきたんじゃないかなって思ってます。これでボトルネックが「家のネット回線が100Mbps」ということになりました(ぇ |
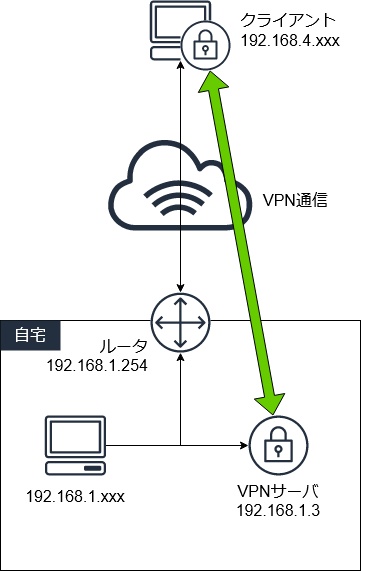
構成図
とりあえずのやつ。

今回はVPNサーバを立ち上げて適当なクライアントと通信ができるところまでを作ります。
登場人物(?)のIPアドレスは以下の通り
| IPアドレス | |
|---|---|
| 自宅ルータ | 192.168.1.254 |
| VPNサーバ | 192.168.1.3 |
| VPNクライアント | 192.168.4.xxx |
| サブネットマスクはすべて 255.255.255.0。 |
VPNサーバ構築まで
RaspbianをSDカードに書き込むとかは省略。そこいら中で紹介されているので適当に参照してください。
VPNソフトウェアインストール
# apt-get install openssl openvpn
認証局の初期化
OpenVPNで接続するための証明書を作成していきます。
まずはそのために必要な認証局を作成します。
# cd /usr/share/easy-rsa
# ./easyrsa init-pki

init-pki complete; you may now create a CA or requests.
Your newly created PKI dir is: /usr/share/easy-rsa/pki
認証局を作成
# ./easy-rsa build-ca

Using SSL: openssl OpenSSL 1.1.1d  10 Sep 2019

Enter New CA Key Passphrase: [[パスフレーズを入力]]
Re-Enter New CA Key Passphrase: [[パスフレーズ確認]]
Generating RSA private key, 2048 bit long modulus (2 primes)
..+++++
.................+++++
e is 65537 (0x010001)
Can't load /usr/share/easy-rsa/pki/.rnd into RNG
3069702160:error:2406F079:random number generator:RAND_load_file:Cannot open file:../crypto/rand/randfile.c:98:Filename=/usr/share/easy-rsa/pki/.rnd
You are about to be asked to enter information that will be incorporated
into your certificate request.
What you are about to enter is what is called a Distinguished Name or a DN.
There are quite a few fields but you can leave some blank
For some fields there will be a default value,
If you enter '.', the field will be left blank.
-----
Common Name (eg: your user, host, or server name) [Easy-RSA CA]: [[任意の名称を入力]]

CA creation complete and you may now import and sign cert requests.
Your new CA certificate file for publishing is at:
/usr/share/easy-rsa/pki/ca.crt
パスフレーズは今後何度も必要となるので覚えておきます。
OpenVPNサーバ証明書と秘密鍵を作成
# ./easyrsa build-server-full server nopass

Using SSL: openssl OpenSSL 1.1.1d  10 Sep 2019
Generating a RSA private key
...................................................................................................................+++++
...+++++
writing new private key to '/usr/share/easy-rsa/pki/private/server.key.rAbhhf7uOw'
-----
Using configuration from /usr/share/easy-rsa/pki/safessl-easyrsa.cnf
Enter pass phrase for /usr/share/easy-rsa/pki/private/ca.key:
Check that the request matches the signature
Signature ok
The Subject's Distinguished Name is as follows
commonName            :ASN.1 12:'server'
Certificate is to be certified until Feb  1 15:08:50 2023 GMT (1080 days)

Write out database with 1 new entries
Data Base Updated
DHパラメータ作成
# ./easyrsa gen-dh

Using SSL: openssl OpenSSL 1.1.1d  10 Sep 2019
Generating DH parameters, 2048 bit long safe prime, generator 2
This is going to take a long time
.................................................................+..............
TLS共有鍵作成
# openvpn --genkey --secret ta.key
これで以下のファイルが作成されました。
| ファイル名 | ディレクトリ |
|---|---|
| ca.crt | /usr/share/easy-rsa/pki/ |
| dh.pem | /usr/share/easy-rsa/pki/ |
| server.crt | /usr/share/easy-rsa/pki/issued/ |
| ca.key | /usr/share/easy-rsa/pki/private/ |
| server.key | /usr/share/easy-rsa/pki/private/ |
| ta.key | /usr/share/easy-rsa/ |
| これらをかき集めて/etc/openvpn/の下にでもコピーして置いておく。 | |
| これでサーバ側で必要になる証明書類ができあがり。 |
OpenVPN設定ファイル作成
OpenVPNの設定ファイルはサンプルがあるのでこれを使用します。
# cp -p /usr/share/doc/openvpn/examples/sample-config-files/server.conf.gz /etc/openvpn/
# cd /etc/openvpn/
# gzip -d server.conf.gz
これで /etc/openvpn/ に server.conf が作成されたので、このファイルの必要な部分を変更します。
各項目の設定はこちらの解説が日本語で大変ありがたいです。感謝。
| 変更前 | 変更後 |
|---|---|
| ca ca.crt | ca /etc/openvpn/ca.crt |
| cert server.crt | cert /etc/openvpn/server.crt |
| key server.key | key /etc/openvpn/server.key |
| dh dh2048.pem | dh /etc/openvpn/dh.pem |
| server 10.8.0.0 255.255.255.0 | (コメント化) |
| (追加) | server 192.168.4.0 255.255.255.0 |
| (追加) | push "route 192.168.4.0 255.255.255.0" |
| (追加) | push "route 192.168.1.0 255.255.255.0" |
| tls-auth ta.key 0 | tls-auth /etc/openvpn/ta.key 0 |
| ;comp-lzo | (コメント外し) |
| ;user nobody | (コメント外し) |
| ;group nogroup | (コメント外し) |
| ;log /var/log/openvpn/openvpn.log | (コメント外し) |
| ;log-append /var/log/openvpn/openvpn.log | (コメント外し) |
起動
ここまでやってようやく起動
systemctl restart openvpn@server
クライアント設定
クライアント用証明書・秘密鍵の作成
次にクライアント側で使用する証明書と秘密鍵を作成します。
# ./easyrsa build-client-full [[任意の名称]] nopass

Using SSL: openssl OpenSSL 1.1.1d  10 Sep 2019
Generating a RSA private key
.......................................................+++++
.......................+++++
writing new private key to '/usr/share/easy-rsa/pki/private/client.key.QPGnJzIhB7'
-----
Using configuration from /usr/share/easy-rsa/pki/safessl-easyrsa.cnf
Enter pass phrase for /usr/share/easy-rsa/pki/private/ca.key:
Check that the request matches the signature
Signature ok
The Subject's Distinguished Name is as follows
commonName            :ASN.1 12:'client'
Certificate is to be certified until Feb 14 08:26:21 2023 GMT (1080 days)

Write out database with 1 new entries
Data Base Updated
これで以下の場所にクライアント用の証明書と秘密鍵が作成されます。
| ファイル名 | ディレクトリ |
|---|---|
| [[任意の名称]].key | /usr/share/easy-rsa/pki/private/private/ |
| [[任意の名称]].crt | /usr/share/easy-rsa/pki/private/issued/ |
クライアント用ファイル作成
クライアント側に設定や証明書類を持っていきます。
OpenVPNクライアントソフトとしてOpenVPN Connectを使う場合などは、OVPNファイルとしてひとつにまとめてしまえば楽です。
client
dev tun
proto udp
remote [[接続先アドレス]] 1194
resolv-retry infinite
nobind
persist-key
persist-tun
remote-cert-tls server
tls-client
key-direction 1
cipher AES-256-CBC
verb 3
tun-mtu 1500
comp-lzo

<ca>
[[ca.crt の内容]]
</ca>

<key>
[[クライアントの xxx.key の内容]]
</key>

<cert>
[[クライアントの xxx.crt の内容]]
</cert>

<tls-auth>
[[ta.key の内容]]
</tls-auth>
作ったOVPNファイルをインポートすればつながる・・・はず。
まだ設定残ってた
(ここからは環境に依存する話なので、設定が必要だったり必要でなかったりします。また、機種によって設定方法が変わるため、具体的な設定方法などは割愛します)
ここまででOpenVPNのサーバとクライアントの設定は完了しましたが、実はまだやらなければいけないことが残ってます。それは、
自宅ルータの設定
具体的には
- ポートを開ける
- ルーティングの設定をする
これらの作業をしなければクライアントからサーバへは接続できないし、サーバからクライアントへの通信が届きません。
ポートを開ける
ルータのNAT(またの名をIPフォワーディングとかIPマスカレードとか言う)の設定します。
今回は1194番ポートの通信は192.168.1.3に流すように設定します。
ルーティングの設定
何もしないとルータは、192.168.4.xxxへの通信はどこに流せばよいかわからないため、通信に失敗します。
今回は、192.168.1.xxxの自宅ネットワークから192.168.4.xxxのネットワークに通信するためには、ルータに**「192.168.4.xxxへの通信は192.168.1.3へ流してください」**というルーティングを設定することになります。
通信が流された側の192.168.1.3、すなわちVPNサーバはすでに「192.168.4.xxxはトンネルを使う」という設定が済んでいるため、VPNを使用した通信が行われます。
疎通確認
正しく通信ができているかどうかの確認はpingを打てばわかるかと思います。
以下はWindowsのコマンドプロンプトから実行したものです。
>ping 192.168.4.6

192.168.4.6 に ping を送信しています 32 バイトのデータ:
192.168.4.6 からの応答: バイト数 =32 時間 =250ms TTL=63
192.168.4.6 からの応答: バイト数 =32 時間 =258ms TTL=63
192.168.4.6 からの応答: バイト数 =32 時間 =175ms TTL=63
192.168.4.6 からの応答: バイト数 =32 時間 =282ms TTL=63

192.168.4.6 の ping 統計:
    パケット数: 送信 = 4、受信 = 4、損失 = 0 (0% の損失)、
ラウンド トリップの概算時間 (ミリ秒):
    最小 = 175ms、最大 = 282ms、平均 = 241ms

>tracert 192.168.4.6

192.168.4.6 へのルートをトレースしています。経由するホップ数は最大 30 です

  1    <1 ms     2 ms    <1 ms  192.168.1.254
  2     3 ms    <1 ms    <1 ms  192.168.1.3
  3   220 ms    87 ms    76 ms  192.168.4.6

トレースを完了しました。
pingの他にtracerouteを実行していますが、tracerouteだと意図通りのルートで通信ができていることがわかります。