前置き
CSSのlinear-gradientとanimationを組み合わせてアレを再現しました。
最近のCSSはすごいですね。
デモとソースコード
解説
linear-gradientについて
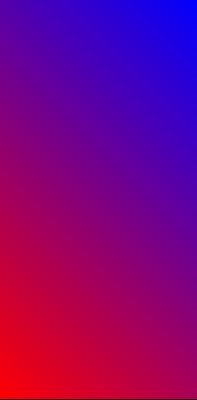
CSSのbackgroundプロパティには、linear-gradientという関数を指定できます。
引数に方向(または角度)、開始色、終了色等を指定することで、開始色から終了色までのグラデーションを表現します。
とりあえず表示してみる
.test {
    background: linear-gradient(0deg,red,blue);
}
すると背景色がこんな風になります。(角度に0degを指定した場合、下から上にグラデーションします)

角度を適当に指定すれば斜め方向のグラデーション表示も可能です。
また、単色で表示させたい領域の範囲を%で指定することで、グラデーションさせる範囲を狭くできます。
以下の例では、下部10%分を赤色単色、上部40%を青色単色とし、残った50%分の領域でグラデーションさせています。
.test {
    background: linear-gradient(0deg,red 10%,blue 60%);
}

つまり、単色で表示させたい領域の割合が100%になっていれば、グラデーションっぽい表示にはなりません。
.test {
    background: linear-gradient(0deg,red 50%,blue 50%);
}

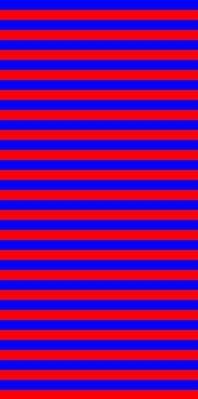
ストライプ(縞模様)を作ってみる
background-sizeで背景のサイズを指定します。
.test {
    background: linear-gradient(0deg,red 50%,blue 50%);
    background-size: 100px 20px;
}
こうなります。
ちなみに、background-repeat: repeat; が効いている必要があります。(指定してなければデフォルトで効きます。)
また、linear-gradientには中間色を複数指定することも可能なので、こんな書き方もできます。
(下から25%分を白、25%~50%分を赤、50%~75%分を白、75%~100%分を青にします)
.test {
    background: linear-gradient(0deg,
        white 25%, red 25%,
        red 50%, white 50%,
        white 75%, blue 75%,
        blue 100%, white 100%);
    background-size: 100px 100px;
}

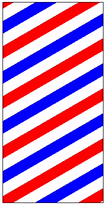
だんだん近づいてきました。
角度を変えてみる
適当に-30degとか指定してみましょう。
.test {
    background: linear-gradient(-30deg,
        white 25%, red 25%,
        red 50%, white 50%,
        white 75%, blue 75%,
        blue 100%, white 100%);
    background-size: 100px 100px;
}

画像がキレイにつながってくれません。Chromeのデベロッパーツールか何かを使って、background-sizeを適当に微調整しましょう。
.test {
    background: linear-gradient(-30deg,
        white 25%, red 25%,
        red 50%, white 50%,
        white 75%, blue 75%,
        blue 100%, white 100%);
    background-size: 173px 100px;
}

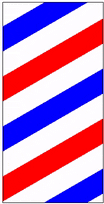
何か惜しいですね。赤色と青色の線が変な混ざり方をしているため、中間色を更に細かく指定していきます。
.test {
    background: linear-gradient(-30deg,
        white 12.5%, red 12.5%,
        red 25%, white 25%,
        white 37.5%, blue 37.5%,
        blue 50%, white 50%,
        white 62.5%, red 62.5%,
        red 75%, white 75%,
        white 87.5%, blue 87.5%,
        blue 100%, white 100%);
    background-size: 173px 100px;
}

とりあえず模様は完成ですね。
線の幅を調整したい場合、またbackground-sizeを調整すればできます。
(デモページでは線を太くするためbackground-size: 346px 200px;としています。)
animationについて
@keyframesでアニメーションを定義し、それを適用させたい要素にanimationプロパティで指定すると、CSSによるアニメーションが実現できます。
今回の場合は、background-positionを変更する(上方向にずらす)処理を定義しておきます。
@keyframes barber-anime {
    0% {
        background-position: 0px 0px;
    }

    100% {
        background-position: 0px -200px;
    }
}
後は先程の背景を設定したクラスにanimationを追加します。
.test {
    background: linear-gradient(-30deg,
        white 12.5%, red 12.5%,
        red 25%, white 25%,
        white 37.5%, blue 37.5%,
        blue 50%, white 50%,
        white 62.5%, red 62.5%,
        red 75%, white 75%,
        white 87.5%, blue 87.5%,
        blue 100%, white 100%);
    background-size: 173px 100px;
    animation: barber-anime 1000ms linear infinite;
}
これで完成です。
余談
後から知ったのですが、repeating-linear-gradient関数でもストライプが実現できるようです。
参考
斜めのストライプをCSSのみでデザインする方法|コトダマウェブ
【CSS3】@keyframes と animation 関連のまとめ