はじめに
この記事は、Youtubeチャンネル『トラハックのエンジニア学習ゼミ【とらゼミ】』の『日本一わかりやすいReact-Redux入門』の学習備忘録です。
前回の記事はこちら。
要約
- Reduxファイルは、
reducksパターンで管理すると、開発・運用・保守全ての面で効率的になる -
selectors.jsにセレクター関数を定義することで、Store内のstateの値を、任意のコンポーネントで簡単に参照・取得できる。 - 外部API、DBとの通信時には、
redux-thunkによる非同期処理制御を入れる - Redux store からの state の取り出し方は「1.コンテナーコンポーネント」「2.
React-Hooks」の二通りあるが、基本的には後者を採用するべき
#8...re-ducksパターンでファイル管理をしよう
re-ducksパターンとは?
Redux 関連ファイルのディレクトリ構成パターン。ファイルの分割基準をルールとして決めてしまうことで、ファイルを管理しやすくする、というもの。
ディレクトリ構成
reducks
 ├ users
 ├ products
 ⋮
state ごとにディレクトリを分けます。
ファイル構成
users
 ├ actions.js
 ├ index.js
 ├ operation.js
 ├ reducers.js
 ├ selectors.js
 └ type.js
state の名前によらず、これら Redux 関連ファイルのファイル名は統一します。
各ファイルの役割をまとめます。
actions.js
Fluxフローにおける最初の窓口。アプリから受け取った state の変更依頼を受け取り、 reducers.js に渡す。
operations.js
actions.js の前に実行したい「何らかの複雑な処理」を書くための場所(例:外部APIやDBから値を取得する、等)
このファイルを用意することで、actions.jsやreducers.jsの記述をシンプルかつ画一的に保つことができるようになる。次回動画以降登場。
reducers.js
actions.js からデータを受け取り、 Store の state をどう変更するか決める。
types.js
Typescript 使用時のみ作成する。型定義を記述して export する。
selectors.js
Store で管理している state を参照する関数を定義して export する。
「どこに何を書くべきか」を決めておくことで、開発スピードアップだけでなく、保守・運用時の手間も最小化できそうです。
selectors.jsの使い方
今回は、selectors.jsを作成して、state の参照を実行してみます。
import { createSelector } from "reselect";

const usersSelector = (state) => state.users;

export const getUserId = createSelector(
  [usersSelector],
  state => state.uid
)
getUserIdという関数を定義しています。これで、Store の中で管理されている state のうち、 users.uid を、任意のコンポーネントで参照・取得できます。
早速、 Home.jsx で使ってみます。
import React from 'react';
import {getUserId} from '../reducks/users/selectors';
import {useSelector} from 'react-redux'

const Home = () => {
  const selector = useSelector(state => state);
  const uid = getUserId(selector);

  return (
    <div>
      <h2>Home</h2>
      <p>{uid}</p>
    </div>
  );
};

export default Home
useSelector()は React Hooksの一種で、Store 全体の state を受け取ります。。これをgetUserId()に渡すことで、 uid を取り出せます。
localhost:3000 をみてみると、

問題なく取得ができています(0000 は initialState.jsで定義した user.uid)
さらに、既に定義してある signInAction を用いて、Store 内の state を更新し、getUserId()で正しく参照できるかを試してみます。
import React from 'react';
import {useDispatch} from "react-redux";
import {push} from "connected-react-router";
import {signInAction} from "../reducks/users/actions"

const Login = () => {
  const dispatch = useDispatch();
  return (
    <div>
      <h2>ログイン</h2>
      <button onClick={() => {
        dispatch(signInAction({uid:"0001", username: "torahack"}))
        dispatch(push('/'))}} >
        ログイン
      </button>
    </div>
  );
};

export default Login
<button> をクリックすることでsignInActionが発火し、state.user が更新されるはずです、。
http://localhost:3000/login より、ボタンをクリックすると、

↓

無事、state.user.uid が更新が確認できます!
#9...redux-thunkで非同期処理を制御すべし
非同期処理とは?
時間のかかる処理と並行して、次の処理を進めてしまうこと。
時間のかかる処理とは、例えば外部APIとのリクエスト・レスポンスの処理や、データベースとの通信などを指す。
通常の React では”時間のかかる処理”が完了する前に次の処理がどんどん進んでいきます(非同期で処理が進む)。しかし例えば「データベースへクエリを出し、返ってきた結果を Redux の Store に保存する」といった場面では、結果が返ってくるまでは処理を止めておかなければ、正常は画面描画を行えません。
redux-thunk とは?
React で非同期処理を制御するためのライブラリ。
actions.jsからreducers.jsへフローを渡すタイミングを制御できます。通常、redux-thunk の記述は、operations.jsに書くケースが多いです。
redux-thunk を導入
store.jsに、redux-thunk を導入します。
⋮
import thunk from "redux-thunk";

export default function createStore(history) {
    ⋮
    applyMiddleware(
      routerMiddleware(history),
      thunk
    )
  )
}
たった2行追加するだけでOK。次に、operations.jsを追加します。
import { signInAction } from "./actions";
import { push } from "connected-react-router";

export const signIn = () => {
  return async (dispatch, getState) => {
    const state = getState()
    const isSignedIn = state.users.isSignedIn

    if(!isSignedIn) {
      // 実際は以下にfirebaseと通信をするようなサインイン処理を書くが、
      // まだ実装していないのでダミー処理を書く
      const url = 'https://api.github.com/users/deatiger'

      const response = await fetch(url)
                            .then(res => res.json())
                            .catch(() => null)

      const username = response.login

      dispatch(signInAction({
        // state.user に対する変更内容
        isSignedIn: true,
        uid:"0002",
        username: username,
      }))
      // 上記処理後、ルートへリダイレクト
      dispatch(push('/'))
    }
  }
}
-
asyncと書くことで、await(その処理が完了するまで次の処理に進まない)を使える -
getState()で store から state を取得できる。 -
dispatch()で actions および push メソッドを使用できる。
if(!isSignedIn){... 以下は、本来であればバックエンド( fireabase など)との通信を行い、ユーザー認証の結果を action へ渡すことで、store 内の state の変更を行います。
今回はバックエンド側は未実装なので、ダミーとして ユーザー名deatigerのgithub APIを叩く仕様にしています。正常に動けば、該当ユーザーのユーザー名を取得し、それを username に格納するよう、action へ命令を出します。
このoperations.jsを使用できるように、templates に変更を加えます。今回はLogin.jsx内のログインボタンを押した時にoperations.jsが発火し、記述した通りの state の変更がなされるように記述します。
import React from 'react';
import {useDispatch} from "react-redux";
import {signIn} from "../reducks/users/operations"

const Login = () => {
  const dispatch = useDispatch();
  return (
    <div>
      <h2>ログイン</h2>
      <button onClick={() => dispatch(signIn())} >
        ログイン
      </button>
    </div>
  );
};

export default Login
<button>タグの onClick イベントとして 先ほどの operations.jsをセットしています。上手くいけば、 state.user の情報が更新されたのち、ルートへリダイレクトされるはずです。

↓ ログインボタンをクリックすると、

operations.jsの記述の通り、uid が 0002 へ変更されています!
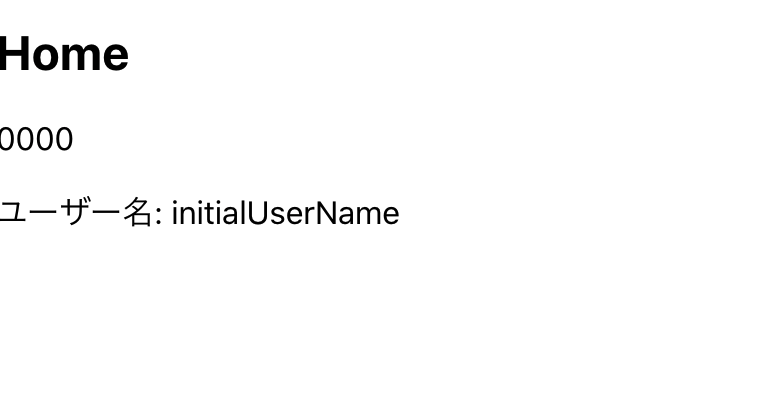
ついでに、この画面(Home.jsx)で username も表示させてみます。templates ファイルでStore内のstateを取得するためには、selectors.jsで、 username を取得する関数を定義する必要があります。
import { createSelector } from "reselect";

const usersSelector = (state) => state.users;

export const getUserId = createSelector(
  [usersSelector],
  state => state.uid
)

// 以下追記
export const getUserName = createSelector(
  [usersSelector],
  state => state.name
)
state.user.username を取得する関数として getUserName()を定義します。
import React from 'react';
import {getUserId, getUserName} from '../reducks/users/selectors';
import {useSelector} from 'react-redux'

const Home = () => {
  const selector = useSelector(state => state);
  const uid = getUserId(selector);
  const username = getUserName(selector);

  return (
    <div>
      <h2>Home</h2>
      <p>{uid}</p>
      <p>ユーザー名: {username}</p>
    </div>
  );
};

export default Home
getUserName()を import して使います。ブラウザで確認しましょう。
↓ localhost:3000/login でボタンを押すと、

username も変更されています!
もし今回の処理を redux-thunk による非同期処理制御を入れなかった場合、github api よりユーザー情報を取得する処理の完了を待たずに action の発行に進んでしまうため、ユーザー情報がうまく画面が表示されなくなってしまいます。
「外部APIやDBとの通信を行う際には非同期制御を入れる」と覚えておけば、大体のケースには対応できそうです。
#10...コンテナーの役割
コンテナーコンポーネントとは
Store とコンポーネントの中継役。 Redux(Store) の世界と React(アプリ) の世界をつなぐ。
かつては更新された Store 内 state を アプリに渡すために唯一の手段でしたが、現在はRedux-Hooksを用いることでも Store 内 stateを渡せるようになりました。
基本的にはRedux-Hooksの方が記述が少なくて楽なため、コンテナーコンポーネントを使う場面は限られています。
いつ使うべき?
明示的に state をフィルタリングしたいに使用します。
例えばユーザー認証情報など、セキュリティの関連から state を渡すコンポーネントを最小限に抑えたいときなどで、コンテナーコンポーネントがしばしば用いられます。
また、「React Hooksが登場する以前に書かれた React+Reduxコードを理解するために、知識としては持っておくべき」という観点も、学習するモチベーションと言えます。
connect() の使い方
コネクトコンポーネントはsrc/containers/の下に保存します。
今回は、React Hooksで実装していた、Login Component への state の引き渡しを、コネクトコンポーネントで実装してみます。
実装ファイルは、以下の5ファイル。
1. src/containers/Login.js (コンテナーコンポーネント)
2. src/templates/LoginClass.jsx (クラスコンポーネントで実装したログインコンポーネント。コンテナーコンポーネントからの state を受け取るためには、関数コンポーネントではなく、クラスコンポーネントである必要がある)
3. src/containers/index.js
4. src/Route.jsx (/login の読み込み先を、LoginClassコンポーネントへ変更)
import LoginClass from '../templates/LoginClass'
import {compose} from 'redux'
import {connect} from 'react-redux';
import * as Actions from '../reducks/users/operations';

const mapStateToProps = state => {
  return {
    users: state.users // 渡したい state だけをオブジェクト型で記述
  }
}

const mapDispatchToProps = dispatch => {
  return {
    actions: {
      signIn() {
        dispatch(Actions.signIn()) // Store から Dispatch する関数
      }
    }
  }
}
export default compose(
  connect(
    mapStateToProps,
    mapDispatchToProps
  )
)(LoginClass)
コネクトコンポーネントで state を渡されるコンポーネントは、クラスコンポーネントがある必要があります。Login Component をクラスコンポーネントで定義し直したものを用意します。
import React, {Component} from 'react';

export default class LoginClass extends Component {
  render() {
    return (
      <div>
      <h2>ログイン</h2>
      <button onClick={() => dispatch(signIn())} >
        ログイン
      </button>
    </div>
    )
  }
}
import React, {Component} from 'react';

export default class LoginClass extends Component {
  render() {
    return (
      <div>
      <h2>ログイン</h2>
      <button onClick={() => this.props.actions.signIn()} >
        ログイン
      </button>
    </div>
    )
  }
}
export {default as LoginContainer } from './Login'
import React from 'react';
import {Route, Switch} from "react-router";
import {Login, Home} from "./templates";
import {LoginContainer} from "./containers"

const Router = () => {
  return (
    <Switch>
      {/* <Route exact path={"/login"} component={Login} /> */}
      <Route exact path={"/login"} component={LoginContainer} />
      <Route exact path={"(/)?"} component={Home} />
    </Switch>
  );
};

export default Router
ここまで実装することで、#9の最後と同じブラウザ表示を確認することができるはずです。
コンテナーコンポーネントによる実装は、Redux Hooksに比べ記述量が多く、かつファイル数も増えてしまいます。
知識としては持っておくべきですが、特別な事情がない限りはRedux Hooksを使用すべきでしょう。
おわり
今回記事を要点をまとめると、
- Reduxファイルは、
reducksパターンで管理すると、開発・運用・保守全ての面で効率的になる -
selectors.jsにセレクター関数を定義することで、Store内のstateの値を、任意のコンポーネントで簡単に参照・取得できる。 - 外部API、DBとの通信時には、
redux-thunkによる非同期処理制御を入れる - Redux store からの state の取り出し方は「1.コンテナーコンポーネント」「2.
React-Hooks」の二通りあるが、基本的には後者を採用するべき
です。
今回はここまで!次回からは実践編として、実際にECアプリの開発を通じた学習が始まる予定です。