やる事
Nuxt3にElementPlusを導入して、サクッと画面を作れるようにする。
動作環境
- Windows10Home64bit(21H2)
- node v16.16.5
- element-plus v2.2.6
- nuxt v3.0.0-rc.4
- sass v1.53.0
※ChromOSのLinux環境でも動作確認済み
手順
プロジェクト作成
公式ドキュメント通りにやる。Nuxt2系と違い細かい質問は聞かれないし必要最小限の要素だけが用意される。
npx nuxi init sample-elementplus
cd sample-elementplus
npm i
動作確認
親の名前並みに見たコマンドで動作確認。とても起動が速い。
npm run dev
ElementPlusの導入
導入
ひとまずnpmからインストール
npm i element-plus @element-plus/theme-chalk sass
公式ドキュメント曰く、Vueのプロジェクトで使用する場合は
// main.ts
import { createApp } from 'vue'
import ElementPlus from 'element-plus'
import 'element-plus/dist/index.css'
import App from './App.vue'

const app = createApp(App)

app.use(ElementPlus)
app.mount('#app')
いつものようにVue.use({導入するモジュール})で行けるらしい。なのでNuxtで使用されているVueのインスタンスに同じことをやればいい。
Pluginを使う。
pluginsディレクトリを作成し、Vueのインスタンスでuseメソッドを使うプラグインを作成する。
import { defineNuxtPlugin } from 'nuxt/app'
import ElementPlus from 'element-plus/dist/index.full'

export default defineNuxtPlugin((nuxtApp) => {
  nuxtApp.vueApp.use(ElementPlus)
})
pluginとなる関数の第1引数はNuxtAppで、この中のVueAppプロパティがVueのインスタンスらしい。なのでvueAppでuse()メソッドを使う
pluginディレクトリ内にファイルを作成すると、自動的にプラグインを読み込んでくれる。なのでnuxt.config.tsに設定を記述する必要はない。
ちなみにnuxt.config.tsに記述すると2重に読み込んでしまうので、以下のようなエラーがコンソールに表示される。
[Vue warn]: Plugin has already been applied to target app.
SCSSの追加
これだけだとコンポーネントは読み込まれてもCSSが無いのでSCSSを追加する。
@use 'element-plus/dist/index.css' ;
@use 'element-plus/theme-chalk/index.css' as theme

html,
body,
#app {
  margin: 0;
  padding: 0;
}

html.dark {
  background: #222;
  color: white;
}

a {
  font-weight: 400;
  color: var(--el-color-primary);
}
as theme(任意の名前でOK)と付けないとエラー。名前空間の問題らしいけどSCSS全然わからんマンなので誰か教えてほしい。
今回はわかりやすいようにサイドバーとヘッダーに背景色を付けている。
nuxt.config.tsの記述
CSSとビルド時の設定を追加する。
import { defineNuxtConfig } from 'nuxt'

const lifecycle = process.env.npm_lifecycle_event
export default defineNuxtConfig({
  css: ['~/assets/css/elementPlus.scss'],
  build: {
    transpile: lifecycle === 'build' ? ['element-plus'] : []
  }
})
色々書いてあるのはビルド時のみElementPlusをトランスパイルするという意味らしい。
app.vueとpages.vueの作成
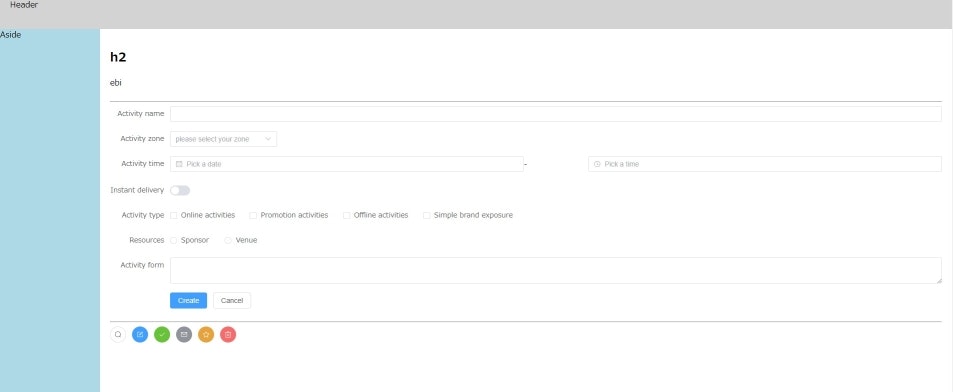
動作確認のためapp.vueとpages/index.vueを作成し、ElementPlusのドキュメントからFormなどをそのままコピペしたコンポーネントを組み込んでみる。
<template>
  <NuxtPage />
</template>
<script setup>
import { ID_INJECTION_KEY } from 'element-plus'
provide(ID_INJECTION_KEY, {
  prefix: 100,
  current: 0
})
</script>

<style>
.contents-wrapper{
  height: 100vh;
  overflow-y: scroll;
}

.el-header{
  background-color:lightgray
}

.el-aside{
  background-color:lightblue
}
.el-container{
  height: 100%;
}
</style>
Formコンポーネントはこんな感じ。
<template>
  <el-form :model="form" label-width="120px">
    <el-form-item label="Activity name">
      <el-input v-model="form.name" />
    </el-form-item>
    <el-form-item label="Activity zone">
      <el-select v-model="form.region" placeholder="please select your zone">
        <el-option label="Zone one" value="shanghai" />
        <el-option label="Zone two" value="beijing" />
      </el-select>
    </el-form-item>
    <el-form-item label="Activity time">
      <el-col :span="11">
        <el-date-picker
          v-model="form.date1"
          type="date"
          placeholder="Pick a date"
          style="width: 100%"
        />
      </el-col>
      <el-col :span="2" class="text-center">
        <span class="text-gray-500">-</span>
      </el-col>
      <el-col :span="11">
        <el-time-picker
          v-model="form.date2"
          placeholder="Pick a time"
          style="width: 100%"
        />
      </el-col>
    </el-form-item>
    <el-form-item label="Instant delivery">
      <el-switch v-model="form.delivery" />
    </el-form-item>
    <el-form-item label="Activity type">
      <el-checkbox-group v-model="form.type">
        <el-checkbox label="Online activities" name="type" />
        <el-checkbox label="Promotion activities" name="type" />
        <el-checkbox label="Offline activities" name="type" />
        <el-checkbox label="Simple brand exposure" name="type" />
      </el-checkbox-group>
    </el-form-item>
    <el-form-item label="Resources">
      <el-radio-group v-model="form.resource">
        <el-radio label="Sponsor" />
        <el-radio label="Venue" />
      </el-radio-group>
    </el-form-item>
    <el-form-item label="Activity form">
      <el-input v-model="form.desc" type="textarea" />
    </el-form-item>
    <el-form-item>
      <el-button type="primary" @click="onSubmit">
        Create
      </el-button>
      <el-button>Cancel</el-button>
    </el-form-item>
  </el-form>
</template>

<script lang="ts" setup>
import { reactive } from 'vue'

// do not use same name with ref
const form = reactive({
  name: '',
  region: '',
  date1: '',
  date2: '',
  delivery: false,
  type: [],
  resource: '',
  desc: ''
})

const onSubmit = () => {
  console.log('submit!')
}
</script>
動作確認
もう一度npm run devコマンドで開発サーバーを立てて、ElementPlusのコンポーネントが表示できていれば正解。

なんか間違いとか動かないとかあったらコメントください。
参考資料
ElementPlusが中国産なので中国系の情報が多い。漢字文化圏なので慣れれば雰囲気で読める。