はじめに
画面遷移のカスタマイズの流れを簡単にまとめておきます。
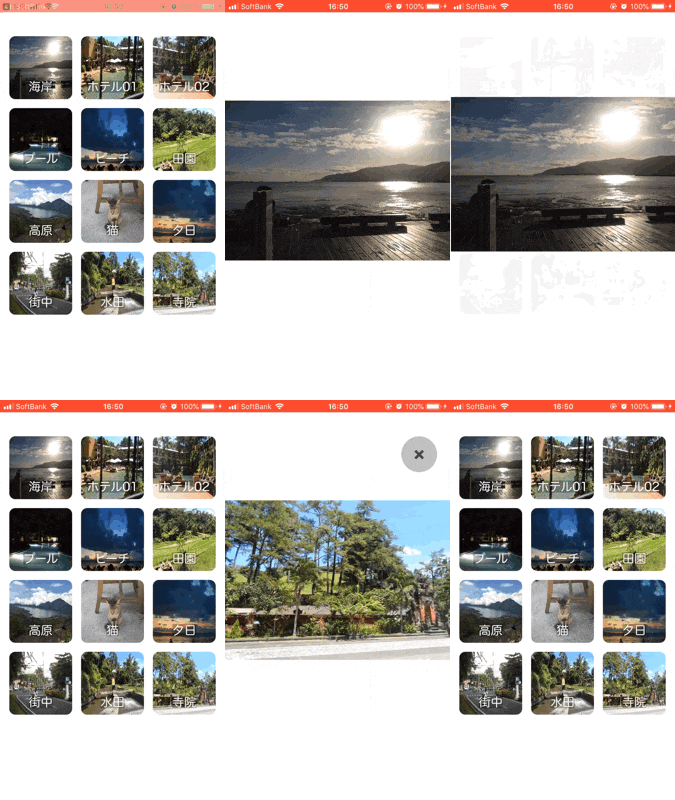
今回は以下のような画面遷移を作ります。

画面遷移をカスタマイズする際に必要なもの
-
UIViewControllerAnimatedTransitioning
遷移時のアニメーションを用意する -
UIViewControllerTransitioningDelegate
用意したアニメーションをViewControllerの遷移時に適用させる
通常の画面遷移
カスタマイズ前の画面遷移はこんな感じです。(通常のpresentでの遷移です)
let detailImageVC = DetailImageViewController(image: image)
present(detailImageVC, animated: true, completion: nil)
UIViewControllerAnimatedTransitioningを準拠したクラスの用意
このクラスは、遷移アニメーションの生成に必要な以下の要素を渡してイニシャライズするようにします。
- 画面遷移にかかる時間
- アニメーションさせるオブジェクト
今回はCollectionViewのセル画像がアニメーションして、遷移先画面のImageViewに描画されるトランジションなので、「遷移元画面のUICollectionView」と「遷移先画面のUIImageView」を渡すようにしています。
※ 実際は以下の抽象化クラスを渡すようにしています。
import UIKit
// 遷移元用
protocol ImageSourceTransitionType: UIViewController {
    var collectionView: UICollectionView! { get }
}
// 遷移先用
protocol ImageDestinationTransitionType: UIViewController {
    var imageView: UIImageView! { get }
}
/// 遷移元
class ViewController: UIViewController, ImageSourceTransitionType {
/// 遷移先
class DetailImageViewController: UIViewController, ImageDestinationTransitionType {
UIViewControllerAnimatedTransitioningの準拠クラス
final class ImagePresentedAnimator: NSObject, UIViewControllerAnimatedTransitioning {
    weak var presenting: ImageSourceTransitionType?
    weak var presented: ImageDestinationTransitionType?
    let duration: TimeInterval
    let selectedCellIndex: IndexPath

    init(presenting: ImageSourceTransitionType, presented: ImageDestinationTransitionType, duration: TimeInterval, selectedCellIndex: IndexPath) {
        self.presenting = presenting
        self.presented = presented
        self.duration = duration
        self.selectedCellIndex = selectedCellIndex
    }

    func transitionDuration(using transitionContext: UIViewControllerContextTransitioning?) -> TimeInterval {
        return duration
    }

    func animateTransition(using transitionContext: UIViewControllerContextTransitioning) {
        guard let presenting = presenting, let presented = presented else {
            transitionContext.cancelInteractiveTransition()
            return
        }

        let containerView = transitionContext.containerView
        // 遷移先のViewのFrameに最終配置位置のFrameをset
        presented.view.frame = transitionContext.finalFrame(for: presented)
        presented.view.layoutIfNeeded()
        // 遷移先のsuperViewをaddしないと画面が描画されない
        containerView.addSubview(presented.view)
        presented.view.alpha = 0

        guard let transitionableCell = presenting.collectionView.cellForItem(at: selectedCellIndex) as? CollectionViewCell else {
            transitionContext.cancelInteractiveTransition()
            return
        }

        let animationView = UIView(frame: presenting.view.frame)
        animationView.backgroundColor = .white
        let imageView = UIImageView(frame: transitionableCell.imageView.superview!.convert(transitionableCell.imageView.frame, to: animationView))
        imageView.image = transitionableCell.imageView.image
        imageView.contentMode = transitionableCell.imageView.contentMode
        animationView.addSubview(imageView)
        containerView.addSubview(animationView)

        let animation = UIViewPropertyAnimator(duration: duration, dampingRatio: 0.8) {
            imageView.frame = presented.imageView.frame
        }
        animation.addCompletion { (_) in
            presented.view.alpha = 1
            animationView.removeFromSuperview()
            transitionContext.completeTransition(true)
        }
        animation.startAnimation()
    }
}
UIViewControllerTransitioningDelegateを準拠して用意した遷移アニメーションを適用させる
遷移元のViewControllerにUIViewControllerTransitioningDelegateを適用させます。
extension ViewController: UIViewControllerTransitioningDelegate {

    // 遷移を開始したタイミングで呼び出されるため、このメソッド内で用意した遷移アニメーションクラスを返すよにする
    func animationController(forPresented presented: UIViewController, presenting: UIViewController, source: UIViewController) -> UIViewControllerAnimatedTransitioning? {
        guard let detailImageVC = presented as? ImageDestinationTransitionType else {
            return nil
        }

        return ImagePresentedAnimator(presenting: self, presented: detailImageVC, duration: 1, selectedCellIndex: selectedCellIndex)
    }

    // 遷移先から戻る(dismiss)するタイミングで呼び出されるため、戻る遷移用のアニメーションクラスを返すようにする
    func animationController(forDismissed dismissed: UIViewController) -> UIViewControllerAnimatedTransitioning? {
        guard let detailImageVC = dismissed as? ImageDestinationTransitionType else {
            return nil
        }

        return ImageDismissedAnimator(presenting: self, presented: detailImageVC, duration: 1, selectedCellIndex: selectedCellIndex)
    }
}
遷移時にデリゲートを準拠する
let detailImageVC = DetailImageViewController(image: image)
// 注意: 遷移先のViewControllerのtransitioningDelegateを準拠する
detailImageVC.transitioningDelegate = self
present(detailImageVC, animated: true, completion: nil)
これで画面遷移をカスタマイズできます。
ソースコード
上記で実装したサンプルは以下のリポジトリにあります。
https://github.com/ddd503/Transition-Image-Sample
備考
上記のサンプルで行っている画面遷移は present/dismiss で行っていますが、NavigationControllerを使った場合の push/pop での画面遷移カスタマイズは若干やり方が異なります。
その場合のサンプルは以下に置いてあります。
https://github.com/ddd503/Transition-Image-NavigationController-Sample