python の web フレームワークとはなんなのか。
なんのことか、よくわかりませんからやってみましょう。
ちなみ arm CPU のタブレットで termux でやっているので、ここでできていることは
他の Linux 環境では特に制約がないのではないかと思います。
CherryPy web framework
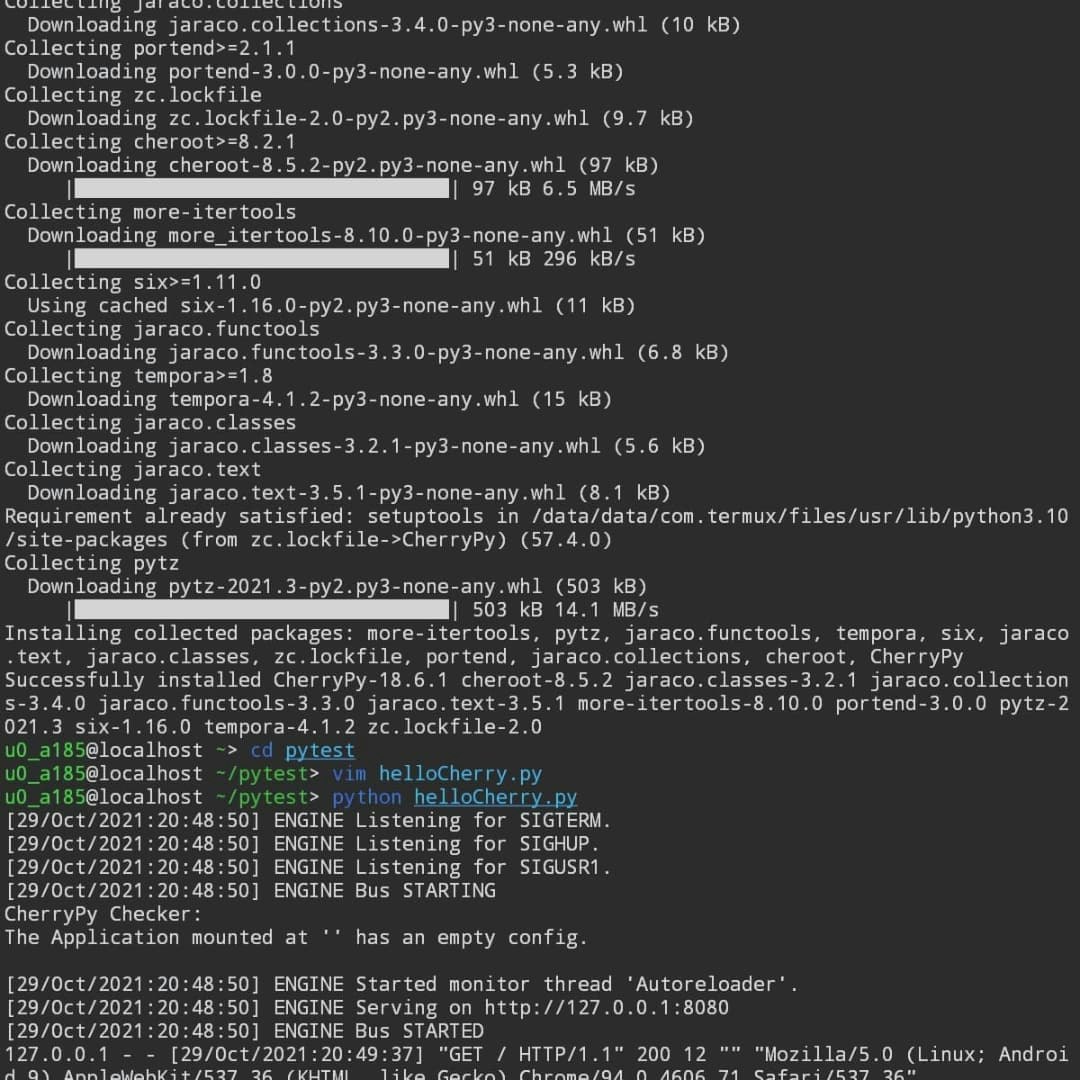
インストールは pip で。
CherryPy supports Python 3.5 through to 3.8.
pip install cherrypy
もしくは github から git する方法でもいいようです。
この場合は、別途 git をインストールする必要があります。
$ git clone https://github.com/cherrypy/cherrypy
$ cd cherrypy
$ python setup.py install
running webserver
Rf.Tutorial 3: My URLs have parameters
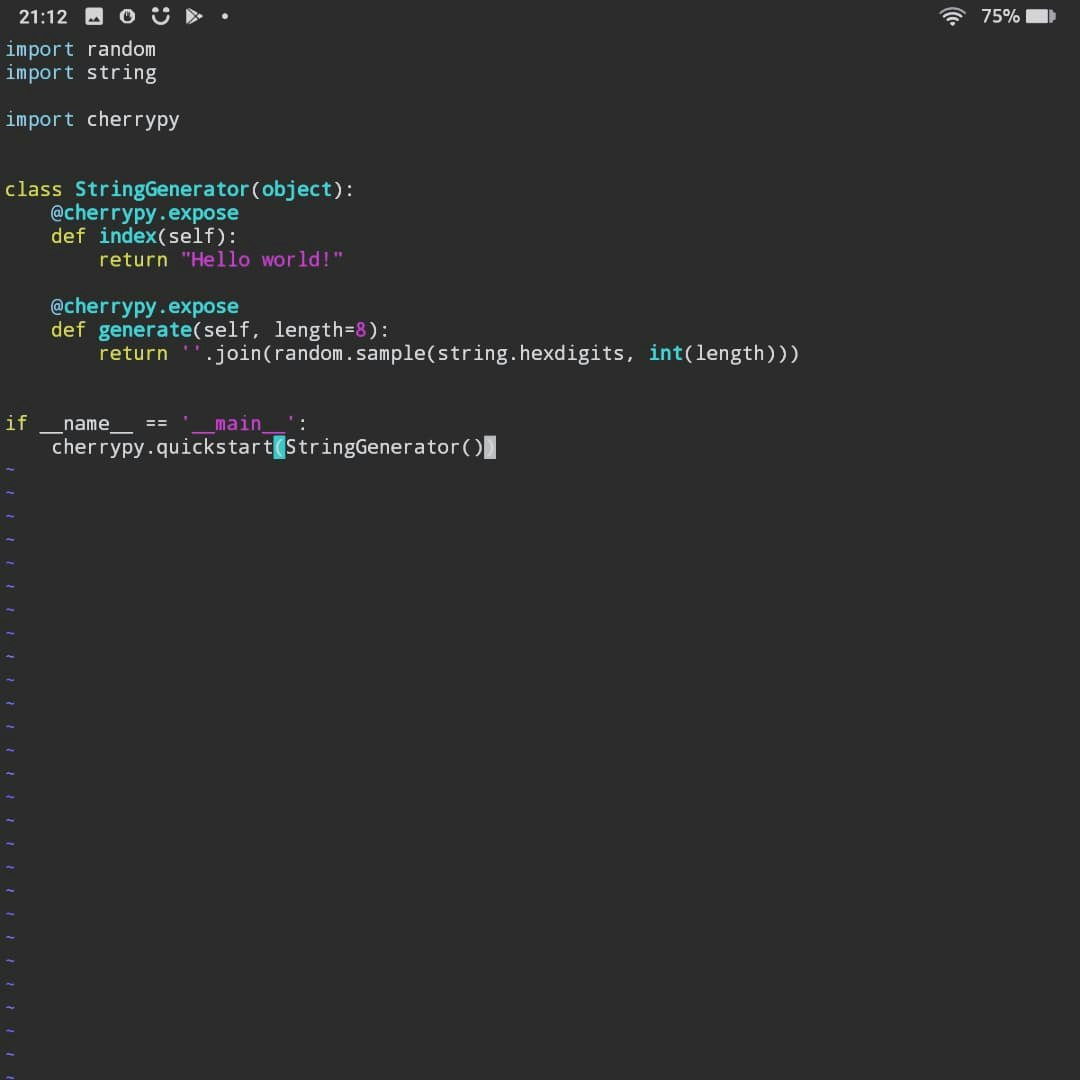
In the previous tutorial, we have seen how to create an application that could generate a random string. Let’s now assume you wish to indicate the length of that string dynamically.
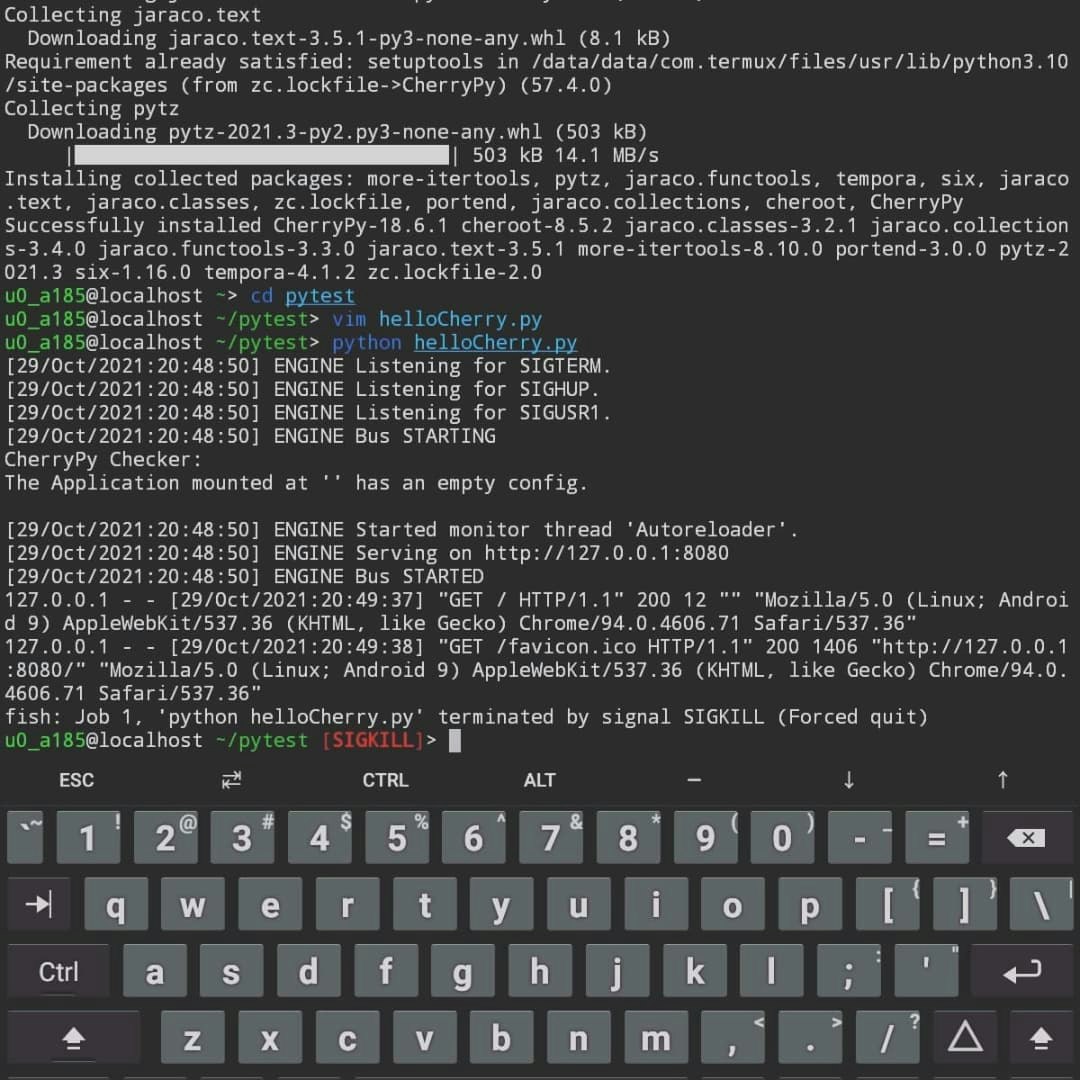
実体 helloCherry.py
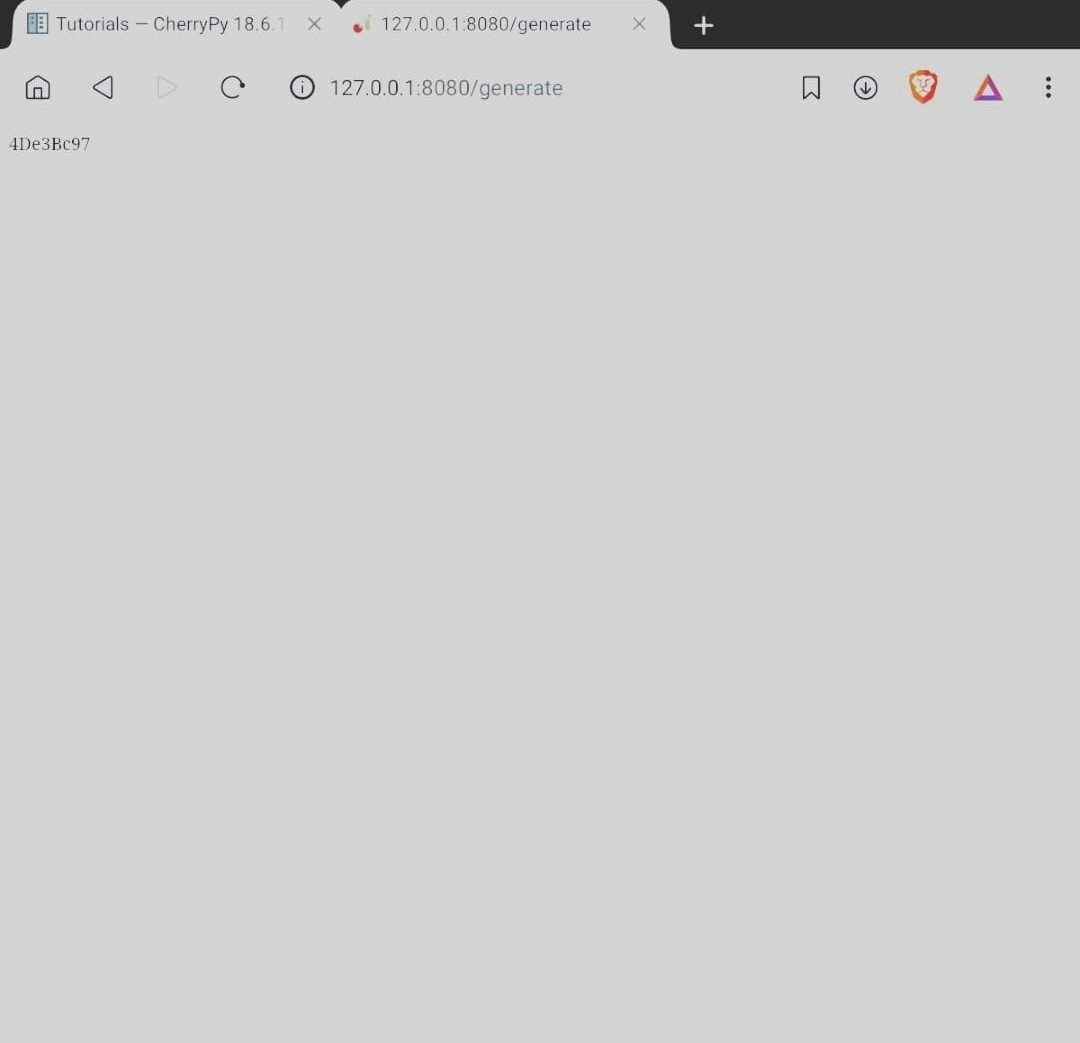
http://localhost:8080/generateにアクセスすると、ブラウザにはランダムな文字列が表示されます。
ここで何が起こっているのか、ちょっと分解してみましょう。これは、あなたがブラウザに入力したURLです。
http://localhost:8080/generate
このURLには以下のような構成が含まれています。
http://これは、HTTPプロトコル(RFC2616参照)を使ったURLであることを示しています。
localhost:8080は、サーバーのアドレスです。ホスト名とポートで構成されています。
/generateは、URLのパスセグメントです。これは CherryPy が応答するために公開されている関数やメソッドを探すのに使うものです。
ここでは、CherryPy は
index()メソッドで/を処理し、generate()メソッドで/generateを処理しています。
http://localhost:8080/generate?に移動します。length=16で、ブラウザは長さ 16 の生成された文字列を表示します。http:// localhost:8080/generateなどの URL をサポートするために Python のデフォルト引数の値がどのように役立つかに注目してください。 このような URL では、?の後のセクションはクエリ文字列と呼ばれます。従来、クエリ文字列は、(キー、値)ペアのセットを渡すことによって URL をコンテキスト化するために使用されていました。これらのペアの形式は key = value です。各ペアは&文字で区切られています。 指定された長さの値を整数に変換する方法に注意してください。実際、値はクライアントからサーバーに文字列として送信されます。 CherryPy が URL パスセグメントを公開された関数にマップするのと同じように、クエリ文字列キーはそれらの公開された関数パラメーターにマップされます。
( google translate )で翻訳されました。
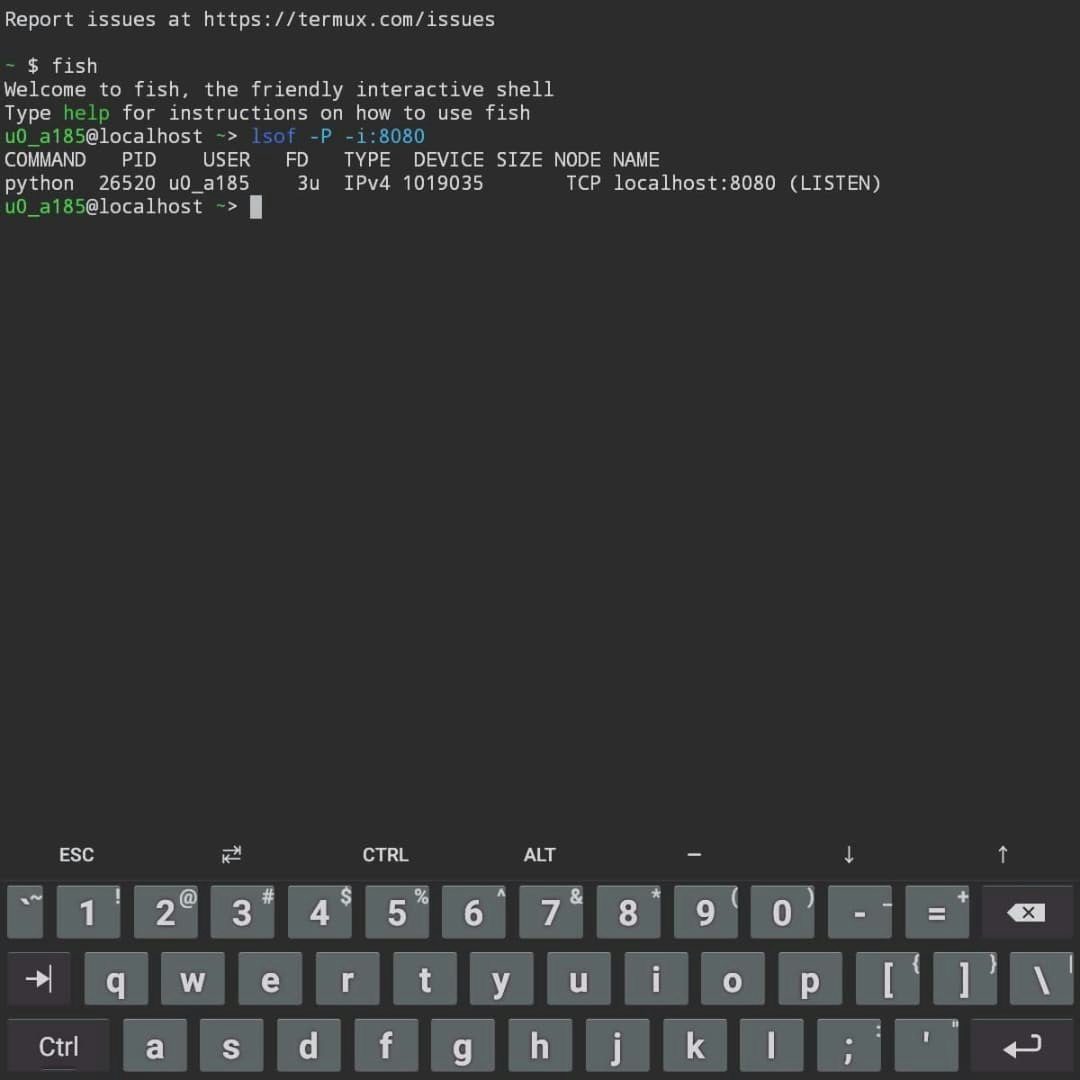
localhost:8080 process check
port :8080 のプロセスをチェックします。
Localhost で LISTEN しているのが webserver です。
lsof -P -i:8080
ブラウザから 127.0.0.1:8080 にアクセスします。
うん、web フレームワークとはこの場合は、「ちょっと書きたせば、それなりに動いてくれるサーバープログラムになるやつ」のことのようですね。他にも定義があると思うけど、この段階では、そうですね。
stop webserver process
動いているサーバーをプロセスをターミナルコマンドで止めて停止します。
kill -9
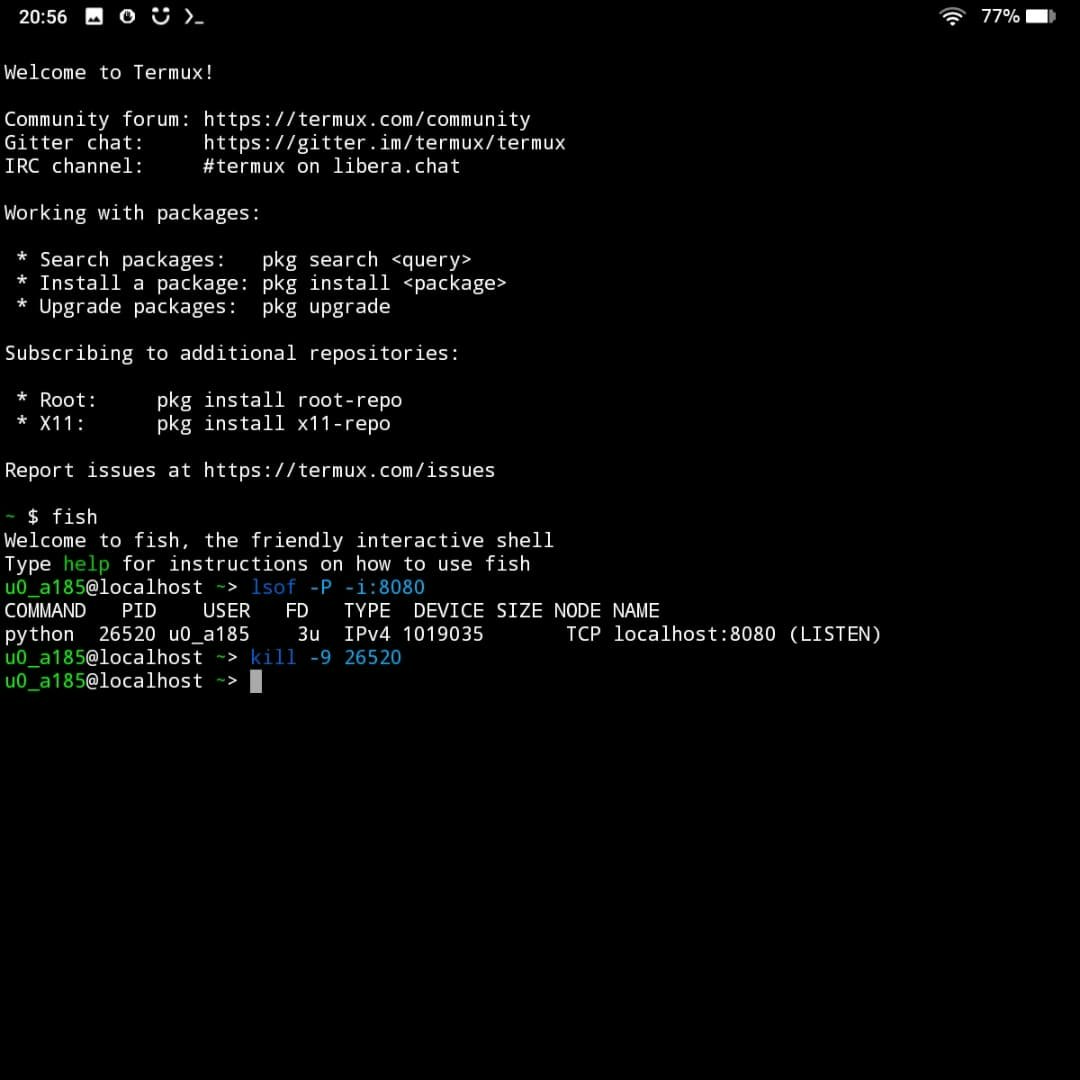
これ以外の方法としては、ターミナルのなかで コントロールキーと c で python を停止できます。
今の段階では他にサーバーを止める方法はないですが、サーバーをストップさせるメソッドを追加すると、メソッドが呼ばれるとサーバーを停止するようにもできるはずですが、チュートリアルには書かれていません。止めることは動かすことと同じくらい大事なことなので、サーバーをきちんと止める方法については調べておいた方がいいです。
Tutorial 9: Data is all my life の SQLite を使ったチュートリアルにいきたいのですが、その前に
Tutorial 6: What about my javascripts, CSS and images?
の箇所に書いてあることをピックアップします。
CherryPy provides support to serve a single file or a complete directory structure. Most of the time, this is what you’ll end up doing so this is what the code above demonstrates. First, we indicate the root directory of all of our static content. This must be an absolute path for security reason. CherryPy will complain if you provide only relative paths when looking for a match to your URLs.
Then we indicate that all URLs which path segment starts with /static will be served as static content. We map that URL to the public directory, a direct child of the root directory. The entire sub-tree of the public directory will be served as static content. CherryPy will map URLs to path within that directory. This is why /static/css/style.css is found in public/css/style.css.
CherryPy は、単一のファイルまたは完全なディレクトリ構造を提供するためのサポートを提供します。ほとんどの場合、これは最終的に実行することになるため、上記のコードが示すものです。まず、URL に一致するものを探すときに相対パスのみを指定すると、CherryPy が文句を言うすべての静的コンテンツのルートディレクトリを示します。これは、セキュリティ上の理由から絶対パスである必要があります。 次に、パスセグメントが/ static で始まるすべての URL が、静的コンテンツとして提供されることを示します。その URL を、ルートディレクトリの直接の子であるパブリックディレクトリにマップします。パブリックディレクトリのサブツリー全体が静的コンテンツとして提供されます。 CherryPy は、URL をそのディレクトリ内のパスにマップします。これが、/ static / css /style.css が public / css /style.css にある理由です。
( google translate )で翻訳されました。
これはどう読んでもわかりにくいんですけれども、
チュートリアルには記載されていない pytest というディレクトリがあるとして、その下に root ディレクトリがあり、このようにファイルが配置されていれば、いいのじゃないかなと思います。
要するに root ディレクトリにコンテンツファイルがおいてあって、その下の public ディレクトリのものが CherryPy によって static というように読み替えられて web サイトとして公開されるということだと思います。
( helloCherry.py というのは、各チュートリアルで出てくる .py をこの名前で置き換えたものです。tut08.py であっても tut09.py でも helloCherry.py と読み替えてください。)
~/pytest/root $ tree
.
├── helloCherry.py
├── index.html
└── public
    └── css
        └── style.css
public/index.html
<!DOCTYPE html>
<html>
  <head>
    <link href="/static/css/style.css" rel="stylesheet">
    <script src="http://code.jquery.com/jquery-2.0.3.min.js"></script>
    <script type="text/javascript">
      $(document).ready(function() {

        $("#generate-string").click(function(e) {
          $.post("/generator", {"length": $("input[name='length']").val()})
           .done(function(string) {
            $("#the-string").show();
            $("#the-string input").val(string);
          });
          e.preventDefault();
        });

        $("#replace-string").click(function(e) {
          $.ajax({
            type: "PUT",
            url: "/generator",
            data: {"another_string": $("#the-string input").val()}
          })
          .done(function() {
            alert("Replaced!");
          });
          e.preventDefault();
        });

        $("#delete-string").click(function(e) {
          $.ajax({
            type: "DELETE",
            url: "/generator"
          })
          .done(function() {
            $("#the-string").hide();
          });
          e.preventDefault();
        });

      });
    </script>
  </head>
  <body>
    <input type="text" value="8" name="length"/>
    <button id="generate-string">Give it now!</button>
    <div id="the-string">
      <input type="text" />
      <button id="replace-string">Replace</button>
      <button id="delete-string">Delete it</button>
    </div>
  </body>
</html>
public/css/style.css
body {
  background-color: blue;
}

# the-string {
  display: none;
}
Tutorial 9: Data is all my life
tut09.py (helloCherry.py)
import os, os.path
import random
import sqlite3
import string
import time

import cherrypy

DB_STRING = "my.db"


class StringGenerator(object):
    @cherrypy.expose
    def index(self):
        return open('index.html')


@cherrypy.expose
class StringGeneratorWebService(object):

    @cherrypy.tools.accept(media='text/plain')
    def GET(self):
        with sqlite3.connect(DB_STRING) as c:
            cherrypy.session['ts'] = time.time()
            r = c.execute("SELECT value FROM user_string WHERE session_id=?",
                          [cherrypy.session.id])
            return r.fetchone()

    def POST(self, length=8):
        some_string = ''.join(random.sample(string.hexdigits, int(length)))
        with sqlite3.connect(DB_STRING) as c:
            cherrypy.session['ts'] = time.time()
            c.execute("INSERT INTO user_string VALUES (?, ?)",
                      [cherrypy.session.id, some_string])
        return some_string

    def PUT(self, another_string):
        with sqlite3.connect(DB_STRING) as c:
            cherrypy.session['ts'] = time.time()
            c.execute("UPDATE user_string SET value=? WHERE session_id=?",
                      [another_string, cherrypy.session.id])

    def DELETE(self):
        cherrypy.session.pop('ts', None)
        with sqlite3.connect(DB_STRING) as c:
            c.execute("DELETE FROM user_string WHERE session_id=?",
                      [cherrypy.session.id])


def setup_database():
    """
    Create the `user_string` table in the database
    on server startup
    """
    with sqlite3.connect(DB_STRING) as con:
        con.execute("CREATE TABLE user_string (session_id, value)")


def cleanup_database():
    """
    Destroy the `user_string` table from the database
    on server shutdown.
    """
    with sqlite3.connect(DB_STRING) as con:
        con.execute("DROP TABLE user_string")


if __name__ == '__main__':
    conf = {
        '/': {
            'tools.sessions.on': True,
            'tools.staticdir.root': os.path.abspath(os.getcwd())
        },
        '/generator': {
            'request.dispatch': cherrypy.dispatch.MethodDispatcher(),
            'tools.response_headers.on': True,
            'tools.response_headers.headers': [('Content-Type', 'text/plain')],
        },
        '/static': {
            'tools.staticdir.on': True,
            'tools.staticdir.dir': './public'
        }
    }

    cherrypy.engine.subscribe('start', setup_database)
    cherrypy.engine.subscribe('stop', cleanup_database)

    webapp = StringGenerator()
    webapp.generator = StringGeneratorWebService()
    cherrypy.quickstart(webapp, '/', conf)
基本的にこのチュートリアルはすべてコピー&ペーストで実践できるようにしてあると思うので、jupyter notebook が使えるのであればセルにコピーして、ポチりポチりと実行していけばわかりやすいかもしれません。
たぶん、
if __name__ == '__main__':
を省いて、インデントを調整すれば jupyter notebook でも動くと思います。
さて、これ何 ?
CherryPy のサーバーを動かしているときに my.db を SQLite3 で見てみると、サーバー起動時
python helloCherry.py (tut09.py)
my.db というファイルができています。
~/pytest/root $ ls
helloCherry.py  index.html  my.db  public
~/pytest/root $ tree
.
├── helloCherry.py
├── index.html
├── my.db
└── public
└── css
        └── style.css
u0_a185@localhost ~/p/root> sqlite3 my.db
SQLite version 3.36.0 2021-06-18 18:36:39
Enter ".help" for usage hints.
sqlite> .schema
CREATE TABLE user_string (session_id, value);
sqlite> .tables
user_string
sqlite> select * from user_string;
sqlite>
127.0.0.1:8080 にブラウザでアクセスします。

そして、Give it now! を押す。
ここでまた SQLite3 でチェックすると、
sqlite> select * from user_string;
5aa2f4b1343baa0959f26c45623e7afd0cc34dde|B5A0deab
sqlite>
セッション ID (=5aa2f4b1343baa0959f26c45623e7afd0cc34dde) と生成されたランダム値 (=B5A0deab) がデータベースにインサートされています。
そういうプログラムですね。
セッション ID
https://thinkit.co.jp/free/article/0604/7/8/
ただし、チュートリアルのこのプログラムはサーバーをシャットダウンするとデータをテーブルごと消してしまうようになっているので、データベースに書き込まれてるのか、サーバーを落としてから確認しようとしても、データベースのテーブル自体が無いので、いまいち何をしているのかよくわかりませんでしたね。
ここまでで、どうやらデータベースへ書き込んだり、データベースのデータを表示させることやセッションID を発行したりすることができるということがわかりました。