はじめに
本記事では、Pythonを用いてFitbitのサーバから心拍数を取得する一連の流れを、OAuth 2.0 tutorial pageを経由させないで実装していく。また、FitbitのPython用のライブラリも今回は使っていない。今回実装するソースコードはgithub上に公開しているので、適宜確認してほしい。ただし、ソースコードは心拍数取得までの流れを主にしているので、実際に用いるためにアクセストークンの更新処理や、例外処理などのコードが足りていないことに注意する。
全体の流れ
※この節のリンクはすべてFitbitの公式ドキュメント
- Fitbitのアカウントを作成、アプリケーションの登録
- 以下、Pythonで実装
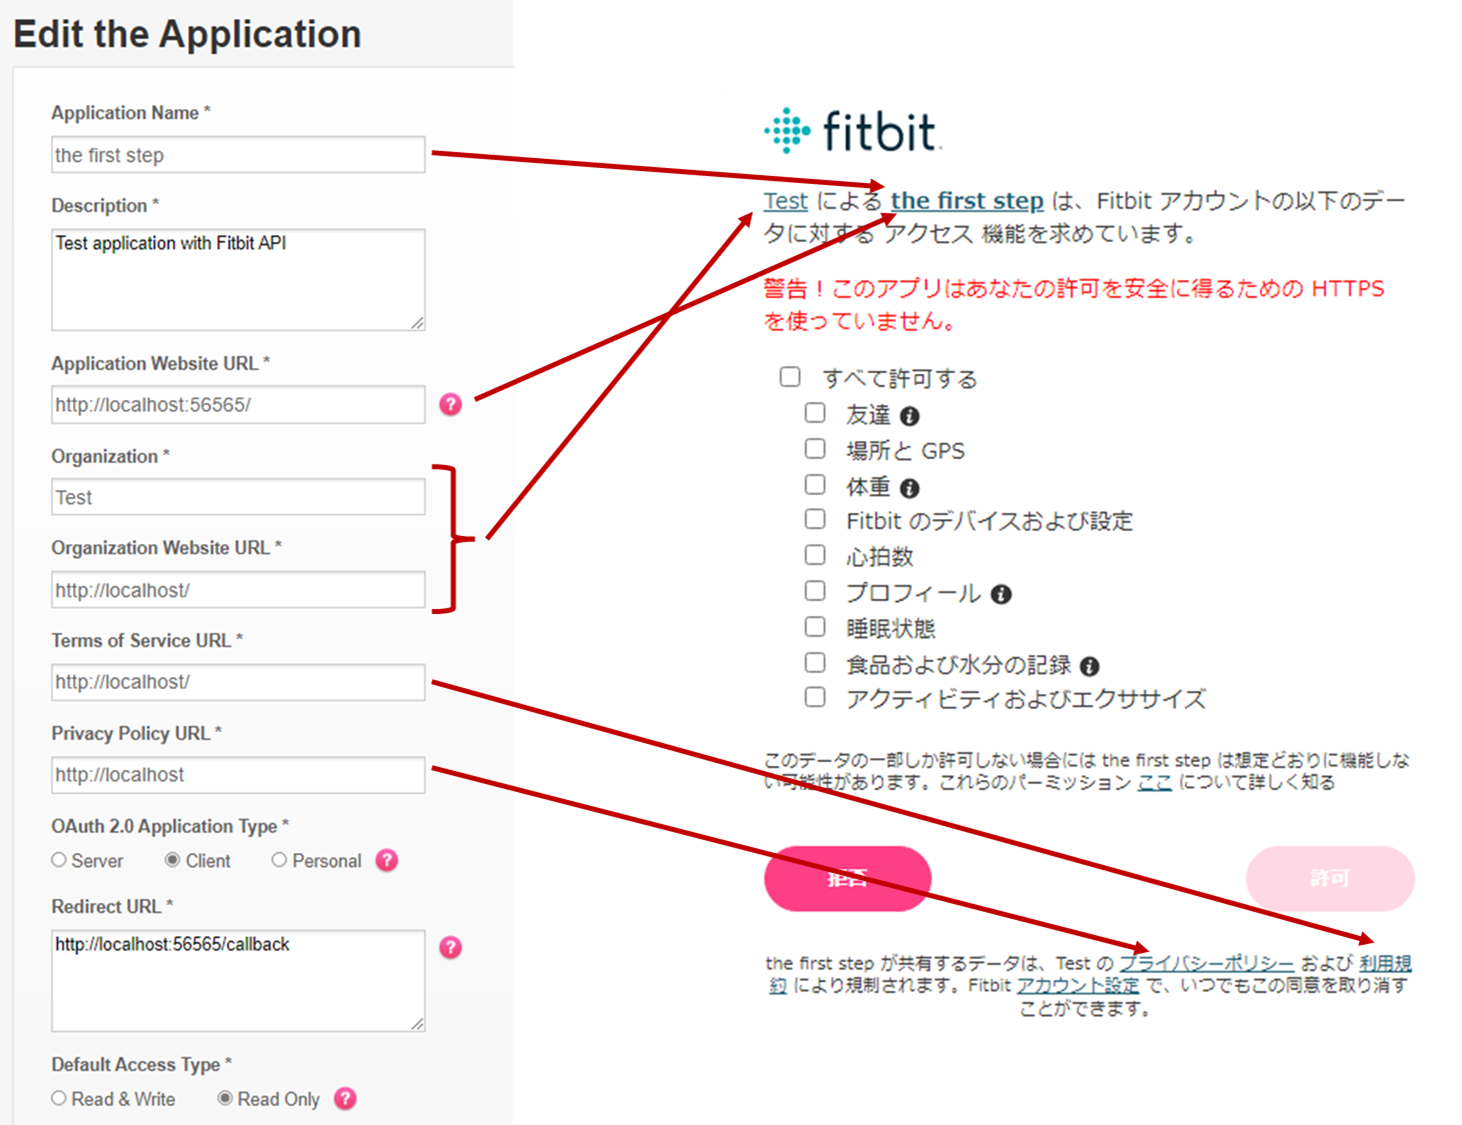
Fitbitのアカウントを作成、アプリケーションの登録

| 項目 | 説明 |
|---|---|
| Application Name | APIを使用するアプリケーション名(fitbitを含むなど公式に思わせる名前は禁止) |
| Description | アプリケーションの説明(最低文字数あり) |
| Application Website URL | アプリケーションを用いるサイトのURL ※localhost以外の場合、https通信を用いないとエラー |
| Organization | 企業名 なんでも |
| Organization Website URL | 企業のURL なんでも |
| Terms of Service URL | 利用規約のURL なんでも |
| Privacy Policy URL | プライバシーポリシーのURL なんでも |
| OAuth 2.0 Application Type | ・Server サーバ側で認証 ・Client クライアント側で認証 ・Persona 自分の情報のみアクセス可 Personaでは1分おきなどでデータが取れるが、ServerとClientではデフォルトでは日ごとのみ。利用したい場合は、別途申請する必要がある。 OAuth 2.0 Application Typeの詳細 |
| Redirect URL | 認証ページで許可が押された後に戻ってくるページ |
| Default Access Type | APIでデータを取得するだけなら、Read OnlyでOK |
- 関連資料
Pythonで実装
繰り返しになるが、すべてのコードはgithub上に公開している
コード内に存在するStepの1~5は公式ドキュメントと連動している
事前準備
- (Pythonの仮想環境を準備)
- 必要なライブラリをインストールする(setup.sh)
- pip install requests
- pip install pyyaml
- pip install mysqlclient
- pip install flask
- pip install flask_sqlalchemy
- _secret.yamlを編集し、secret.yamlを作成
- client_idとclient_secretは https://dev.fitbit.com/apps の作成したアプリケーション名から取得
- database_uriは使っているDBに合わせて編集(今回はMySQLを用いた場合のサンプル)
fitbit:
  client_id: xxx
  client_secret: xxx

flask:
  secret_key: xxx(なんでもいい)

database_uri: "mysql://{ユーザ名}:{パスワード}@localhost:3306/{スキーマ名}?charset=utf8"
- MySQLにスキーマを作成(database.pyをそのまま使う場合、テーブルは自動に作成される)
localhost:56565/ のページ
@app.get("/")
def top():
    # Step1: code_verifierとcode_challengeの作成
    code_verifier = ''.join(secrets.choice(string.digits)
                            for _ in range(random.randint(43, 128)))
    session['code_verifier'] = code_verifier
    code_challenge = base64urlencode(
        hashlib.sha256(code_verifier.encode()).digest())

    # Step2: 認証ページで認証してもらう
    # https://dev.fitbit.com/build/reference/web-api/authorization/authorize/
    authorization_url = f"\
https://www.fitbit.com/oauth2/authorize?\
&response_type=code\
&client_id={secret['fitbit']['client_id']}\
&redirect_uri=http%3A%2F%2Flocalhost%3A56565%2Fcallback\
&code_challenge={code_challenge}\
&code_challenge_method=S256\
&scope=activity%20heartrate%20location%20nutrition%20profile%20settings%20sleep%20social%20weight\
&expires_in=86400"

    return f"<a href={authorization_url}>認証</a>"
Step1: code_verifierとcode_challengeの作成
Oauth2の認証を始めるために、code_verifierとcode_challengeを作成する
code_verifier:43~128桁のコード
code_challenge:code_verifierをSHA256でハッシュ化したのち、BASE64URLでエンコーディングする
BASE64URLでエンコードするツールが見つからなかったため、以下の関数を作成しエンコードを行った
# 文字列をBase64URLへエンコード
def base64urlencode(code):
    b64 = base64.b64encode(code)
    b64_str = str(b64)[2:-1]
    b64url = b64_str.translate(str.maketrans({'+': '-', '/': '_', '=': ''}))

    return b64url
Step2: 認証ページで認証してもらう
Fitbitの認証用のページを表示するためのURLを作成し、トップページに表示
URLのパラメータの詳細
localhost:56565/callback のページ
@app.get("/callback")
def callback():
    # 認証ページで許可が押されるとこのページへ遷移

    # Step3: 認証コードの取得
    authorization_code = request.args.get('code')
    if authorization_code is None:  # ?code= がなければトップへ
        return redirect(url_for('top'))

    # Step4: アクセストークンとリフレッシュトークン取得のためのURLを構築
    # https://dev.fitbit.com/build/reference/web-api/authorization/oauth2-token/
    headers = {
        'Authorization': 'Basic ' + str(base64.b64encode(f"{secret['fitbit']['client_id']}:{secret['fitbit']['client_secret']}".encode()))[2:-1],
        'Content-Type': 'application/x-www-form-urlencoded',
    }
    data = f"client_id={secret['fitbit']['client_id']}&code={authorization_code}&code_verifier={session['code_verifier']}&grant_type=authorization_code&redirect_uri=http%3A%2F%2Flocalhost%3A56565%2Fcallback&expires_in=31536000"

    # Step5: アクセストークンとリフレッシュトークンの取得
    tokens = requests.post(
        'https://api.fitbit.com/oauth2/token', headers=headers, data=data)

    # 取得できた場合
    if tokens.status_code == 200:
        token_dict = tokens.json()  # json -> dict
        user_id = token_dict['user_id']                 # user_id
        access_token = token_dict['access_token']       # access_token
        refresh_token = token_dict['refresh_token']     # refresh_token

        # DBにすでに存在するか検索
        user = User.query.filter_by(user_id=user_id).one_or_none()

        if user is not None:        # 存在していた場合、トークンを更新
            user.access_token = access_token
            user.refresh_token = refresh_token

        else:                       # 存在しなかった場合、新規に登録
            user = User(user_id, access_token, refresh_token)

        try:
            db.session.add(user)
            db.session.commit()
        except:
            return redirect(url_for('top'))

        session['user_id'] = user_id

        return redirect(url_for('apitest'))

    # 取得できなかった場合
    else:
        return redirect(url_for('top'))
Step3: 認証コードの取得
認証ページで許可が押された場合、事前に設定した/callbackのページに遷移してくる
その時、URLにGETパラメータとして認証コード(code=)が渡されるので、認証を続けるためにその情報を取り出す
Step4: アクセストークンとリフレッシュトークン取得のためのURLを構築
OAuth2 Tokenのページに従い、アクセストークンとリフレッシュトークンを取得するためのURLを構築
URLのヘッダーのAuthorizationはOAuth 2.0 Application TypeでServerを選んだ場合は必須。ClientかPersona時は任意である。
Step5: アクセストークンとリフレッシュトークンの取得
Step4で準備したURLを用いて、アクセストークンとリフレッシュトークンを取得する
取得できたらトークンをデータベースに登録する
localhost:56565/apitest のページ
@app.get("/apitest")
def apitest():
    # Step6 心拍数の取得(テスト)
    # https://dev.fitbit.com/build/reference/web-api/heartrate-timeseries/get-heartrate-timeseries-by-date-range/

    # user_idが存在しない場合、トップページへ
    try:
        user_id = session['user_id']
    except:
        return redirect(url_for('top'))

    # DBからアクセストークンの取得
    user = User.query.filter_by(user_id=user_id).one_or_none()
    access_token = user.access_token

    # 心拍数取得用のURLの構築
    headers = {
        'accept': 'Basic ' + 'application/json',
        'authorization': 'Bearer '+access_token,
        'accept-language': 'ja_JP',
    }

    heart_rate = requests.get(
        f"https://api.fitbit.com/1/user/{user_id}/activities/heart/date/2022-05-01/today.json", headers=headers)

    return heart_rate.json()
Step6: 心拍数の取得(テスト)
心拍数のAPIのドキュメントに従いURLを作成後、データを取得し画面に表示する
成功すれば以下のように表示される

まとめ
Pythonを用いてFitbitから心拍数を取得することに成功した。OAuth2の実装が初めてで最初は少し悩んだが、素直にドキュメント通りに実装すれば問題なく実装できた。今後は、APIでまだ試していないものが多いのでいろいろ試してみたい。また、集めたデータを解析して有効活用していけたらと考えている。最後に、再三にはなるが、リフレッシュトークンを用いたアクセストークンの更新などは実装していないので、その辺は公式ドキュメントを確認して実装してみてほしい。