はじめに
Instagramのアプリにあるようなハート型のボタンを作成し、OSSとして公開しましたので、解説として本記事を書きました。
HeartButton
作成したライブラリはこちらです。
https://github.com/darquro/heart-button

タップすると、アニメーションして状態が変わるというシンプルなものです。
UIBezierPathを使ってハート型を描く
今回はUIBezierPathを使って、線を描画し、ハートを描いています。
よくボタンはpngなど画像リソースを使用することが多く、
製品プロダクトではデザイナーによるアプリ全体のテーマに合わせた画像を使うべきだと思いますが、個人で作るアプリなどで、いちいち各解像度ごとの画像用意するのが面倒というケースでは用途あるのではないかと思います。
以下がUIBezierPathを使用して、ハートを描いているコードになります。
extension UIBezierPath {

    /// Create heart path
    ///
    /// - Parameter rect: draw in the rect
    convenience init(heartIn rect: CGRect) {
        self.init()

        let bottomCenter = CGPoint(x: rect.width * 0.5, y: rect.height)
        let topCenter = CGPoint(x: rect.width * 0.5, y: rect.height * 0.25)
        let leftSideControl = CGPoint(x: -(rect.width * 0.45), y: (rect.height * 0.45))
        let leftTopControl = CGPoint(x: (rect.width * 0.25), y: -(rect.height * 0.2))
        let rightTopControl = CGPoint(x: rect.width - leftTopControl.x, y: leftTopControl.y)
        let rightSideControl = CGPoint(x: rect.width + (leftSideControl.x * -1), y: leftSideControl.y)

        self.move(to: bottomCenter)

        // Left Side Curve
        self.addCurve(to: topCenter,
                      controlPoint1: leftSideControl,
                      controlPoint2: leftTopControl)

        // Right Side Curve
        self.addCurve(to: bottomCenter,
                      controlPoint1: rightTopControl,
                      controlPoint2: rightSideControl)

        self.close()
    }
}
幾つかハート型を描く方法はあるかと思いますが、これが一番シンプルな方法だと思います。
UIBezierPathのaddCurve(to:controlPoint1:controlPoint2:)を使用し、
中央下の位置から左側の線、右側の線と描きます。
controlPointをどのように配置するかで、カーブの形が変わってきます。
以下の図がそのイメージになります。
線を引っ張るようなイメージでcontrolPointを決めていくといいと思います。
ざっくりとイメージが出来たらPlaygroundで描画しながら微調整していきました。
また、OffのときのハートとOnのときのハートはそれぞれ別のCAShapeLayerを作成して、addSubLayerしていきます。
注意
UIColorのsetStroke()やsetFill()はUIViewのdrawRectで単一の描画する際には使えますが、複数のCAShapeLayerを使用する場合は、CAShapeLayer側に線の色や塗りつぶし色を指定します。
extension CAShapeLayer {

   /// Create heart shape layer
   ///
   /// - Parameters:
   ///   - rect: draw in the rect
   ///   - lineWidth: used to line width
   ///   - lineColor: used to line color
   ///   - fillColor: used to fill color
   convenience init(heartIn rect: CGRect,
                    lineWidth: CGFloat,
                    lineColor: UIColor,
                    fillColor: UIColor) {
       self.init()
       let path = UIBezierPath(heartIn: rect)
       self.path = path.cgPath
       self.lineWidth = lineWidth
       self.strokeColor = lineColor.cgColor
       self.fillColor = fillColor.cgColor
   }
}
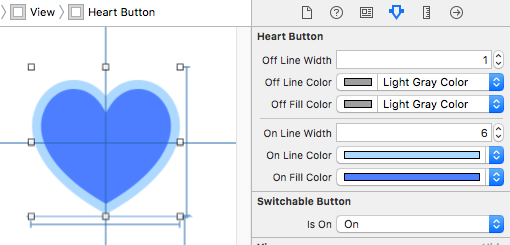
UIBezierPathを使用した場合のメリットとして、Storyboard上でのデザイン変更ができるということもあります。
@IBDesignableのattributeを使用することで、線幅や色などを指定できるようにしました。
ステータスの変更
ハンドラはdelegateパターンではなくクロージャをそのままプロパティに設定する形式にしました。
self.heartButton.stateChanged = { sender, isOn in
    if isOn {
      // selected
    } else {
      // unselected
    }
}
状態をコードから変更するには以下のようになります。
self.heartButton.setOn(true, animated: true)
アニメーション
アニメーションはCASpringAnimationを使用しました。バネのアニメーションの細かい指定が可能です。
extension CASpringAnimation {

    /// The Expansion and bouncing animation
    static var expansionAndBouncingAnimation: CASpringAnimation {
        let anim = CASpringAnimation(keyPath: "transform.scale") //変化させるプロパティ(今回はCAShapeLayer#transform.scale)
        anim.fromValue = 0.5         // 開始
        anim.toValue = 1.0           // 終了
        anim.mass = 1.0              // 質量
        anim.initialVelocity = 30.0  // 初速度
        anim.damping = 30.0          // 減衰率
        anim.stiffness = 120.0       // バネの硬さ
        anim.duration = anim.settlingDuration // 設定により、停止するまでの時間を指定
        return anim
    }
}
この初速度、減衰率、バネの硬さの数値も大体で設定して、微調整しました。
上記のCASpringAnimationを使用し、タップジェスチャーから、
- 変更後レイヤーを表示
- レイヤーの順番変更
- アニメーション
- 変更前レイヤーを非表示
という順番で行っています。
// MARK: Changes The button display

/// Change display to on state
///
/// - Parameter animated: true to animate, otherwise false.
private func changeDisplayToOn(animated: Bool) {
    onLayer?.isHidden = false
    switchLayer()
    if animated {
        let animGroup = CAAnimationGroup()
        animGroup.animations = self.onAnimations.compactMap { $0 }
        layer.add(animGroup, forKey: nil)
    }
    offLayer?.isHidden = true
}

/// Change display to off state
///
/// - Parameter animated: true to animate, otherwise false.
private func changeDisplayToOff(animated: Bool) {
    offLayer?.isHidden = false
    switchLayer()
    if animated {
        let animGroup = CAAnimationGroup()
        animGroup.animations = self.offAnimations.compactMap { $0 }
        layer.add(animGroup, forKey: nil)
    }
    onLayer?.isHidden = true
}

/// Switch the order of sub layers
private func switchLayer() {
    guard let sublayers = self.layer.sublayers,
        sublayers.count == 2,
        let firstLayer = self.layer.sublayers?.first,
        let secondLayer = self.layer.sublayers?.last
        else {
            return
    }
    self.layer.insertSublayer(secondLayer, at: 0)
    self.layer.insertSublayer(firstLayer, at: 1)
}
以上です。よかったら使ってみてください!

