この記事を読んでできるものは以下の通りです
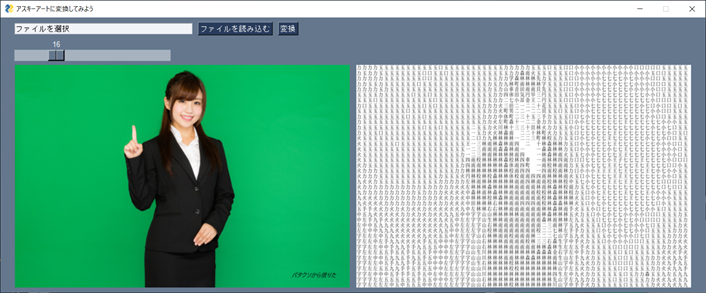
- 画像を選択して表示するビューアー
- パラメータを渡して画像処理を行う
- 画像処理した画像を表示する
PySimPleGUIの基本的な説明に関しては、Tkinterを使うのであればPySimpleGUIを使ってみたらという話を参考にしてください
検証環境
- windows10
- macOS(catalina)
- Python3.7
- ライブラリー
- tkinter
- PySimpleGUI
- Pillow
きっかけ
上の画像を作られた、アスキーアートを自動生成するの記事を見かけて、実際に動かすと面白かったのですが、画像とアスキートにする文字の大きさが固定だったのでその部分にUIをつけてみました。
変換のアルゴリズム自体は元の記事のをお借りしていまています。asci_art_transform.pyファイルが該当します。
画像の表示自体は公式のDemo_Img_Viewerを参考にしています。08_asci_Img_.pyファイルが該当します。
コードの置き場所
githubに配置しております
https://github.com/okajun35/for_pycon_shizu/tree/master/example/08_asci_art
# !/usr/bin/env python
import PySimpleGUI as sg
from PIL import Image, ImageTk
import io
import os

import asci_art_transform as asci

"""
参考URL; https://github.com/PySimpleGUI/PySimpleGUI/blob/master/DemoPrograms/Demo_Img_Viewer.py
"""

def get_img_data(f, maxsize=(600, 450), first=False):
    """Generate image data using PIL
    """
    print("open file:", f)
    img = Image.open(f)
    img.thumbnail(maxsize)
    if first:  # tkinter is inactive the first time
        bio = io.BytesIO()
        img.save(bio, format="PNG")
        del img
        return bio.getvalue()
    return ImageTk.PhotoImage(img)


filename = './model.jpg'  # 最初のファイル
asci_image = "./test.png"

image_elem = sg.Image(data=get_img_data(filename, first=True))
filename_display_elem = sg.Text(filename, size=(80, 3))

# 初期表示時はascに変換してなくてもよい
# './model.jpg' をうわがいてしまってもよい
# asci_image = tranfa_asci('./model.jpg', './test.png', 16)

asc_image_elem = sg.Image(data=get_img_data(asci_image, first=True))

# define layout, show and read the form
col = [image_elem, asc_image_elem]

col_read_file = [sg.InputText('ファイルを選択', key='-INPUT-TEXT-', enable_events=True, ),
                 sg.FileBrowse('ファイルを読み込む', key='-FILE-',
                               file_types=(('jpegファイル', '*.jpg'), ('png', '*.png'),)),
                 sg.Button('変換')]

layout = [col_read_file,
         [sg.Slider(range=(1,64),
          key='-FONT-SIZE-',
          default_value=16,
         orientation='h',
         )], col]

window = sg.Window('アスキーアートに変換してみよう', layout, return_keyboard_events=True,
                   location=(0, 0), use_default_focus=False)

# loop reading the user input and displaying image, filename
i = 0
while True:
    # read the form
    event, values = window.read()
    print(event, values)
    # perform button and keyboard operations
    if event is None:
        break
    elif event == '変換':
        print(values['-INPUT-TEXT-'])
        if os.path.isfile(values['-INPUT-TEXT-']):
            # Animationするには別スレッドにする必要
            sg.popup_animated(sg.DEFAULT_BASE64_LOADING_GIF, message='実行中',text_color='black', background_color='white', time_between_frames=100)
            asci_image = asci.tranfa_asci(values['-INPUT-TEXT-'], asci_image, int(values['-FONT-SIZE-']))
            sg.popup_animated(image_source=None)
            print('変換終了')
            asc_image_elem.update(data=get_img_data(asci_image, first=True))
        else:
            error_massage = values['-INPUT-TEXT-'] + ' は存在してません'
            sg.popup('エラー', error_massage)


    elif values['-FILE-'] != '':
        print('FilesBrowse')
        if os.path.isfile(values['-INPUT-TEXT-']):
            image_elem.update(data=get_img_data(values['-INPUT-TEXT-'], first=True))
処理について
処理については以下の手順となります
- ファイルダイアログを開いて変換したいファイルを読み込む
- 変換するフォントの大きさを選択する
- アスキーアートに変換した画像を保存する
- 変換した画像を読み込んで結果画面に表示する
ファイルダイアログを開いて変換したいファイルを読み込む
sg.InputText('ファイルを選択', key='-INPUT-TEXT-', enable_events=True, ),
sg.FileBrowse('ファイルを読み込む', key='-FILE-',  file_types=(('jpegファイル', '*.jpg'), ('png', '*.png'),)
ファイルダイアグのレイアウトです。
起動時に初期画像を表示するのは以下になります。
image_elem = sg.Image(data=get_img_data(filename, first=True))
filenameは固定の画像ファイルが格納されています。
- 参考:公式のImage Elementの説明
画像を表示するのはget_img_data()を使用しています。このメソッドは公式のDemo_Img_Viewerで使われていた関数をそのまま使用しています。
def get_img_data(f, maxsize=(600, 450), first=False):
    """Generate image data using PIL
    """
    print("open file:", f)
    img = Image.open(f)
    img.thumbnail(maxsize)
    if first:  # tkinter is inactive the first time
        bio = io.BytesIO()
        img.save(bio, format="PNG")
        del img
        return bio.getvalue()
    return ImageTk.PhotoImage(img)
pillowを使用して該当のファイルを開いて、png形式保存したものをpillowのImageTkを用いて表示しています。
- 参考:pillowの公式リファレンスの ImageTk モジュールの説明
PySimpleGUIはtkinterのラッパーですのでtkinterように作られた他のライブラリを使用できるのが強みの一つかと思います。
読み込んだファイルを実際に表示するのは以下の部分です。
image_elem.update(data=get_img_data(values['-INPUT-TEXT-'], first=True))
読み込んだファイルを指定しています。ここでupdate()を使用して表示を更新しています。
2. 変換するフォントの大きさを選択する
変換するフォントの大きさをスライダーで設定します
sg.Slider(range=(1,64),
          key='-FONT-SIZE-',
          default_value=16,
         orientation='h',
         )
スライダーの値に関しては以下で取得できます。
event, values = window.read()
values['-INPUT-TEXT-']
3. アスキーアートに変換した画像を保存する
ファイルを読み込んで変換した「test.png」ファイルに出力します。
asci_image = asci.tranfa_asci(values['-INPUT-TEXT-'], "asci_image", int(values['-FONT-SIZE-']))
4. 変換した画像を読み込んで結果画面に表示する
アスキーアートの画像ファイル「test.png」を表実施します
asc_image_elem.update(data=get_img_data(asci_image, first=True))
まとめ
PySimpleGUIを使うと画像を読み込んでパラメータを加えて変換する画像処理ビューアーを簡単に作ることができます。
公式のデモではpillow以外でもOpenCVを使ったサンプルがあります。
またデープランニングを使用して、白黒画像に色を付けるサンプルプログラムもあります