はじめに
こんにちは、こんばんは、佐藤佑哉です。
本日は、Androidアプリ開発で使用されるRoborazziとReg-suitを用いて、VRTを行い、その結果をPRに表示する方法をGitHubActionsで実現していきたいと思います。
本記事の動機
これは、前回の記事の続きになります。
1番初めのVRTの記事でreg-suitを使用してVRTを行い、差分レポートを表示するところまでやりました。そして、前回はroborazziのVRTの結果をPRに表示するところまでやりました。
今回は、roborazziとreg-suitを組み合わせて、GitHub Actionsを使用して、VRTを行い、その結果をPRに表示する方法を紹介していきたいと思います。
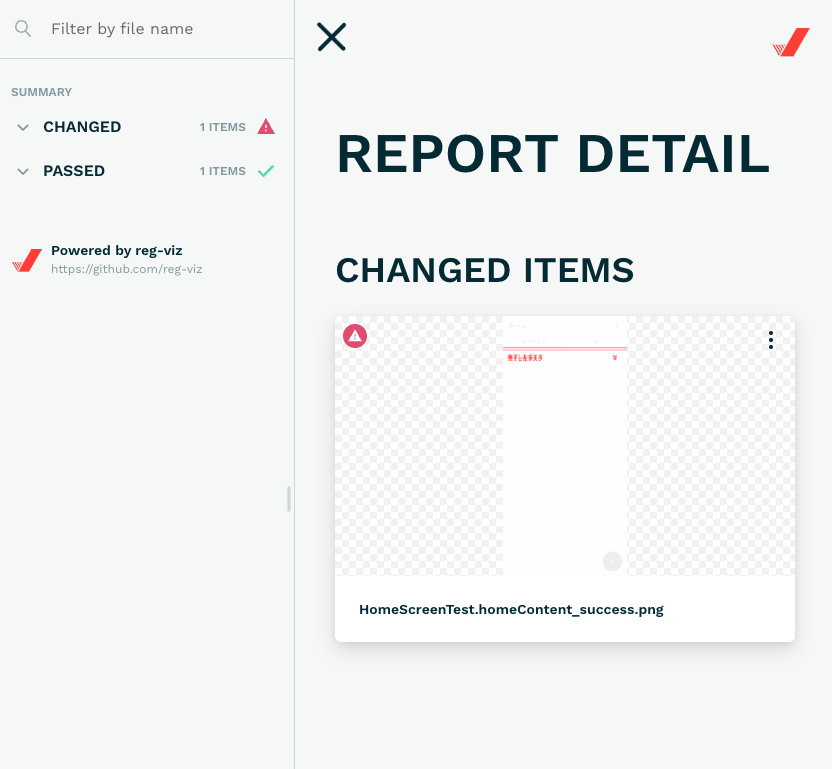
前回のroborazziでは差分の写真やコメントをPRに表示することができましたが、reg-suitのサイトには動的に差分を表示する機能があり、サイトの方が見やすいと感じたので、それをPRに表示するようにしていきたいと思います。
使用する技術
今回は以下の技術を使用していきます。
reg-suit
VRTを行い、差分レポートを表示するためのツール
Roborazzi
スクリーンショットを撮影するためのライブラリ
GitHub Actions
CI/CDを行うためのツール
GitHub Pages
GitHubの静的ページホスティングサービス
前回の記事のまとめ
前回の記事では以下のようなことを行いました。
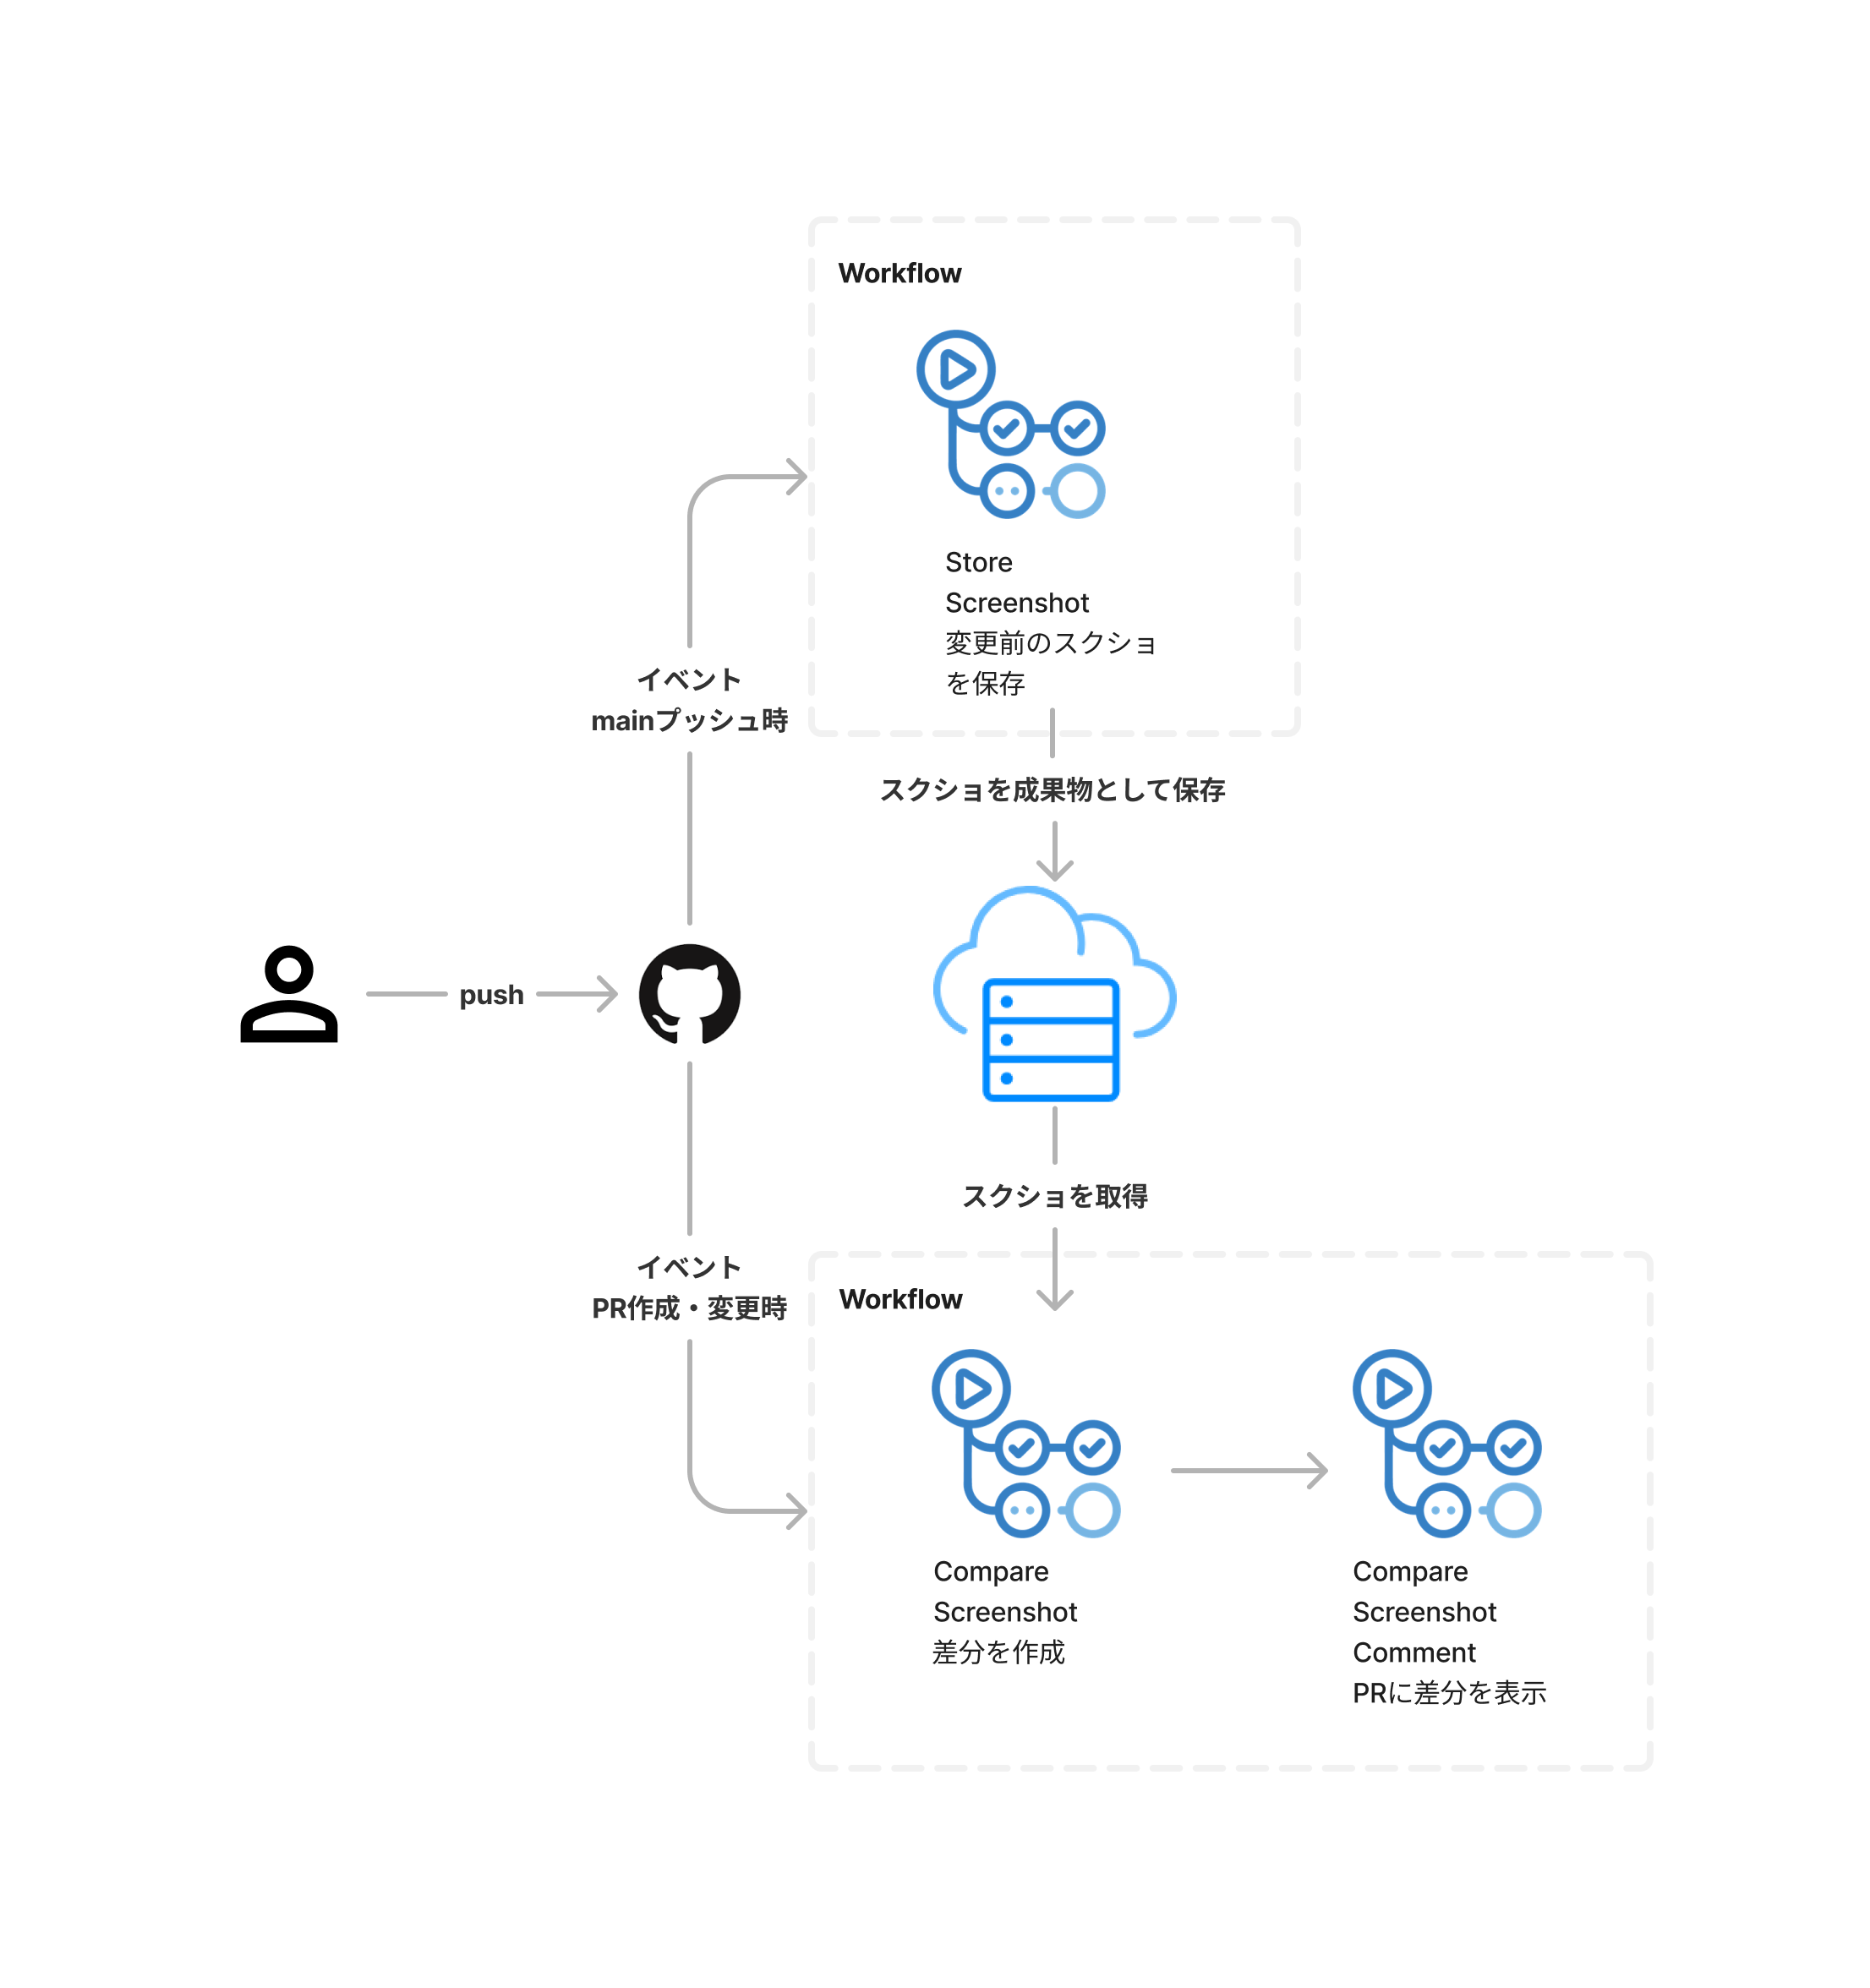
前回はGitHubのStorageを使用して、変更前のスクリーンショットを保存し、それを比較して差分を表示するという流れでした。
今回は、reg-suitによるVRTがメインなので、roborazziの役割であるスクリーンショットの撮影の部分は変わらずに使用していきます。
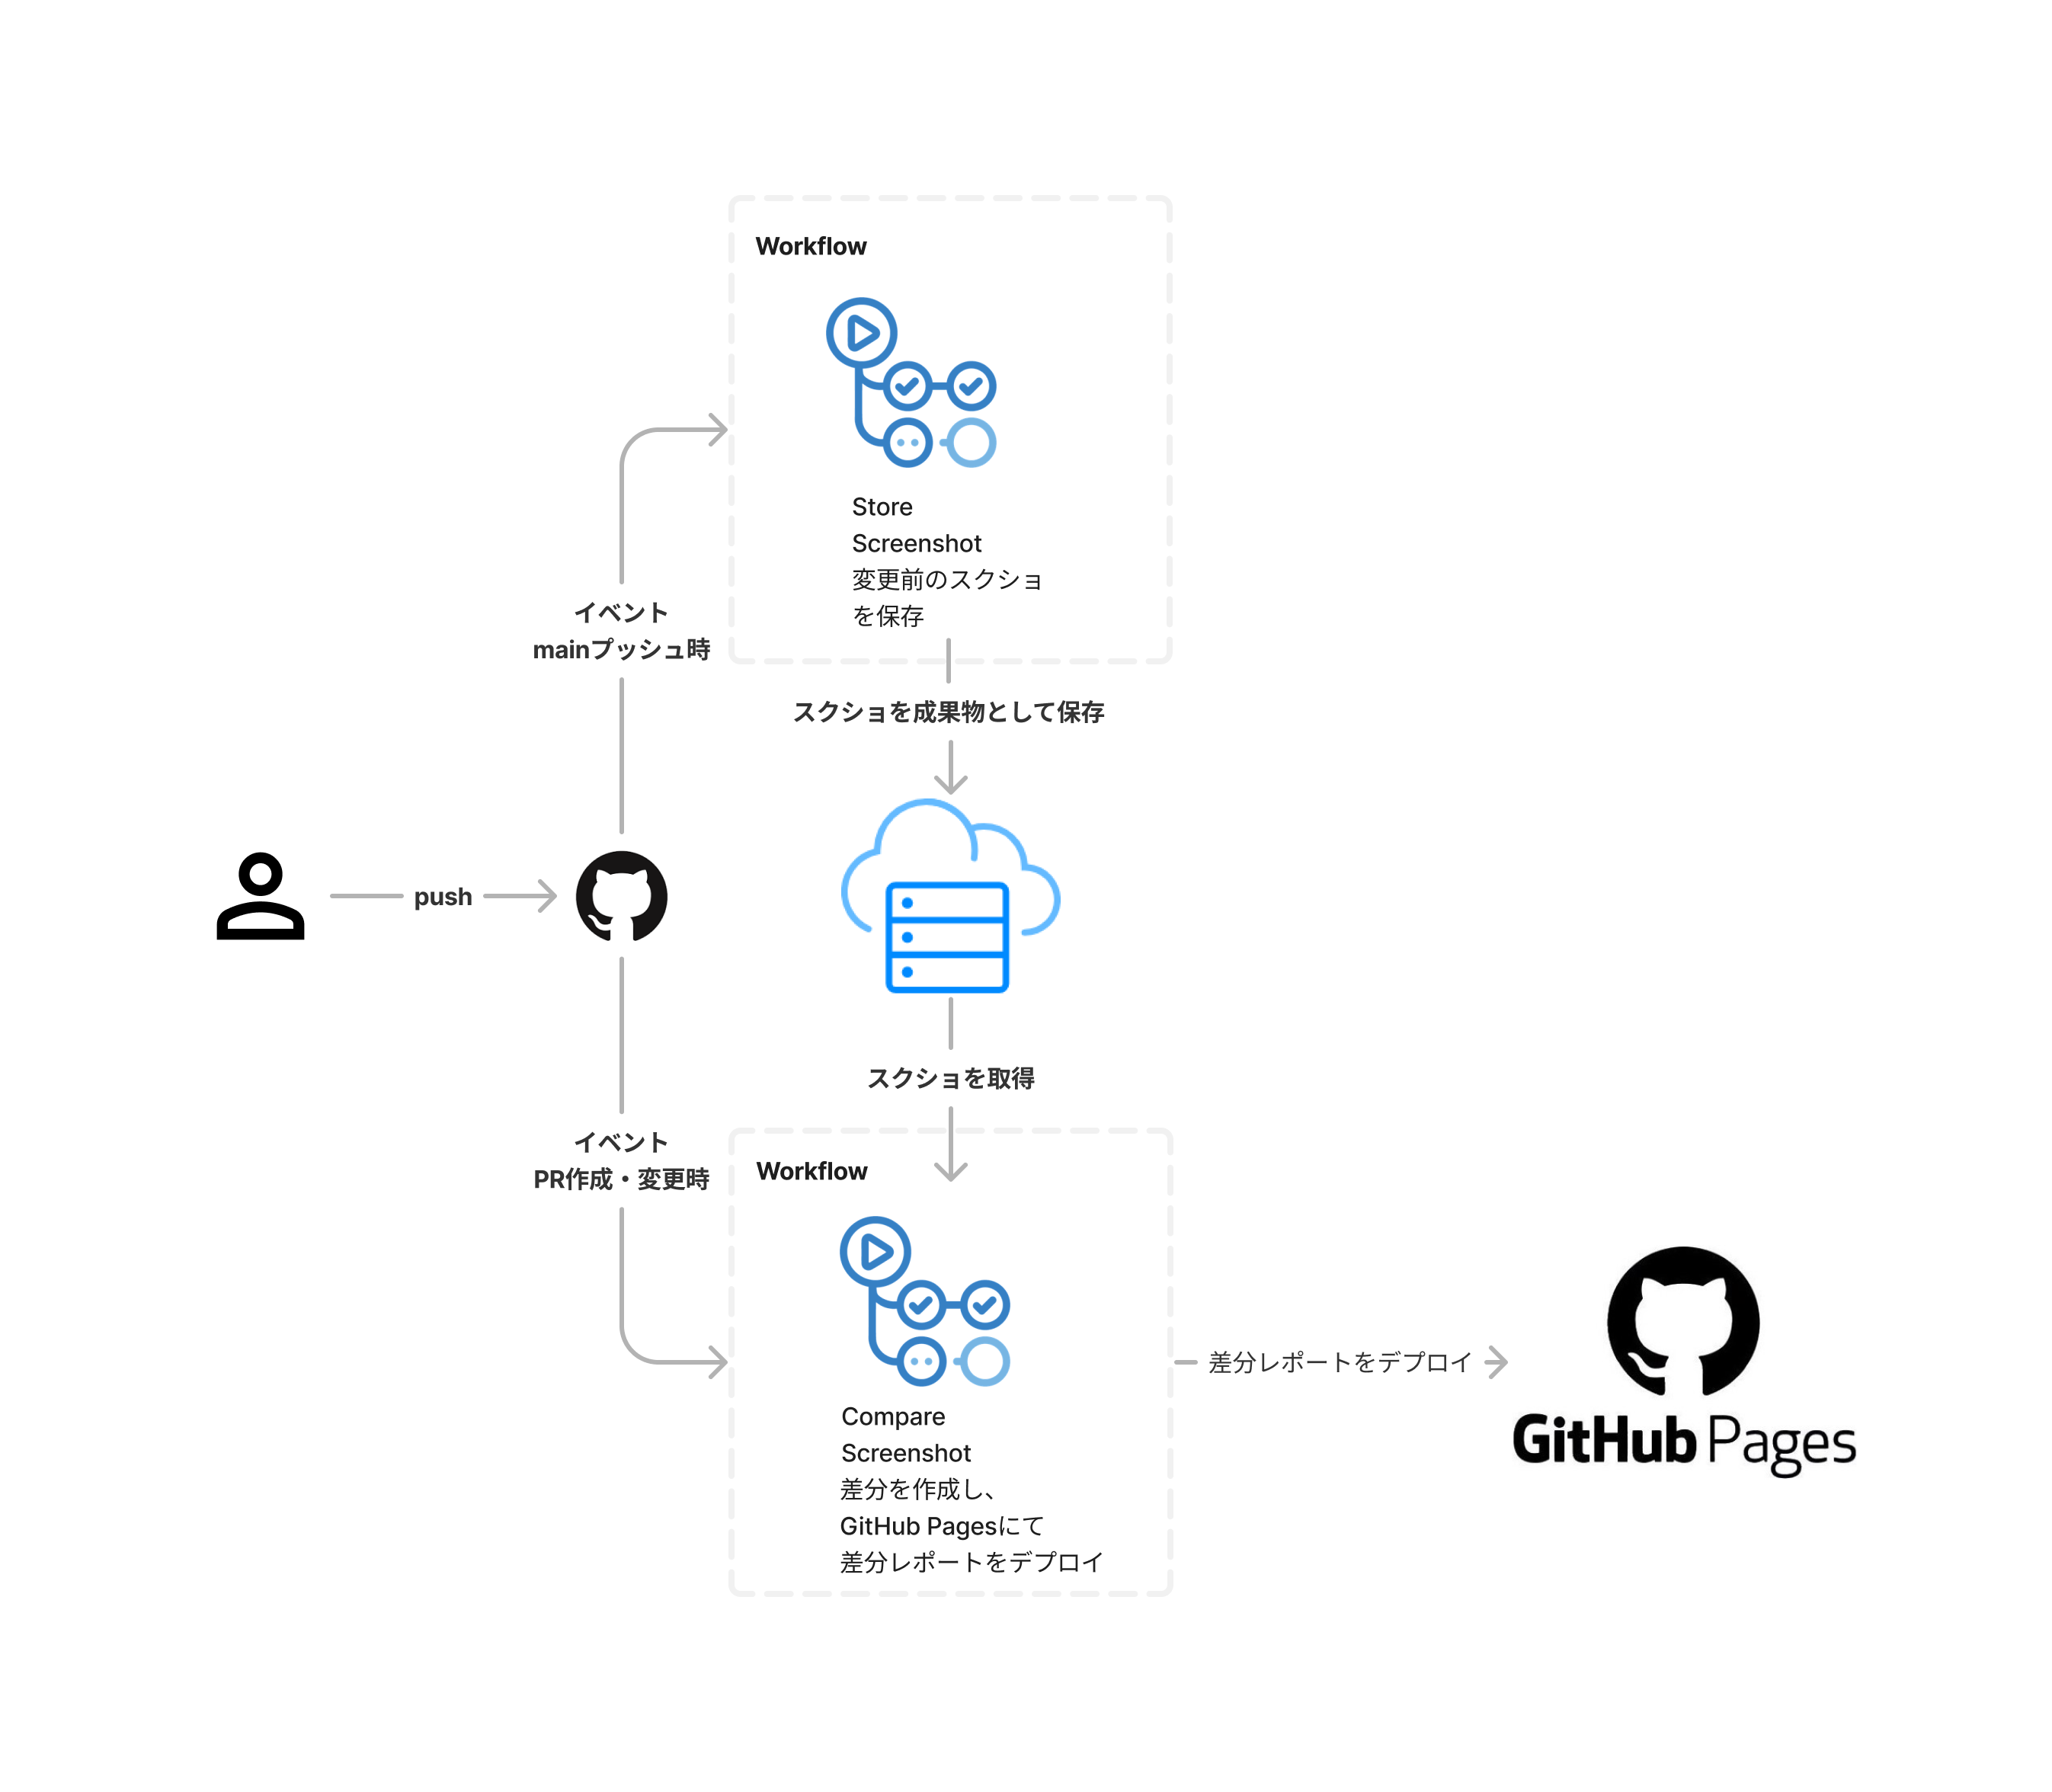
PRに表示するまでの流れ
今回は、以下のような流れで実装していきます。
前回と違い、今回はサイトを表示するために、実装コストもかからず、無料で使用できるGitHub Pagesを使用していきます。
reg-suitを使用してVRTを行う
以下のようにcompare-screenshot.ymlのjobを変更して、VRTを行うようにします。
まず初めに、github pagesに結果を表示するために、actionsをwriteに変更します。
permissions:
  contents: write
  actions: write
次に、reg-suitが正しく動作するために、現在のチェックアウトされているGitブランチの状態を取得するために以下のコマンドを実行します。
reg-suitのgit-hash-pluginは、ベースコミットのハッシュ値を取得するために、現在のチェックアウトされているGitブランチの状態を取得する必要があります。
しかし、GitHub Actionsで実行されると、デフォルトでdetached HEAD状態になってしまうため、以下のコマンドを実行して、detached HEAD状態を解消します。
これをしないと、reg-suit run時にError: Fail to detect the current branch. が発生してしまい、正しくVRTが行えません。
 ## #regs/head/を書くことで、ヘッドブランチ名を取得できる
- name: workaround for detached HEAD
  run: |
    git checkout ${GITHUB_HEAD_REF#refs/heads/} || git checkout -b ${GITHUB_HEAD_REF#refs/heads/} && git pull origin ${GITHUB_HEAD_REF#refs/heads/}
次に、スクリーンショットを.reg/expectedに移動します。
reg-suitは、スクリーンショットを確認するために、変更前のスクリーンショットは.reg/expectedに保存する必要があります。
## 前回と同じく、store-screenshot.ymlで保存したスクリーンショットをダウンロード
- uses: dawidd6/action-download-artifact@v2
  continue-on-error: true
  with:
    name: screenshots
    workflow: store-screenshot.yml
    branch: ${{ github.event.pull_request.base.ref || github.event.repository.default_branch }}

## 先ほどダウンロードしたスクリーンショットを/.reg/expectedに移動
- name: Move screenshots
  run: |
    mkdir -p .reg/expected
    mv actual_images/* .reg/expected ## actual_imagesはroborazziで保存したスクリーンショットのディレクトリ名
次に、変更後のスクリーンショットを記録します。
roborazziのスクリーンショットの撮影の部分は変わらずに使用していくので、そのまま記録します。
- name: record screenshots
  id: record-screenshot-test
  run: |
    ./gradlew recordRoborazziDebug --stacktrace
次に、reg-suitの実行を行います。
以下のコマンドを実行することで、VRTを行い、差分レポートを表示することができます。
- name: run reg-suit
  id: compare-screenshot-test
  run: |
    yarn ci:reg-suit ## package.jsonに記述されているコマンド reg-suit run を実行
次に、結果をgithub pagesにデプロイします。
以下のコマンドを実行することで、github pagesに結果をデプロイすることができます。
- name: deploy test results to github pages
  uses: peaceiris/actions-gh-pages@v3
  with:
    github_token: ${{ secrets.GITHUB_TOKEN }}
    publish_dir: .reg
    destination_dir: ${{ github.head_ref }}
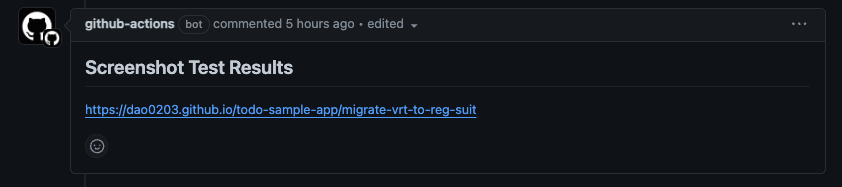
最後に、結果をPRに表示します。
- name: find comment
  uses: peter-evans/find-comment@v3
  id: fc
  with:
    issue-number: ${{ github.event.pull_request.number }}
    comment-author: github-actions[bot]
    body-includes: '## Screenshot Test Results'

- name: upsert comment
  uses: peter-evans/create-or-update-comment@v4
  with:
    comment-id: ${{ steps.fc.outputs.comment-id }}
    issue-number: ${{ github.event.pull_request.number }}
    body: |
      ## Screenshot Test Results
      https://dao0203.github.io/todo-sample-app/${{ github.head_ref }}
    edit-mode: replace
このように実装し、以下のようなymlファイルになると思います。
compare-screenshot.yml
name: CompareScreenshot

on:
  pull_request:

jobs:
  compare-screenshot-test:
    runs-on: ubuntu-latest
    timeout-minutes: 20

    permissions:
      contents: write
      actions: write

    steps:
      - name: Checkout
        uses: actions/checkout@v4
        with:
          fetch-depth: 0

      - name: Set up JDK 17
        uses: actions/setup-java@v4
        with:
          java-version: 17
          distribution: adopt

      - name: Set up Gradle
        uses: gradle/gradle-build-action@v3
        with:
          gradle-version: wrapper

      - name: workaround for detached HEAD
        run: |
          git checkout ${GITHUB_HEAD_REF#refs/heads/} || git checkout -b ${GITHUB_HEAD_REF#refs/heads/} && git pull origin ${GITHUB_HEAD_REF#refs/heads/}

      - uses: dawidd6/action-download-artifact@v2
        continue-on-error: true
        with:
          name: screenshots
          workflow: store-screenshot.yml
          branch: ${{ github.event.pull_request.base.ref || github.event.repository.default_branch }}

      ## 先ほどダウンロードしたスクリーンショットを/.reg/expectedに移動
      - name: Move screenshots
        run: |
          mkdir -p .reg/expected
          mv actual_images/* .reg/expected

      ## 変更後のスクリーンショットを記録する
      - name: record screenshots
        id: record-screenshot-test
        run: |
          ./gradlew recordRoborazziDebug --stacktrace

      ## reg-suitを実行してスクリーンショットの差分を確認
      - name: run reg-suit
        id: compare-screenshot-test
        run: |
          yarn ci:reg-suit

      - name: deploy test results to github pages
        uses: peaceiris/actions-gh-pages@v3
        with:
          github_token: ${{ secrets.GITHUB_TOKEN }}
          publish_dir: .reg
          destination_dir: ${{ github.head_ref }}

      - name: find comment
        uses: peter-evans/find-comment@v3
        id: fc
        with:
          issue-number: ${{ github.event.pull_request.number }}
          comment-author: github-actions[bot]
          body-includes: '## Screenshot Test Results'

      - name: upsert comment
        uses: peter-evans/create-or-update-comment@v4
        with:
          comment-id: ${{ steps.fc.outputs.comment-id }}
          issue-number: ${{ github.event.pull_request.number }}
          body: |
            ## Screenshot Test Results
            https://dao0203.github.io/todo-sample-app/${{ github.head_ref }}
          edit-mode: replace
これで、VRTを行い、その結果をPRに表示することができるようになりました。
しかし、このままだと、サイトを開いた時に、404 Not Foundが表示されてしまいます。
そのため、GitHubPagesでサイトが表示されるようにするために、Settings -> Pagesに移動し、以下のような設定を行います。

これによって、GitHubPagesでサイトが表示されるようになりました。
まとめ
今回は、reg-suitとroborazziとGitHubActionsを用いて、VRTを行い、その結果をGitHubPagesに表示し、PRに表示する方法を紹介しました。
GitHubPagesを使用することで、サイトの表示が簡単にできるため、そこまで実装コストと変更コストがかからず、無料で使用できるため、とても便利だと感じました。
また、開発を通じて、reg-suitの高機能なツールを活かしたまま、Roborazziの高速なスクリーンショットの撮影を活かすことができるため、移行作業もスムーズに行えると感じました。
今回の記事が、VRTを行う際の参考になれば幸いです😆