gsutilをインストール
gsutilはGoogle Cloud CLIに同梱されています。
ページ先のリンクからインストーラをダウンロードして実行。
セットアップ画面が開きます。
規約に同意します。
ユーザー単位かシステム単位でインストールを選択します。
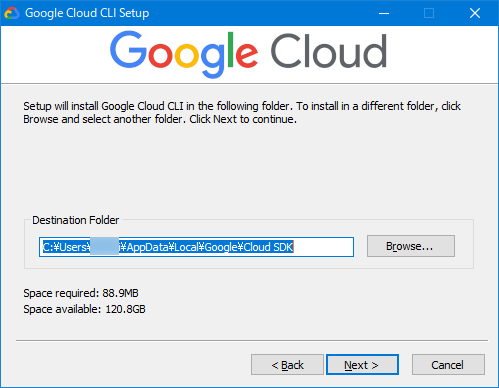
インストール場所を指定。
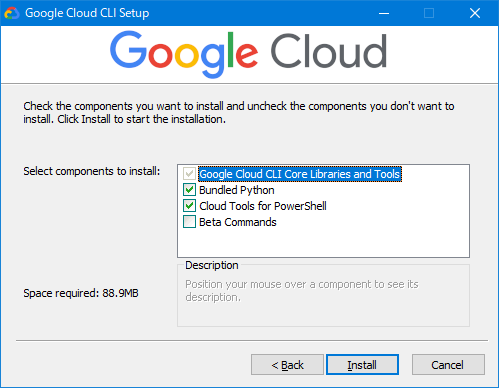
バンドルを指定。
インストールを実行。
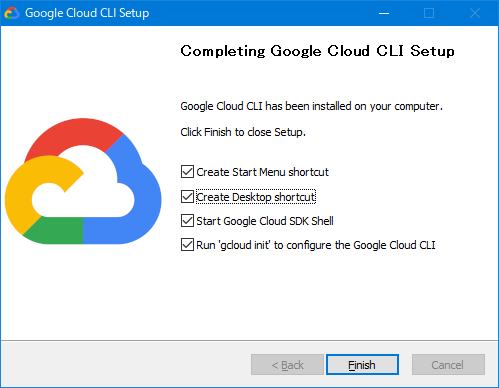
インストール後のオプションを選択します。
そのまま実行すればコマンドプロンプトでgcloud initが実行されて、Google Cloud CLIの初期設定が行えます。
Google Cloud CLIの初期設定
コマンドラインで gcloud init を実行します。
>gcloud init
Welcome! This command will take you through the configuration of gcloud.

Settings from your current configuration [default] are:
accessibility:
  screen_reader: 'False'
core:
  disable_usage_reporting: 'True'

Pick configuration to use:
 [1] Re-initialize this configuration [default] with new settings
 [2] Create a new configuration
Please enter your numeric choice: 1
ここでは1をタイプしてEnterを押します。
Your current configuration has been set to: [default]

You can skip diagnostics next time by using the following flag:
  gcloud init --skip-diagnostics

Network diagnostic detects and fixes local network connection issues.
Checking network connection...done.
Reachability Check passed.
Network diagnostic passed (1/1 checks passed).

Choose the account you want to use for this configuration.
To use a federated user account, exit this command and sign in to the gcloud CLI with your login configuration file,
then run this command again.

Select an account:
 [1] *********@gmail.com
 [2] Sign in with a new Google Account
 [3] Skip this step
Please enter your numeric choice:  2
どのアカウントでGoogle Cloud CLIの認証を通すか選択できます。
システムから検出されたGoogleアカウントか、新たにサインインができます。
ここでは2を選択して進めてみます。
※このあとgsutilを使うためのGoogle Cloudプロジェクトへのアクセスが可能なGoogleアカウントで進めてください。
ブラウザが開きGoogleの認証画面に遷移するので、アカウントを選択、サインインし、Google Cloud CLIにアクセス許可を与えます。
You are signed in as: [*********@gmail.com].

Pick cloud project to use:
 [1] pj-hoge
 [2] pj-fuga
 [3] pj-piyo
 [4] Enter a project ID
 [5] Create a new project
Please enter numeric choice or text value (must exactly match list item):  3
認証が成功すると、デフォルトのGoogle Cloudプロジェクトを選択できます。
アカウントに紐づいたものか、任意のプロジェクトID、プロジェクトの新規作成から選べます。
Your current project has been set to: [pj-piyo].

Not setting default zone/region (this feature makes it easier to use
[gcloud compute] by setting an appropriate default value for the
--zone and --region flag).
See https://cloud.google.com/compute/docs/gcloud-compute section on how to set
default compute region and zone manually. If you would like [gcloud init] to be
able to do this for you the next time you run it, make sure the
Compute Engine API is enabled for your project on the
https://console.developers.google.com/apis page.

The Google Cloud CLI is configured and ready to use!

* Commands that require authentication will use shunji.nishida.biz@gmail.com by default
* Commands will reference project `pj-danishi` by default
Run `gcloud help config` to learn how to change individual settings

This gcloud configuration is called [default]. You can create additional configurations if you work with multiple accounts and/or projects.
Run `gcloud topic configurations` to learn more.

Some things to try next:

* Run `gcloud --help` to see the Cloud Platform services you can interact with. And run `gcloud help COMMAND` to get help on any gcloud command.
* Run `gcloud topic --help` to learn about advanced features of the CLI like arg files and output formatting
* Run `gcloud cheat-sheet` to see a roster of go-to `gcloud` commands.
これで初期設定が完了しました。
gsutilを利用する。
gsutilコマンドを試してみます。
>gsutil ls
gs://my-test-bucket-240806/
プロジェクトにCloud Storageバケットがあればこのようにバケットの一覧が返却されるはずです。
ファイルをバケットにアップロード
gsutilでファイルをアップロードしてみます。
バケットがなければコンソールまたはgsutilコマンドで作成してください。
>gsutil cp test.txt gs://my-test-bucket-240806/
Copying file://test.txt [Content-Type=text/plain]...
/ [1 files][    4.0 B/    4.0 B]
Operation completed over 1 objects/4.0 B.
ここではカレントディレクトリのtest.txtファイルをgs://my-test-bucket-240806/バケットにアップロードしています。
Google Cloudコンソール上からもファイルのアップロードが確認できています。
このようにWindows環境でgsutilを利用するまでの手順を説明しました。
その他のコマンドについては下記を参照ください。


