- この記事はOpenCV Advent Calendar 2020の1日目の記事です。
- 他の記事は目次にまとめられています。
はじめに
最近OpenCVのソースコードを読んでいるときにcv::cuda::BufferPoolというメモリプール機能があることにたまたま気付きました。その際に興味本位で内部処理を追ってみたので本記事ではこの機能について紹介しようと思います。
cv::cuda::BufferPoolとは
https://docs.opencv.org/4.5.0/d5/d08/classcv_1_1cuda_1_1BufferPool.htmlによると
BufferPool for use with CUDA streams.
BufferPool utilizes Stream's allocator to create new buffers for GpuMat's.
という説明があります。端的に言うとGpuMatのためのメモリアロケータということですね。また、
StackAllocator allocates a chunk of GPU device memory beforehand, and when GpuMat is declared later on, it is given the pre-allocated memory. This kind of strategy reduces the number of calls for memory allocating APIs such as cudaMalloc or cudaMallocPitch.
という説明が続きます。この説明から「あらかじめGPUのデバイスメモリ領域を確保しておき、その領域からGpuMatのメモリを割り当てるようにすることでcudaMalloc、cudaMallocPitchなどのAPI呼び出し回数を減らすことを目的としているメモリアロケータ」であることがわかります。
公式サンプルコード
https://docs.opencv.org/4.5.0/d5/d08/classcv_1_1cuda_1_1BufferPool.htmlの公式サンプルコードをベースに簡略化したものを以下に示します。
#include <opencv2/opencv.hpp>

int main()
{
    // メモリプール機能の有効化
    cv::cuda::setBufferPoolUsage(true);

    // メモリプールのサイズ変更
    size_t stack_size = 1024 * 1024 * 64;
    int stack_count = 1;
    cv::cuda::setBufferPoolConfig(cv::cuda::getDevice(), stack_size, stack_count);

    // cv::cuda::BufferPoolクラスのインスタンス生成
    cv::cuda::Stream stream;
    cv::cuda::BufferPool pool(stream);

    // メモリプールからメモリを確保
    cv::cuda::GpuMat d_src = pool.getBuffer(cv::Size(4096, 4096), CV_8UC1);
    cv::cuda::GpuMat d_dst = pool.getBuffer(cv::Size(4096, 4096), CV_8UC3);

    // GpuMatを使った処理
    cv::cuda::cvtColor(d_src, d_dst, cv::COLOR_GRAY2BGR, 0, stream);

    return 0;
}
サンプルコードで登場するAPIを眺める
前述のサンプルコードで使用されているメモリプール関連のAPIは以下の通りです。
- cv::cuda::setBufferPoolUsage
- cv::cuda::setBufferPoolConfig
- cv::cuda::BufferPool
- cv::cuda::getBuffer
それではこれらのAPIが何をやっているのかを上から順に追いかけていきます。
cv::cuda::setBufferPoolUsage
cv::cuda::setBufferPoolUsageはメモリプール機能の有効化、無効化を設定する関数です。
BufferPoolクラスが提供するメモリプール機能を使用する場合、以下のようにcv::cuda::setBufferPoolUsageメソッドをコールする必要があります。
cv::cuda::setBufferPoolUsage(true);
このメソッドの第一引数をtrueにするとGpuMat::Allocatorクラスを継承したStackAllocatorを使用してメモリプールの初期化が行われるようになります。
if (enableMemoryPool)
{
    const int deviceId = getDevice();
    memStack_ = initializer.getMemoryPool(deviceId).getFreeMemStack();
    DeviceInfo devInfo(deviceId);
    alignment_ = devInfo.textureAlignment();
}
https://github.com/opencv/opencv/blob/4.5.0/modules/core/src/cuda_stream.cpp#L597-L606
cv::cuda::setBufferPoolConfig
cv::cuda::setBufferPoolConfigは、メモリプール設定(スタックサイズ、スタック数)をカスタマイズするための関数です。
- https://github.com/opencv/opencv/blob/4.5.0/modules/core/src/cuda_stream.cpp#L681-L709
- https://github.com/opencv/opencv/blob/4.5.0/modules/core/src/cuda_stream.cpp#L155-L165
メモリプールにおけるスタックサイズ、スタック数のデフォルト値は以下の通りです。
- スタックサイズ:10 MB
- スタック数:5
MemoryPool::MemoryPool() : initialized_(false), mem_(0)
{
    // default : 10 Mb, 5 stacks
    stackSize_ = 10 * 1024 * 1024;
    stackCount_ = 5;
}
https://github.com/opencv/opencv/blob/4.5.0/modules/core/src/cuda_stream.cpp#L148-L153
cv::cuda::BufferPool
cv::cuda::BufferPoolはメモリプールを管理するためのクラスです。
このクラスのクラスのインスタンス生成時に指定するStreamからアロケータをセットできます。デフォルトではStackAllocatorが使用されます。
cv::cuda::BufferPool::getBuffer
cv::cuda::BufferPool::getBufferメソッドを呼ぶとGpuMatクラスのインスタンスをメモリプールから確保することができます。内部的にはStackAllocatorを使用し、GpuMatクラスのインスタンスを確保しています。
GpuMat cv::cuda::BufferPool::getBuffer(int rows, int cols, int type)
{
#ifndef HAVE_CUDA
    CV_UNUSED(rows);
    CV_UNUSED(cols);
    CV_UNUSED(type);
    throw_no_cuda();
#else
    GpuMat buf(allocator_);
    buf.create(rows, cols, type);
    return buf;
#endif
}
https://github.com/opencv/opencv/blob/4.5.0/modules/core/src/cuda_stream.cpp#L723-L735
ここではcv::cuda::BufferPoolのアロケータとしてStackAllocatorクラスを使用されていることとし、メモリ確保、解放を担っているallocate、freeについてもう少し処理を追っていくこととします。
StackAllocator::allocate
allocateメソッドではまずアライメント調整を行った後、メモリプールから確保するサイズを確定します。
size_t pitch, memSize;

if (rows > 1 && cols > 1)
{
    pitch = alignUp(cols * elemSize, alignment_);
    memSize = pitch * rows;
}
else
{
    // Single row or single column must be continuous
    pitch = elemSize * cols;
    memSize = alignUp(elemSize * cols * rows, 64);
}
https://github.com/opencv/opencv/blob/4.5.0/modules/core/src/cuda_stream.cpp#L625-L654
その後、requestMemoryメソッドをコールし、メモリプールからメモリを確保します。
uchar* ptr = memStack_->requestMemory(memSize);
https://github.com/opencv/opencv/blob/4.5.0/modules/core/src/cuda_stream.cpp#L644
StackAllocator::free
returnMemoryメソッドをコールしてメモリを解放します。
void StackAllocator::free(GpuMat* mat)
{
    if (memStack_ == 0)
        return;

    memStack_->returnMemory(mat->datastart);
    fastFree(mat->refcount);
}
https://github.com/opencv/opencv/blob/4.5.0/modules/core/src/cuda_stream.cpp#L656-L663
nvvpでタイムラインを追う
cv::cuda::BufferPoolを使ったメモリプール処理中にCUDA APIがどのようにコールされているかを見るためにnvvp(NVIDIA Visual Profiler)でタイムラインを追ってみることにしましょう。
サンプルコード
今回以下のサンプルコードを使用してタイムラインを追ってみました。
#include <opencv2/core.hpp>
#include <opencv2/core/cuda.hpp>
#include <opencv2/cudaimgproc.hpp>
#include <opencv2/cudaarithm.hpp>

#define USE_MEMPOOL

int main()
{
#ifdef USE_MEMPOOL
    cv::cuda::setBufferPoolUsage(true);
    size_t stack_size = 1024 * 1024 * 128;
    int stack_count = 1;
    cv::cuda::setBufferPoolConfig(cv::cuda::getDevice(), stack_size, stack_count); // Allocate 128 MB, 1 stack
#endif

    cv::cuda::Stream stream;
#ifdef USE_MEMPOOL
    cv::cuda::BufferPool pool(stream);
#endif

    for(int i = 0; i < 10; i++)
    {
#ifdef USE_MEMPOOL
        cv::cuda::GpuMat d_src = pool.getBuffer(cv::Size(4096, 4096), CV_8UC3);
        cv::cuda::GpuMat d_dst = pool.getBuffer(cv::Size(4096, 4096), CV_8UC1);
        cv::cuda::GpuMat d_bin = pool.getBuffer(cv::Size(4096, 4096), CV_8UC1);
#else
        cv::cuda::GpuMat d_src(cv::Size(4096, 4096), CV_8UC3);
        cv::cuda::GpuMat d_dst(cv::Size(4096, 4096), CV_8UC1);
        cv::cuda::GpuMat d_bin(cv::Size(4096, 4096), CV_8UC1);
#endif
        cv::cuda::cvtColor(d_src, d_dst, cv::COLOR_BGR2GRAY, 0, stream);
        cv::cuda::threshold(d_dst, d_bin, 200, 255, cv::THRESH_BINARY, stream);
    }

    return 0;
}
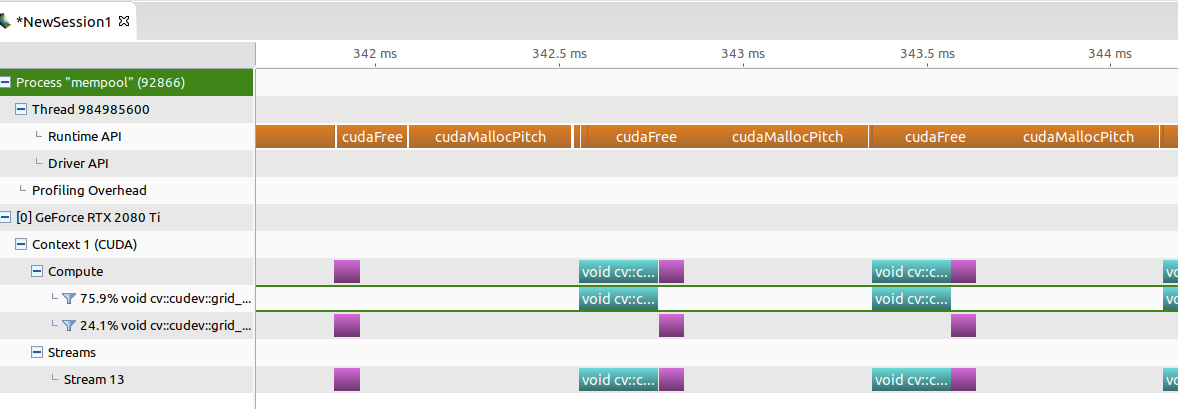
メモリプール使用
以下にメモリプールを使用した場合のタイムラインを示します。緑、紫がCUDAカーネル呼び出しです。
前述のサンプルコードではforループ内でメモリプールからメモリ確保するためのgetBufferメソッドをコールしていますが、メモリ確保関連のCUDA APIが呼ばれていないことがわかります(メモリプール初期化時には呼ばれる)。

メモリプール未使用
以下にメモリプールを使用していない場合のタイムラインを示します。緑、紫がCUDAカーネル呼び出しです。
forループ内でGpuMatクラスのインスタンスを確保する度にcudaMallocPitchがコールされていることがわかります。
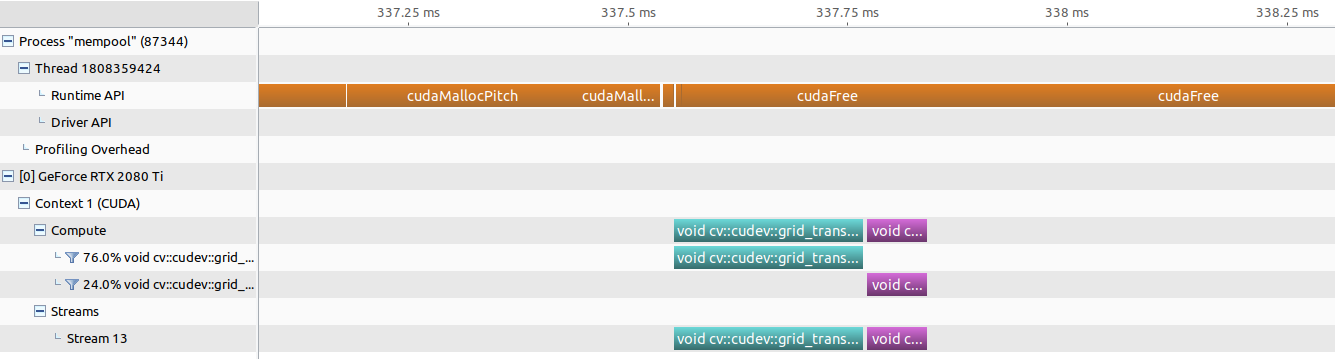
setBufferPoolConfigコール時にcudaFreeが呼ばれる
cv::cuda::setBufferPoolConfigでメモリプール設定をカスタムした時のタイムラインは以下の通りです。

タイムラインの左上に着目するとcudaFreeが呼ばれていることがわかります。
何が起きているのか気になるのでソースコードを追ったところ、cv::cuda::setBufferPoolConfigをコールするとMemoryPoolクラスのインスタンスが初期化されます。その際、デフォルトで確保していた領域を解放しており、その際にcudaFreeがコールされています。このときのコールシーケンスは以下の通りです。
cv::cuda::setBufferPoolConfig
  MemoryPool::initialize // 初期化
    MemoryPool::release  // デフォルトで確保していた領域解放
      cudaFree           // ここでcudaFreeが呼ばれる
細かい実装は下記URLを参照ください。
- https://github.com/opencv/opencv/blob/4.5.0/modules/core/src/cuda_stream.cpp#L155-L165
- https://github.com/opencv/opencv/blob/4.5.0/modules/core/src/cuda_stream.cpp#L196-L213
使用時の注意点
https://docs.opencv.org/4.5.0/d5/d08/classcv_1_1cuda_1_1BufferPool.htmlにも書かれていますが使用時の注意点がいくつかあります。
- BufferPoolクラスのインスタンス生成前にsetBufferPoolUsageをコールする必要がある
- StackAllocatorを使う場合、解放順に気を付ける
- メモリプールの容量を超えてメモリを確保しようとするとDefaultAllocatorが使われる
以降、これらの注意点について説明していきます。
BufferPoolクラスのインスタンス生成前にsetBufferPoolUsageをコールする必要がある
冒頭でも説明したようにBufferPoolクラスのインスタンス生成前にsetBufferPoolUsageをコールしてメモリプール機能を有効化する必要があります。
OK
int main()
{
    setBufferPoolUsage(true);
    Stream stream;
    BufferPool pool(stream);
    GpuMat mat1 = pool.getBuffer(1024, 1024, CV_8UC1);
}
NG
int main()
{
    Stream stream;
    BufferPool pool(stream); // メモリプール機能を有効化する前にBufferPoolクラスのインスタンス生成している
    setBufferPoolUsage(true);
    GpuMat mat1 = pool.getBuffer(1024, 1024, CV_8UC1);
}
StackAllocatorを使う場合、解放順に気を付ける
Just like a stack, deallocation must be done in LIFO order. Below is an example of erroneous usage that violates LIFO rule. If OpenCV is compiled in Debug mode, this sample code will emit CV_Assert error.
LIFOの順でスタックされるのでメモリプールから解放する際に順序があるという点に注意が必要です。正しくない順序で解放するとDebugビルドの場合はCV_Assertでメッセージが出ます。
OK
int main()
{
    setBufferPoolUsage(true);
    Stream stream;
    BufferPool pool(stream);
    GpuMat mat1 = pool.getBuffer(1024, 1024, CV_8UC1);
    GpuMat mat2 = pool.getBuffer(1024, 1024, CV_8UC1);
    mat2.release();
    mat1.release();
}
NG
int main()
{
    setBufferPoolUsage(true);
    Stream stream;
    BufferPool pool(stream);
    GpuMat mat1 = pool.getBuffer(1024, 1024, CV_8UC1);
    GpuMat mat2 = pool.getBuffer(1024, 1024, CV_8UC1);
    mat1.release(); // mat1の前にmat2を解放する必要がある
    mat2.release();
}
メモリプールの容量を超えてメモリを確保しようとするとDefaultAllocatorが使われる
https://docs.opencv.org/4.5.0/d5/d08/classcv_1_1cuda_1_1BufferPool.htmlによると
allocating with getBuffer within that stream will also be carried out by the DefaultAllocator because we've run out of stacks.
という記載があり、メモリプールのスタックを超えるサイズを確保しようとするとDefaultAllocatorが使われるという記載があります。実際に動かしてみるのが手っ取り早いので試してみます。
#include <opencv2/core.hpp>
#include <opencv2/core/cuda.hpp>
#include <opencv2/cudaimgproc.hpp>
#include <opencv2/cudaarithm.hpp>

int main()
{
    cv::cuda::setBufferPoolUsage(true);
    size_t stack_size = 1024 * 1024 * 64;
    int stack_count = 1;

    // Allocate 64 MB, 1 stack
    cv::cuda::setBufferPoolConfig(cv::cuda::getDevice(), stack_size, stack_count);

    cv::cuda::Stream stream;
    cv::cuda::BufferPool pool(stream);

    for(int i = 0; i < 10; i++)
    {
        cv::cuda::GpuMat d_src = pool.getBuffer(cv::Size(4096, 4096), CV_8UC3); // 48MB
        cv::cuda::GpuMat d_dst = pool.getBuffer(cv::Size(4096, 4096), CV_8UC1); // 16MB
        cv::cuda::GpuMat d_bin = pool.getBuffer(cv::Size(4096, 4096), CV_8UC1); // 16MB

        cv::cuda::cvtColor(d_src, d_dst, cv::COLOR_BGR2GRAY, 0, stream);
        cv::cuda::threshold(d_dst, d_bin, 200, 255, cv::THRESH_BINARY, stream);
    }

    return 0;
}
以下に上記プログラム実行時のタイムラインを示します。
確かにDefaultAllocatorが使われる(=cudaMallocPitchが呼ばれる)というのは正しいようです。
動作確認環境
筆者は以下の環境で動作確認しました。
ソフトウェア
- Ubuntu 20.04 64bit
- CMake 3.16.3
- gcc 9.3.0
- CUDA 11.1
- OpenCV 4.5.0
ハードウェア
- CPU:Intel Core i7-9800X CPU @ 3.80GHz
- メモリ:32GB
- GPU:NVIDIA GeForce RTX 2080 Ti 11GB
おわりに
今回OpenCVのメモリプール機能であるcv::cuda::BufferPoolを紹介しました。使用するメモリサイズが見積もれるようなユースケースであればメモリ確保のCUDA APIの呼び出しオーバーヘッドが減らせるので便利そうな機能ですね。
明日はtomoaki_teshimaさんの記事です、楽しみにしましょう!