はじめに
職場の建物が新築されたので,各階の分電盤に電力計を設置し,1か所でモニタリングできるシステムを構築しようと考えた。
電力計は@arms22 さんの記事を参考に製作した。
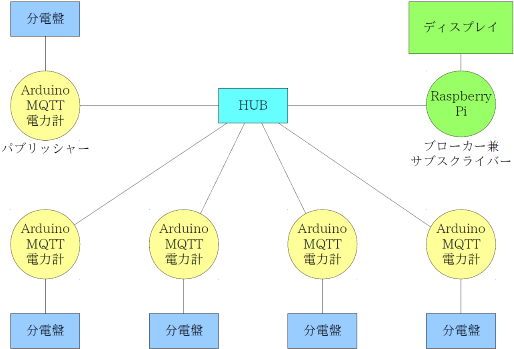
システムの全体図
開発環境の構築
Windows10上に,先人の知恵を参考に環境構築。
paho-mqttはpipでインストール
MQTTブローカーの準備
稼働中のサーバにmosquittoをインストールしても良かったのだが,Raspberry Piを使うことにした。
普通にRaspberry Piのセットアップ後,apt-getでpython3,mosquittoをインストール。
pipでPyQt5,paho-mqttをインストール。
Raspberry PiのIPアドレスは静的なものを振っておく。
UIのデザイン
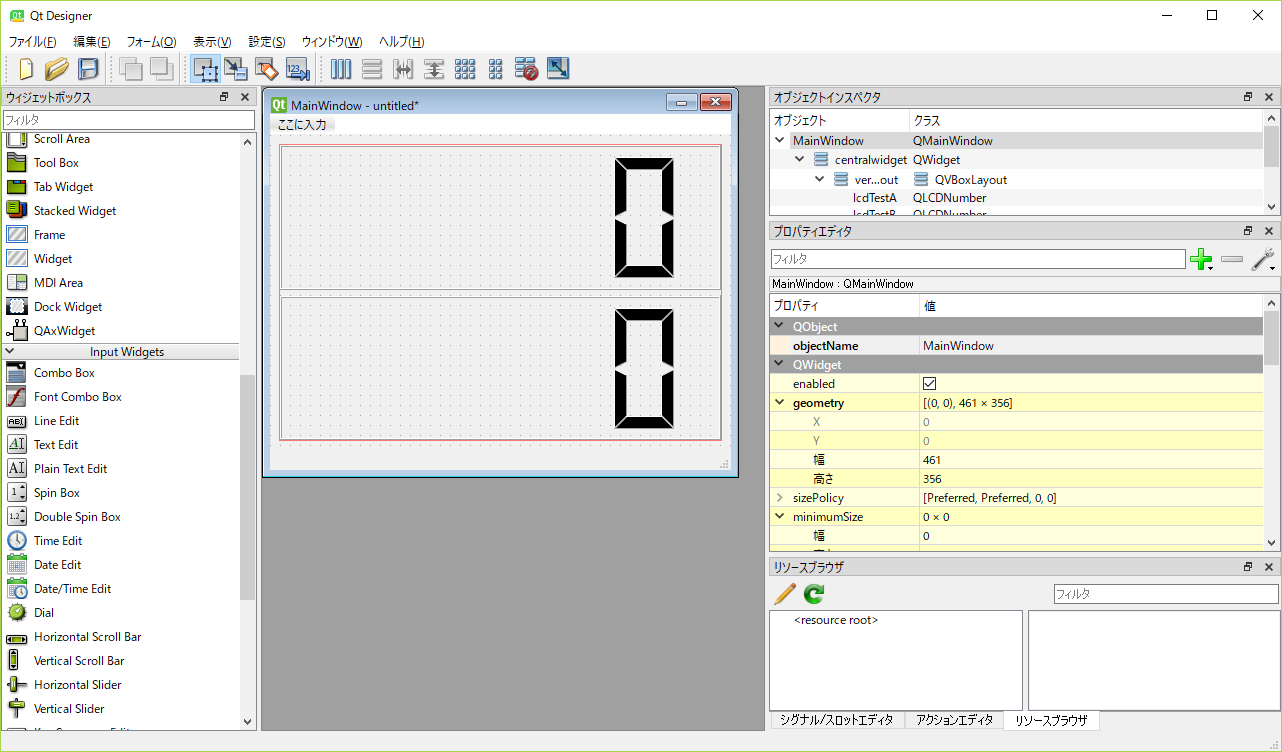
Qt Designerを起動

新しいフォームでは,「Main Window」を選ぶ。(Dialogでもいいが,その場合UIを表示するコードが少し変わる)
適当にUIをデザインする。
この例ではLCD Numberウィジェットを2つ配置してみた。この際,各ウィジェットのobjectNameは分かりやすいものに変えておくと吉。
適当な名前(test_ui.ui)を付けて保存する。
pyuic5で.uiを.pyに変換
pyuic5のインストールパスは自分の場合,PyQt5をインストールした際--userオプションを付けないとインストールできなかったので,C:\Users\[username]\AppData\Roaming\Python\Python36\Scriptsに入っていた。
次のコマンドで.uiファイルを.pyに変換する。
> pyuic5 test_ui.ui -o test_ui.py
変換した.pyを表示するコードを書く
import sys
from PyQt5.QtCore import *
from PyQt5.QtGui import *
from PyQt5.QtWidgets import *
from PyQt5.Qt import *
from test_ui import Ui_MainWindow

class Test(QMainWindow):
	def __init__(self):
		super(Test, self).__init__()
		self.ui = Ui_MainWindow()
		self.ui.setupUi(self)

if __name__ == '__main__':
	app = QApplication(sys.argv)
	window = Test()
	window.show()
	sys.exit(app.exec())
次のコマンドでデザインしたUIが表示されるはず。
> python test.py
MQTTのコードを埋め込む
import sys
from PyQt5.QtCore import *
from PyQt5.QtGui import *
from PyQt5.QtWidgets import *
from PyQt5.Qt import *
from test_ui import Ui_MainWindow
import paho.mqtt.client as mqtt

class Test(QMainWindow):
	def __init__(self, mqtt_client):
		super(Test, self).__init__()
		self._mqtt_client = mqtt_client
		self._mqtt_client.on_connect = self.on_connect
		self._mqtt_client.on_message = self.on_message

		self.ui = Ui_MainWindow()
		self.ui.setupUi(self)
		# トピックと表示するウィジェットを対応させる辞書
		self.lcd = {
			"test/A": self.ui.lcdTestA,
			"test/B": self.ui.lcdTestB,
		}

	def on_message(self, client, userdata, msg):
		print("Topic: " + str(msg.topic))
		print("Message: " + str(msg.payload))
		# 受信したtopicにより対応するwidgetにpayloadを表示する処理
		for i in self.lcd.items():
			if str(i[0]) == str(msg.topic):
				i[1].display(format("%.1f" % float(msg.payload)))

	def on_connect(self, client, userdata, flags, rc):
		print("connected with result code: " + str(rc))
		client.subscribe("#") # 全てのトピックを受信

if __name__ == '__main__':
	client = mqtt.Client()
	app = QApplication(sys.argv)
	window = Test(client)
	window.show()

	client.connect('localhost', 1883)
	client.loop_start()
	try:
		sys.exit(app.exec_())
	finally:
		client.loop_stop()
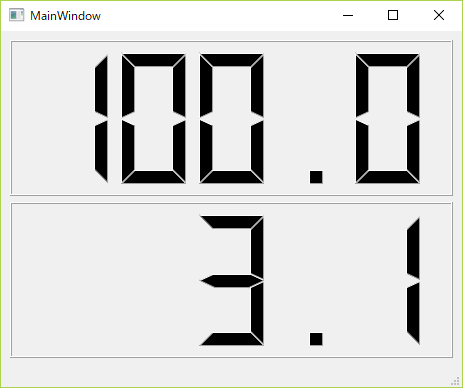
次のコマンドでUIを表示させる。
python test.py
別のシェルからpublishしてみる。
% mosquitto_pub -h localhost -t test/A -m 100
% mosquitto_pub -h localhost -t test/B -m 3.14
次のように表示されるはず。
実際に作ったもの
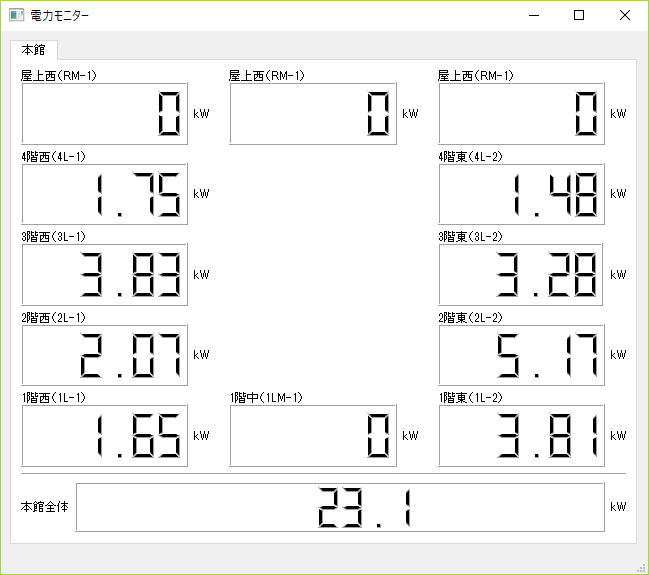
表示が0なのは,電力計を設置してないところ。