- はじめに
=========
本記事では、PX4/Firmwareのマルチコプター姿勢制御モジュール(mc_att_control)に実装されているアルゴリズムをコードベースで解説しています。以下の予備知識があると理解が捗ると思います。
- PID制御
- ブロック線図
対象ソースコード
Tag: 1.6.0 Release RC1
- 全体像
========
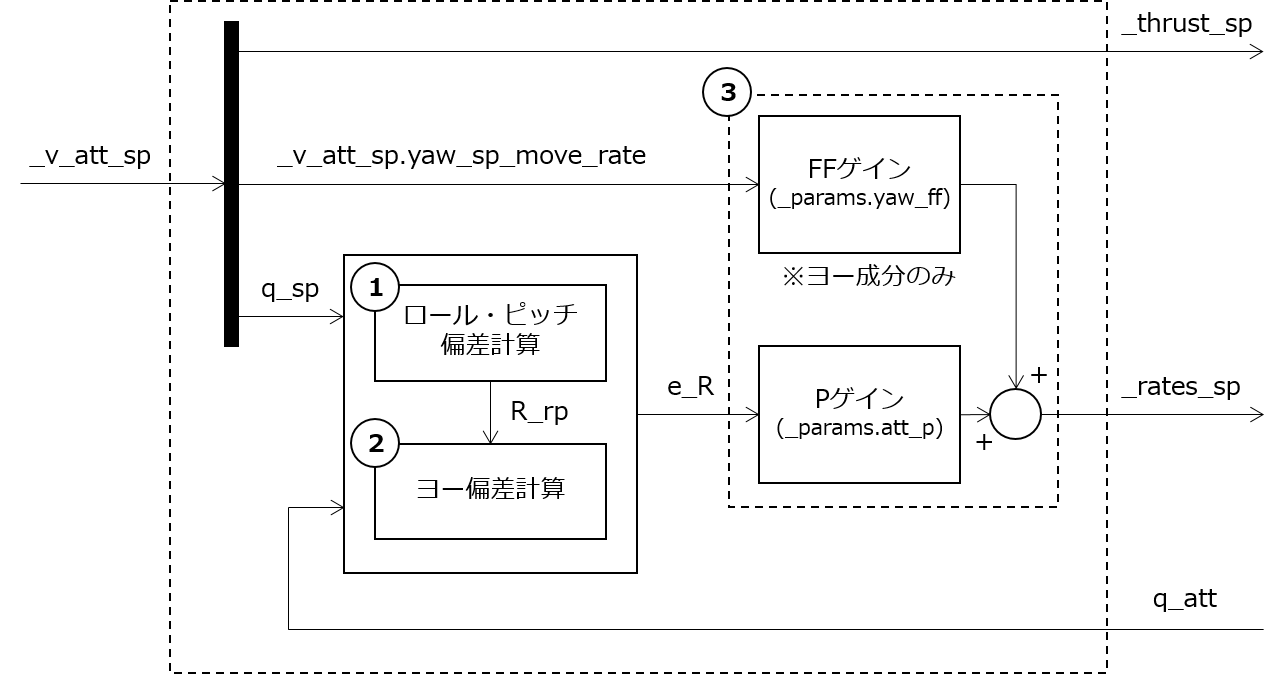
void MulticopterAttitudeControl::control_attitude(float dt)の内容は、Simlink風のブロック図で表すと次のようになります。ここでは姿勢制御(P制御)を行います。
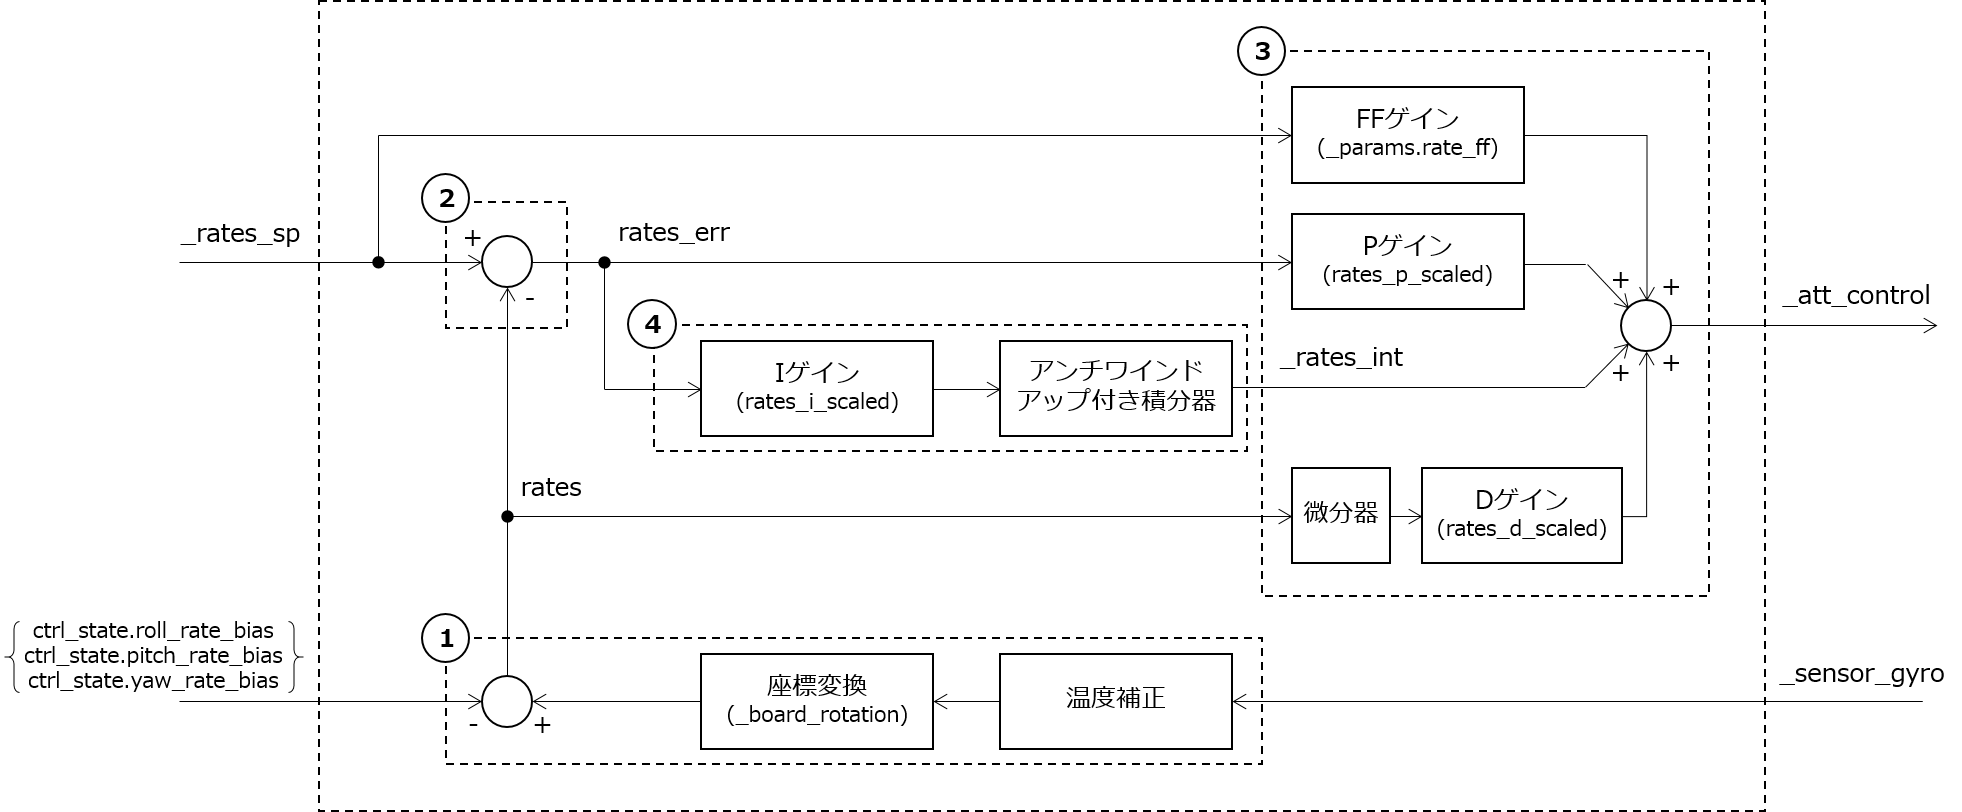
void MulticopterAttitudeControl::control_attitude_rates(float dt)については次のようになっています。姿勢制御の結果(角速度目標値)を受け取って、角速度制御(PID制御)を行っています。
- 姿勢制御
==========
制御自体は単純なP制御ですが、姿勢偏差を求める計算で少し難しいことをしています。姿勢制御の処理は大きく分けて次の3つの要素に分けられます。(イレギュラー対策は除く)
- ロール・ピッチ姿勢偏差の計算
- ヨー姿勢偏差の計算
- 角速度目標値の計算
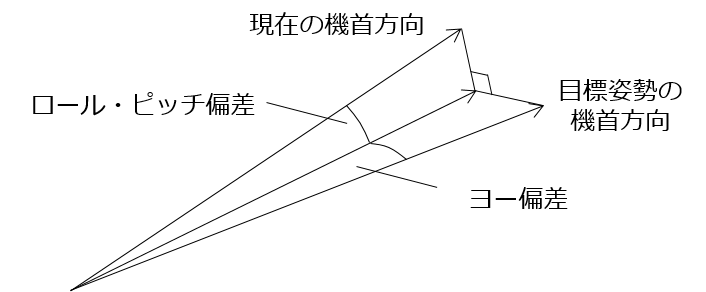
1と2は、目標姿勢と現在姿勢の偏差をロール・ピッチを複合した成分とヨー成分に分解する処理となります。イメージとしてはこのようになります。
ロール・ピッチ姿勢偏差の計算
まずはじめに、目標姿勢q_spと、最新の姿勢q_attを3x3の回転行列に変換します。これらの姿勢はクォータニオンで表されています。
	/* construct attitude setpoint rotation matrix */
	math::Quaternion q_sp(_v_att_sp.q_d[0], _v_att_sp.q_d[1], _v_att_sp.q_d[2], _v_att_sp.q_d[3]);
	math::Matrix<3, 3> R_sp = q_sp.to_dcm();

	/* get current rotation matrix from control state quaternions */
	math::Quaternion q_att(_ctrl_state.q[0], _ctrl_state.q[1], _ctrl_state.q[2], _ctrl_state.q[3]);
	math::Matrix<3, 3> R = q_att.to_dcm();
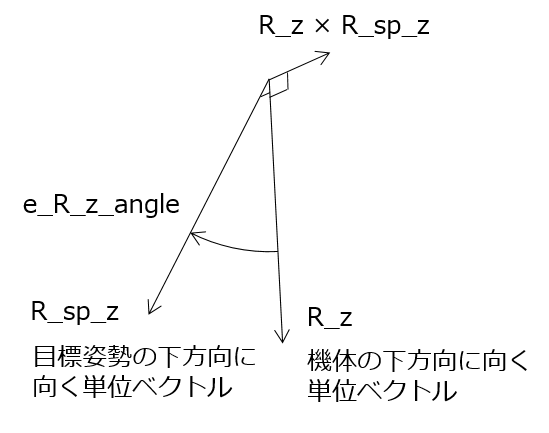
回転行列の第3列であるR_zとR_sp_zは、現在姿勢と目標姿勢のZ軸方向を表しています。Z軸をR_zからR_sp_zに回転移動させる軸と角度は、姿勢変化からヨーを除いたロール・ピッチ同時回転の回転軸と角度となります。以下のコードは、外積と内積を使ってそれらを求めています。(ちなみにmath::Vector<3>クラスの演算子%は外積、*は内積)
なお、ここでのe_Rはブロック図にあるe_Rとは対応しないので注意してください。後で上書きされます。
	/* all input data is ready, run controller itself */

	/* try to move thrust vector shortest way, because yaw response is slower than roll/pitch */
	math::Vector<3> R_z(R(0, 2), R(1, 2), R(2, 2));
	math::Vector<3> R_sp_z(R_sp(0, 2), R_sp(1, 2), R_sp(2, 2));

	/* axis and sin(angle) of desired rotation */
	math::Vector<3> e_R = R.transposed() * (R_z % R_sp_z);

	/* calculate angle error */
	float e_R_z_sin = e_R.length();
	float e_R_z_cos = R_z * R_sp_z;
以下2行が回転角度と回転軸(Body-frame上の単位ベクトル)を求める部分です。
		/* get axis-angle representation */
		float e_R_z_angle = atan2f(e_R_z_sin, e_R_z_cos);
		math::Vector<3> e_R_z_axis = e_R / e_R_z_sin;
図にすると、どのような回転なのかイメージしやすくなります。
続く処理では、`e_R`の長さを`e_R_z_angle`にします。 e_R = e_R_z_axis * e_R_z_angle;
これで姿勢偏差のロール軸成分e_R(0)とピッチ軸成分e_R(1)が決まりました。(e_R(2)は常に0)
現時点のe_Rに幾何学的な意味はありません。偏差の大きさを格納した配列と考えたほうが混乱しません。
最後に、ロール・ピッチ同時回転を現在姿勢のX,Y,Z軸に適用し、結果を回転行列の形式で求めておきます。(ロドリゲスの回転公式)
		/* cross product matrix for e_R_axis */
		math::Matrix<3, 3> e_R_cp;
		e_R_cp.zero();_params.att_p
		e_R_cp(0, 1) = -e_R_z_axis(2);
		e_R_cp(0, 2) = e_R_z_axis(1);
		e_R_cp(1, 0) = e_R_z_axis(2);
		e_R_cp(1, 2) = -e_R_z_axis(0);
		e_R_cp(2, 0) = -e_R_z_axis(1);
		e_R_cp(2, 1) = e_R_z_axis(0);

		/* rotation matrix for roll/pitch only rotation */
		R_rp = R * (_I + e_R_cp * e_R_z_sin + e_R_cp * e_R_cp * (1.0f - e_R_z_cos));
ヨー姿勢偏差の計算
ヨー姿勢偏差を求めるために、ロール・ピッチ同時回転後の姿勢と目標姿勢のX軸を使います。X軸は回転行列の第1列にあたります。
	/* R_rp and R_sp has the same Z axis, calculate yaw error */
	math::Vector<3> R_sp_x(R_sp(0, 0), R_sp(1, 0), R_sp(2, 0));
	math::Vector<3> R_rp_x(R_rp(0, 0), R_rp(1, 0), R_rp(2, 0));
角度のsin成分とcos成分を求めるために外積と内積を用います。* R_sp_zにはsin成分の符号を決める役割があります。
e_R(2) = atan2f((R_rp_x % R_sp_x) * R_sp_z, R_rp_x * R_sp_x) * yaw_w;
yaw_wは以下のコードで求まる0以上1以下の係数です。目標姿勢が水平のとき1、横転しているとき0となることから、姿勢角が大きい状態でヨー制御を抑制する役割があるものと思われます。
	/* calculate weight for yaw control */
	float yaw_w = R_sp(2, 2) * R_sp(2, 2);
これで、e_Rのすべての成分が決まりました。
角速度目標値の計算
あとは制御に関する処理が続きます。
角速度目標値はPゲインと偏差の積で求めます。それを行っているのがこの行で、e_Rの各要素に3つあるゲインをそれぞれ掛けています。
	/* calculate angular rates setpoint */
	_rates_sp = _params.att_p.emult(e_R);
ヨー軸に対してはフィードフォワード成分をさらに加えています。
	/* feed forward yaw setpoint rate */
	_rates_sp(2) += _v_att_sp.yaw_sp_move_rate * yaw_w * _params.yaw_ff;
-
角速度制御
============
処理の流れはこのようになっています。 -
角速度のバイアス、スケール補正
-
角速度偏差の計算
-
制御入力の計算
-
積分値の計算(アンチワインドアップ処理含む)
1と2の間には"Throttle PID attenuation"という処理が行われていますが、読み飛ばしても理解を妨げないので本記事では説明を省きます。
角速度のバイアス、スケール補正
まず制御で用いる角速度を求めるところからはじまります。
角速度は計測値そのままではなく、次の3つの補正や変換を適用したものを使っています。
- ジャイロセンサの温度補正
- フライトコントローラの取り付け方向に基づく座標変換 (_board_rotation)
- 動的バイアス補正
	/* get transformation matrix from sensor/board to body frame */
	get_rot_matrix((enum Rotation)_params.board_rotation, &_board_rotation);

	/* fine tune the rotation */
	math::Matrix<3, 3> board_rotation_offset;
	board_rotation_offset.from_euler(M_DEG_TO_RAD_F * _params.board_offset[0],
					 M_DEG_TO_RAD_F * _params.board_offset[1],
					 M_DEG_TO_RAD_F * _params.board_offset[2]);
	_board_rotation = board_rotation_offset * _board_rotation;

	// get the raw gyro data and correct for thermal errors
	math::Vector<3> rates(_sensor_gyro.x * _sensor_correction.gyro_scale[0] + _sensor_correction.gyro_offset[0],
			      _sensor_gyro.y * _sensor_correction.gyro_scale[1] + _sensor_correction.gyro_offset[1],
			      _sensor_gyro.z * _sensor_correction.gyro_scale[2] + _sensor_correction.gyro_offset[2]);

	// rotate corrected measurements from sensor to body frame
	rates = _board_rotation * rates;

	// correct for in-run bias errors
	rates(0) -= _ctrl_state.roll_rate_bias;
	rates(1) -= _ctrl_state.pitch_rate_bias;
	rates(2) -= _ctrl_state.yaw_rate_bias;
角速度偏差の計算
単純に目標角速度と補正済み角速度の差を偏差とします。
	/* angular rates error */
	math::Vector<3> rates_err = _rates_sp - rates;
制御入力の計算
比例成分、積分成分、微分成分、フィードフォワード成分の和をとり、制御入力とします。
微分成分のみ、偏差ではなく角速度にゲインを作用させています。このような方式を微分先行形PIDと呼びます。
	_att_control = rates_p_scaled.emult(rates_err) +
		       _rates_int +
		       rates_d_scaled.emult(_rates_prev - rates) / dt +
		       _params.rate_ff.emult(_rates_sp);
積分値の計算
積分値計算のメインは、float rate_i = _rates_int(i) + _params.rate_i(i) * rates_err(i) * dt;と、_rates_int(i) = rate_i;のみとなります。それ以外は、イレギュラー対策とアンチワインドアップと呼ばれるワインドアップ現象を抑えるための処理になっています。ワインドアップ現象とは、積分要素を使った制御で飽和が発生したときに起こる異常な性能劣化のことで、マルチコプターの姿勢制御系でこれが発生すると最悪の場合、機体がひっくり返って墜落してしまいます。対策は基本的に制御器が持つ積分要素に対して行います。
以下の3つが姿勢制御ループで起こる飽和の代表例です。
- ESCに送出する指令値が上限または下限に達する
- ロータの回転数が、高回転域または低回転域で指令値が増減しても変化しにくくなる(ESCによる)
- 角速度がジャイロセンサの計測レンジ外になる
すべてをソフト的に対策するのは困難なので、PX4では検出が容易な1に対して対策がなされています。その対策は、
- 飽和を検知したら積分を行わない
これだけです。対策の方法は他にもありますが、PX4はシンプルなこの方式で実装されています。
		for (int i = AXIS_INDEX_ROLL; i < AXIS_COUNT; i++) {
			// Check for positive control saturation
			bool positive_saturation =
				((i == AXIS_INDEX_ROLL) && _saturation_status.flags.roll_pos) ||
				((i == AXIS_INDEX_PITCH) && _saturation_status.flags.pitch_pos) ||
				((i == AXIS_INDEX_YAW) && _saturation_status.flags.yaw_pos);

			// Check for negative control saturation
			bool negative_saturation =
				((i == AXIS_INDEX_ROLL) && _saturation_status.flags.roll_neg) ||
				((i == AXIS_INDEX_PITCH) && _saturation_status.flags.pitch_neg) ||
				((i == AXIS_INDEX_YAW) && _saturation_status.flags.yaw_neg);

			// prevent further positive control saturation
			if (positive_saturation) {
				rates_err(i) = math::min(rates_err(i), 0.0f);

			}

			// prevent further negative control saturation
			if (negative_saturation) {
				rates_err(i) = math::max(rates_err(i), 0.0f);

			}

			// Perform the integration using a first order method and do not propaate the result if out of range or invalid
			float rate_i = _rates_int(i) + _params.rate_i(i) * rates_err(i) * dt;

			if (PX4_ISFINITE(rate_i) && rate_i > -_params.rate_int_lim(i) && rate_i < _params.rate_int_lim(i)) {
				_rates_int(i) = rate_i;

			}
		}
- おわりに
==========
なるべく表現が難しくならないように心がけてみましたがいかがだったでしょうか。代わりに座標系の定義が曖昧であったり、厳密さに欠ける説明があるかもしれません。それでも、なんとなくで良いのでオープンソースのドローンってこうなってるんだと分かってもらえれば幸いです。


