ReactNativeとSkyWay
ネイティブアプリケーションを作る際に、ReactNativeはとても生産性が高く、好んで使っています。
また、SkyWayですが、WebRTCを使ったアプリケーションを作る際のプラットフォームとして、特に日本では一定のコミュニティもありますし、良い選択肢だと思います。
SkyWayでは、iOS SDKとAndroid SDKが提供されているのですが、ReactNativeからそれらネイティブSDKを使おうとすると、JSとブリッジしてやる必要があります。
今回、ReactNativeからSkyWayをブリッジするネイティブモジュールを書いて公開した1ので、その紹介をかねて導入と簡単なサンプルコードを説明させてもらおうと思います。
以下は、iOSで説明していきますが、Androidにも対応することが可能です。
プロジェクトの作成
まずは、新しいプロジェクトを作成していきます。なお、この記事ではnpmではなく、yarnを使っていきますが、npmでも特に問題はありません。
yarn global add create-react-native-app
create-react-native-app SkywaySample
cd SkywaySample
プロジェクトが作られた状態では、Expoが有効になっているのですが、今回はネイティブモジュールを使うため無効にします。
yarn run eject
SkyWayの導入
まずは、npmパッケージをインストールします。
yarn add git+ssh://git@github.com/micin-jp/react-native-skyway.git#v0.1.1
yarn react-native link
次に、SkyWay iOS SDKをインストールします。SDKをダウンロードしてプロジェクトに追加してもよいですが、CocoaPodsを使うのが管理上も良いかと思います。
source 'https://github.com/CocoaPods/Specs.git'
platform :ios, '9.0'

target 'SkywaySample' do
  pod 'SkyWay'
  inherit! :search_paths
end
pod install
pod installが完了するとProjectName.xcworkspaceというファイルができていると思いますので、これをXcodeで開きます。
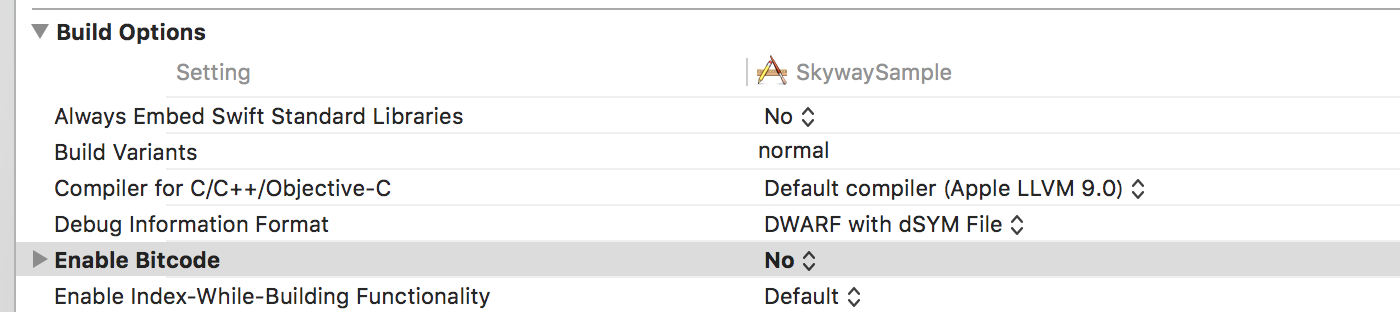
SkyWay iOS SDKはBitcodeに対応していないようなので、プロジェクトをビルドするにはBitcodeを無効にする必要があります。
Build Settings -> Enable bitcodeをNOに設定します。
また、カメラとマイクを使用するので、Info.plist内にUsageDescriptionを記載する必要があります。Info.plistに、Privacy - Microphone Usage Description, Privacy - Camera Usage Descriptionを追加します。

ここまできたら一度ビルドが問題なく行えるか、確認しておきましょう。⌘Bでビルドを実行します。
開発者登録とAPIキーの発行
SkyWayのデベロッパーサイトから開発者登録とAPIキーの発行を行います。APIキーの発行はこちらの手順に従います。
サンプルの実装
では、JavaScriptコードを追加して、ReactNative上でSkyWayを動かしてみます。作るのは簡単なビデオ通話アプリケーションです。全体のコードはこちらでも公開をしているの合わせて参考にしてください。
プロジェクト内にApp.jsというファイルがあるので、こちらを編集します。
いきなりですが、実装後のコードはこのようになります。
import React from 'react';
import { StyleSheet, Text, View, TouchableHighlight, Dimensions } from 'react-native';
import { Peer, RemoteVideo, LocalVideo } from 'react-native-skyway';

const PEER_ID = 'SET_PEER_ID_A';
const CALLEE_PEER_ID = 'SET_PEER_ID_B';
const options = {
  key: 'YOUR_API_KEY',
  domain: 'localhost',
  debug: 3
};

export default class App extends React.Component {
  constructor(props) {
    super(props);

    this.onPressCall = this.onPressCall.bind(this);
    this.onPeerOpen = this.onPeerOpen.bind(this);
    this.onPeerClose = this.onPeerClose.bind(this);
    this.onPeerCall = this.onPeerCall.bind(this);
    this.onPeerError = this.onPeerError.bind(this);
    this.onMediaConnectionError = this.onMediaConnectionError.bind(this);
    this.onMediaConnectionClose = this.onMediaConnectionClose.bind(this);

    this.state = {
      peer: null,
      open: false,
    };
  }

  componentDidMount() {
    const peer = new Peer(PEER_ID, options);
    peer.connect();

    peer.addEventListener('peer-open', this.onPeerOpen);
    peer.addEventListener('peer-close', this.onPeerClose);
    peer.addEventListener('peer-call', this.onPeerCall);
    peer.addEventListener('peer-error', this.onPeerError);
    peer.addEventListener('media-connection-close', this.onMediaConnectionClose);
    peer.addEventListener('media-connection-error', this.onMediaConnectionError);

    this.setState({ peer });
  }

  componentWillUnmount() {
    this.dispose();
  }

  dispose() {
    if (this.state.peer) {
      this.state.peer.dispose();
      this.state.peer.removeEventListener('peer-open', this.onPeerOpen);
      this.state.peer.removeEventListener('peer-close', this.onPeerClose);
      this.state.peer.removeEventListener('peer-call', this.onPeerCall);
      this.state.peer.removeEventListener('peer-error', this.onPeerError);
      this.state.peer.removeEventListener('media-connection-close', this.onMediaConnectionClose);
      this.state.peer.removeEventListener('media-connection-error', this.onMediaConnectionError);
      this.setState({peer: null, open: false});
    }
  }

  render() {
    return (
      <View style={styles.container}>
        <View style={styles.remoteVideoFrame}>
          <RemoteVideo style={styles.remoteVideo} peer={this.state.peer} />
        </View>
        <View style={styles.localVideoFrame}>
          <LocalVideo style={styles.localVideo} peer={this.state.peer} />
        </View>
        <TouchableHighlight underlayColor='rgba(0,0,0,0)' onPress={this.onPressCall} style={styles.callButton}>
          <Text style={styles.callButtonText}>Call</Text>
        </TouchableHighlight>
      </View>
    );
  }

  onPressCall() {
    if (this.state.open) {
      this.state.peer.call(CALLEE_PEER_ID);
    }
  }

  onPeerOpen() {
    this.setState({open: true});
  }

  onPeerError() {
    this.dispose();
  }

  onPeerClose() {
    this.dispose();
  }

  onPeerCall() {
    if (this.state.open) {
      this.state.peer.answer();
    }
  }

  onMediaConnectionError() {
    this.dispose();
  }

  onMediaConnectionClose() {
    this.dispose();
  }
}

const styles = StyleSheet.create({
  container: {
    flex: 1,
    backgroundColor: '#fff',
    alignItems: 'center',
    justifyContent: 'center',
  },
  localVideoFrame: {
    position: 'absolute',
    width: 100,
    height: 100 * 1.3333,
    bottom: 10,
    right: 10,
  },
  localVideo: {
    flex: 1,
  },
  remoteVideoFrame: {
    position: 'absolute',
    width: Dimensions.get('window').width,
    height: Dimensions.get('window').height,
    top: 0,
    left: 0,
  },
  remoteVideo: {
    flex: 1,
  },
  callButton: {
    position: 'absolute',
    bottom: 20,
    left: 20,
    padding: 10,
    backgroundColor: '#03a9f4',
  },
  callButtonText: {
    color: '#ffffff',
  }

});
いくつかのポイントについて、簡単に解説を行います。
まず、冒頭のimport文、
import { Peer, RemoteVideo, LocalVideo } from 'react-native-skyway';
によって、react-native-skywayパッケージの読み込みを行います。react-native-skywayパッケージは、3つのクラス、Peer, RemoteVideo, LocalVideo
を提供しており、これらを読み込みます。それぞれ、
-
Peer: Skywayシグナリングサーバとの接続をハンドリング -
RemoteVideo: 相手のストリームを描画 -
LocalVideo: 自分のストリームを描画
といった役割があります。このPeerは、iOSやAndroidのSkyway SDKのPeerオブジェクトをラップしてJSレイヤーで扱えるようにしたものです。
次に進んで、componentDidMount()の部分ですが、ここでPeerオブジェクトを生成しています。
  componentDidMount() {
    const peer = new SkyWay.Peer(PEER_ID, options);
    peer.connect();

    peer.addEventListener('peer-open', this.onPeerOpen);
    peer.addEventListener('peer-close', this.onPeerClose);
    ...

    this.setState({ peer });
  }
ここで、Skywayのシグナリングサーバとの接続が行われ、無事接続ができると、他のPeerに対して通話をかけたり、逆に受け取ったりできるようになります。
接続の確立、切断、通話の受電などは、addEventListenerによってイベントを監視することでハンドリングできます。
次のrender()ですが、今回のサンプルでは、自分と相手の映像、通話を開始するボタンを設置するようにしました。
render() {
  return (
    <View style={styles.container}>
      <View style={styles.remoteVideoFrame}>
        <RemoteVideo style={styles.remoteVideo} peer={this.state.peer} />
      </View>
      <View style={styles.localVideoFrame}>
        <LocalVideo style={styles.localVideo} peer={this.state.peer} />
      </View>
      <TouchableHighlight underlayColor='rgba(0,0,0,0)' onPress={this.onPressCall} style={styles.callButton}>
        <Text style={styles.callButtonText}>Call</Text>
      </TouchableHighlight>
    </View>
  );
}
2つ端末を用意して、1つ目の端末で通話開始ボタンを押すと、
Peerオブジェクトのcallメソッドが呼ばれ、相手のPeerに対して通話の呼び出しがかかります。
onPressCall() {
  if (this.state.open) {
    this.state.peer.call(CALLEE_PEER_ID);
  }
}
そうすると、もう一方のアプリ内のPeerオブジェクトでpeer-callイベントが発火し、それに応じてanswerメソッドを呼ぶと通話が確立します。
onPeerCall() {
  if (this.state.open) {
    this.state.peer.answer();
  }
}
サンプルを動かす
では、サンプルを端末で動かしてみましょう。端末を2台用意します。
まず、冒頭のAPIキーの設定部分にSkywayの開発者画面で表示されたAPIキーを記載します。
const options = {
  key: 'xxxxxxxxxxxxxxxxxxxxxxxxxxxx',
  domain: 'localhost',
  debug: 3
};
また、適当なPeerIDの文字列を変数にセットします。たとえば、次のようにします。
const PEER_ID = 'peer0';
const CALLEE_PEER_ID = 'peer1';
端末AをMacにつなぎ、XcodeからRunします。
次に、PeerIDの部分を次のように書き換えた上で、同様に端末Bでも、XcodeからRunします。
// PeerIDを入れ替える
const PEER_ID = 'peer1';
const CALLEE_PEER_ID = 'peer0';
これで、お互いに通話ができるようになりました。
どちらかの端末から、通話開始ボタンを押し、お互いに動画のストリームが表示されれば、成功です!
今回は、PeerIDはソースコード上にハードコードしてしまいましたが、実際のアプリケーションでは、それぞれに合った方法で、PeerIDの生成・管理を行なってください。
雑記
以下は、ネイティブモジュールを書いてみて、感じたことです。
一応、元のSkyWayと似たようなインターフェースになるようにはしているのですが、元々は自分で使う必要に迫られて作ったものなので、今は足りていないAPIやオプションは結構あると思います。また、抽象化も妥協していて、例えば、JSレイヤーにMediaConnectionを扱うオブジェクトがなく、peer.addEventListener('media-connection-close', ..); というようにPeerからMediaConnectionイベントが発火したりと雑な感じになっています。これは、必要に迫られたら直すか…というところです。
また、公式のJavaScript SDKであるskyway-js-sdkの昔のコミットを眺めていて気づいたんですが、ReactNativeに対応しようとされているようでした。現在は消えているようですが…
その際の方法は、WebRTC部分はreact-native-webrtcを使っていて、シグナリングはブラウザと同様のコードベースを使うという形で、なるほどと思いました。react-native-webrtcは結構綺麗にブラウザのAPIと互換しているので、あまり無理なく対応できるのでは、と思います。
私は、SkyWayのiOS SDKとAndroid SDKにブリッジする形で書いてしまったので、今ではあまり筋が良くなかったのでは…と思います。早く公式SDKでReactNativeに対応してくれたらなと願っております。
-
ちなみに私はNTTComさんとは全く関連はなく完全なサードパーティのライブラリになります。 ↩