初めに
この記事では以下のような構成のAngularアプリケーションを開発する際のローカル開発環境の構築を解説します。
- Angular公式のi18n機能を使ってi18nを実現する
- 最終的なビルド生成物はAOTビルド後にサーバーまたはS3などの静的ファイルホスティングサービスから配信する
-
**/en/**/ja/などのアクセス先のパスを変化させることによって言語切替が可能 - アプリケーションのUI上から言語選択を行う機能の動作確認をローカルで行う必要がある
環境
$ ng -v
Angular CLI: 6.1.5
Node: 9.11.1
OS: darwin x64
Angular: 6.1.4
... animations, common, compiler, compiler-cli, core, forms
... http, language-service, platform-browser
... platform-browser-dynamic, router

Package                           Version
-----------------------------------------------------------
@angular-devkit/architect         0.7.5
@angular-devkit/build-angular     0.7.5
@angular-devkit/build-optimizer   0.7.5
@angular-devkit/build-webpack     0.7.5
@angular-devkit/core              0.7.5
@angular-devkit/schematics        0.7.5
@angular/cli                      6.1.5
@ngtools/webpack                  6.1.5
@schematics/angular               0.7.5
@schematics/update                0.7.5
rxjs                              6.2.2
typescript                        2.7.2
webpack                           4.9.2
リポジトリ
今回解説する内容の結果は次のサンプルプロジェクトに反映しています。
https://github.com/daikiojm/angular-v6-i18n-sample
雛形作成
今回の目的は開発環境の説明ですが、対象になるアプリケーションがないと始まらないので、Angular CLIでサクッとサンプルのプロジェクトを作成しておきます。 ng new した状態で作成されるAppComponentの内容をi18nするシンプルなプロジェクトを作っていきます。
まずは、プロジェクトを作成
$ ng new angular-v6-i18n-sample
テンプレート内の翻訳したい箇所にi18n 属性を付加していきます。
この方法の他にもそれぞれの箇所にカスタムIDを付加する方法もありますが、今回は一番シンプルにi18n属性を付加し、翻訳箇所を示します。
 <!--The content below is only a placeholder and can be replaced.-->
 <div style="text-align:center">
-  <h1>
+  <h1 i18n>
     Welcome to {{ title }}!
   </h1>
   <img width="300" alt="Angular Logo" src="data:image/svg+xml;base64,PHN2ZyB4bWxucz0iaHR0cDovL3d3dy53My5vcmcvMjAwMC9zdmciIHZpZXdCb3g9IjAgMCAyNTAgMjUwIj4KICAgIDxwYXRoIGZpbGw9IiNERDAwMzEiIGQ9Ik0xMjUgMzBMMzEuOSA2My4ybDE0LjIgMTIzLjFMMTI1IDIzMGw3OC45LTQzLjcgMTQuMi0xMjMuMXoiIC8+CiAgICA8cGF0aCBmaWxsPSIjQzMwMDJGIiBkPSJNMTI1IDMwdjIyLjItLjFWMjMwbDc4LjktNDMuNyAxNC4yLTEyMy4xTDEyNSAzMHoiIC8+CiAgICA8cGF0aCAgZmlsbD0iI0ZGRkZGRiIgZD0iTTEyNSA1Mi4xTDY2LjggMTgyLjZoMjEuN2wxMS43LTI5LjJoNDkuNGwxMS43IDI5LjJIMTgzTDEyNSA1Mi4xem0xNyA4My4zaC0zNGwxNy00MC45IDE3IDQwLjl6IiAvPgogIDwvc3ZnPg==">
 </div>
-<h2>Here are some links to help you start: </h2>
+<h2 i18n>Here are some links to help you start: </h2>
 <ul>
   <li>
-    <h2><a target="_blank" rel="noopener" href="https://angular.io/tutorial">Tour of Heroes</a></h2>
+    <h2><a i18n target="_blank" rel="noopener" href="https://angular.io/tutorial">Tour of Heroes</a></h2>
   </li>
   <li>
-    <h2><a target="_blank" rel="noopener" href="https://github.com/angular/angular-cli/wiki">CLI Documentation</a></h2>
+    <h2><a i18n target="_blank" rel="noopener" href="https://github.com/angular/angular-cli/wiki">CLI Documentation</a></h2>
   </li>
   <li>
-    <h2><a target="_blank" rel="noopener" href="https://blog.angular.io/">Angular blog</a></h2>
+    <h2><a i18n target="_blank" rel="noopener" href="https://blog.angular.io/">Angular blog</a></h2>
   </li>
 </ul>
メッセージファイルの作成
Angular CLIの ng xi18n コマンドを使ってリソースファイルの作成を行います。
ここでは、/locale/ フォルダにデフォルトのenに対して**.ja.xlfというファイル名と拡張子を指定して作成しています。
ng xi18n --i18n-format=xlf --out-file locale/messages.ja.xlf
正常に作成が完了すると、次のような内容をファイルが作成されているのが確認できます。
<?xml version="1.0" encoding="UTF-8" ?>
<xliff version="1.2" xmlns="urn:oasis:names:tc:xliff:document:1.2">
  <file source-language="en" datatype="plaintext" original="ng2.template">
    <body>
      <trans-unit id="1e9a15da9ecb3574be8b466c285ed4aca1d89e4b" datatype="html">
        <source>
    Welcome to <x id="INTERPOLATION" equiv-text="{{ title }}"/>!
  </source>
        <context-group purpose="location">
          <context context-type="sourcefile">app/app.component.html</context>
          <context context-type="linenumber">3</context>
        </context-group>
      </trans-unit>
      <trans-unit id="54f29f9a6da150fc7c4fcd0b7e6d9a1b0314fd35" datatype="html">
        <source>Here are some links to help you start: </source>
        <context-group purpose="location">
          <context context-type="sourcefile">app/app.component.html</context>
          <context context-type="linenumber">8</context>
        </context-group>
      </trans-unit>
...
上記ファイルには、i18n属性を付加したそれぞれの箇所とそのタグに含まれるメッセージのマッピングが記述されています。
このファイルの<source>**</source>の下に<target>**</target>として翻訳先のメッセージを記述してきます。
@@ -6,6 +6,7 @@
         <source>
     Welcome to <x id="INTERPOLATION" equiv-text="{{ title }}"/>!
   </source>
+        <target>ようこそ</target>
         <context-group purpose="location">
           <context context-type="sourcefile">app/app.component.html</context>
           <context context-type="linenumber">3</context>
@@ -13,6 +14,7 @@
       </trans-unit>
       <trans-unit id="54f29f9a6da150fc7c4fcd0b7e6d9a1b0314fd35" datatype="html">
         <source>Here are some links to help you start: </source>
+        <target>いい感じのいい感じのリンク一覧:</target>
         <context-group purpose="location">
           <context context-type="sourcefile">app/app.component.html</context>
           <context context-type="linenumber">8</context>
@@ -20,6 +22,7 @@
       </trans-unit>
       <trans-unit id="170b2bb80cfeeaf71c71cd4b56d240fdda4dfc0b" datatype="html">
         <source>Tour of Heroes</source>
+        <target>公式チュートリアル</target>
         <context-group purpose="location">
           <context context-type="sourcefile">app/app.component.html</context>
           <context context-type="linenumber">11</context>
@@ -27,6 +30,7 @@
       </trans-unit>
       <trans-unit id="4446b939821a1c94d99d8f88ebf5c67844d48d08" datatype="html">
         <source>CLI Documentation</source>
+        <target>CLI ドキュメント</target>
         <context-group purpose="location">
           <context context-type="sourcefile">app/app.component.html</context>
           <context context-type="linenumber">14</context>
@@ -34,6 +38,7 @@
       </trans-unit>
       <trans-unit id="f7b003c76057ba9ff6d99232971f826d015eaf54" datatype="html">
         <source>Angular blog</source>
+        <target>Angular ブログ</target>
         <context-group purpose="location">
           <context context-type="sourcefile">app/app.component.html</context>
           <context context-type="linenumber">17</context>
ここまでで、i18n対応に必要な基本的な手順は完了です。
ビルド設定
AOTビルド時にロケールを指定してビルドするi18n対応では、ロケールごとにビルドしたアプリケーションを、パスで分けて言語切替を行うパターンがよくあるパターンかと思います。イメージとしては次のとおりです。
この場合は、最終的なビルド生成物は次のようなファイル構成になっている必要があります。
(別言語でビルドした2つのアプリケーションが生成されるイメージ)
dist/
└── app-name
    ├── en
    │   ├── 3rdpartylicenses.txt
    │   ├── favicon.ico
    │   ├── index.html
    │   ├── main.js
    │   ├── polyfills.js
    │   ├── runtime.js
    │   ├── styles.js
    │   └── vendor.js
    └── ja
        ├── 3rdpartylicenses.txt
        ├── favicon.ico
        ├── index.html
        ├── main.js
        ├── polyfills.js
        ├── runtime.js
        ├── styles.js
        └── vendor.js
プロキシ設定
ローカルで2つの開発サーバーをng serve しつつ、それぞれを同一ポートへのアクセスで確認できるようにするには次のようなproxy設定を行います。
まず、プロジェクトルートに次のようなproxy.conf.jsonを作成します。
{
  "/ja": {
    "target": "http://localhost:4300",
    "secure": false
  }
}
Angular CLIのproxy設定は、バックエンドAPIへのリクエストプロキシに使われることが多いですが、ここではパスごとに別のng serveしているページへのリンクを行うために使っています。
ビルド設定
angular.jsonに言語ごとのビルド設定を記述していきます。
まず、build.configurationsの項目にproductionの設定を参考に言語ごとに追加のconfigurationを追加します。
...
            "production": {
              "fileReplacements": [
                {
                  "replace": "src/environments/environment.ts",
                  "with": "src/environments/environment.prod.ts"
                }
              ],
              "optimization": true,
              "outputHashing": "all",
              "sourceMap": false,
              "extractCss": true,
              "namedChunks": false,
              "aot": true,
              "extractLicenses": true,
              "vendorChunk": false,
              "buildOptimizer": true
            },
            "en": {
              ...
              "outputPath": "dist/en",
              "baseHref": "/en/"
            },
            "ja": {
              ...
              "outputPath": "dist/ja",
              "baseHref": "/ja/",
              "i18nFile": "src/locale/messages.ja.xlf",
              "i18nFormat": "xlf",
              "i18nLocale": "ja"
            }
...
- outputPath
- ビルド生成物の出力先ディレクトリ(上で挙げたディレクトリ構成になるように設定)
- baseHref
- HTMLの
<base href="">を指定する
- HTMLの
- i18nFile
- 前の手順で作成したリソースファイルを指定
- i18nFormat
- リソースファイルのファイルフォーマットを指定
- i18nLocale
- ロケールを指定
この設定は、それぞれng serve --configuration=en、 ng serve --configuration=ja を指定して実行した際に適用されます。
また、同様にserveのconfigurationsにも設定を追加します。
          "configurations": {
            "production": {
              "browserTarget": "angular-v6-i18n-sample:build:production"
            },
            "en": {
              "browserTarget": "angular-v6-i18n-sample:build:en",
              "baseHref": "/en/"
            },
            "ja": {
              "browserTarget": "angular-v6-i18n-sample:build:ja",
              "baseHref": "/ja/"
            }
          }
起動&ビルドコマンド
上記までの設定を踏まえ、npm scriptは次のように設定しました。
{
  "name": "angular-v6-i18n-sample",
  "version": "0.0.0",
  "scripts": {
    "ng": "ng",
    "start": "ng serve",
    "start:en": "ng serve --configuration=en --proxy-config proxy.conf.json",
    "start:ja": "ng serve --configuration=ja --port 4300",
    "build": "npm run build:en && npm run build:ja",
    "build:en": "ng build --configuration=en",
    "build:ja": "ng build --configuration=ja",
    ...
  },
...
確認
ローカルでの開発時は次のように起動します。
npm run start:en と npm run start:ja をそれぞれ別のターミナルで実行します。
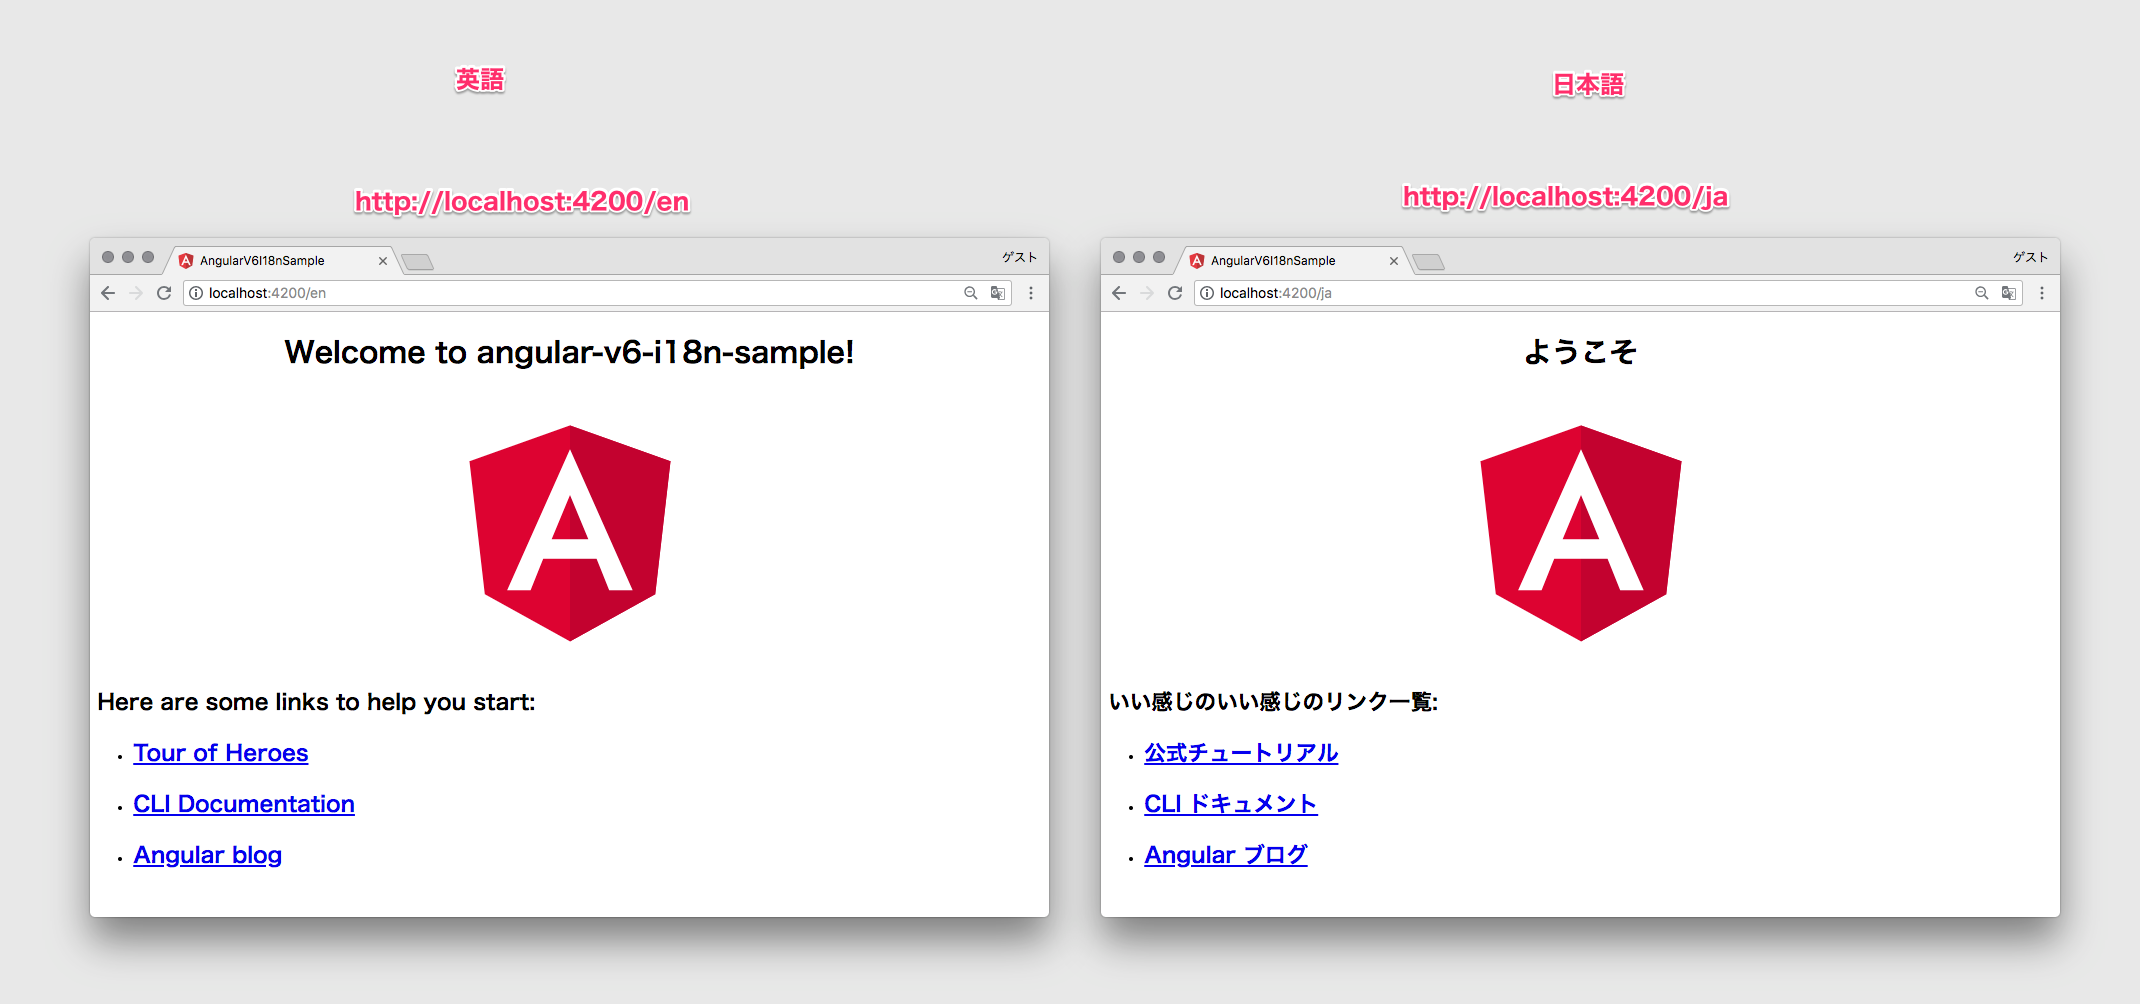
この状態で、http://localhost:4200/enにアクセスすると英語、http://localhost:4200/jaにアクセスすると日本語になっているかと思います。
これで、リンクによる言語切替のテストなどもローカルで行えるようになりました。
実環境へのデプロイも、上で設定したbuild scriptを実行したあとdist以下をアップロードするだけですが、また機会があれば記事を書ければと思っています。
参考
