はじめに
さくらVPS(CentOS7)上でPythonのwebサーバーを構築するメモ
Apache → gunicorn → Pipenv → Flask + SQLAlchemy(おまけでphpMyAdmin)
サーバーインスタンス作成から最短でDBを扱うwebサーバーをPythonで構築します。
完全に初心者向けの記事ですが、最低限必要な知識は
- viの基本的な使い方
- クライアントからのssh接続方法
程度です。
サーバー構築、Python初心者の方(自分です)の参考になればと思います。
テスト用webサーバーを最短で構築するための記事なのでセキュリティ等は考慮しません
最終的には以下をインストールします。
- CentOS7
- Apache2.4
- Python3.8.0
- Pipenv
- gunicorn
- Flask
- SQLAlchemy
- PhpMyAdmin7.2
それではサクっといってみましょう。
OSインストール
さくらVPSの管理者画面から以下の設定でOSインストール
各種設定>OSインストール
- 標準OS
- CentOS7 x86_64
- 管理ユーザー名 : root
- 新しい管理ユーザのパスワード : rootのパスワードを作成
- スタートアップスクリプトを利用しない
- パケットフィルタ
- SSH
- Web
- FTP
コンソールへログイン
さくらVPSのコンソールかクライアントのssh接続からrootでログイン
macのクライアントからログイン時に
Offending ECDSA key in /Users/'ユーザー名'/.ssh/known_hosts:1
と出たら ~/.sshのknown_hostsを削除する
MySQLインストールと設定
さくらVPSのマニュアルを参考に
https://www.sakura-vps.net/centos7-setting-list/mysql-settings-for-sakura-vps-centos7
MariaDBの削除
$ yum remove -y mariadb-libs
$ rm -rf /var/lib/mysql
MySQL公式リポジトリの追加
$ rpm -Uvh http://dev.mysql.com/get/mysql57-community-release-el7-11.noarch.rpm
MySQLのインストール
$ yum -y install mysql-community-server
バージョン確認
$ mysqld --version
MySQLの起動と自動起動の設定
$ systemctl start mysqld.service
$ systemctl enable mysqld.service
MySQL初期パスワードを確認
MySQL5.7では、初回起動時に初期パスワードが生成されますので、その初期パスワードを下記コマンドで確認します。
※(ぱすわーど)部分が初期パスワードです。
このあと再入力するためにとっておきましょう
$ cat /var/log/mysqld.log | grep password
[Note] A temporary password is generated for root@localhost: (ぱすわーど)
MySQLのセキュリティ設定
[root@ ~]# mysql_secure_installation

Securing the MySQL server deployment.

Enter password for user root: ”先程の初期パスワードを入力します”

The existing password for the user account root has expired. Please set a new password.

New password: ”新しいパスワードを入力(英字大小文字、数字、記号を含める)”

Re-enter new password: ”確認のためパスワードを再入力”
The 'validate_password' plugin is installed on the server.
The subsequent steps will run with the existing configuration
of the plugin.
Using existing password for root.

Estimated strength of the password: 100
Change the password for root ? ((Press y|Y for Yes, any other key for No) : y ”yを入力(※1)”

New password: ”上記で設定した同じパスワードを入力”

Re-enter new password: ”確認のためパスワードを再入力”

Estimated strength of the password: 100
Do you wish to continue with the password provided?(Press y|Y for Yes, any other key for No) : y ”設定したパスワードで良いかの確認なのでyを入力”
By default, a MySQL installation has an anonymous user,
allowing anyone to log into MySQL without having to have
a user account created for them. This is intended only for
testing, and to make the installation go a bit smoother.
You should remove them before moving into a production
environment.

Remove anonymous users? (Press y|Y for Yes, any other key for No) : y ”匿名ユーザーを削除して良いかの確認なのでyを入力”
Success.

Normally, root should only be allowed to connect from
'localhost'. This ensures that someone cannot guess at
the root password from the network.

Disallow root login remotely? (Press y|Y for Yes, any other key for No) : y ”リモートからrootでログインできないようにして良いかの確認なのでyを入力”
Success.

By default, MySQL comes with a database named 'test' that
anyone can access. This is also intended only for testing,
and should be removed before moving into a production
environment.

Remove test database and access to it? (Press y|Y for Yes, any other key for No) : y ”テストデータベースを削除して良いかの確認なのでyを入力”
 - Dropping test database...
Success.

 - Removing privileges on test database...
Success.

Reloading the privilege tables will ensure that all changes
made so far will take effect immediately.

Reload privilege tables now? (Press y|Y for Yes, any other key for No) : y ”今すぐ権限テーブルを読み込んで設定を有効にするかの確認なのでyを入力”
Success.

All done!
MySQLの設定変更(my.cnf)
$ vi /etc/my.cnf
my.cnfファイルに下記のハイライト部分を追加してください。
「character-set-server = utf8」⇒MySQLデータベースで利用する文字コードをUTF8に指定します。
「default_password_lifetime = 0」⇒MySQL5.7からユーザーのパスワード有効期限がデフォルトで360日のため、この有効期限を0に設定して無効にします。
MySQLを再起動して設定を反映します。
$ systemctl restart mysqld.service
データベースの作成
MySQLへログイン
$ mysql -u root -p
test_dbを作成します
mysql>CREATE DATABASE test_db;
mysql>SHOW DATABASES;
+--------------------+
| Database           |
+--------------------+
| information_schema |
| mysql              |
| performance_schema |
| sys                |
| test_db            |
+--------------------+
MySQLからログアウト
mysql> QUIT;
Apacheインストール
yum インストール
$ yum install httpd
自動起動設定
$ systemctl enable httpd.service
Apache 起動
$ systemctl start httpd
ブラウザから確認
http://'サイトのアドレス'
pyenvとPythonをインストール
必要なパッケージをyum install
$ yum install gcc bzip2 bzip2-devel openssl openssl-devel readline readline-devel
$ yum update -y
$ yum groupinstall "Development Tools"
$ yum install libffi-devel
$ yum install mariadb-devel
pyenvインストール
パス通したりするので場所はこちらへ
$ cd /usr/local/
pyenvをgitからクローン
$ git clone https://github.com/pyenv/pyenv.git ./pyenv
$ mkdir -p ./pyenv/versions ./pyenv/shims
PATHの設定
$ echo 'export PYENV_ROOT="/usr/local/pyenv"' | sudo tee -a /etc/profile.d/pyenv.sh
$ echo 'export PATH="${PYENV_ROOT}/shims:${PYENV_ROOT}/bin:${PATH}"' | sudo tee -a /etc/profile.d/pyenv.sh
$ source /etc/profile.d/pyenv.sh
pyenvのバージョンを確認
$ pyenv --version
Python3.8.0をインストール
なんとなくwsgi用のオプションを指定してインストール
$ env PYTHON_CONFIGURE_OPTS="--enable-shared" pyenv install 3.8.0
バージョンの切り替え
$ pyenv global 3.8.0
$ pyenv rehash
確認
$ python --version
Python 3.8.0
pipenvで仮想環境構築
インストール
$ pip install --upgrade pip
$ pip install pipenv
仮想環境作成
「test」プロジェクト作成
$ mkdir -p /var/www/app/test
$ cd /var/www/app/test
$ pipenv install
pipenvのシェルを起動
$ pipenv shell
インストール確認
$ python --version
今回使うパッケージをインストール
pipenv shell中は左側にフォルダ名が表示される
(test) $ pipenv install gunicorn
(test) $ pipenv install flask
(test) $ pipenv install sqlalchemy
(test) $ pipenv install mysqlclient
Apacheの設定とFlaskアプリの作成
Apache で受けたリクエストを gunicorn にプロキシ
$ vi /etc/httpd/conf/httpd.conf
最終行に追加
ProxyPass /test http://localhost:8000/
apache再起動
$ systemctl restart httpd.service
http リクエストが8000番ポートにプロキシされ
作成した Flask アプリケーションにブラウザからアクセスできるようになります。
.pyファイル作成
/var/www/app/testにFlask起動とsqlの.pyファイルを2つ作成します。
$ vi app.py
from flask import Flask
from testsql import *
import datetime

app = Flask(__name__)

@app.route("/")
def hello():
	return "Hello World! "

@app.route("/insert")
def insert():
	# テーブルがない場合 CREATE TABLE 文が実行される
	Base.metadata.create_all(bind=ENGINE)

	data = TestTable()
	ret = data.create_date.strftime("%Y-%m-%d %H:%M:%S")
	session.add(data)
	session.commit()
	session.close()

	return "insert data "+ret

@app.route("/select")
def select():
	# 最新のデータを取得
	res = session.query(TestTable).order_by(desc(TestTable.create_date)).all()

	ret = ""

	print("ret len "+str(len(res)))

	if 0 < len(res):
		ret = str(res[0].create_date)

	return "select "+ret


if __name__ == "__main__":
	# webサーバー立ち上げ
	app.run(debug=True)
次はDBを扱うファイルの作成
$ vi testsql.py
from sqlalchemy import *
from sqlalchemy.orm import sessionmaker, scoped_session
from sqlalchemy.ext.declarative import declarative_base
from sqlalchemy import Column, Integer, String, Float, DateTime, Text
from datetime import datetime, timedelta, timezone

# mysqlのDBの設定
DATABASE = 'mysql://%s:%s@%s/%s?charset=utf8' % (
	"root",             # ユーザー
	“最初にメモしたmysqlのパスワード”,         # パスワード
	"localhost",        # host ip
	"test_db", # DB名
)

ENGINE = create_engine(
	DATABASE,
	encoding = "utf-8",
	echo=False # Trueだと実行のたびにSQLが出力される
)

# Sessionの作成
session = scoped_session(
			sessionmaker(
				autocommit = False,
				autoflush = True,
				bind = ENGINE))

# ベースモデル作成
Base = declarative_base()
Base.query = session.query_property()

# ベースモデルを継承してモデルクラスを定義します
class TestTable(Base):
	__tablename__ = 'tbl_test'

	id          = Column('id', Integer, primary_key = True)

	create_date = Column('create_date', DateTime)

	def __init__(self):
		# タイムゾーンの生成
		JST = timezone(timedelta(hours=+9), 'JST')

		self.create_date = datetime.now(JST)
gunicornを起動
gunicorn [ファイル名]:[変数名]で起動します(ファイル変更で再読み込みオプション付)
(test) $ gunicorn --reload app:app
http:'サイトのアドレス'/test
で表示を確認します
http:'サイトのアドレス'/test/insert
でデータベースへ書き込み
http:'サイトのアドレス'/test/select
でデータベースへ書き込んだデータを返します(日付と時刻)
/select時にgunicornのログに
ret len [インサートされたレコード数]
が表示されます
gunicorn 終了
(test) $ pkill gunicorn
今回はやりませんでしたが
サーバー起動時に gunicorn を起動する
参考:https://qiita.com/sti320a/items/c196387d405272cce46e
【おまけ】phpMyAdmin
DB関連GUIで触りたい人向け
remiリポジトリからPHPインストール
$ rpm -Uvh http://rpms.famillecollet.com/enterprise/remi-release-7.rpm
$ yum install --enablerepo=remi,remi-php71 php php-devel php-mbstring php-mysqlnd php-pdo php-gd
phpMyAdminインストールと設定
参考:https://knowledge.sakura.ad.jp/9006/
インストール
$ yum --enablerepo=remi-php72 install phpmyadmin
アクセス設定
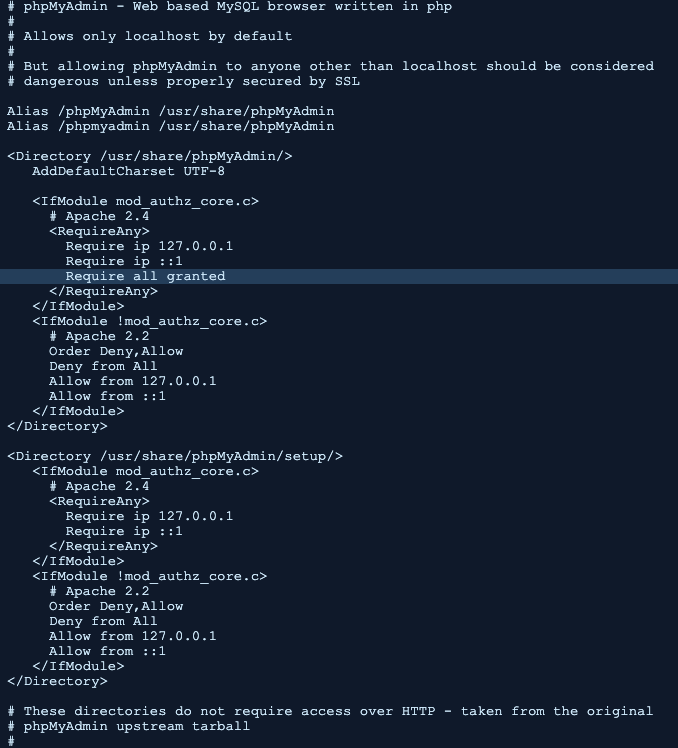
$ vi /etc/httpd/conf.d/phpMyAdmin.conf
下記のハイライト箇所に「Require all granted」を追記します。
この設定で外部からphpMyAdminにアクセスできるようになります。
apache再起動
$ systemctl restart httpd
http://'サイトのアドレス'/phpmyadmin/
さいごに
Pythonでwebサーバーを構築するために色々と調査していると
- FTPのインストール
- sshでのrootの接続禁止とパスワード接続禁止
- ssh用のユーザーやftp用のユーザーの追加
- ユーザーをrootグループに追加してsudoコマンドを実行できるようにする
この辺はだいたいどの記事にも共通した内容でした。
本来の目的ではない部分で躓いて調査に時間がとられ、結局最初からやり直す、、、
ということがかなり多かったので
余計な作業や説明は省いてとにかくサクッと構築する
というところにフォーカスしてみました。
さらにPython環境のpyenvとpipenvの違いや
仮想環境がどこに作られ、どのように機能するのか
gunicornのapサーバーの仕組み等など
調べ始めるとさらに奥深く、興味が湧くと同時にどんどん目的から遠ざかっていきました...
今回の記事 + selenium 等を使って処理を自動化した
各マンガアプリでイッキ読みできるマンガを集めたサイト
マンガイッキ
を運営しています。
良かったらこちらも見てみてください。