はじめに
2019年6月に OpenShift Container Platform 4.1(以降、OCP4.1と表記する)がリリースされました。
評価用にOCP4.1をIntelの超小型PC「 NUC (NUC6i7KYK) 」にインストールした時の手順を投稿します。
(2020年6月追記)OpenShift4.2以降の差分を反映しました。 この手順を元に 4.4のインストールも確認しました。
このNUCはコンパクトなのにIntel Corei7-6770HQ、32GBメモリ、1TBのSSDと結構パワーがある構成になっていて、OCP3でも動作実績のあるマシンで、コンパクトで持ち歩けるので,外出先での評価やデモができて便利なんです。

筐体にOpenShiftのスティッカー貼りたいな....
今回、インストールするのに、赤帽エンジニアブログのRed Hatの田中さんが書かれたブログ記事 「 OpenShift 4.1をベアメタルへUPIインストールする 」が大変参考になりました&影響を受けました&真似したところも多いです。貴重な情報を提供していただいてありがとうございます。
- [赤帽エンジニアブログ] OpenShift 4.1をベアメタルへUPIインストールする
https://rheb.hatenablog.com/entry/openshift41-baremetal-upi
上記記事を読んでから本記事を読むとわかりやすいです。
今回の記事の概要
本記事は以下の構成で書いています。
- はじめに
- 今回の記事の概要
- インストール概要
- ドキュメント
- 構成
- 各ノードの構成
- bastion(踏み台)ホスト構築
- tool類インストール
- IPアドレス設定
- IPv6無効化, IPv4ルーティング
- Firewalld
- selinux
- dnsmasq
- haproxy
- nginx
- 必要なファイルの設置
- SSHプライベートキーの生成及びエージェントへの追加
- インストール設定ファイル(install-config.yaml)の手動作成
- Red Hat Enterprise Linux CoreOS(RHCOS)マシン作成
- クラスターへのログイン
- Operatorの初期設定
- インストール完了の確認
- Web Consoleへのログイン
- 最後に
bastion(踏み台)ホスト構築の項目が半分以上占めてますが、インストールをするための資材をbastion(踏み台)ホストに事前に準備しておけば、OSのisoイメージで仮想マシンを起動すると自動的にインストールしてくれるためです。
インストール概要
ドキュメント
今回、インストールに使用したドキュメントは、前述のブログとOCP4.1の公式ドキュメントになります。
- OCP4.1の公式ドキュメント 第3章 ベアメタルへのインストール
https://access.redhat.com/documentation/ja-jp/openshift_container_platform/4.1/html/installing/installing-on-bare-metal
前述のブログ記事を読んでから本記事を読むとわかりやすいです。
構成

- Intel NUC (NUC6i7KYK) に VMware ESXi 6.5をインストールして、仮想マシンとしてOCP4.1の各ノードをインストールします。
- Intel NUC (NUC6i7KYK) には物理NICが1本しかないため、Development Networkに接続する vSwith0に物理NICを割り当てます。
一方、Testing Networkは各ノード間の通信ができれば良いので物理NICを割り当てない vSwith1を作成します。

- OCP4.1のインストールに必要なDNS、DHCP、NAT、NAPT、WEBのサービスをインストールしたVMを用意します。構成図ではBastion(踏み台)と書いてあるホストになります。
作業の大半は、踏み台(Bastion)ホストで行います。
各ノードの構成
(製品ドキュメントより)
3.1.2.1. 必要なマシン
最小の OpenShift Container Platform クラスターでは以下のホストが必要です。
1 つのブートストラップマシン
3 つのコントロールプレーン、またはマスター、マシン
2 つ以上のコンピュートまたはワーカーマシン
製品ドキュメントの必要なマシンの定義の台数に加えて、下記の通り4種類の仮想マシンを用意しました。
| マシン | 台数 | OS | vCPU | メモリ | ストレージ |
|---|---|---|---|---|---|
| Bootstrap Node | 1 | RHCOS | 4 | 16GB | 120GB |
| Master Node | 3 | RHCOS | 4 | 16GB | 120GB |
| Worker Node | 2 | RHCOS | 2 | 8GB | 120GB |
| Bastion(踏み台) | 1 | RHCOS | 2 | 4GB | 25GB |
- NUCの物理リソース[ CPU: 4コア8スレッド、メモリ: 32GB ] に対してCPU、メモリ共にオーバーコミットして登録してます。
- Bootstrap Nodeはクラスターのインストール完了後に削除できます。
bastion(踏み台)ホスト構築
(前提) CentOS7 Minimum Install済み
tool類インストール
# yum install -y bind-utils net-tools epel-release
IPアドレス設定
* 各マシンには、クラスターをインストールするためにインターネットへの直接のアクセスが必要なため、NAT、NAPT設定を行います。
* 内部ネットワークは、OpenShiftのService Networkとネットワークが被らないように設定する必要があります。
- 外部ネットワーク
nmcli con modify ens192 ipv4.method manual  ipv4.address 192.168.25.99/24
nmcli con modify ens192 ipv4.gateway 192.168.25.1
nmcli con modify ens192 ipv4.dns 192.168.25.1
- 内部ネットワーク
nmcli con modify ens224 ipv4.method manual ipv4.address 172.16.0.99/24
nmcli con down ens224;nmcli con up ens224
IPv6無効化、IPv4ルーティング
# cat <<EOF > /etc/sysctl.d/99-custom.conf
net.ipv6.conf.all.disable_ipv6 = 1
net.ipv4.ip_forward = 1
EOF
# sysctl -p /etc/sysctl.d/99-custom.conf
net.ipv6.conf.all.disable_ipv6 = 1
net.ipv4.ip_forward = 1
Firewalld
# firewall-cmd --get-active-zones
public
  interfaces: ens192 ens224
# firewall-cmd --set-default-zone=trusted
success
# firewall-cmd --get-active-zones
trusted
  interfaces: ens192 ens224
# firewall-cmd --add-masquerade --zone=trusted --permanent
success
# firewall-cmd --reload
success
# firewall-cmd --get-active-zones
trusted
  interfaces: ens192 ens224
# firewall-cmd --list-all --permanent --zone=trusted
trusted
  target: ACCEPT
  icmp-block-inversion: no
  interfaces:
  sources:
  services:
  ports:
  protocols:
  masquerade: yes
  forward-ports:
  source-ports:
  icmp-blocks:
  rich rules:
selinux
WebサーバとLoadBalancer用の設定
setsebool -P httpd_read_user_content 1
setsebool -P haproxy_connect_any 1
dnsmasq
OCP4.1ではクラスターのマシンを長期間管理するために、DHCPサーバを使ってIPアドレスを配布する方法が推奨されています。
実際、今回のインンストールでは、Red Hat CoreOSのisoイメージをマウントした仮想マシンが起動して、DHCPサーバよりIPアドレスを取得して、Bastion(踏み台)ホストのWebサーバよりBIOSファイル、Ignitionファイルを取得してインストールを開始します。
また、各ノード、Kubernetes API、Route、etcdが名前解決できるDNSサーバが必要です。
今回は、dnsmasqを使って DHCPサーバ、DNSサーバを構築します。
# yum install -y dnsmasq

# cat <<EOF > /etc/dnsmasq.conf
port=53
domain-needed
bogus-priv
resolv-file=/etc/resolv.dnsmasq
no-poll
address=/apps.lab.example.com/172.16.0.99
no-dhcp-interface=ens192
expand-hosts
domain=lab.example.com
dhcp-range=172.16.0.100,172.16.0.230,255.255.255.0,12h
dhcp-host=xx:xx:xx:xx:xx:xx,bootstrap,172.16.0.110
dhcp-host=xx:xx:xx:xx:xx:xx,master-0,172.16.0.100
dhcp-host=xx:xx:xx:xx:xx:xx,master-1,172.16.0.101
dhcp-host=xx:xx:xx:xx:xx:xx,master-2,172.16.0.102
dhcp-host=xx:xx:xx:xx:xx:xx,worker-0,172.16.0.103
dhcp-host=xx:xx:xx:xx:xx:xx,worker-1,172.16.0.104
dhcp-option=option:dns-server,172.16.0.99
dhcp-option=option:netmask,255.255.255.0
dhcp-leasefile=/var/lib/dnsmasq/dnsmasq.leases
srv-host=_etcd-server-ssl._tcp.lab.example.com,etcd-0.lab.example.com,2380,0,10
srv-host=_etcd-server-ssl._tcp.lab.example.com,etcd-1.lab.example.com,2380,0,10
srv-host=_etcd-server-ssl._tcp.lab.example.com,etcd-2.lab.example.com,2380,0,10
log-dhcp
log-facility=/var/log/dnsmasq.log
conf-dir=/etc/dnsmasq.d,.rpmnew,.rpmsave,.rpmorig
EOF
# nmcli con modify ens192 ipv4.dns 127.0.0.1
# nmcli con down ens192 && nmcli con up ens192

# cat <<EOF > /etc/resolv.conf
search lab.example.com
nameserver 127.0.0.1
EOF

# cat <<EOF > /etc/resolv.dnsmasq
search lab.example.com
nameserver 192.168.25.1
EOF

# cat <<EOF >> /etc/hosts
# for OCP4
192.168.25.99   api
172.16.0.99     api-int
172.16.0.110    bootstrap
172.16.0.100    master-0
172.16.0.101    master-1
172.16.0.102    master-2
172.16.0.100    etcd-0
172.16.0.101    etcd-1
172.16.0.102    etcd-2
172.16.0.103    worker-0
172.16.0.104    worker-1
EOF

# systemctl enable --now dnsmasq
# systemctl status dnsmasq
haproxy
今回、ロードバランサーにはhaproxyを利用しました。
yum install -y haproxy
- haproxy.cfg 初期設定は変更なし、下記設定追加
cat <<EOF >> /etc/haproxy/haproxy.cfg
# ---------------------------------------------------------------------
# for ocp4
# ---------------------------------------------------------------------
frontend K8s-api
    bind *:6443
    option tcplog
    mode tcp
    default_backend     api-6443

frontend Machine-config
    bind *:22623
    option tcplog
    mode tcp
    default_backend     config-22623

frontend Ingress-http
    bind *:80
    option tcplog
    mode tcp
    default_backend http-80

frontend Ingress-https
    bind *:443
    option tcplog
    mode tcp
    default_backend     https-443

backend api-6443
    mode tcp
    balance     roundrobin
    option  ssl-hello-chk
    server  bootstrap bootstrap.lab.example.com:6443 check
    server  master-0 master-0.lab.example.com:6443 check
    server  master-1 master-1.lab.example.com:6443 check
    server  master-2 master-2.lab.example.com:6443 check

backend config-22623
    mode tcp
    balance     roundrobin
    server  bootstrap bootstrap.lab.example.com:22623 check
    server  master-0 master-0.lab.example.com:22623 check
    server  master-1 master-1.lab.example.com:22623 check
    server  master-2 master-2.lab.example.com:22623 check

backend http-80
    mode tcp
    balance     roundrobin
    server  worker-0 worker-0.lab.example.com:80 check
    server  worker-1 worker-1.lab.example.com:80 check

backend https-443
    mode tcp
    balance     roundrobin
    option      ssl-hello-chk
    server  worker-0 worker-0.lab.example.com:443 check
    server  worker-1 worker-1.lab.example.com:443 check
EOF

# systemctl enable --now haproxy
nginx
インストールに必要なファイルを配布するために、Webサーバが必要で今回はnginxを利用します。 80番ポートはhaproxyとぶつかるため、nginxは8008番ポートを利用します。
yum install -y epel-release
yum install -y nginx
サンプルコンフィグ(初期コンフィグから変更点のみ記載)
http {

    server {
        listen       8008 default_server;   # ポート番号変更:80->8008
#        listen       [::]:80 default_server;   # コメントアウト

    }

    disable_symlinks off;   # 追加
}
# systemctl enable --now nginx
ディレクトリ作成
mkdir -p /usr/share/nginx/html/ocp/rhcos/ignitions
mkdir -p /usr/share/nginx/html/ocp/rhcos/images/release/410
mkdir /usr/share/nginx/html/ocp/rhcos/images/latest
/usr/share/nginx/html/
├── ocp
    └── rhcos
        ├── ignitions
        │   ├── bootstrap.ign
        │   ├── master.ign
        │   └── worker.ign
        └── images
            ├── latest
            │   ├── bios.raw.gz -> ../release/410/rhcos-4.1.0-x86_64-metal-bios.raw.gz
            └── release
                └── 410
                    └── rhcos-4.1.0-x86_64-metal-bios.raw.gz
必要なファイルの設置
インストールに必要なファイルを "Red Hat OpenShift Cluster Manager"からダウンロードします。
https://cloud.redhat.com/openshift/install/metal/user-provisioned
ダウンロードするには、Red Hatアカウントでのログインが必要です。

① openshift-installerのダウンロード
- 取得するファイルのバージョンは常に変わってます。
openshift-install-linux-x.x.x.tar.gzの x.x.xの箇所
# mkdir /root/ocp
# cd /root/ocp

# openshift-installのダウンロード
# curl -LO https://mirror.openshift.com/pub/openshift-v4/clients/ocp/latest/openshift-install-linux-4.1.8.tar.gz
# tar zxvf openshift-install-linux-4.1.8.tar.gz
README.md
openshift-install
② インストール設定ファイル(install-config.yaml)で使用する Pull Seacret のダウンロード
インストール設定ファイル(install-config.yaml)の作成に必要なので、Pull Seacretを保存しておきます。
③ Red Hat CoreOSのダウンロード
ダウンロードしたrhcos-x.x.x-x86_64-installer.isoファイルはVMware ESX 6.5の データストアに保存します。
# RHCOS ISOイメージのダウンロード
# curl -Lo /root/ocp4/rhcos-4.1.0-x86_64-installer.iso https://mirror.openshift.com/pub/openshift-v4/dependencies/rhcos/4.1/latest/rhcos-4.1.0-x86_64-installer.iso

# BIOSファイルのダウンロード
# curl -Lo /usr/share/nginx/html/ocp/rhcos/images/release/410/rhcos-4.1.0-x86_64-metal-bios.raw.gz https://mirror.openshift.com/pub/openshift-v4/dependencies/rhcos/4.1/latest/rhcos-4.1.0-x86_64-metal-bios.raw.gz
# cd  /usr/share/nginx/html/ocp/rhcos/images/latest
# ln -s ../release/410/rhcos-4.1.0-x86_64-metal-bios.raw.gz bios.raw.gz
# ls -la
total 0
drwxr-xr-x. 2 root root 25 Jul 12 14:35 .
drwxr-xr-x. 4 root root 35 Jul 12 14:13 ..
lrwxrwxrwx. 1 root root 51 Jul 12 14:35 bios.raw.gz -> ../release/410/rhcos-4.1.0-x86_64-metal-bios.raw.gz
BIOSファイルのファイル名は長いのでシンボリックリンクで短くしてます。
④ oc clientのダウンロード
# cd /root/ocp
#

# tar zxvf openshift-client-linux-4.1.8.tar.gz
README.md
oc
kubectl
# mv oc /usr/local/bin/
# mv kubectl /usr/local/bin/
# ls -ltr /usr/local/bin/
total 149608
-rwxr-xr-x. 2 root root 76597424 Jun 28 03:11 oc
-rwxr-xr-x. 2 root root 76597424 Jun 28 03:11 kubectl
SSH プライベートキーの生成およびエージェントへの追加
- 各ノードへSSH公開鍵認証でアクセスするためのSSHキーを作成します。
このキーを使用して、ユーザーcoreとして各ノードに対してSSHを実行できます。
# ssh-keygen -t rsa -b 4096 -N '' -f ~/.ssh/new_rsa
- ssh-agent プロセスをバックグラウンドタスクとして開始します。
# eval "$(ssh-agent -s)"
- SSHプライベートキーをssh-gentに追加します。
# ssh-add ~/.ssh/new_rsa

# ssh-add -l
4096 SHA256:xxxxxxxxxxxxxxxxxxxxxxxx /root/.ssh/new_rsa (RSA)
インストール設定ファイル(install-config.yaml)の手動作成
インストール設定ファイル(install-config.yaml)を作成します。
今回作成したinstall-config.yamlは下記のような内容になります。
# cat <<EOF >> /root/ocp/install-config.yaml
apiVersion: v1
baseDomain: example.com
compute:
- name: worker
  replicas: 0
controlPlane:
  name: master
  replicas: 3
metadata:
  ## The name for the cluster
  name: lab
networking:
  clusterNetworks:
  - cidr: 10.128.0.0/14
    hostPrefix: 23
  networkType: OpenShiftSDN
  serviceNetwork:
  - 172.30.0.0/16
platform:
  none: {}
pullSecret: '{"auths":{"xxx-xxx-xxxx"}}'
sshKey: 'ssh-rsa AAAAB3.... root@bastion.lab.example.com'
EOF
- < base_domain> : example.com
- < cluster_name> : lab
- この設定ファイルのworkerのreplicasの値は 0 に設定(ドキュメンに書かれてる)
- < pull Secret> : "Red Hat OpenShift Cluster Manager"からダウンロードして pullSecretを貼り付け
- < sshKey> : SSH公開鍵の内容(~/.ssh/new_rsa.pub)を貼り付け
次にインストールディレクトリ( bare-metal )を作成し,install-config.yamlをインストールディレクトリに格納します。
mkdir bare-metal
cp install-config.yaml ./bare-metal
OpenShift 4.1の手順 - Ignitionファイルの生成
./openshift-install create ignition-configs --dir=bare-metal
cp ./bare-metal/*.ign /usr/share/nginx/html/ocp/rhcos/ignitions/
OpenShift 4.2以降の手順 - Kubernetes manifestとIgnitionファイルの生成
./openshift-install create manifests --dir=bare-metal/
 INFO Consuming Install Config from target directory
 WARNING Making control-plane schedulable by setting MastersSchedulable to true for Scheduler cluster settings

vi ./bare-metal/manifests/cluster-scheduler-02-config.yml
-> mastersSchedulableパラメータを trueから falseに変更

./openshift-install create ignition-configs --dir=bare-metal/
OpenShift4.1、OpenShift4.2以降の手順で生成された次の3つのIgnition設定ファイルをnginxのディレクトリにコピーします。( bootstrap.ign, master.ign.ign, worker.ign.ign )
# cp ./bare-metal/*.ign /usr/share/nginx/html/ocp/rhcos/ignitions/
インストールを繰り返す場合は、インストールディレクトリ( bare-metal )を必ず削除してからIgnition 設定ファイルの作成を行います。
インストールディレクトリの中には、隠しファイルもあるので、隠しファイルも忘れずに削除してください。
# ls -1a
auth
bootstrap.ign
master.ign
metadata.json
.openshift_install.log
.openshift_install_state.json
worker.ign
これで、事前準備は終了です。ついにインストールの開始になります。
Red Hat Enterprise Linux CoreOS (RHCOS) マシンの作成
各ノードを、VMware ESXi 6.5にて仮想マシンを作成し起動します。この手順は全てのノード同じです。
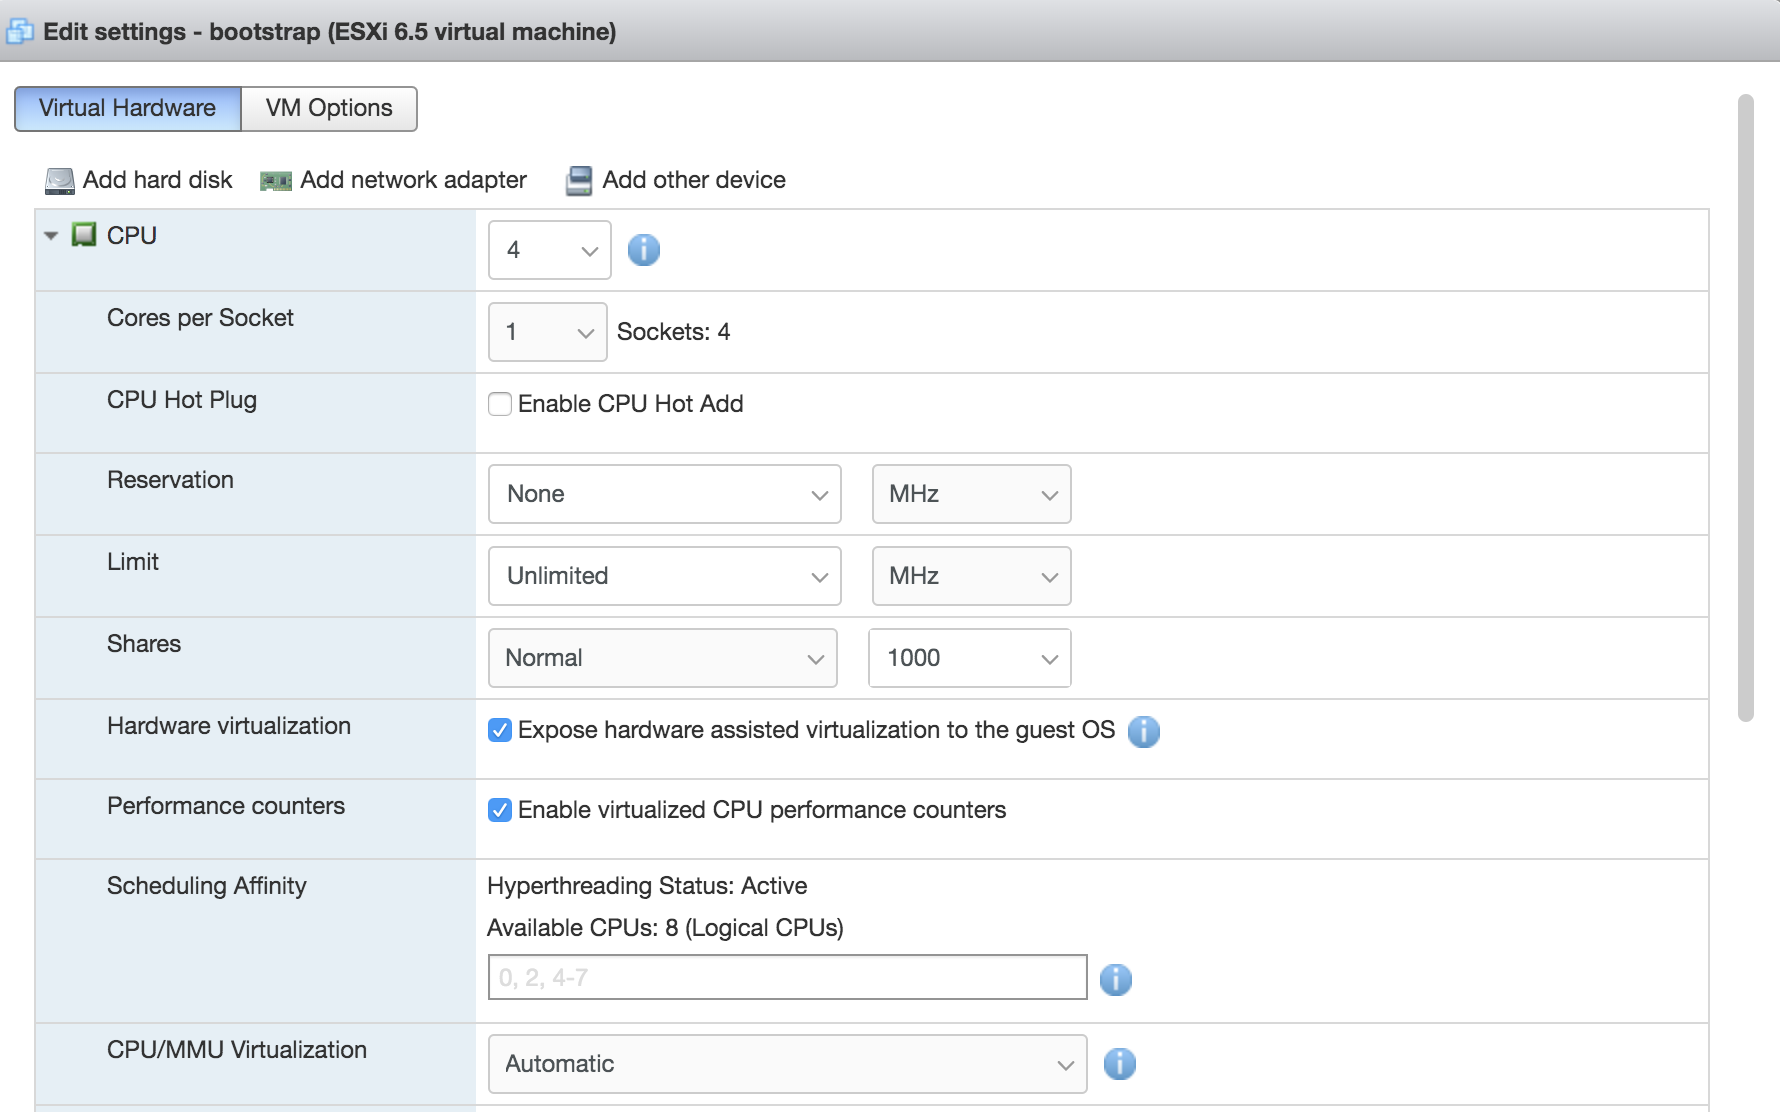
- Hardware virtualizatioの "Expose hardware assisted virtualization to the guest OSHardware virtualization" を有効
- Performance countersの "Enable virtualized CPU performance counters"を有効
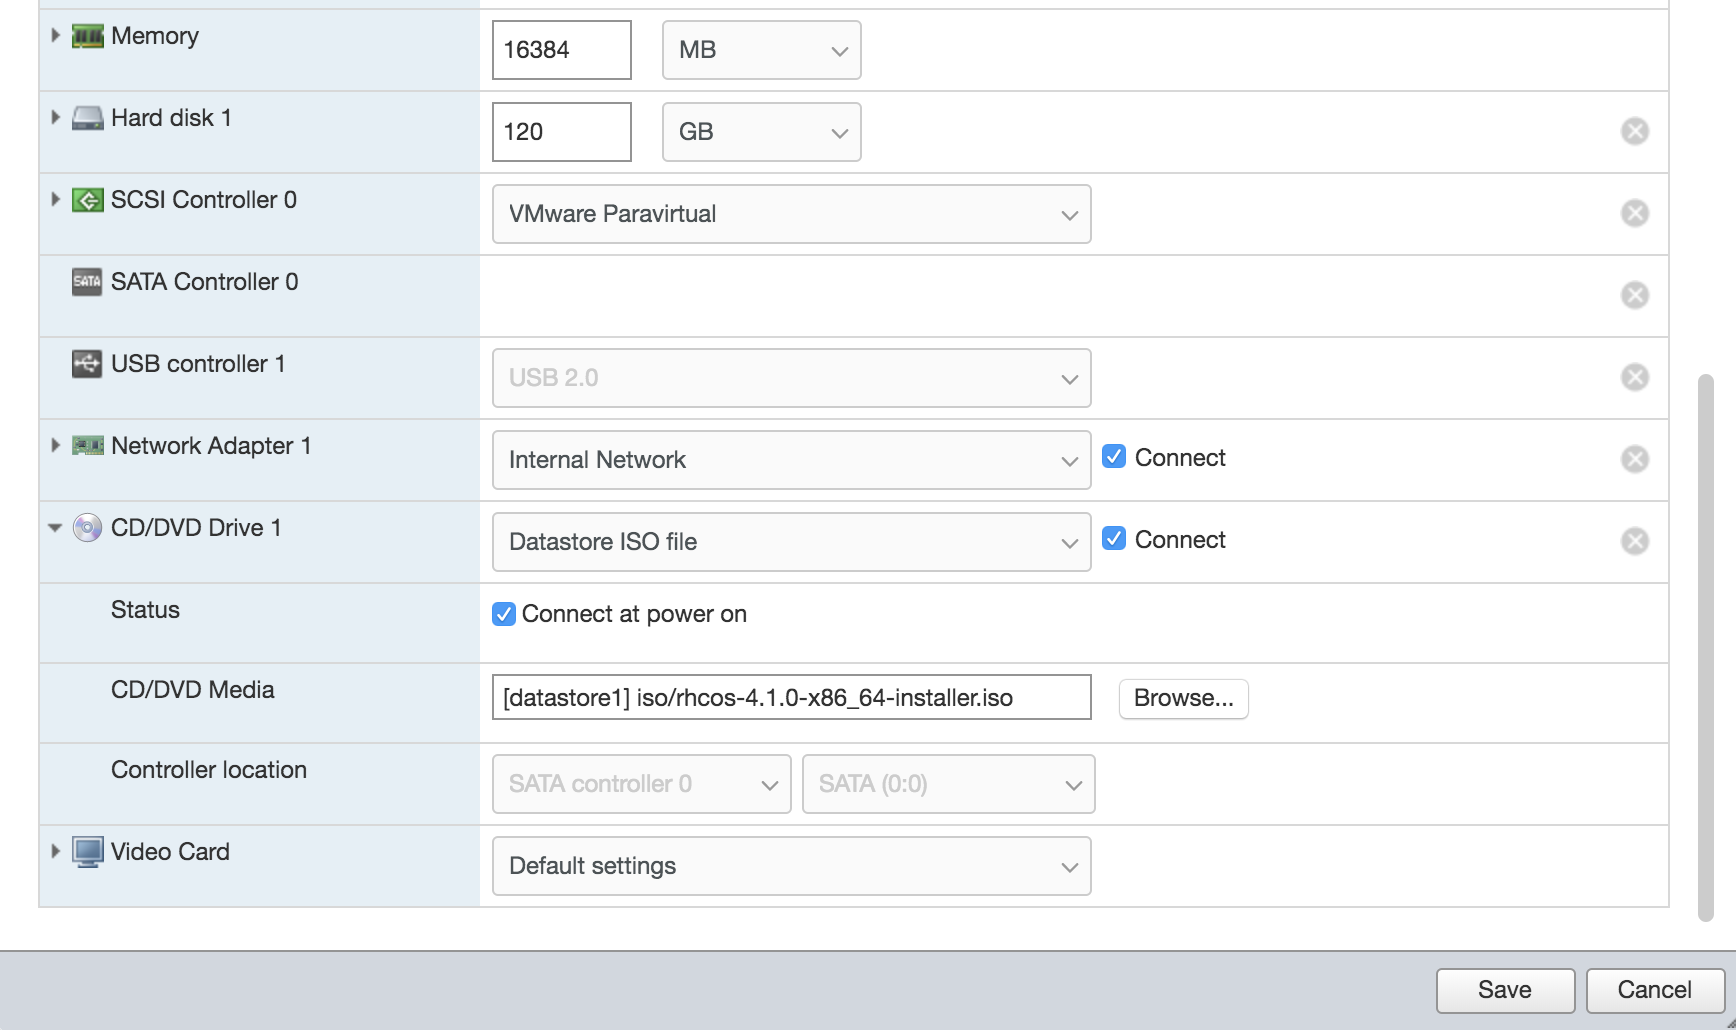
- Network Adapterは 内部ネットワーク(Testing Network[172.16.0.0/24])のアダプタを選択
- CD/DVD Mediaは Datastoreに保存した Red Hat CoreOSのisoイメージを選択
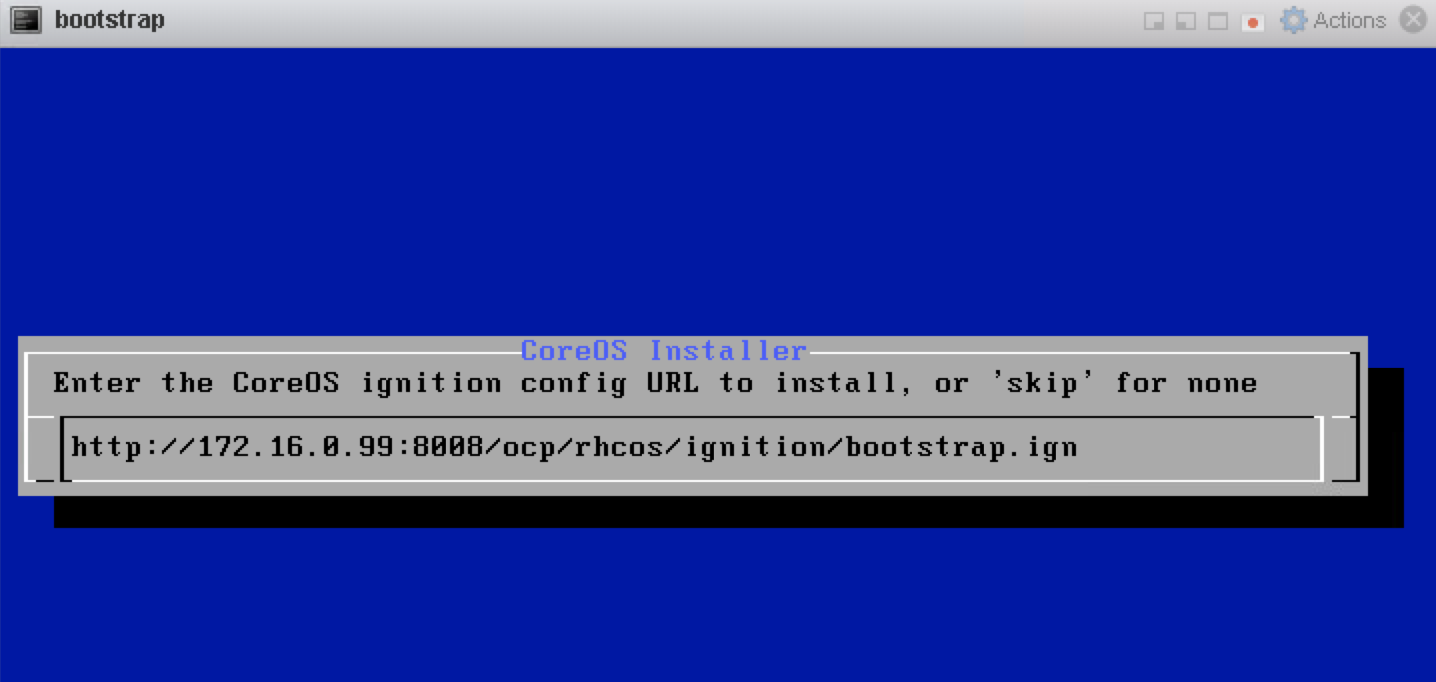
OpenShift4.1の場合
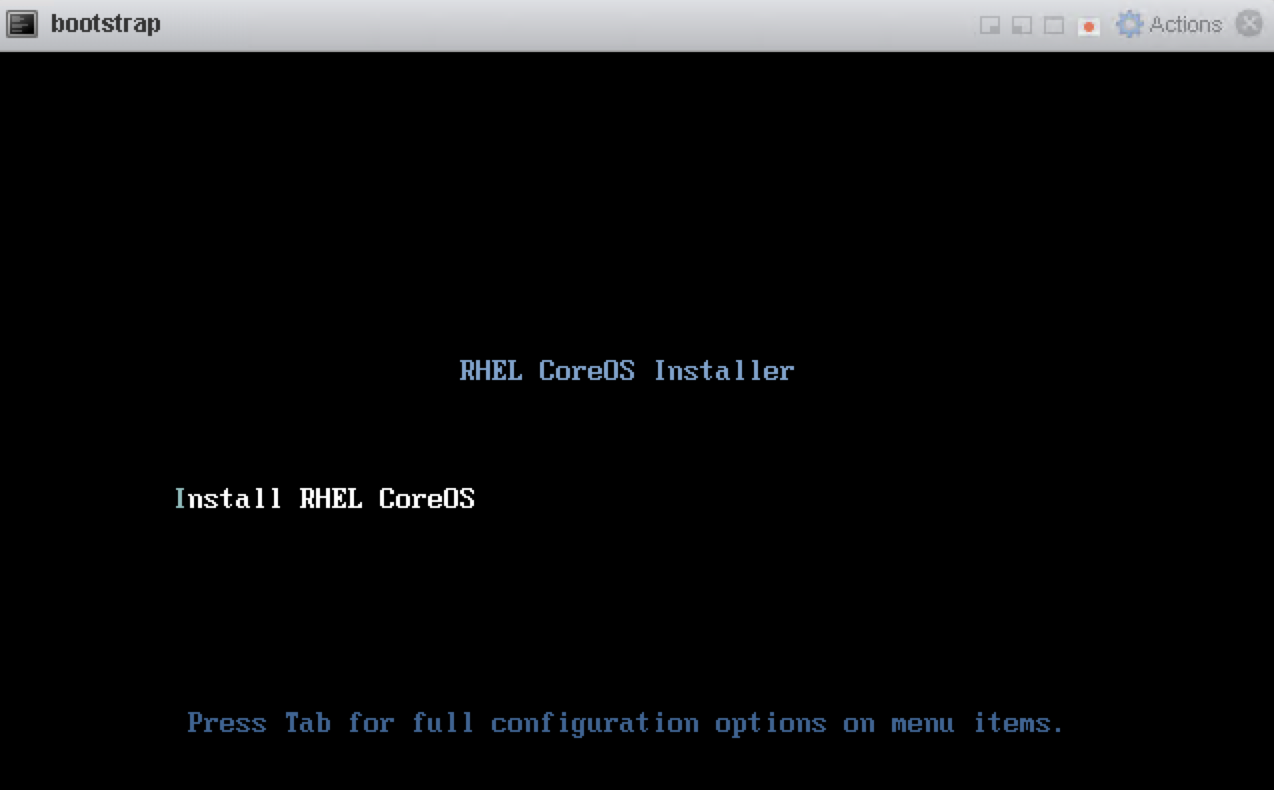

- 各ノードの Ignition設定ファイルを入力
- sdaを選択してOKをクリック

OpenShift4.4の場合
Tabキーを押して以下の内容を入力してブート
coreos.inst.install_dev=sda \
coreos.inst.image_url=http://x.x.x:8080/ocp/bios.raw.gz \
coreos.inst.ignition_url=http://x.x.x.x:8080/okd/bootstrap.ign \
--insecure
--insecureは image_urlとignition_urlがhttpsではなくhttpの場合に使用する。

- bootstrapノードのOSが起動したら、自動的にインストールが始まるので終わるまでまっていてもよいのですが、ただ待っていてもインストールの仕組みがよくわからないので、bootstrapノードにBastion(踏み台)からsshログインしてみます。
# ssh -i ~/.ssh/new_rsa.pub core@bootstrap.lab.example.com
Red Hat Enterprise Linux CoreOS 410.8.20190520.0
WARNING: Direct SSH access to machines is not recommended.
This node has been annotated with machineconfiguration.openshift.io/ssh=accessed

---
This is the bootstrap node; it will be destroyed when the master is fully up.

The primary service is "bootkube.service". To watch its status, run e.g.

  journalctl -b -f -u bootkube.service
[systemd]
Failed Units: 1
  systemd-firstboot.service
- ログインしたらbootkube.serviceのログをtailしてみます。
$ journalctl -b -f -u bootkube.service
-- Logs begin at Mon 2019-08-05 17:21:09 UTC. --
Aug 06 02:19:56 bootstrap systemd[1]: Started Bootstrap a Kubernetes cluster.
Aug 06 02:19:56 bootstrap bootkube.sh[1613]: Pulling release image...
Aug 06 02:23:58 bootstrap systemd[1]: Started Bootstrap a Kubernetes cluster.
Aug 06 02:23:58 bootstrap bootkube.sh[2791]: Pulling release image...
Aug 06 02:24:09 bootstrap bootkube.sh[2791]: 6e32a98acedb77883826bf029304d6ead14449fb0d1e92b7bd7c8faf04e4c6f5
Aug 06 02:24:23 bootstrap bootkube.sh[2791]: Rendering Cluster Version Operator Manifests...
Aug 06 02:24:24 bootstrap bootkube.sh[2791]: Rendering cluster config manifests...
<<省略>>
 manifests/machineconfigserver/kube-apiserver-serving-ca-configmap.yaml
Aug 06 02:24:55 bootstrap bootkube.sh[2791]: Starting etcd certificate signer...
Aug 06 02:25:00 bootstrap bootkube.sh[2791]: bb22b2fa64551e6d1b546edf253674868c818393623b72def8c5e18c96c9bf95
Aug 06 02:25:00 bootstrap bootkube.sh[2791]: Waiting for etcd cluster...
しばらく bootkube.serviceのログを眺めてると" bootkube.sh[2791]: Waiting for etcd cluster... "とログの出力が止まって etcd clusterとの通信を求めてるので、ここから master nodeの3台のマシンを作成します。
- master node3台を起動を行った後にbootstrap nodeのbootkube.serviceのログは、etcdサーバ3つとも 状態がunhealthyでしたが、インストールが進むにつれ、状態がhealthy、そしてetcd cluster up.と状態が変わっていきます。master-0 = etcd-0、master-1 = etcd-1、master-2 = etcd-2
Aug 05 17:36:30 bootstrap bootkube.sh[2791]: https://etcd-0.lab.example.com:2379 is unhealthy: failed to connect: dial tcp 172.16.0.100:2379: connect: no route to host
Aug 05 17:36:30 bootstrap bootkube.sh[2791]: https://etcd-1.lab.example.com:2379 is unhealthy: failed to connect: dial tcp 172.16.0.101:2379: connect: no route to host
Aug 05 17:36:30 bootstrap bootkube.sh[2791]: https://etcd-2.lab.example.com:2379 is unhealthy: failed to connect: dial tcp 172.16.0.102:2379: connect: no route to host
Aug 05 17:36:30 bootstrap bootkube.sh[2791]: Error: unhealthy cluster
Aug 05 17:36:30 bootstrap bootkube.sh[2791]: etcdctl failed. Retrying in 5 seconds...
Aug 05 17:37:25 bootstrap bootkube.sh[2791]: https://etcd-0.lab.example.com:2379 is healthy: successfully committed proposal: took = 2.848249ms
Aug 05 17:37:26 bootstrap bootkube.sh[2791]: https://etcd-1.lab.example.com:2379 is healthy: successfully committed proposal: took = 2.206689ms
Aug 05 17:38:25 bootstrap bootkube.sh[2791]: https://etcd-2.lab.example.com:2379 is healthy: successfully committed proposal: took = 1.753272ms
Aug 05 17:38:25 bootstrap bootkube.sh[2791]: etcd cluster up. Killing etcd certificate signer...
Aug 05 17:38:25 bootstrap bootkube.sh[2791]: bb22b2fa64551e6d1b546edf253674868c818393623b72def8c5e18c96c9bf95
Aug 05 17:38:25 bootstrap bootkube.sh[2791]: Starting cluster-bootstrap...
Aug 05 17:38:36 bootstrap bootkube.sh[2791]: Starting temporary bootstrap control plane...
- worker nodeのマシンの起動も行い、openshift-installコマンドでブートストラッププロセスの進行と完了をモニタリングします。
# ./openshift-install --dir=bare-metal wait-for bootstrap-complete --log-level=debug
INFO Waiting up to 30m0s for the Kubernetes API at https://api.lab.example.com:6443...
INFO API v1.13.4+3a25c9b up
INFO Waiting up to 30m0s for bootstrapping to complete...
DEBUG Bootstrap status: complete
INFO It is now safe to remove the bootstrap resources
"INFO It is now safe to remove the bootstrap resources" と出力されるとbootstrap nodeのマシンを停止します。
クラスターへのログイン
kubeadmin 認証情報をエクスポートします。
# export KUBECONFIG=/root/ocp/bare-metal/auth/kubeconfig
# oc whoami
system:admin
マシンの CSR の承認
クラスターに各ノードが起動しているか確認します。
# oc get node -o wide
NAME       STATUS   ROLES    AGE   VERSION             INTERNAL-IP    EXTERNAL-IP   OS-IMAGE                                                   KERNEL-VERSION               CONTAINER-RUNTIME
master-0   Ready    master   51m   v1.13.4+205da2b4a   172.16.0.100   <none>        Red Hat Enterprise Linux CoreOS 410.8.20190718.1 (Ootpa)   4.18.0-80.4.2.el8_0.x86_64   cri-o://1.13.9-1.rhaos4.1.gitd70609a.el8
master-1   Ready    master   52m   v1.13.4+205da2b4a   172.16.0.101   <none>        Red Hat Enterprise Linux CoreOS 410.8.20190718.1 (Ootpa)   4.18.0-80.4.2.el8_0.x86_64   cri-o://1.13.9-1.rhaos4.1.gitd70609a.el8
master-2   Ready    master   51m   v1.13.4+205da2b4a   172.16.0.102   <none>        Red Hat Enterprise Linux CoreOS 410.8.20190718.1 (Ootpa)   4.18.0-80.4.2.el8_0.x86_64   cri-o://1.13.9-1.rhaos4.1.gitd70609a.el8
worker-0   Ready    worker   42m   v1.13.4+205da2b4a   172.16.0.103   <none>        Red Hat Enterprise Linux CoreOS 410.8.20190718.1 (Ootpa)   4.18.0-80.4.2.el8_0.x86_64   cri-o://1.13.9-1.rhaos4.1.gitd70609a.el8
worker-1   Ready    worker   42m   v1.13.4+205da2b4a   172.16.0.104   <none>        Red Hat Enterprise Linux CoreOS 410.8.20190718.1 (Ootpa)   4.18.0-80.4.2.el8_0.x86_64   cri-o://1.13.9-1.rhaos4.1.gitd70609a.el8
csrの一覧を出力し、Pending の場合は手動で承認します。
# oc get csr
NAME        AGE     REQUESTOR                                                                   CONDITION
csr-5pbht   5m37s   system:serviceaccount:openshift-machine-config-operator:node-bootstrapper   Pending

# oc adm certificate approve csr-5pbht
certificatesigningrequest.certificates.k8s.io/csr-5pbht approved

[root@bastion01 ocp]# oc get csr
NAME        AGE     REQUESTOR                                                                   CONDITION
csr-5pbht   6m36s   system:serviceaccount:openshift-machine-config-operator:node-bootstrapper   Approved,Issued
Operator の初期設定
クラスターコンポーネントがオンライン(AVAILABLEがTrue)になることを確認します。
# oc get clusteroperators
NAME                                 VERSION   AVAILABLE   PROGRESSING   DEGRADED   SINCE
authentication                       4.1.7     True        False         False      49m
cloud-credential                     4.1.7     True        False         False      63m
cluster-autoscaler                   4.1.7     True        False         False      63m
console                              4.1.7     True        False         False      52m
dns                                  4.1.7     True        False         False      63m
image-registry                                 False       False         True       58m
ingress                              4.1.7     True        False         False      54m
kube-apiserver                       4.1.7     True        False         False      60m
kube-controller-manager              4.1.7     True        False         False      60m
kube-scheduler                       4.1.7     True        False         False      60m
machine-api                          4.1.7     True        False         False      63m
machine-config                       4.1.7     True        False         False      61m
marketplace                          4.1.7     True        False         False      58m
monitoring                           4.1.7     True        False         False      52m
network                              4.1.7     True        False         False      63m
node-tuning                          4.1.7     True        False         False      59m
openshift-apiserver                  4.1.7     True        False         False      59m
openshift-controller-manager         4.1.7     True        False         False      62m
openshift-samples                    4.1.7     True        False         False      49m
operator-lifecycle-manager           4.1.7     True        False         False      62m
operator-lifecycle-manager-catalog   4.1.7     True        False         False      62m
service-ca                           4.1.7     True        False         False      63m
service-catalog-apiserver            4.1.7     True        False         False      59m
service-catalog-controller-manager   4.1.7     True        False         False      59m
storage                              4.1.7     True        False         False      58m
image-registry のみ自動的に利用可能(AvailableがTrue)にならないので、手動で設定する必要があるとドキュメントに書かれています。
今回はインストールが目的なのでイメージレジストリーストレージを空のディレクトリーに設定します。
# oc patch configs.imageregistry.operator.openshift.io cluster --type merge --patch '{"spec":{"storage":{"emptyDir":{}}}}'
config.imageregistry.operator.openshift.io/cluster patched
インストール完了の確認
openshift-installコマンドでインストールの完了を確認します。
# ./openshift-install --dir=bare-metal wait-for install-complete --log-level=debug
INFO Waiting up to 30m0s for the cluster at https://api.lab.example.com:6443 to initialize...
INFO Waiting up to 10m0s for the openshift-console route to be created...
INFO Install complete!
INFO To access the cluster as the system:admin user when using 'oc', run 'export KUBECONFIG=/root/ocp4/bare-metal/auth/kubeconfig'
INFO Access the OpenShift web-console here: https://console-openshift-console.apps.lab.example.com
INFO Login to the console with user: kubeadmin, password: xxxx-xxxx-xxxx-xxxx
web consoleのURL https://console-openshift-console.apps.lab.example.com と ログインするために必要なユーザー名とパスワードは忘れないようにメモします。
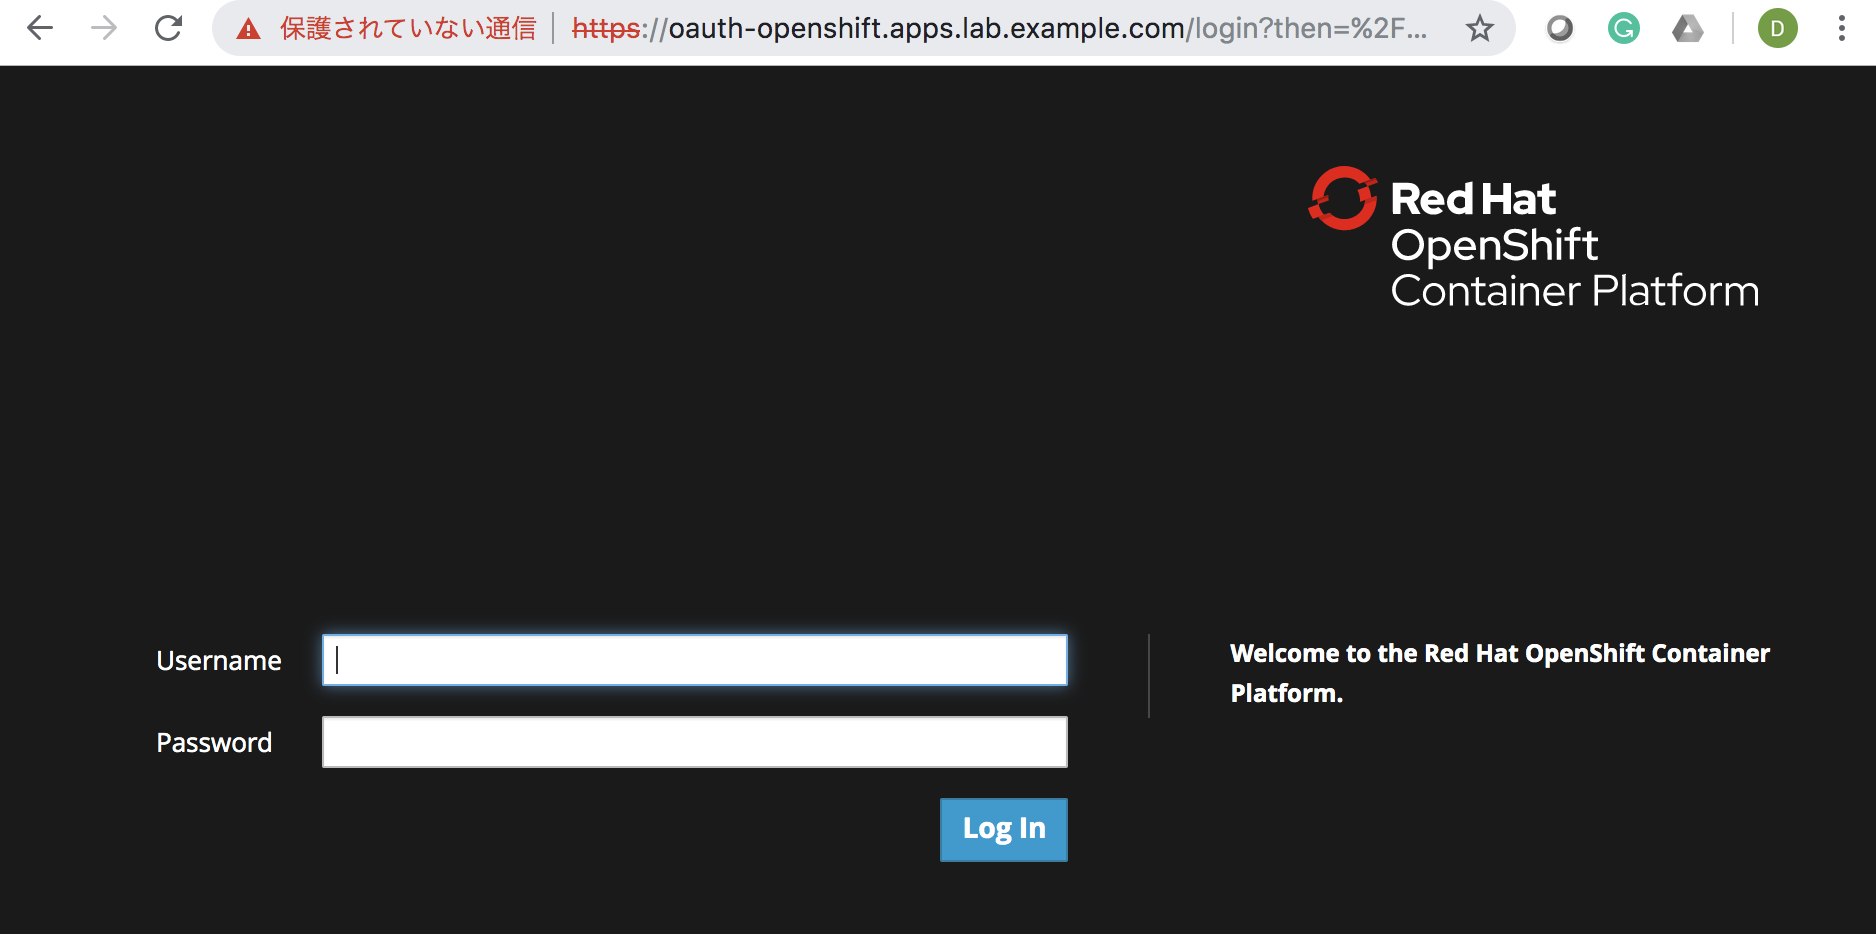
Web Consoleへのログイン
- 前述のユーザー名: kubeadmin とパスワードでログインします。
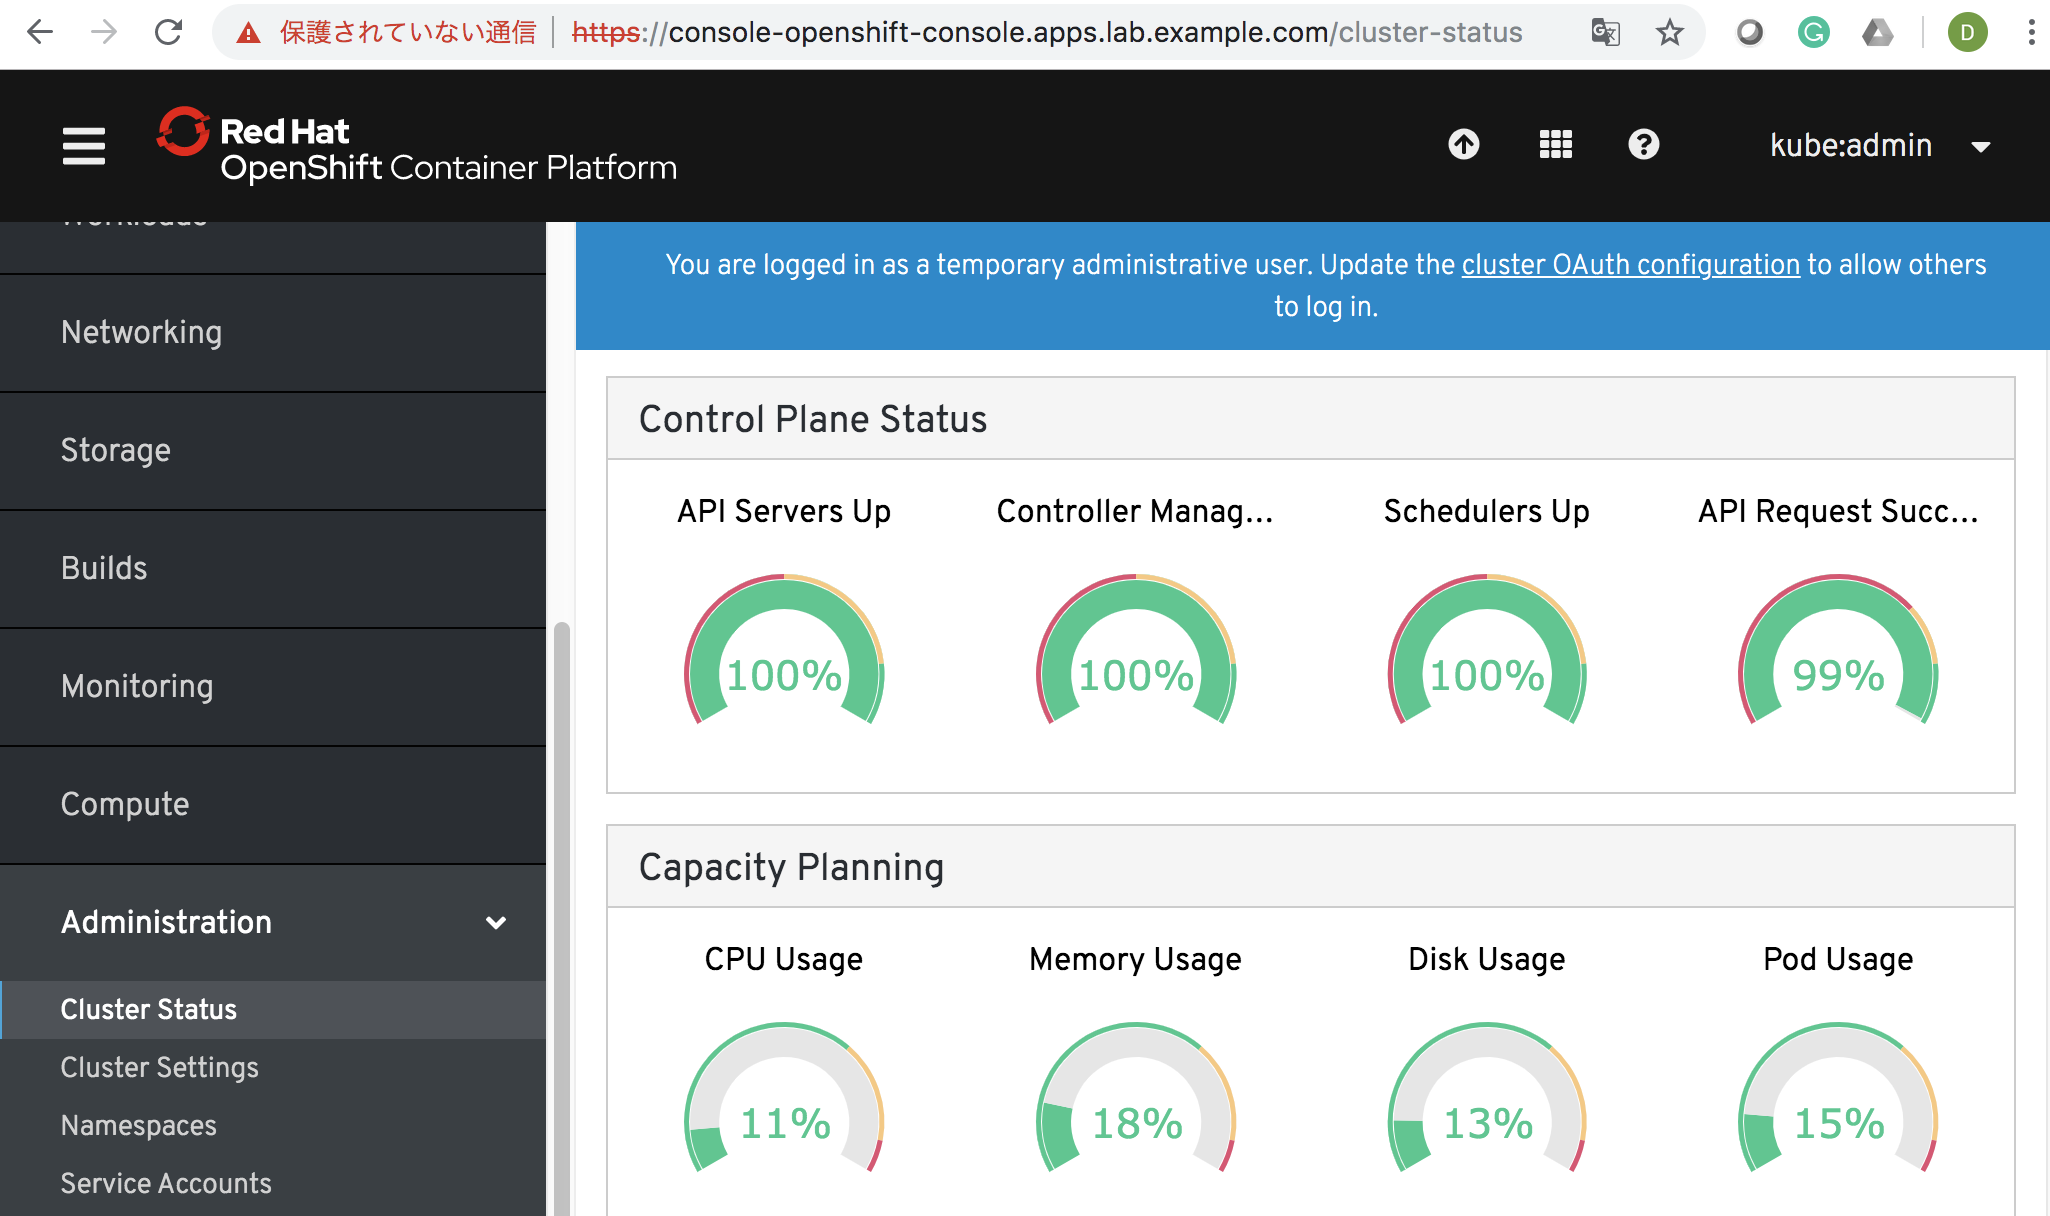
- ログイン後、Administration > Cluster Statusでクラスターのステータスに問題が無ければ正常稼動しています。
最後に
OpenShiftクラスタの検証は、それなりのリソースが必要で長期間クラウドで借りるとそれなりの金額になるので、お家パソコンにインストールして検証になるので、現時点ではベアメタルへのUPIインストールしか選択肢がありません。
ベアメタルサーバへのUPIインストールは最初は、ドキュメントやブログを読んでも、何かしらどこかで失敗して試行錯誤を繰り返してました。でもその試行錯誤が、知識を深めることができたので得たものは多かったと思います。
OpenShift4.1をインストールするために、必要な踏み台の構築で、RHEL,Firewalld,haproxyなどのOSS関連がたくさんあるので、知ってる場合は振り返り、もし知らない場合は、まじめに取り組めば力がつくと思います。
今回、試行錯誤しているうちに、嵌ったポイントは2つありました。
- →Ignition 設定ファイルのあるインストールディレクトリ内のファイル削除忘れ
- 仮想マシンなので大幅に時間がずれて、インストールに失敗
→Ignition 設定ファイルには、24 時間後に期限が切れる証明書が含まれているから
やっと、OpenShift4.1のインストールは終わりましたが、これが終わりじゃなくて、やっと検証の始まりです!