かずー氏といえば Thunderfist、 Thunderfist といえば Twitterクライアント。
ということで今更ですが、Twitter産の SNS Framework であるところの Fabric を試してみました。
これはなに
- Fabric を使って HomeTimeline を取得した
- Xcode 6.1 (Swift 1.1) を使用した
- Fabric は Twitter を使ったアプリを作るのにはかなり強力なフレームワークである
- 手順は Fabric アプリのガイドにそってやれば簡単にできる
Fabric
Twitter Japanのブログ によると、10月22日に発表されたらしい。内容としては
- 安定性を高める(クラッシュレポート)
- 利用者を増やす(ツイート埋め込み)
- 収益を上げる(広告収入)
- 本人確認(電話番号での本人確認)
ができるとのことです。
- Xcode
- Android Studio
- IntelliJ IDEA
- Eclipse
の IDE へのインストールが可能になっています。
私はもちろん iPhone アプリをつくるので Xcode 用ですすめます。
Install
- 公式ページの "Get Start" から登録
- しばらくするとメールが送られてくる
- 手順に沿ってSDKをダウンロードする
まあ、英語読めなくても流れでいけるので特に説明はしません
Usage
SDKをアプリケーションフォルダに入れて起動すると、さっそくセッティングをすることができます。
プロジェクトを選択する

SDKを使用するプロジェクトを選択します。
xcworkspace を選んだときは、その先でさらにどの xcodeproj にインストールするのかを選択します。
インストールする Kit を選択する
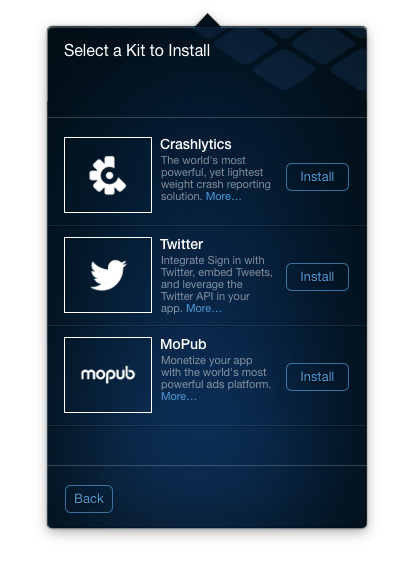
Crashlytics, Twitter, MoPub の三種類があります。
今回は Twitter API を試したいので、Twitter を選択します。
Xcode にインストールする
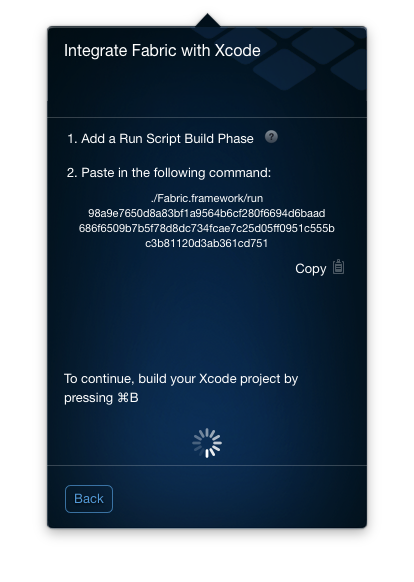
ここに書いてあることに従ってすすみます。
-
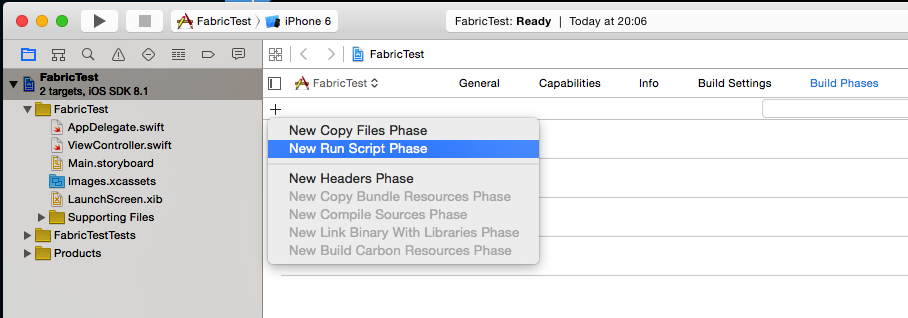
Build Phase から Run Script を加える
-
下に書いてある長ったらしいコマンドをコピペする
-
⌘+B でビルドする
無事にビルドが成功すると、クルクル回っているのがなくなって次に進めます。
SDK のインストール

このアイコンを Xcode のプロジェクトのところにコピペすると Framework が導入されます。
Linked Frameworks and Libraries にも自動的に追加されています。
導入はこれでおわり。いよいよログインなど実装してみましょう。
Login
ログインボタンを作ります。
その前に AppDelegate.swift: application(application: UIApplication, didFinishLaunchingWithOptions launchOptions: [NSObject: AnyObject]?) -> Bool に次の一行を加えます。
Fabric.with([Twitter()])
これで SDK を使用するということになります(曖昧)。
import Fabric
import TwitterKit
も忘れずに。
ログインボタン自体は、TWTRLogInButtonというクラスがあるのでこれを使います。
適当にクラスを作りました。
import UIKit
import TwitterKit

class LoginViewController: UIViewController {

    override func viewDidLoad() {
        super.viewDidLoad()
        let loginButton = TWTRLogInButton(logInCompletion: {
            session, error in
            if session != nil {
                println(session.userName)
                // ログイン成功したらクソ遷移する
                let timelineVC = TimelineViewController()
                UIApplication.sharedApplication().keyWindow?.rootViewController = timelineVC
            } else {
                println(error.localizedDescription)
            }
        })
        loginButton.center = self.view.center
        self.view.addSubview(loginButton)
    }
}
TWTRLogInButtonはログイン成功時のハンドラを返してくれるので、そこでタイムラインを取得する ViewController に遷移させています。

ログインボタン一つ作るのにも元の UIKit から作ると骨が折れますが、かなりラクチンになっていますね。
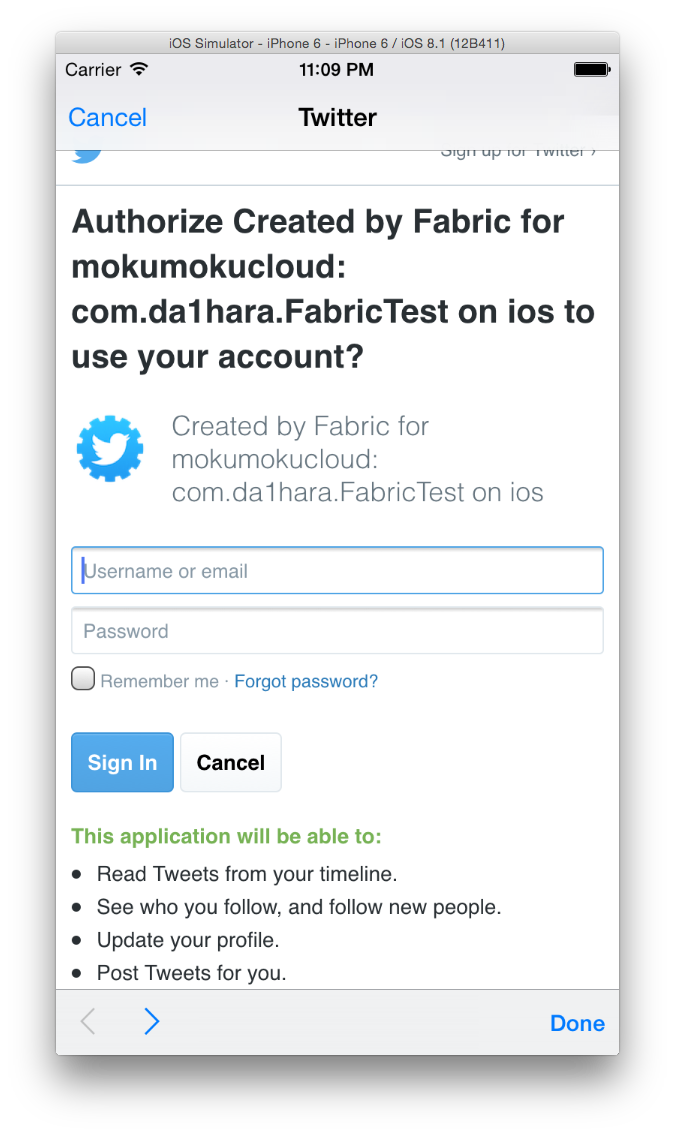
ボタンを押すと、モーダルでこんな画面がでました。アプリの登録とかしてないのに自動でやってくれていたみたいです。
API を叩く
Twitter API を叩くのには認証情報を付加してやらないといけません。
大抵は access_token と access_token_secret を取っておいて叩く場面で使ってあげることになります。
TwitterKit ではそのへんを Twitter.sharedInstance().APIClient で済ませることができます。
- 特定のツイートを取得
- 特定のツイートたちを取得
- ユーザ情報を取得
は function が用意されています。他の API は自前で叩く必要がありますが、 NSURLRequest を自分で作るより簡単です。
HomeTimeline を取得
適当に TwitterAPI クラスを作ってみました。
import Foundation
import TwitterKit

class TwitterAPI {
    let baseURL = "https://api.twitter.com"
    let version = "/1.1"

    init() {

    }

    class func getHomeTimeline(tweets: [TWTRTweet]->(), error: (NSError) -> ()) {
        let api = TwitterAPI()
        var clientError: NSError?
        let path = "/statuses/home_timeline.json"
        let endpoint = api.baseURL + api.version + path
        let request = Twitter.sharedInstance().APIClient.URLRequestWithMethod("GET", URL: endpoint, parameters: nil, error: &clientError)

        if request != nil {
            Twitter.sharedInstance().APIClient.sendTwitterRequest(request, completion: {
                response, data, err in
                if err == nil {
                    var jsonError: NSError?
                    let json: AnyObject? =  NSJSONSerialization.JSONObjectWithData(data,
                        options: nil,
                        error: &jsonError)
                    if let jsonArray = json as? NSArray {
                        tweets(TWTRTweet.tweetsWithJSONArray(jsonArray) as [TWTRTweet])
                    }
                } else {
                    error(err)
                }
            })
        }
    }
}
Tweet の情報を持っている TWTRTweet というクラスがあり、さらに TWTRTweet.tweetsWithJSONArray() で JSON から TWTRTweet にコンバートできるので、もうわざわざ JSON をパースする必要はありません。
かなり適当なのでエラーハンドリングとかちゃんとするといいと思います。
Tweet を表示する
UITableView にツイートを表示します。
これがまた骨が折れて、普通にやろうとすると
- Cell のレイアウトをする
- パースした JSON を Cell に貼り付ける
- アイコンの画像は非同期で取得する
- セルの高さをツイートの長さで変える
…などなど、ハマりポイントが盛りだくさんです。
これを TWTRTweetTableViewCell クラスがいい感じに解決してくれます。
先ほど作った TwitterAPI.getHomeTimeline() は TWTRTweet の Array を返しますが、この TWTRTweetTableViewCell に読み込ませるとだいたい Twitter公式アプリのようなセルに自動的に形成してくれます。
さらに画像を非同期で読み込みます。
画像の高さは calculatedHeightForWidth() で計算してくれます。
非常にすっきりしたコードでタイムラインを表示することができました。
import UIKit
import TwitterKit

class TimelineViewController: UIViewController, UITableViewDataSource, UITableViewDelegate {
    var tableView: UITableView!
    var tweets: [TWTRTweet] = [] {
        didSet {
            tableView.reloadData()
        }
    }
    var prototypeCell: TWTRTweetTableViewCell?

    override func viewDidLoad() {
        super.viewDidLoad()
        tableView = UITableView(frame: self.view.bounds)
        tableView.delegate = self
        tableView.dataSource = self

        prototypeCell = TWTRTweetTableViewCell(style: .Default, reuseIdentifier: "cell")

        tableView.registerClass(TWTRTweetTableViewCell.self, forCellReuseIdentifier: "cell")
        self.view.addSubview(tableView)

        loadTweets()
    }

    func loadTweets() {
        TwitterAPI.getHomeTimeline({
            twttrs in
            for tweet in twttrs {
                self.tweets.append(tweet)
            }
            }, error: {
                error in
                println(error.localizedDescription)
        })
    }

    // MARK: UITableViewDataSource
    func tableView(tableView: UITableView, numberOfRowsInSection section: Int) -> Int {
        // Return the number of Tweets.
        return tweets.count
    }

    func tableView(tableView: UITableView, cellForRowAtIndexPath indexPath: NSIndexPath) -> UITableViewCell {
        let cell = tableView.dequeueReusableCellWithIdentifier("cell") as TWTRTweetTableViewCell

        let tweet = tweets[indexPath.row]
        cell.configureWithTweet(tweet)

        return cell
    }

    // MARK: UITableViewDelegate
    func tableView(tableView: UITableView, heightForRowAtIndexPath indexPath: NSIndexPath) -> CGFloat {
        let tweet = tweets[indexPath.row]

        prototypeCell?.configureWithTweet(tweet)

        if let height = prototypeCell?.calculatedHeightForWidth(self.view.bounds.width) {
            return height
        } else {
            return tableView.estimatedRowHeight
        }
    }
}
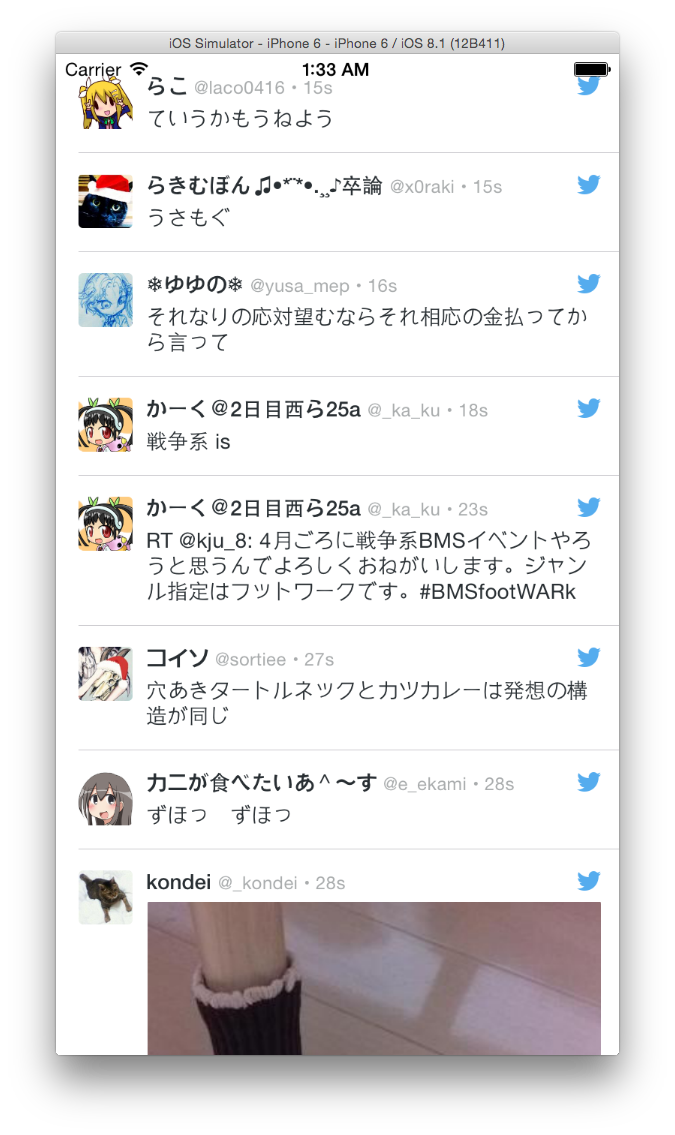
ちゃんとツイッターの鳥がいるし、Display Requirements に則っている感じですね(あたりまえ)。
画像もあらかじめ展開されているのがクールだと思いました。
まとめ
- Fabric を使って HomeTimeline を取得した
- Xcode 6.1 (Swift 1.1) を使用した
- Fabric は Twitter を使ったアプリを作るのにはかなり強力なフレームワークである
- 手順は Fabric アプリのガイドにそってやれば簡単にできる
さいごに
とっても簡単に Tweet を表示することができました。
今までやっていたことはなんだったのか…と思うほど強力な Framework だというのは間違いないので、Twitter を使ったアプリを開発したい場合は使ってみてはいかがでしょうか。
今回作成したソースコードは GitHub にあげておきました。Fabric の認証関係でビルドできるかはわかりませんが、コードの確認くらいに使ってください。
https://github.com/mokumoku/FabricTest
TODO
- Crashlytics を使ってみる
- MoPub も試してみる
- TWTRTweetTableViewCell をカスタムできるか試してみる
- またツイッタークライアント作ってみようかな…もくもく…
つづき
書きました。