この記事はDjangoのCreateView(汎用クラスビュー)を使い、
viewからtemplateへ値を渡すところのみの記述になります。
サジェスト機能とは
検索サイトに調べたいことを入力する際に検索サイト側が
文字に続く候補を自動的に表示してくれる機能。
アプリ概要
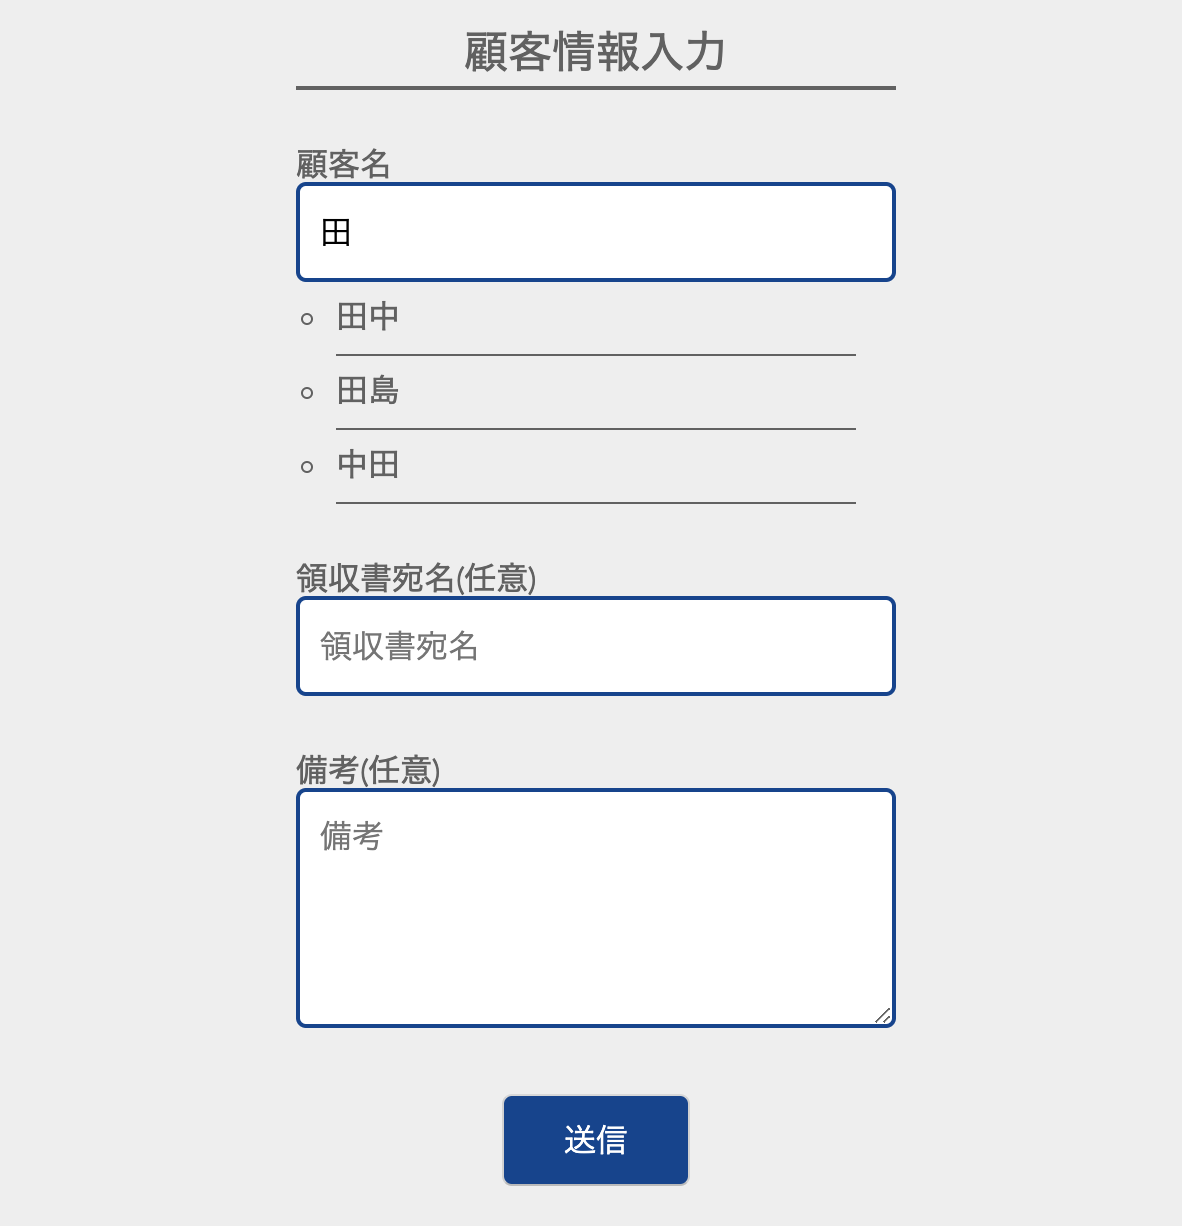
顧客管理アプリの顧客名入力フォームにてサジェスト機能を実装。
下記画像では田と入力すると、DBに保存されてる顧客名をリストで
フォーム下に表示し、該当の名前を選択するとフォームに値を挿入してくれる機能となります。

ModelFormを継承したフォームの作成
from django.db import models
from datetime import datetime


class Client(models.Model):
    class Meta:
        db_table ="client"
        verbose_name ="顧客"
        verbose_name_plural ="顧客"

    client_name = models.CharField(verbose_name="顧客名", max_length=255,unique=True)
    receipt_name = models.CharField(verbose_name="領収書宛名", max_length=500, blank=True)
    memo = models.TextField(verbose_name="備考", max_length=1000, blank=True)

    def __str__(self):
        return '{0}'.format(self.client_name)
from django import forms
from .models import Client


class ClientForm(forms.ModelForm):
    class Meta:
        model = Client
        fields = ['client_name', 'receipt_name', 'memo']

    def __init__(self, *args, **kwargs):
        super().__init__(*args, **kwargs)
        for field in self.fields.values():
            field.widget.attrs["class"] = "form-control"
            field.widget.attrs['placeholder'] = field.label
フォームについてもコードを見ればわかると思うので説明は省略
CreateView(汎用クラスビュー)の作成
from django.shortcuts import render
from django.urls import reverse_lazy
from django.views.generic import CreateView
from .forms import ClientForm
from .models import Client

# 省略
class ClientCreateView(CreateView):
    model = Client
    form_class = ClientForm
    success_url = reverse_lazy('client:create_done')

    def get_context_data(self, **kwargs):
        client_name_list = [] # templateに渡す空のlist型の変数を定義
        context = super().get_context_data(**kwargs)
        client_data = Client.objects.all() # Clientモデルのデータを全件取得
        for client in client_data: # Clientモデルのデータを1件ずつ取り出し、リストに値を格納
            client_name_list.append(client.client_name)
        context["client_name_list"] = client_name_list
        return context
get_context_dataメソッドを利用し、templateに渡す値を関数内で作成。
templateの作成
サジェスト機能についてはJavaScriptを使用して実装。
{% extends 'base.html' %}
{% load static %}
{% block extra_css %}
<link rel="stylesheet" href="{% static 'css/client/client_form.css' %}">
{% endblock %}
{% block content %}
<div class="form_contents">
    <h1 class="form_title">顧客情報入力</h1>
    <form action="" method="POST">
        {{ form.non_field_errors }}
        <div class="field">
            <p>{{ form.client_name.label }}</p>
            {{ form.client_name }}
            <div class="js-suggestions"></div>
            {{ form.client_name.errors }}
        </div>
        <div class="field">
            <p>{{ form.receipt_name.label }}(任意)</p>
            {{ form.receipt_name }}
            {{ form.receipt_name.errors }}
        </div>
        <div class="field">
            <p>{{ form.memo.label }}(任意)</p>
            {{ form.memo }}
            {{ form.memo.errors }}
        </div>
        <div class="field submit_btn">
            <button type="submit">送信</button>
        </div>
        {% csrf_token %}
    </form>
</div>
{% endblock %}
{% block script %}
<script>
    const list = [
        {% for name in client_name_list %}
            "{{name}}",
        {% endfor %}
    ];
    const elInput = document.querySelector("#id_client_name");
    const elSuggestions = document.querySelector(".js-suggestions");
    const state = {
        inputValue: elInput.value,
        inputting: false
    };
    const dataMap = new WeakMap();

    function render() {
        renderInput();
        renderSuggestions();
    }

    function renderInput() {
        elInput.value = state.inputValue;
    }

    function renderSuggestions() {
        const elNewList = document.createElement("ul");
        if (state.inputting) {
            list.filter(text => text.includes(state.inputValue)).forEach(text => {
            const elItem = document.createElement("li");
            dataMap.set(elItem, { text });
            elItem.textContent = text;
            elItem.addEventListener("click", handleClickItem);
            elNewList.appendChild(elItem);
            });
        }
        elSuggestions.innerHTML = "";
        elSuggestions.appendChild(elNewList);
    }

    function handleClickItem(e) {
        state.inputValue = dataMap.get(e.currentTarget).text;
        state.inputting = false;

        render();
    }

    elInput.addEventListener("input", () => {
        state.inputValue = elInput.value;
        state.inputting = elInput.value !== "";

        renderSuggestions();
    });
</script>
{% endblock %}
contextで渡された値を<script></script>内でfor文を使って値を取り出し、
JavaScript内で再度リストを形成する。
フォームに入力された値と、const list = []内の値で一致した場合は、
一致した値をフォームの下に挿入する仕様。
JavaScriptのコードについては説明省略。
コードコピペで使用してもらえればサジェスト機能として動きます。