初めに
文字列とかを管理するのにSwiftGenというものがあるらしいので使ってみました。
導入
まず最初にcocoaPodsを使ってプロジェクトに読み込みます。
- pod init
- pod 'SwiftGen'をpodfileに書く
- pod install
実際に使ってみる
まずプロジェクト直下にswiftgen.ymlファイルを追加して以下の設定を追加します
strings:
  inputs: Localizable.strings
  outputs:
    templateName: structured-swift4
    output: Project名/strings.swift
上の設定ではLocalizable.stringsからProject/strings.swiftを生成するというものです。
今回は文字列を管理するのでstrings:をしています。
次にLocalizable.stringsを作ります。
xcodeのFile -> New -> Fileの順に選んでstringsファイルを作ります。
作れたらとりあえず中身を記述します。
"name"="defaultname";
"labelText"="ウヒョーーーー";
こんな感じです。
それでは最後にTerminalで
Pods/SwiftGen/bin/swiftgen
を実行すると
strings.swiftというファイルができていると思います。
import Foundation

// swiftlint:disable superfluous_disable_command
// swiftlint:disable file_length

// MARK: - Strings

// swiftlint:disable explicit_type_interface function_parameter_count identifier_name line_length
// swiftlint:disable nesting type_body_length type_name
internal enum L10n {
  /// ウヒョーーーー
  internal static let labelText = L10n.tr("Localizable", "labelText")
  /// defaultname
  internal static let name = L10n.tr("Localizable", "name")
}
// swiftlint:enable explicit_type_interface function_parameter_count identifier_name line_length
// swiftlint:enable nesting type_body_length type_name

// MARK: - Implementation Details

extension L10n {
  private static func tr(_ table: String, _ key: String, _ args: CVarArg...) -> String {
    // swiftlint:disable:next nslocalizedstring_key
    let format = NSLocalizedString(key, tableName: table, bundle: Bundle(for: BundleToken.self), comment: "")
    return String(format: format, locale: Locale.current, arguments: args)
  }
}

private final class BundleToken {}
これができているともう文字列が使えるようになっています。
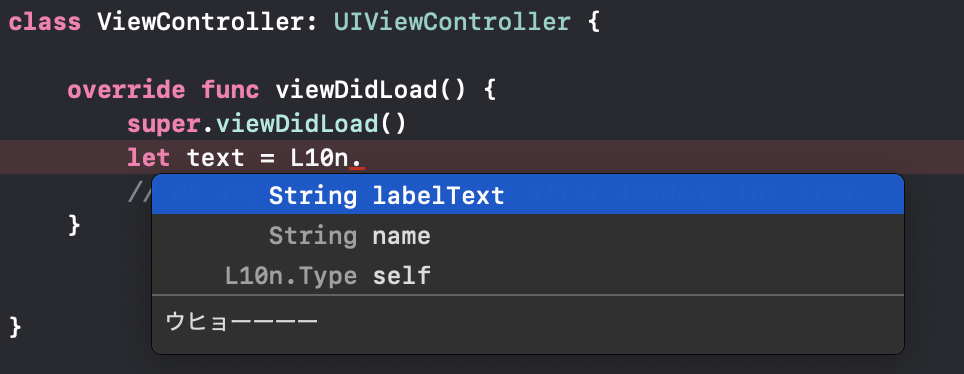
試しにViewControllerで使ってみると

こんな感じで文字列を参照できるようになっています。
最後に
他にも色々管理できるみたいなので詳しくは公式ドキュメントをみましょう
https://github.com/SwiftGen/SwiftGen