背景
友人から、画像認識においてかなり高機能でイケているYOLOv3というのを教えてもらった。
少し調べてみると、
簡単に言えば、今までのものより正確に早く物体検出・物体検知をしてくれる便利なもの。導入も簡単。
ディープラーニングで自分が一からモデルを構築しなくても、YOLOは初期装備でかなり使える。
画像はもちろん、Webカメラなどとも連動できる。リアルタイムに物体検出が可能ということ。
参考:https://pycarnival.com/yolo_python_opencv/
とあり、早速触ってみました。
まずはYOLOv3ではなく、YOLOにトライしました。
途中エラーも発生したので、対処法をメモしておきます。
非ソフトエンジニアなので、わかりにくい点があるかもしれませんがご容赦ください。
開発環境
macOS Mojave 10.14.2
tensorflow 1.12.0
python 3.6.3
opencv-python 4.0.0.21
環境構築
以下のサイトを見ながら進めました。
$ pip install --upgrade opencv-python
$ pip install --upgrade tensorflow

$ git clone https://github.com/thtrieu/darkflow.git
$ cd darkflow
$ python setup.py build_ext --inplace
darkflowディレクトリ内にbinディレクトリを作成し、その中に学習の重みファイルを下記からダウンロードして配置。
[https://drive.google.com/drive/folders/0B1tW_VtY7onidEwyQ2FtQVplWEU]
ここまでで準備完了。
動作確認
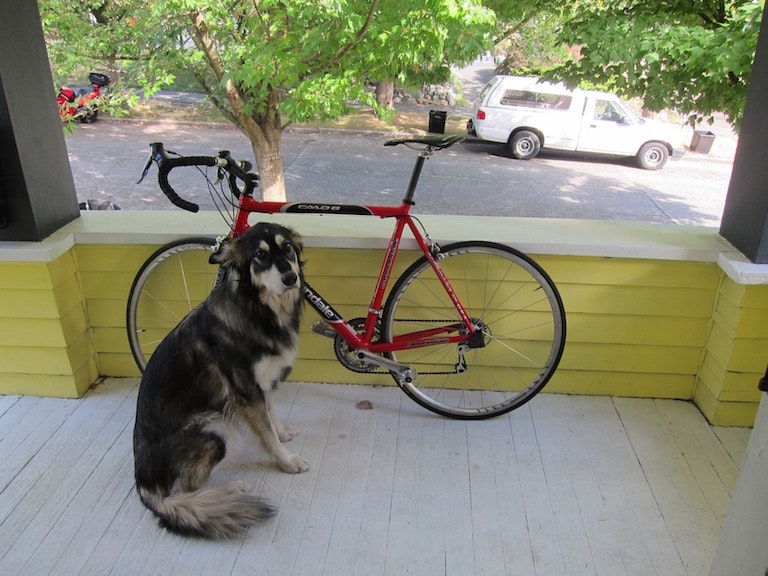
犬と自転車のサンプル画像を認識する下記test.pyスクリプトをdarkflowディレクトリ内に作成して実行。
from darkflow.net.build import TFNet
import cv2

options = {"model": "cfg/yolo.cfg", "load": "bin/yolo.weights", "threshold": 0.1}

tfnet = TFNet(options)

imgcv = cv2.imread("./sample_img/sample_dog.jpg")
result = tfnet.return_predict(imgcv)
print(result)
ここで下記エラーが発生。
$ python3 test.py
RuntimeError: module compiled against API version 0xc but this version of numpy is 0xb
ImportError: numpy.core.multiarray failed to import
ImportError: numpy.core.umath failed to import
ImportError: numpy.core.umath failed to import
2019-01-14 14:24:13.685256: F tensorflow/python/lib/core/bfloat16.cc:675] Check failed: PyBfloat16_Type.tp_base != nullptr
Abort trap: 6
どうやらnumpyが古かったみたいなので、upgrade。
$ pip install numpy -U
もう一度実行しみてみるも、またまたエラー。
$ python3 test.py
AttributeError: module 'pandas.core.computation' has no attribute 'expressions'
今度はdaskが古かったみたいなので、upgrade。
$ pip install --upgrade dask
再度リトライ。
$ python3 test.py

Building net ...
Source | Train? | Layer description                | Output size
-------+--------+----------------------------------+---------------
       |        | input                            | (?, 608, 608, 3)
 Load  |  Yep!  | conv 3x3p1_1  +bnorm  leaky      | (?, 608, 608, 32)
 Load  |  Yep!  | maxp 2x2p0_2                     | (?, 304, 304, 32)
 Load  |  Yep!  | conv 3x3p1_1  +bnorm  leaky      | (?, 304, 304, 64)
 Load  |  Yep!  | maxp 2x2p0_2                     | (?, 152, 152, 64)
 Load  |  Yep!  | conv 3x3p1_1  +bnorm  leaky      | (?, 152, 152, 128)
 Load  |  Yep!  | conv 1x1p0_1  +bnorm  leaky      | (?, 152, 152, 64)
 Load  |  Yep!  | conv 3x3p1_1  +bnorm  leaky      | (?, 152, 152, 128)
 Load  |  Yep!  | maxp 2x2p0_2                     | (?, 76, 76, 128)
 Load  |  Yep!  | conv 3x3p1_1  +bnorm  leaky      | (?, 76, 76, 256)
 Load  |  Yep!  | conv 1x1p0_1  +bnorm  leaky      | (?, 76, 76, 128)
 Load  |  Yep!  | conv 3x3p1_1  +bnorm  leaky      | (?, 76, 76, 256)
 Load  |  Yep!  | maxp 2x2p0_2                     | (?, 38, 38, 256)
 Load  |  Yep!  | conv 3x3p1_1  +bnorm  leaky      | (?, 38, 38, 512)
 Load  |  Yep!  | conv 1x1p0_1  +bnorm  leaky      | (?, 38, 38, 256)
 Load  |  Yep!  | conv 3x3p1_1  +bnorm  leaky      | (?, 38, 38, 512)
 Load  |  Yep!  | conv 1x1p0_1  +bnorm  leaky      | (?, 38, 38, 256)
 Load  |  Yep!  | conv 3x3p1_1  +bnorm  leaky      | (?, 38, 38, 512)
 Load  |  Yep!  | maxp 2x2p0_2                     | (?, 19, 19, 512)
 Load  |  Yep!  | conv 3x3p1_1  +bnorm  leaky      | (?, 19, 19, 1024)
 Load  |  Yep!  | conv 1x1p0_1  +bnorm  leaky      | (?, 19, 19, 512)
 Load  |  Yep!  | conv 3x3p1_1  +bnorm  leaky      | (?, 19, 19, 1024)
 Load  |  Yep!  | conv 1x1p0_1  +bnorm  leaky      | (?, 19, 19, 512)
 Load  |  Yep!  | conv 3x3p1_1  +bnorm  leaky      | (?, 19, 19, 1024)
 Load  |  Yep!  | conv 3x3p1_1  +bnorm  leaky      | (?, 19, 19, 1024)
 Load  |  Yep!  | conv 3x3p1_1  +bnorm  leaky      | (?, 19, 19, 1024)
 Load  |  Yep!  | concat [16]                      | (?, 38, 38, 512)
 Load  |  Yep!  | conv 1x1p0_1  +bnorm  leaky      | (?, 38, 38, 64)
 Load  |  Yep!  | local flatten 2x2                | (?, 19, 19, 256)
 Load  |  Yep!  | concat [27, 24]                  | (?, 19, 19, 1280)
 Load  |  Yep!  | conv 3x3p1_1  +bnorm  leaky      | (?, 19, 19, 1024)
 Load  |  Yep!  | conv 1x1p0_1    linear           | (?, 19, 19, 425)
-------+--------+----------------------------------+---------------
Running entirely on CPU
2019-01-14 14:39:26.937092: I tensorflow/core/platform/cpu_feature_guard.cc:141] Your CPU supports instructions that this TensorFlow binary was not compiled to use: AVX2 FMA
Finished in 20.373854875564575s

[{'label': 'bicycle', 'confidence': 0.84797806, 'topleft': {'x': 80, 'y': 113}, 'bottomright': {'x': 555, 'y': 467}}, {'label': 'motorbike', 'confidence': 0.29457846, 'topleft': {'x': 59, 'y': 76}, 'bottomright': {'x': 113, 'y': 124}}, {'label': 'truck', 'confidence': 0.8014206, 'topleft': {'x': 462, 'y': 81}, 'bottomright': {'x': 694, 'y': 167}}, {'label': 'cat', 'confidence': 0.124769196, 'topleft': {'x': 139, 'y': 197}, 'bottomright': {'x': 313, 'y': 551}}, {'label': 'dog', 'confidence': 0.770815, 'topleft': {'x': 136, 'y': 214}, 'bottomright': {'x': 322, 'y': 539}}]
できた!どうやらこれで認識はできていそう。
画像認識実行
次に、認識結果を書き出してみる。
from darkflow.net.build import TFNet
import cv2
import numpy as np

options = {"model": "cfg/yolo.cfg", "load": "bin/yolo.weights", "threshold": 0.1}

tfnet = TFNet(options)

class_names = ['aeroplane', 'bicycle', 'bird', 'boat', 'bottle',
              'bus', 'car', 'cat', 'chair', 'cow', 'diningtable',
              'dog', 'horse', 'motorbike', 'person', 'pottedplant',
              'sheep', 'sofa', 'train', 'tvmonitor']

imgcv = cv2.imread("./sample_img/sample_dog.jpg")
result = tfnet.return_predict(imgcv)
print(result)

num_classes = len(class_names)
class_colors = []
for i in range(0, num_classes):
    hue = 255*i/num_classes
    col = np.zeros((1,1,3)).astype("uint8")
    col[0][0][0] = hue
    col[0][0][1] = 128
    col[0][0][2] = 255
    cvcol = cv2.cvtColor(col, cv2.COLOR_HSV2BGR)
    col = (int(cvcol[0][0][0]), int(cvcol[0][0][1]), int(cvcol[0][0][2]))
    class_colors.append(col)

for item in result:
    tlx = item['topleft']['x']
    tly = item['topleft']['y']
    brx = item['bottomright']['x']
    bry = item['bottomright']['y']
    label = item['label']
    conf = item['confidence']

    if conf > 0.6:

        for i in class_names:
            if label == i:
                class_num = class_names.index(i)
                break

        #枠の作成
        cv2.rectangle(imgcv, (tlx, tly), (brx, bry), class_colors[class_num], 2)

        #ラベルの作成
        text = label + " " + ('%.2f' % conf)
        cv2.rectangle(imgcv, (tlx, tly - 15), (tlx + 100, tly + 5), class_colors[class_num], -1)
        cv2.putText(imgcv, text, (tlx, tly), cv2.FONT_HERSHEY_SIMPLEX, 0.5, (0,0,0), 1)

# 書き出し
cv2.imwrite("./sample_img/sample_dog2.jpg", imgcv)
結果がこちら。
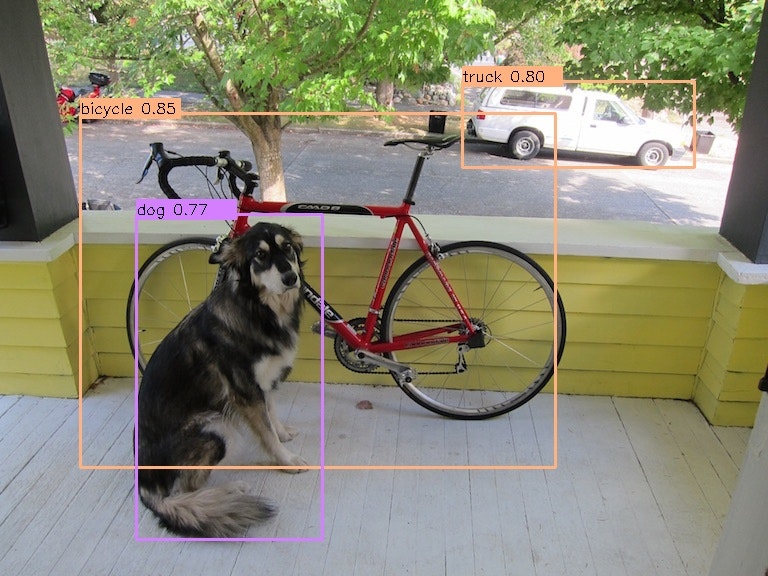
ばっちりできている!!
続いて、webカメラを使ってリアルタイム認識を実行してみる。
from darkflow.net.build import TFNet
import cv2
import numpy as np

options = {"model": "cfg/yolo.cfg", "load": "bin/yolo.weights", "threshold": 0.1}
tfnet = TFNet(options)

# カメラの起動
cap = cv2.VideoCapture(0)

class_names = ['aeroplane', 'bicycle', 'bird', 'boat', 'bottle',
              'bus', 'car', 'cat', 'chair', 'cow', 'diningtable',
              'dog', 'horse', 'motorbike', 'person', 'pottedplant',
              'sheep', 'sofa', 'train', 'tvmonitor']

num_classes = len(class_names)
class_colors = []
for i in range(0, num_classes):
    hue = 255*i/num_classes
    col = np.zeros((1,1,3)).astype("uint8")
    col[0][0][0] = hue
    col[0][0][1] = 128
    col[0][0][2] = 255
    cvcol = cv2.cvtColor(col, cv2.COLOR_HSV2BGR)
    col = (int(cvcol[0][0][0]), int(cvcol[0][0][1]), int(cvcol[0][0][2]))
    class_colors.append(col)

def main():

    while(True):

        # 動画ストリームからフレームを取得
        ret, frame = cap.read()
        result = tfnet.return_predict(frame)

        for item in result:
            tlx = item['topleft']['x']
            tly = item['topleft']['y']
            brx = item['bottomright']['x']
            bry = item['bottomright']['y']
            label = item['label']
            conf = item['confidence']

            if conf > 0.6:

                for i in class_names:
                    if label == i:
                        class_num = class_names.index(i)
                        break

                #枠の作成
                cv2.rectangle(frame, (tlx, tly), (brx, bry), class_colors[class_num], 2)

                #ラベルの作成
                text = label + " " + ('%.2f' % conf)
                cv2.rectangle(frame, (tlx, tly - 15), (tlx + 100, tly + 5), class_colors[class_num], -1)
                cv2.putText(frame, text, (tlx, tly), cv2.FONT_HERSHEY_SIMPLEX, 0.5, (0,0,0), 1)

        # 表示
        cv2.imshow("Show FLAME Image", frame)

        # escを押したら終了。
        k = cv2.waitKey(10);
        if k == ord('q'):  break;

    cap.release()
    cv2.destroyAllWindows()

if __name__ == '__main__':
    main()
認識結果がこちら。
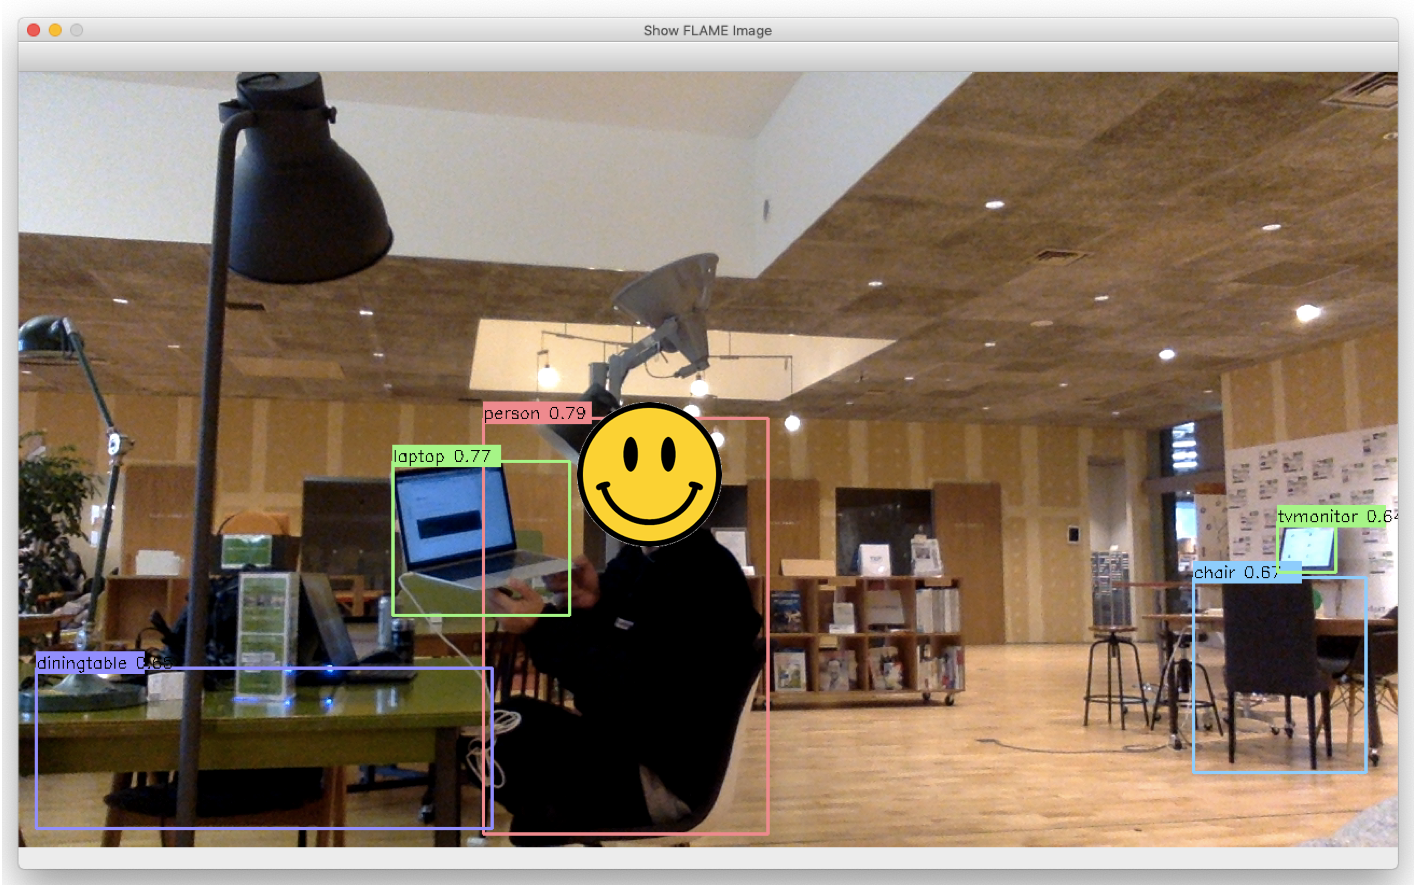
人だけでなく、テーブル、イス、PC、モニタまで認識できている。
YOLO、すごすぎる。。。
今回はMACのwebカメラで実行しましたが、
USBカメラ繋いで、test3.pyの
cap = cv2.VideoCapture(0)
↓
cap = cv2.VideoCapture(1)
と書き換えてあげればUSBカメラでも実行可能。
いろいろと用途が広がりそうです。