アドサーバ(広告配信サーバ)は、通常iframeで広告のクリエイティブを配信している。(JS配信とかに対応しているアドサーバもある)
通常のセキュリティだとiframeの中身(srcで実際に表示されている側)がiframeを操作する事はできない。つまりexpandなどのリッチ広告、特に表示領域を変更(特に拡大)する場合に問題となる。
このような問題を、セキュアに解決するために、IABが提唱したのがSafeFrameという規格だ。GoogleのDFPにも採用されている。
基本準備
下記のページに必要なソース群があるので、まずはそれをダウンロードする。
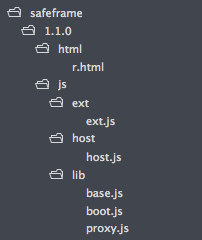
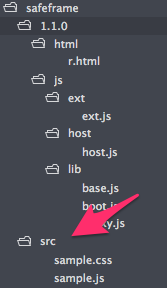
src以下のファイルを下記のようにsafeframe/1.1.0というフォルダに格納する。
r.htmlはrender用のHTMLだが、特に修正する必要は無いので、そのまま使う事をお勧めする。このフォルダへのアクセスを仮にhttp://path.to.cdn/safeframeとする。
呼び出し側(Host)のコード
呼び出し側(iframeを書くページ側)を Host と呼ぶ。
Host側HTMLのiframeを期待する場所に次のようなコードが入る。
<div id="leaderboard"></div>
<script type='text/x-safeframe'>
{
	"id" : "leaderboard_src",
	"src" : "../../src/sample.js",
	"conf" :
		{
		"size" : "728x90",
		"dest":	"leaderboard",
		"supports" : {
			"exp-push" : "1"
		}
	}
}
</script>
コード中の../../src/sample.jsが 広告のクリエイティブとなる。詳細は後述。相対パスで書く場合は、先ほどの r.htmlからの相対 になるので注意。confの中のexp-pushは、iframeがexpandした際に、コンテンツをpushする事を明示的に許可している。(デフォルトではexp-pushはfalse)
ドキュメントの最後の方に、必要なJSを読み込んだり、HOST側の設定をするコードを書く。
<script src="http://path.to.cdn/safeframe/1.1.0/js/lib/base.js"></script>
<script src="http://path.to.cdn/safeframe/1.1.0/js/host/host.js"></script>
<script src="http://path.to.cdn/safeframe/1.1.0/js/lib/boot.js"></script>
<script type="text/javascript">
	(function() {
		var conf = new $sf.host.Config({
			renderFile: "http://path.to.cdn/safeframe/1.1.0/html/r.html"
		});
	})();
</script>
広告クリエイティブ(External Party側)の実装
広告クリエイティブを表示するsample.jsと、そこで使うcsssample.cssを次の位置に格納する。今回は便宜上、レンダーファイルなどと同じホストに置いたが r.htmlやhost.jsなどとは別のホスト(ドメイン)でも構わない。
このクリエイティブ中では、次の3つを行っている。
- inviewのパーセンテージを表示
- expand(overlay)する
- expand (pushdown) する
ソース全体は最後に書いてる。大事な所だけ抜粋。基本的に$sf.extオブジェクトにアクセルする事で制御等を行う。
Inviewのパーセンテージを表示には$sf.ext.inViewPercentage()を利用。
(function(){
  window.setInterval(function(){
    var totalViewable = $sf.ext.inViewPercentage();
    var elem = document.getElementById("inview");
    elem.innerHTML = "Viewable: " + totalViewable + "%";
    }, 50);
})();
Expandには$sf.ext.expand()を利用。
overlay.addEventListener("click", function(){
  $sf.ext.expand({b:100,push:false}); // Pushしない
}, false);

pushdown.addEventListener("click", function(){
  $sf.ext.expand({b:100,push:true}); // Pushする
}, false);
詳しいAPIドキュメントは、先ほどダウンロードしたファイルの中にある。今回は External
ソースコード
ちなみに、動作はChromeでしか確認してない。
css = document.createElement("link");
css.setAttribute("rel", "stylesheet");
css.setAttribute("type", "text/css");
css.setAttribute("href", "../../src/sample.css");
document.body.appendChild(css);

var bg = document.createElement("div");
bg.setAttribute("id", "bg");
document.body.appendChild(bg);

var inview = document.createElement("div");
inview.setAttribute("id", "inview");
inview.setAttribute("class", "btn");
bg.appendChild(inview);

var overlay = document.createElement("div");
overlay.setAttribute("id", "overlay");
overlay.setAttribute("class", "btn");
overlay.innerHTML = "OVERLAY";
overlay.addEventListener("click", function(){
  $sf.ext.expand({b:100,push:false});
}, false);
bg.appendChild(overlay);

var pushdown = document.createElement("div");
pushdown.setAttribute("id", "pushdown");
pushdown.setAttribute("class", "btn");
pushdown.innerHTML = "PUSHDOWN";
pushdown.addEventListener("click", function(){
  $sf.ext.expand({b:100,push:true});
}, false);
bg.appendChild(pushdown);

var collapse = document.createElement("div");
collapse.setAttribute("id", "collapse");
collapse.setAttribute("class", "btn");
collapse.addEventListener("click", function(){
  $sf.ext.collapse();
}, false);
collapse.innerHTML = "COLLAPSE";
bg.appendChild(collapse);

$sf.ext.register(300, 250, function(status,data){});

(function(){
  window.setInterval(function(){
    var totalViewable = $sf.ext.inViewPercentage();
    var elem = document.getElementById("inview");
    elem.innerHTML = "Viewable: " + totalViewable + "%";
    }, 50);
})();
* {
  margin: 0;
  padding: 0;
}

div#bg {
  background-color: #999;
  height: 190px;
}

div.btn {
  background-color: #eee;
  width: 100px;
  height: 20px;
  position: absolute;
  font-size: 8pt;
  line-height: 20px;
  text-align: center;
  vertical-align: middle;
  cursor: pointer;
}

div#inview {
  top: 10px;
  left: 10px;
}

div#overlay {
  top: 60px;
  left: 10px;
}

div#pushdown {
  top: 60px;
  left: 120px;
}

div#collapse {
  top: 160px;
  left: 10px;
}

