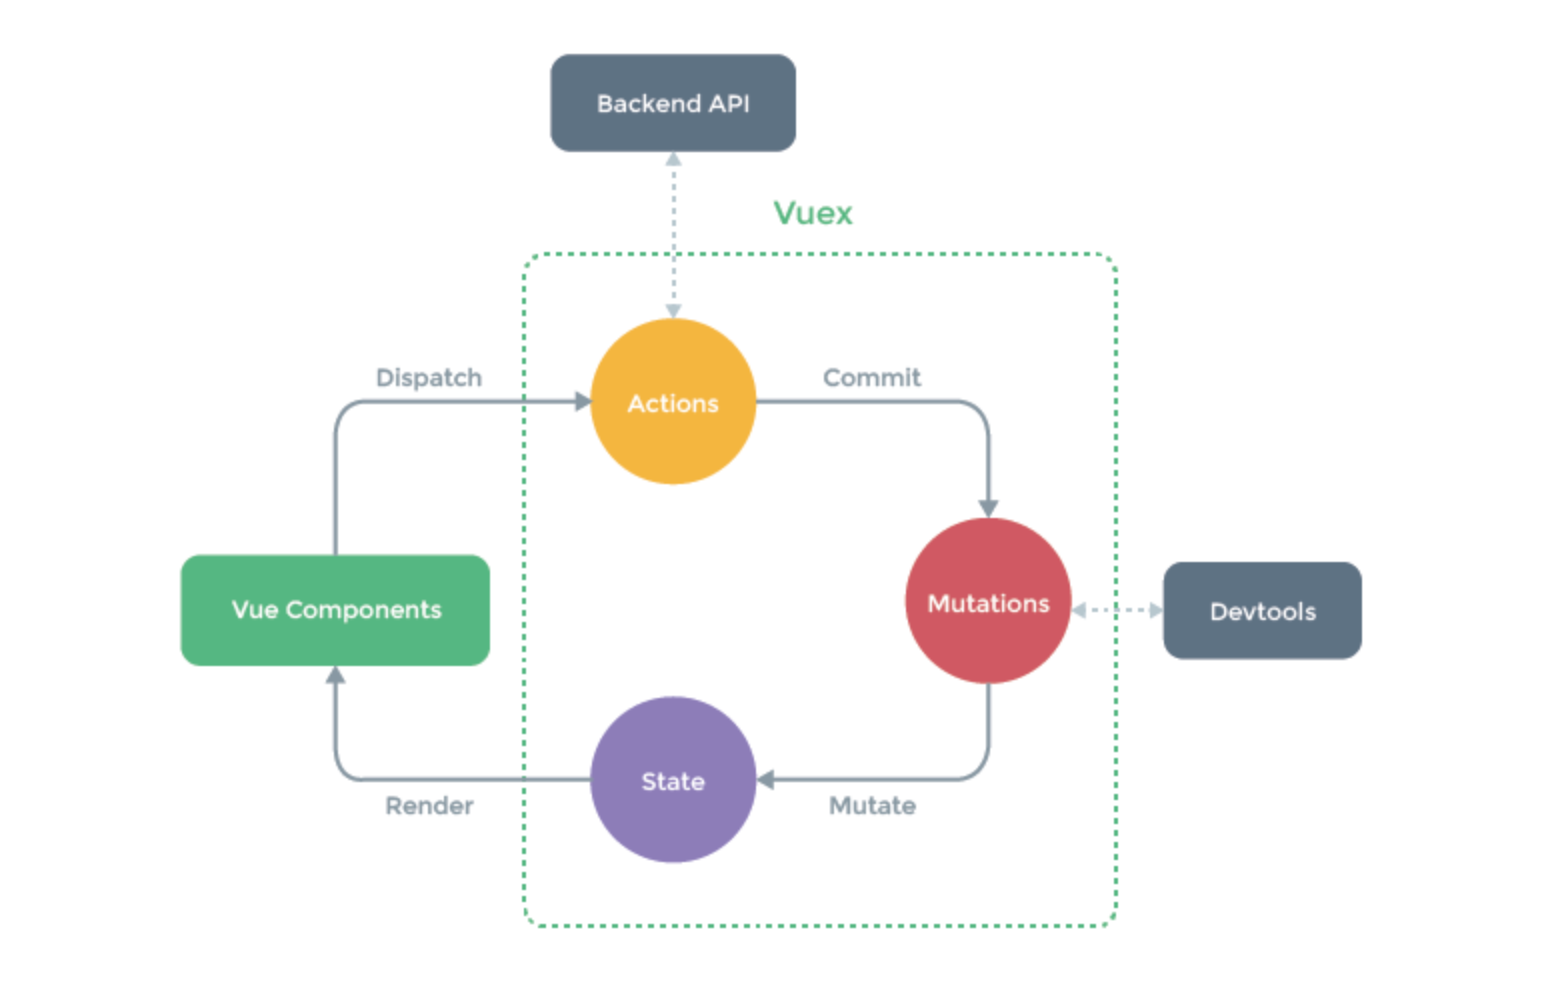
Vuexとは
Vuex(ビューエックス)は、ReactにおけるReduxのように、データの管理を一元化するためのライブラリです。
コンポーネント間で状態の受け渡しが容易になるため、ある程度以上の規模の開発において利用されることが多いライブラリになります。
説明は以下の公式ページが分かりやすいです。
https://vuex.vuejs.org/ja/
簡単なプロジェクトを使った使用例をまとめます。
今回は以下の4ステップをまとめました。
- 1つのコンポーネントを使う
- 2つのコンポーネントを使う
- 他のコンポーネントの状態を参照するコンポーネントを使う
- 同じコンポーネントを再利用する
環境構築
プロジェクトを作成
今回は、Vue CLIというものを使って、プロジェクトを作成します。
Vue CLIを使うと、基本的なファイルを自動的に作成してくれます。
以下コマンドは、vue-cliをグローバルにインストールする例です。
もちろん、-gを付けずにローカルにインストールしていただいても構いません。
vue-cliは今回はバージョン 3.1.3 を使います。
2系が入っているようならアンインストールをします。
npm uninstall -g vue-cli

npm install -g @vue/cli
インストールが終わるとvueコマンドが使えるようになります。
vue createでプロジェクトの作成を行います。
プロジェクト名を入力して、enterを押します。今回はmy-appとしました。
vue create my-app
いくつか質問をされますので、 Manually select features を選択し、
Vuex にチェックを入れ、あとはenterを押します。
Vue CLI v3.1.3
? Please pick a preset:
  default (babel, eslint)
❯ Manually select features
? Check the features needed for your project:
 ◉ Babel
 ◯ TypeScript
 ◯ Progressive Web App (PWA) Support
 ◯ Router
❯◉ Vuex
 ◯ CSS Pre-processors
 ◉ Linter / Formatter
 ◯ Unit Testing
 ◯ E2E Testing
これでプロジェクトが作成されました。
最後に以下のように表示されると思いますので、実行をしてみましょう。
 $ cd my-app
 $ yarn serve
下記のように表示されますので、ブラウザで開くと、Vue.jsのロゴがあるページが表示されます。
  App running at:
  - Local:   http://localhost:8080/
  - Network: http://{IP}:8080/

  Note that the development build is not optimized.
  To create a production build, run yarn build.
確認できたら、Cmd + C でkillして大丈夫です。
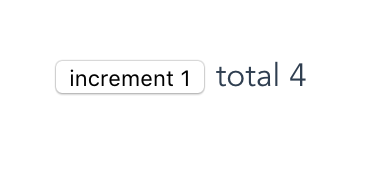
ステップ1.単一のカウンターを作成
まずは、簡単な例として、ボタンをクリックすると1インクリメントされ、ボタンの右に合計の数値が表示される「Counter」コンポーネントを作成していきます。
イメージ
src/App.vue
Vue CLIで作成されたファイルです。
ロゴを消し、HelloWorldコンポーネントをCounterコンポーネントに変更します。
<template>
  <div id="app">
    <Counter/>
  </div>
</template>

<script>
import Counter from './components/Counter.vue'

export default {
  name: 'app',
  components: {
    Counter
  }
}
</script>

<style>
# app {
  font-family: 'Avenir', Helvetica, Arial, sans-serif;
  -webkit-font-smoothing: antialiased;
  -moz-osx-font-smoothing: grayscale;
  text-align: center;
  color: #2c3e50;
  margin-top: 60px;
}
</style>
src/main.js
Vue CLIで作成されたファイルです。
storeのインポートをして、new Vueに与えます。
import Vue from 'vue'
import App from './App.vue'
import store from './store'

Vue.config.productionTip = false

new Vue({
  store,
  render: h => h(App)
}).$mount('#app')
src/store/modules/counter.js
新規に作成するファイルです。
Vuexは、「ストア」と呼ばれるファイルにて状態管理を行います。
後ほど作成するCounterコンポーネント用のストアになります。
Vuexの以下4点の特徴を覚えましょう。
- stateで状態を持つ。
- gettersでstateを返す。
- actions内のcommitにて、mutationsのメソッドを実行する。
- mutationsにてstateを操作する。
actionsを使わず、直接mutationsを実行することも出来ますが、
違いとして、actionsは非同期処理を行うことが出来ます。
詳細は以下をご覧ください。
https://vuex.vuejs.org/ja/guide/actions.html
const state = {
  step: 1,
  count: 0
}

const getters = {
  step: state => state.step,
  count: state => state.count
}

const actions = {
  increment({ commit }) {
    commit('increment')
  }
}

const mutations = {
  increment (state) {
    state.count += state.step
  }
}

export default {
  state,
  getters,
  actions,
  mutations
}
src/store.js
Vue CLIで作成されたファイルです。
先ほど作成した counter.js をインポートし、Vuexをnewする際のmodulesとして与えます。
strictを指定すると、mutations以外でstateを変更しようとした場合に、
コンソールでエラーを教えてくれます。
import Vue from 'vue'
import Vuex from 'vuex'
import counter from './store/modules/counter'

Vue.use(Vuex)

export default new Vuex.Store({
  strict: process.env.NODE_ENV !== 'production',
  modules: {
    counter
  },
  state: {

  },
  mutations: {

  },
  actions: {

  }
})
src/components/Counter.vue
新規に作成するファイルです。
Counterというコンポーネントを定義します。
gettersでstoreの状態を取得します。
dispatchでstoreのactionsを呼び出します。
<template>
  <div>
    <button @click="increment">increment {{ step }}</button>
    <span>total {{ count }}</span>
  </div>
</template>

<script>
  export default {
    name: "Counter",
    computed: {
      step() { return this.$store.getters.step},
      count() { return this.$store.getters.count}
    },
    methods: {
      increment() {
        this.$store.dispatch('increment')
      }
    }
  }
</script>

<style scoped>

</style>
これで完成です。 yarn serve を実行してページを表示してみましょう。
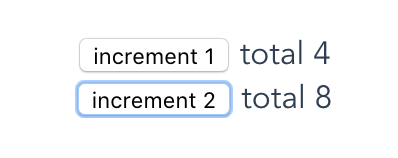
ステップ2.異なるカウンターを作成
次に、クリックすると2加算するカウンター「DoubleCouner」を作り、Counterと同時に使用します。
イメージ
stateやactionsはCounterと同名としますが、同名のstateやactionsを扱う場合はネームスペースを使います。ネームスペースを使わない場合、すべてのモジュールの同名のgetter, mutations, actions がすべて呼び出されてしまいます。
Counterをネームスペースに対応
まず、以下の差分のようにファイルを書き換え、Counterをネームスペースに対応させます。
コンポーネントからgettersやdispatchを使用する際は、モジュール名/{名前} という形になります。
src/components/Counter.vue
-      step() { return this.$store.getters.step},
-      count() { return this.$store.getters.count}
+      step() { return this.$store.getters['counter/step']},
+      count() { return this.$store.getters['counter/count']}
     },
     methods: {
       increment() {
-        this.$store.dispatch('increment')
+        this.$store.dispatch('counter/increment')
src/store/modules/counter.js
 export default {
+  namespaced: true,
   state,
DoubleCounterを作成
それでは、DoubleCounterを作成します。
Counter.vue, counter.jsをコピーして以下ファイルを作り、以下の差分になるよう編集します。
src/components/DoubleCounter.vue
<script>
  export default {
-    name: "Counter",
+    name: "DoubleCounter",
    computed: {
-      step() { return this.$store.getters['counter/step']}
-      count() { return this.$store.getters['counter/count']}
+      step() { return this.$store.getters['doubleCounter/step']}
+      count() { return this.$store.getters['doubleCounter/count']}
    },
    methods: {
      increment() {
-        this.$store.dispatch('counter/increment')
+        this.$store.dispatch('doubleCounter/increment')
      }
    }
src/store/modules/doubleCounter.js
const state = {
-  step: 1,
+  step: 2,
  count: 0
}
DoubleCounterを組み込む
DoubleCounterをApp.vueなどに組み込みます。
src/App.vue
     <Counter/>
+    <DoubleCounter/>

import Counter from './components/Counter'
+import DoubleCounter from './components/DoubleCounter'

 export default {
   name: 'App',
   components: {
-    Counter
+    Counter,
+    DoubleCounter
src/store.js
 import counter from './store/modules/counter'
+import doubleCounter from './store/modules/doubleCounter'

   strict: process.env.NODE_ENV !== 'production',
   modules: {
-    counter
+    counter,
+    doubleCounter
これで完成です。ページを表示してみましょう。
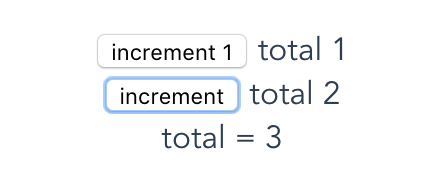
ステップ3.別のコンポーネントのstateを参照する
次に、これまでとは異なり、別コンポーネントのstateを参照して表示する「TotalCouner」コンポーネントを作ります。
CounterコンポーネントとDoubleCounterコンポーネントの値の合計値を表示するコンポーネントです。
イメージ
TotalCounterを作成
src/store/modules/totalCounter.js
gettersの関数の第三引数でrootStateを渡すことが出来ます。
関数内では、rootState.モジュール名.state名で任意のモジュールのstateを参照できます。
const getters = {
  count(state, getters, rootState) {
    return rootState.counter.count + rootState.doubleCounter.count
  }
}

export default {
  namespaced: true,
  getters
}
src/compoment/TotalCounter.vue
<template>
  <div>
    <span>total = {{ count }}</span>
  </div>
</template>
<script>
  export default {
    name: "TotalCounter",
    computed: {
      count() { return this.$store.getters[`totalCounter/count`]}
    }
  }
</script>

<style scoped>

</style>
TotalCounterを組み込む
TotalCounterをApp.vueなどに組み込みます。
src/App.vue
     <Counter/>
     <DoubleCounter/>
+    <TotalCounter/>
 import DoubleCounter from './components/DoubleCounter'
+ import TotalCounter from "./components/TotalCounter";

   components: {
     Counter,
-    DoubleCounter
+    DoubleCounter,
+    TotalCounter
   }
src/store.js
 import counter from './store/modules/counter'
 import doubleCounter from './store/modules/doubleCounter'
+import totalCounter from './store/modules/totalCounter'

   modules: {
     counter,
-    doubleCounter
+    doubleCounter,
+    totalCounter
   }
これで完成です。ページを表示してみましょう。
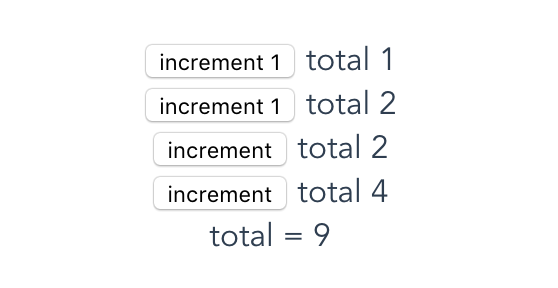
ステップ4.コンポーネントを再利用する
次は、CounterとDoubleCounterコンポーネントを再利用して、それぞれ2つずつ表示します。
イメージ
モジュール名をプロパティで渡せるようにする
今はvueファイルのgettersやdispatchに、モジュール名を直接記載しています。
this.$store.getters['counter/count']
再利用するために、moduleという名前のプロパティを定義し、外から渡せるようにします。
src/App.vue
   <div id="app">
-    <Counter/>
-    <DoubleCounter/>
+    <Counter module="counter"/>
+    <DoubleCounter module="doubleCounter"/>
     <TotalCounter/>
src/components/Counter.vue
モジュール名を固定で書いていたところを、プロパティのmoduleに変更します。
+    props: {
+      module: {
+        type: String,
+        required: true,
+      }
+    },
     computed: {
-      step() { return this.$store.getters['counter/step']},
-      count() { return this.$store.getters['counter/count']},
+      step() { return this.$store.getters[`${this.module}/step`]},
+      count() { return this.$store.getters[`${this.module}/count`]},
     },
     methods: {
       increment() {
-        this.$store.dispatch('counter/increment')
+        this.$store.dispatch(`${this.module}/increment`)
src/components/DoubleCounter.vue
+    props: {
+      module: {
+        type: String,
+        required: true,
+      }
+    },
     computed: {
-      step() { return this.$store.getters['doubleCounter/step']},
-      count() { return this.$store.getters['doubleCounter/count']},
+      step() { return this.$store.getters[`${this.module}/step`]},
+      count() { return this.$store.getters[`${this.module}/count`]},
     },
     methods: {
       increment() {
-        this.$store.dispatch('doubleCounter/increment')
+        this.$store.dispatch(`${this.module}/increment`)
コンポーネントを増やす
src/App.vue
moduleの値を、 counterA, counterBのように変更します。
-    <Counter module="counter"/>
-    <DoubleCounter module="doubleCounter"/>
+    <Counter module="counterA"/>
+    <Counter module="counterB"/>
+    <DoubleCounter module="doubleCounterA"/>
+    <DoubleCounter module="doubleCounterB"/>
src/store.js
App.vueのmoduleの値に合わせて、modulesを名前を付けて使用します。
ハッシュ形式なので、任意の名前:値のように記載できます。
このstoreからtotalCounterで扱うモジュール名をセットするため、dispatchをします。
-export default new Vuex.Store({
+const store = new Vuex.Store({
  strict: process.env.NODE_ENV !== 'production',
  modules: {
-    counter,
-    doubleCounter,
+    counterA: counter,
+    counterB: counter,
+    doubleCounterA: doubleCounter,
+    doubleCounterB: doubleCounter,
     totalCounter

+store.dispatch('totalCounter/setModules',
+  ['counterA','counterB', 'doubleCounterA', 'doubleCounterB'])
+
+export default store
src/store/modules/counter.js
コンポーネントを再利用するためには、stateをreturnする形で記述する必要があります。
-const state = {
-  step: 1,
-  count: 0
-}
+const state = () => ({step: 1, count: 0})
src/store/modules/doubleCounter.js
こちらも同じくreturnする形で記載します。
-const state = {
-  step: 2,
-  count: 0
-}
+const state = () => ({step: 2, count: 0})
src/store/modules/totalCounter.js
扱うモジュール名を外から渡せるように、state, actions, mutationsを追加します。
+const state = () => ({modules: []})
+
 const getters = {
   count (state, getters, rootState) {
-    return rootState.counter.count + rootState.doubleCounter.count
+    let sum = 0
+    state.modules.forEach((elem) => {
+      sum += rootState[elem].count
+    })
+    return sum
+  }
+}
+
+const actions = {
+  setModules({commit}, val) {
+    commit('setModules', val)
+  }
+}
+
+const mutations = {
+  setModules(state, val) {
+    state.modules = val
   }
 }

 export default {
   namespaced: true,
-  getters
+  state,
+  getters,
+  actions,
+  mutations
 }
これで完成です。ページを表示してみましょう。
Vuexのデバッグ
Vuexのデバッグ方法を紹介します。
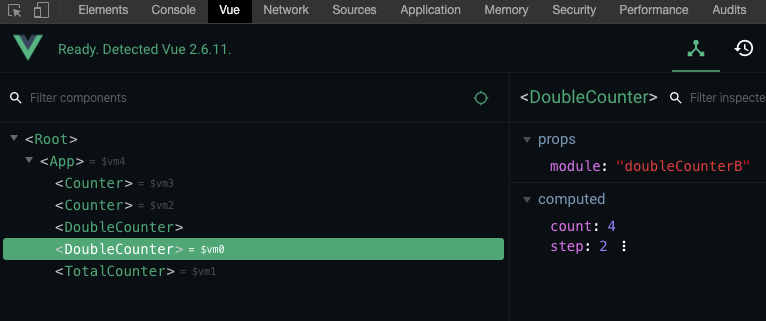
Vue.js devtools を使う
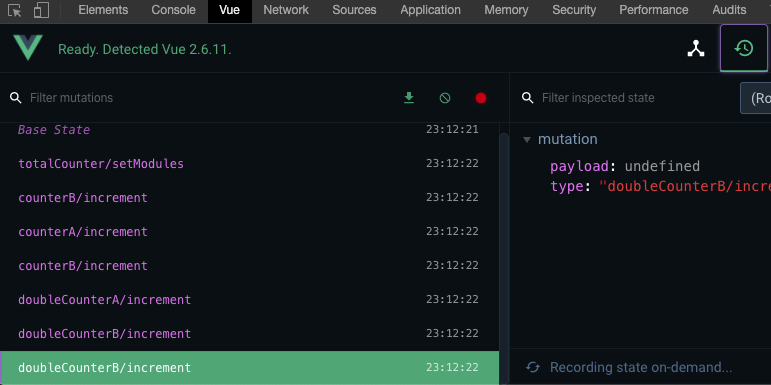
Chromeの Vue.js devtools を使うと、computedの値を確認したり、ミューテーションの発生を確認することが出来ます。
computedの値の確認
ミューテーションの発生を確認
watch, subscribe, subscribeAction を使う
watchを使うと、ステートやゲッターの値の変更を監視できます。
watchの定義は以下です。
第一引数で監視したい値をreturnするように記載すると、値が変わった際に第二引数の処理が走ります。第二引数には新旧の値が渡ります。
watch<T>(getter: (state: S, getters: any) => T, cb: (value: T, oldValue: T) => void, options?: WatchOptions): () => void;
subscribeはミューテーションが発生したときに実行したい処理を、subscribeActionはアクションが発生したときに実行したい処理を定義できます。
監視というよりはイベントのフック処理になります。
すべてのミューテーションやアクションを拾ってしまうので、処理の中でtypeの値でミューテーション名やアクション名が分かるので、任意の値の場合だけ処理をさせるといいでしょう。
定義は以下です。
  subscribe<P extends MutationPayload>(fn: (mutation: P, state: S) => any, options?: SubscribeOptions): () => void;
  subscribeAction<P extends ActionPayload>(fn: SubscribeActionOptions<P, S>, options?: SubscribeOptions): () => void;
サンプルとして、コンソールに値やミューテーションの発生などをロギングする処理をstore.jsに入れてみます。
先頭のeslintのコメントは使っていない変数の警告を抑制するためです。
+
+/* eslint-disable no-unused-vars */
+
+store.watch(
+  (state, getters) => state['counterA'].count,
+  (newVal, oldVal) => {
+    console.log(`counterA.count changed! ${oldVal} => ${newVal}`);
+  }
+)
+
+store.watch(
+  (state, getters) => getters['counterB/count'],
+  (newVal, oldVal) => {
+    console.log(`counterB.count changed! ${oldVal} => ${newVal}`);
+  }
+)
+
+store.subscribe((mutation, state) => {
+  if (mutation.type === 'doubleCounterA/increment') {
+    console.log('doubleCounterA/increment committed!');
+  }
+})
+
+store.subscribeAction((action, state) => {
+  if (action.type === 'doubleCounterB/increment') {
+    console.log('doubleCounterB/increment dispatched!');
+  }
+})
+
export default store
また、watchについては、単一ファイルコンポーネントの中に書くことも出来ます。
    methods: {
      increment() {
        this.$store.dispatch(`${this.module}/increment`)
      }
-    }
+    },
+    watch: {
+      count(newVal, oldVal) {
+        console.log(`counter count changed! ${oldVal} => ${newVal}`);
+      }
+    }