はじめに
keras-yolo3はyolo3のkeras実装です。
yoloを使うと、高速に画像内の物体が存在する領域と物体を認識することができます。
今回は、手動での領域のラベルづけ(アノテーション)を行い、自分で用意した画像を使ってkeras-yolo3を学習させてみました。
今回書いたソースコードはここに置いておきます。
https://github.com/algaeeater/keras-yolo3
やること
- 画像を同じ大きさにリサイズ
- VoTTでアノテーション作業
- VoTTからアノテーション位置を取得し、keras-yolo3用のtxtファイルを生成
- keras-yolo3の重みをダウンロード
- 学習用にkeras-yolo3のファイルを修正
GitHubからクローン
GitHubからkeras-yolo3をクローンします。
git clone https://github.com/qqwweee/keras-yolo3.git
cd keras-yolo3
画像を同じ大きさにリサイズ
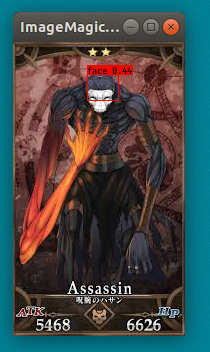
学習用に呪腕のハサンの画像を300枚程スクレイピングしてきました。
仮面とシャイタンの腕を物体認識したいと思います。

まずはじめに、すべての画像を学習用の大きさにリサイズします。
keras-yolo3の学習に使う画像サイズは統一されている必要があります。
ここでは128*128にリサイズすることにします。
以下のコードでリサイズしました。
パスは適宜変えてください。
import os
from glob import glob

from PIL import Image


def resize_images(images_dir, image_save_dir, image_size):

    os.makedirs(image_save_dir, exist_ok=True)

    image_paths = glob(os.path.join(images_dir, '*'))

    for img_path in image_paths:
        image = Image.open(img_path)
        image = image.convert('RGB')

        resize_image = image.resize((image_size, image_size))
        save_path = os.path.join(image_save_dir, os.path.basename(img_path))
        resize_image.save(save_path)


def _main():
    images_dir = '../images/'  # 適宜変更
    image_save_dir = '../resize_images/'  # 適宜変更
    image_size = 128 # 適宜変更

    resize_images(images_dir=images_dir, image_save_dir=image_save_dir, image_size=image_size)


if __name__ == '__main__':
    _main()
python resize_images.py
VoTTでアノテーション作業
VoTTというマイクロソフトが開発しているアノテーションツールを使います。
Electronアプリなのでmac, Windows, Linuxで動きます。
以下のURLからOSに合わせたバイナリをインストールできます。
https://github.com/Microsoft/VoTT/releases
画像1枚1枚にアノテーションを行います。
ここが一番面倒です。
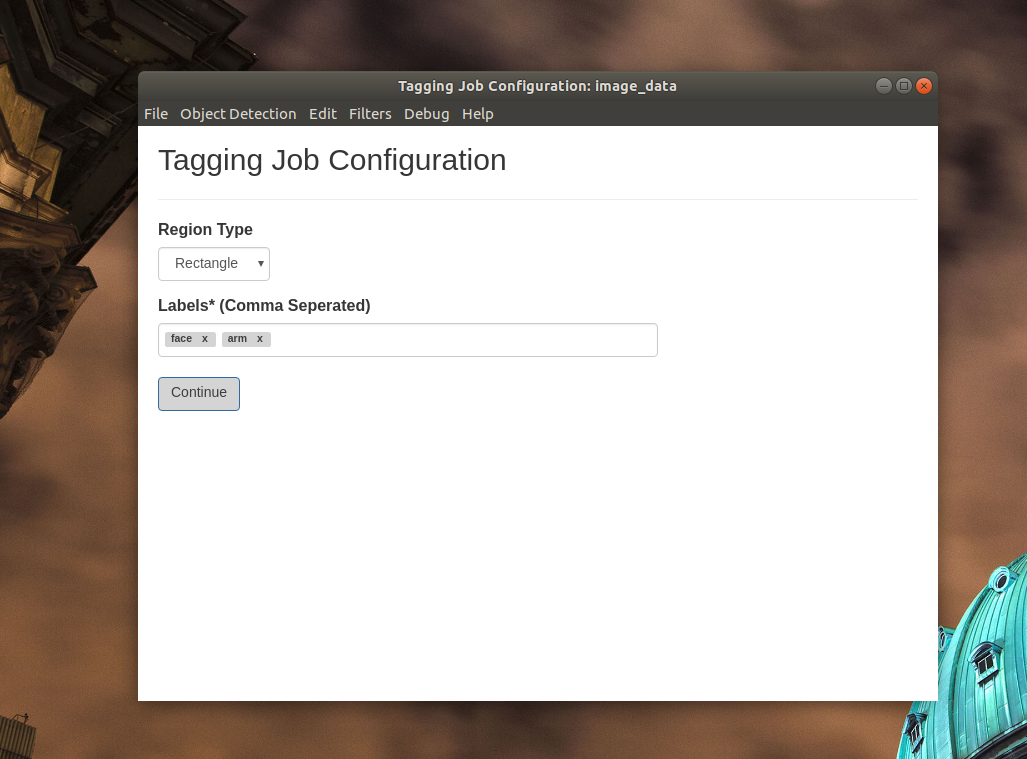
はじめに対象の画像が入っているディレクトリを指定します。
今回はさきほどリサイズ済の画像が置いてあるディレクトリを指定することにします。
ラベルはコンマ区切りで複数入力できます。今回は「face」と「arm」の2クラスの物体を認識します。
こんな感じで、1枚の画像に複数のラベルが写っている場合はそれぞれにアノテーションします。
ラベルのオンオフが若干わかりにくいので注意が必要かもしれません。
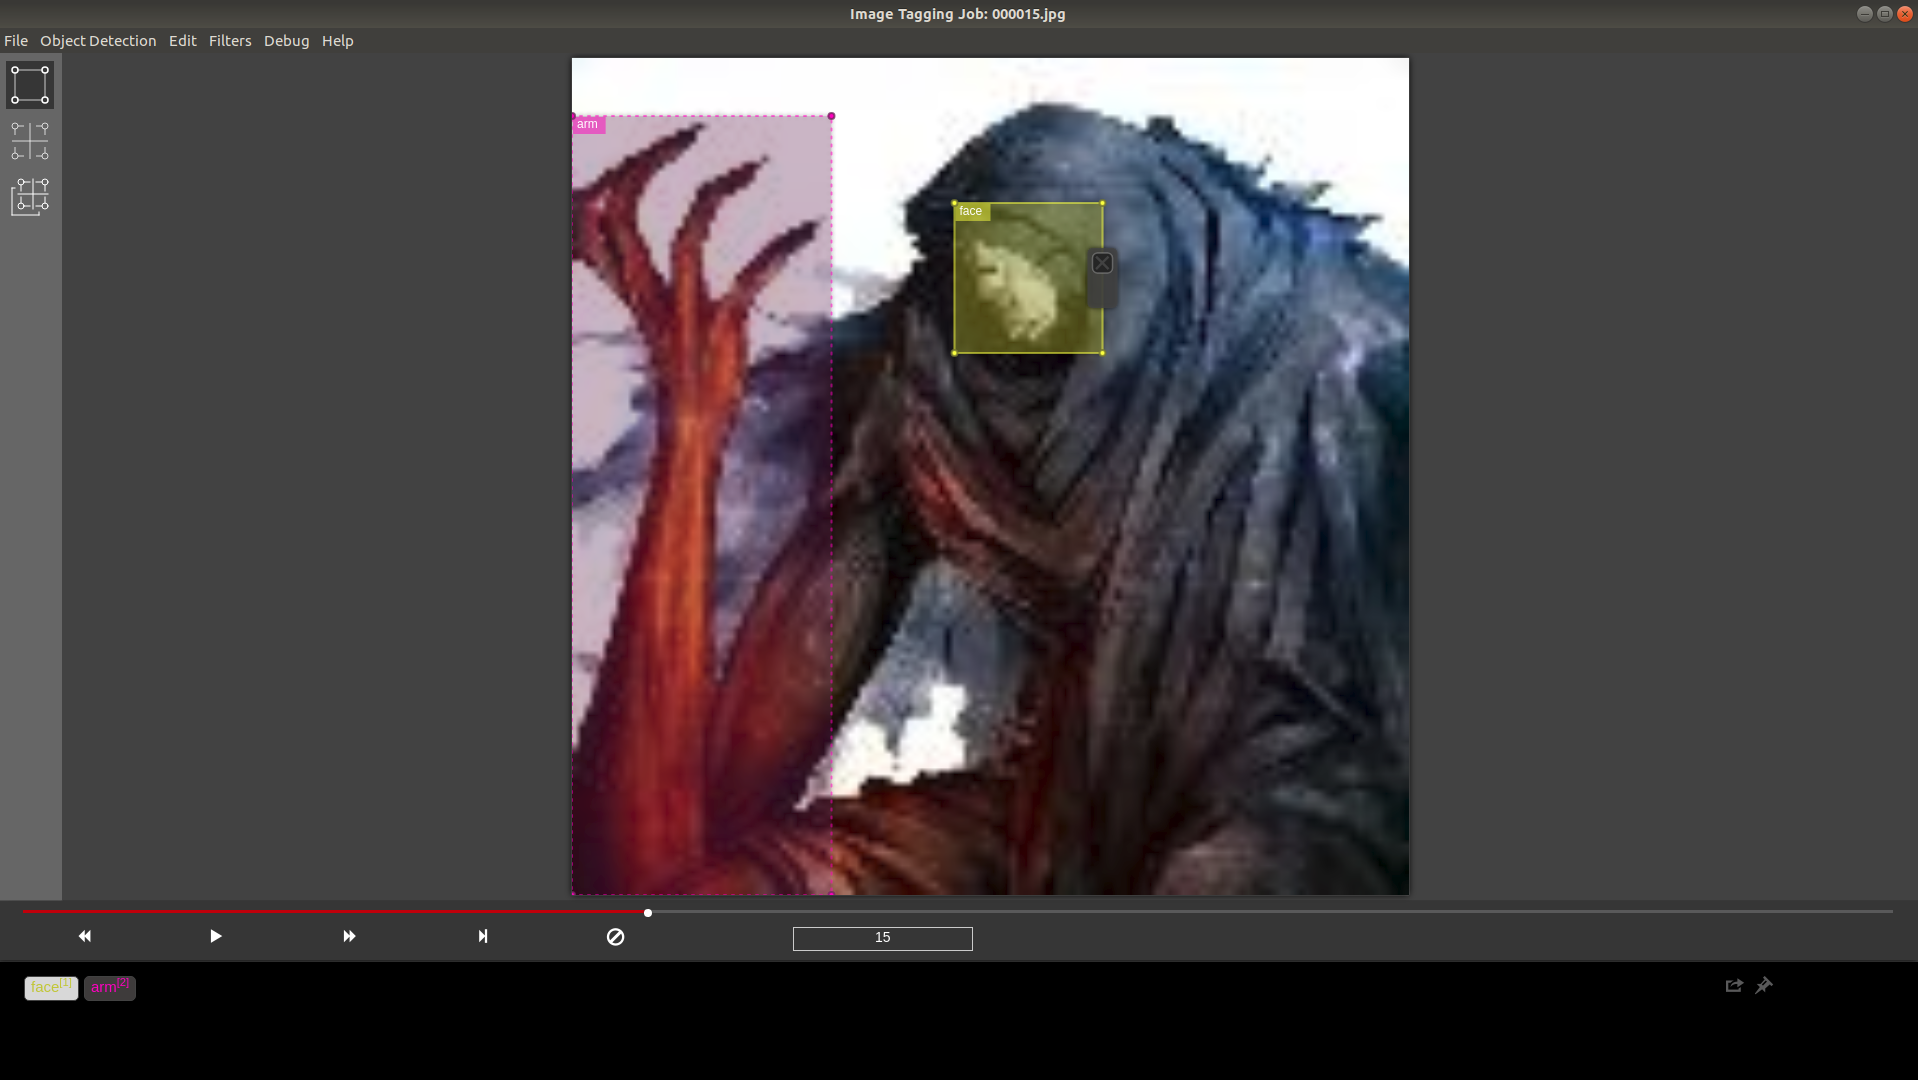
Ctrl + Sでアノテーションを保存できます。
保存すると、対象のディレクトリと同じ階層にディレクトリと同名のjsonファイルができていると思います。このjsonにアノテーション情報が保存されており、次回VoTTを開いたときにも今までやったアノテーションが表示されるはずです。
ディレクトリを移動するさいも、対象ディレクトリと同名のjsonファイルを一緒に移動すれば問題ないです。
今回は使いませんが、メニュー上部のObject Detection -> Export Tags でYOLOやVOCなどよく使われるアノテーションの形式でエクスポートできます。自分はmacでこの機能を使おうとしたらなぜか動きませんでした(Ubuntuならできた)。
VoTTからバウンディングボックスを取得し、keras-yolo3用のtxtファイルを生成
画像のアノテーション作業が終わったら、VoTTのアノテーションが記録されたjsonから座標情報を取得し、keras-yolo3用のtxtファイルを作成します。
アノテーション情報が書かれたtxtファイル
keras-yolo3のアノテーションを学習させるtxtファイルは、以下のような形式である必要があります。
path/to/img1.jpg 50,100,150,200,0 30,50,200,120,3
path/to/img2.jpg 120,300,250,600,2
1行が1画像を表し、行頭に学習画像のパスを書きます。同じ行にスペースを挟んでバウンディングボックスの情報を書いていきます。バウンディングボックスはいくつあってもいいです。
バウンディングボックスの5つの数値の意味は以下です。
keras-yolo3を使うばあい、クラスの番号は0始まりである必要があります。
x1,y1,x2,y2,クラスの番号
ラベル情報が書かれたtxtファイル
ラベルは以下のように1行に1つのラベルが記録されている形式です。
person
bicycle
car
motorbike
aeroplane
bus
形式を変換する処理
VoTTのアノテーション情報が保存されたjsonファイルを、keras-yolo3で使うアノテーション用のテキストファイルに変換するコードを書きました。
convert_vott_to_kerasyolo3txt.pyというファイル名で変換用のPythonのファイルを作成します。
json_pathには、VoTTのアノテーション情報が記録されたjsonファイルのパスを書きます。
image_dirには、画像が保存されたディレクトリのパスを書きます。
train_txt_save_pathには、keras-yolo3で学習に使うアノテーション用のテキストファイルの保存先のパスを書きます。
classes_txt_save_pathには、keras-yolo3で学習に使うラベル用のテキストファイルの保存先のパスを書きます。
import json
import os


def convert_vott_to_kerasyolo3txt(json_path, image_dir, train_txt_save_path, classes_txt_save_path):

    row_list = []

    with open(json_path) as f:
        dic = json.load(f)
        tag_set = set()

        visited_frames = dic['visitedFrames']

        frames = dic['frames']
        frame_keys = frames.keys()

        for visited in visited_frames:
            if visited in frame_keys:  # framesに存在するkeyのみ
                img_annotation_list = frames[visited]
                for item in img_annotation_list:
                    tags = item['tags']
                    for t in tags:
                        tag_set.add(t)

        tag_dic = {}
        tag_list = list(tag_set)
        tag_list.sort()
        for i, tag in enumerate(tag_list):
            tag_dic[tag] = i

        for visited in visited_frames:
            if visited in frame_keys:  # framesに存在するkeyのみ
                img_annotation_list = frames[visited]

                row_text = os.path.join(image_dir, visited)

                for item in img_annotation_list:
                    box = item['box']
                    tags = item['tags']

                    for tag in tags:
                        row_text = row_text + ' {},{},{},{},{}'.format(int(box['x1']),int(box['y1']),int(box['x2']),int(box['y2']), int(tag_dic[tag]))

                if len(img_annotation_list) != 0:
                    row_list.append(row_text)

    train_txt = '\n'.join(row_list)

    print(train_txt)

    f = open(train_txt_save_path, 'w')
    f.write(train_txt)
    f.close()

    classes_txt = '\n'.join(tag_list)

    f = open(classes_txt_save_path, 'w')
    f.write(classes_txt)
    f.close()


def _main():
    json_path = '../resize_images.json'  # VoTTのアノテーション情報が記録されたjsonファイルのパス
    image_dir = '../resize_images/'  # 画像が保存されたディレクトリのパス
    train_txt_save_path = 'my_train.txt'  # keras-yolo3で学習に使うアノテーション用のテキストファイルの保存先のパス
    classes_txt_save_path = 'model_data/my_classes.txt' # keras-yolo3で学習に使うラベル用のテキストファイルの保存先のパス

    convert_vott_to_kerasyolo3txt(
        json_path=json_path,
        image_dir=image_dir,
        train_txt_save_path=train_txt_save_path,
        classes_txt_save_path=classes_txt_save_path
    )

if __name__ == '__main__':
    _main()
python convert_vott_to_kerasyolo3txt.py
実行すると、txt_save_pathのパスにkeras-yolo3の学習用のテキストファイルが指定したパスに2つできていると思います。
アノテーション用のtxtファイルとラベル用のtxtファイルです。
keras-yolo3の重みをダウンロード
学習済みの重みをダウンロードします。
wget https://pjreddie.com/media/files/yolov3.weights
以下を実行してダウンロードしたdarknetの重みをkerasの形式に変換します。
実行にはkerasが必要です。
python convert.py yolov3.cfg yolov3.weights model_data/yolo_weights.h5
学習用にkeras-yolo3のファイルを修正
train.pyの修正
train.pyは、keras-yolo3を学習させるためのプログラムです。
train.pyの以下の3つの箇所を修正します。
内容は自分の学習させる画像サイズやディレクトリの場所によって適宜読み替えてください。
annotation_pathを、convert_vott_to_kerasyolo3txt.pyで生成したtxtファイルに変更します。
# annotation_path = 'train.txt'
annotation_path = 'my_train.txt'  # 先ほどconvert_vott_to_kerasyolo3txt.pyで生成したtxtファイルに変更します
今回学習するクラスのtxtファイルに変更します。
# classes_path = 'model_data/voc_classes.txt'
classes_path = 'model_data/my_classes.txt'  # 今回学習するクラスのtxtファイルに変更します
学習用の画像サイズに変更します 今回は128*128なので(128, 128)にします。
# input_shape = (416,416) # multiple of 32, hw
input_shape = (128,128) # 学習用の画像サイズに変更します 今回は128*128なので(128, 128)にします
上の3つの修正をしたあとのtrain.pyが以下になります。
"""
Retrain the YOLO model for your own dataset.
"""

import numpy as np
import keras.backend as K
from keras.layers import Input, Lambda
from keras.models import Model
from keras.optimizers import Adam
from keras.callbacks import TensorBoard, ModelCheckpoint, ReduceLROnPlateau, EarlyStopping

from yolo3.model import preprocess_true_boxes, yolo_body, tiny_yolo_body, yolo_loss
from yolo3.utils import get_random_data


def _main():
    # annotation_path = 'train.txt'
    annotation_path = 'my_train.txt'  # 先ほどconvert_vott_to_kerasyolo3txt.pyで生成したtxtファイルに変更します
    log_dir = 'logs/000/'
    # classes_path = 'model_data/voc_classes.txt'
    classes_path = 'model_data/my_classes.txt'  # 今回学習するクラスのtxtファイルに変更します
    anchors_path = 'model_data/yolo_anchors.txt'
    class_names = get_classes(classes_path)
    num_classes = len(class_names)
    anchors = get_anchors(anchors_path)

    # input_shape = (416,416) # multiple of 32, hw
    input_shape = (128,128) # 学習用の画像サイズに変更します 今回は128*128なので(128, 128)にします

    is_tiny_version = len(anchors)==6 # default setting
    if is_tiny_version:
        model = create_tiny_model(input_shape, anchors, num_classes,
            freeze_body=2, weights_path='model_data/tiny_yolo_weights.h5')
    else:
        model = create_model(input_shape, anchors, num_classes,
            freeze_body=2, weights_path='model_data/yolo_weights.h5') # make sure you know what you freeze

    logging = TensorBoard(log_dir=log_dir)
    checkpoint = ModelCheckpoint(log_dir + 'ep{epoch:03d}-loss{loss:.3f}-val_loss{val_loss:.3f}.h5',
        monitor='val_loss', save_weights_only=True, save_best_only=True, period=3)
    reduce_lr = ReduceLROnPlateau(monitor='val_loss', factor=0.1, patience=3, verbose=1)
    early_stopping = EarlyStopping(monitor='val_loss', min_delta=0, patience=10, verbose=1)

    val_split = 0.1
    with open(annotation_path) as f:
        lines = f.readlines()
    np.random.seed(10101)
    np.random.shuffle(lines)
    np.random.seed(None)
    num_val = int(len(lines)*val_split)
    num_train = len(lines) - num_val

    # Train with frozen layers first, to get a stable loss.
    # Adjust num epochs to your dataset. This step is enough to obtain a not bad model.
    if True:
        model.compile(optimizer=Adam(lr=1e-3), loss={
            # use custom yolo_loss Lambda layer.
            'yolo_loss': lambda y_true, y_pred: y_pred})

        batch_size = 32
        print('Train on {} samples, val on {} samples, with batch size {}.'.format(num_train, num_val, batch_size))
        model.fit_generator(data_generator_wrapper(lines[:num_train], batch_size, input_shape, anchors, num_classes),
                steps_per_epoch=max(1, num_train//batch_size),
                validation_data=data_generator_wrapper(lines[num_train:], batch_size, input_shape, anchors, num_classes),
                validation_steps=max(1, num_val//batch_size),
                epochs=50,
                initial_epoch=0,
                callbacks=[logging, checkpoint])
        model.save_weights(log_dir + 'trained_weights_stage_1.h5')

    # Unfreeze and continue training, to fine-tune.
    # Train longer if the result is not good.
    if True:
        for i in range(len(model.layers)):
            model.layers[i].trainable = True
        model.compile(optimizer=Adam(lr=1e-4), loss={'yolo_loss': lambda y_true, y_pred: y_pred}) # recompile to apply the change
        print('Unfreeze all of the layers.')

        batch_size = 32 # note that more GPU memory is required after unfreezing the body
        print('Train on {} samples, val on {} samples, with batch size {}.'.format(num_train, num_val, batch_size))
        model.fit_generator(data_generator_wrapper(lines[:num_train], batch_size, input_shape, anchors, num_classes),
            steps_per_epoch=max(1, num_train//batch_size),
            validation_data=data_generator_wrapper(lines[num_train:], batch_size, input_shape, anchors, num_classes),
            validation_steps=max(1, num_val//batch_size),
            epochs=100,
            initial_epoch=50,
            callbacks=[logging, checkpoint, reduce_lr, early_stopping])
        model.save_weights(log_dir + 'trained_weights_final.h5')

    # Further training if needed.


def get_classes(classes_path):
    '''loads the classes'''
    with open(classes_path) as f:
        class_names = f.readlines()
    class_names = [c.strip() for c in class_names]
    return class_names

def get_anchors(anchors_path):
    '''loads the anchors from a file'''
    with open(anchors_path) as f:
        anchors = f.readline()
    anchors = [float(x) for x in anchors.split(',')]
    return np.array(anchors).reshape(-1, 2)


def create_model(input_shape, anchors, num_classes, load_pretrained=True, freeze_body=2,
            weights_path='model_data/yolo_weights.h5'):
    '''create the training model'''
    K.clear_session() # get a new session
    image_input = Input(shape=(None, None, 3))
    h, w = input_shape
    num_anchors = len(anchors)

    y_true = [Input(shape=(h//{0:32, 1:16, 2:8}[l], w//{0:32, 1:16, 2:8}[l], \
        num_anchors//3, num_classes+5)) for l in range(3)]

    model_body = yolo_body(image_input, num_anchors//3, num_classes)
    print('Create YOLOv3 model with {} anchors and {} classes.'.format(num_anchors, num_classes))

    if load_pretrained:
        model_body.load_weights(weights_path, by_name=True, skip_mismatch=True)
        print('Load weights {}.'.format(weights_path))
        if freeze_body in [1, 2]:
            # Freeze darknet53 body or freeze all but 3 output layers.
            num = (185, len(model_body.layers)-3)[freeze_body-1]
            for i in range(num): model_body.layers[i].trainable = False
            print('Freeze the first {} layers of total {} layers.'.format(num, len(model_body.layers)))

    model_loss = Lambda(yolo_loss, output_shape=(1,), name='yolo_loss',
        arguments={'anchors': anchors, 'num_classes': num_classes, 'ignore_thresh': 0.5})(
        [*model_body.output, *y_true])
    model = Model([model_body.input, *y_true], model_loss)

    return model

def create_tiny_model(input_shape, anchors, num_classes, load_pretrained=True, freeze_body=2,
            weights_path='model_data/tiny_yolo_weights.h5'):
    '''create the training model, for Tiny YOLOv3'''
    K.clear_session() # get a new session
    image_input = Input(shape=(None, None, 3))
    h, w = input_shape
    num_anchors = len(anchors)

    y_true = [Input(shape=(h//{0:32, 1:16}[l], w//{0:32, 1:16}[l], \
        num_anchors//2, num_classes+5)) for l in range(2)]

    model_body = tiny_yolo_body(image_input, num_anchors//2, num_classes)
    print('Create Tiny YOLOv3 model with {} anchors and {} classes.'.format(num_anchors, num_classes))

    if load_pretrained:
        model_body.load_weights(weights_path, by_name=True, skip_mismatch=True)
        print('Load weights {}.'.format(weights_path))
        if freeze_body in [1, 2]:
            # Freeze the darknet body or freeze all but 2 output layers.
            num = (20, len(model_body.layers)-2)[freeze_body-1]
            for i in range(num): model_body.layers[i].trainable = False
            print('Freeze the first {} layers of total {} layers.'.format(num, len(model_body.layers)))

    model_loss = Lambda(yolo_loss, output_shape=(1,), name='yolo_loss',
        arguments={'anchors': anchors, 'num_classes': num_classes, 'ignore_thresh': 0.7})(
        [*model_body.output, *y_true])
    model = Model([model_body.input, *y_true], model_loss)

    return model

def data_generator(annotation_lines, batch_size, input_shape, anchors, num_classes):
    '''data generator for fit_generator'''
    n = len(annotation_lines)
    i = 0
    while True:
        image_data = []
        box_data = []
        for b in range(batch_size):
            if i==0:
                np.random.shuffle(annotation_lines)
            image, box = get_random_data(annotation_lines[i], input_shape, random=True)
            image_data.append(image)
            box_data.append(box)
            i = (i+1) % n
        image_data = np.array(image_data)
        box_data = np.array(box_data)
        y_true = preprocess_true_boxes(box_data, input_shape, anchors, num_classes)
        yield [image_data, *y_true], np.zeros(batch_size)

def data_generator_wrapper(annotation_lines, batch_size, input_shape, anchors, num_classes):
    n = len(annotation_lines)
    if n==0 or batch_size<=0: return None
    return data_generator(annotation_lines, batch_size, input_shape, anchors, num_classes)

if __name__ == '__main__':
    _main()
ここまできたら、train.pyを実行します。
python train.py
途中でエラーが出なければ、無事に学習ができていると思います。
学習済のモデルは今回だとlogs/000/の中に保存されると思います。
自分で学習させたモデルの使い方
最後に自分で学習させたモデルに適当な画像を物体認識させて終わろうと思います。
yolo.pyの_defaultの辞書の中身を修正します。
model_pathには、今学習してできたお好みのh5ファイルを指定します。
classes_pathには、自分の学習に使ったラベルのtxtファイル(今回はmodel_data/my_classes.txt)を指定します。
model_image_sizeには、学習時の画像サイズを指定します。
私は以下のようになりました。
    _defaults = {
        "model_path": 'logs/000/trained_weights_final.h5',
        "anchors_path": 'model_data/yolo_anchors.txt',
        "classes_path": 'model_data/my_classes.txt',
        "score" : 0.3,
        "iou" : 0.45,
        "model_image_size" : (128, 128),
        "gpu_num" : 1,
    }
以下はyolo.py全文
# -*- coding: utf-8 -*-
"""
Class definition of YOLO_v3 style detection model on image and video
"""

import colorsys
import os
from timeit import default_timer as timer

import numpy as np
from keras import backend as K
from keras.models import load_model
from keras.layers import Input
from PIL import Image, ImageFont, ImageDraw

from yolo3.model import yolo_eval, yolo_body, tiny_yolo_body
from yolo3.utils import letterbox_image
import os
from keras.utils import multi_gpu_model

class YOLO(object):
    _defaults = {
        "model_path": 'logs/000/trained_weights_final.h5',
        "anchors_path": 'model_data/yolo_anchors.txt',
        "classes_path": 'model_data/my_classes.txt',
        "score" : 0.3,
        "iou" : 0.45,
        "model_image_size" : (128, 128),
        "gpu_num" : 1,
    }

    @classmethod
    def get_defaults(cls, n):
        if n in cls._defaults:
            return cls._defaults[n]
        else:
            return "Unrecognized attribute name '" + n + "'"

    def __init__(self, **kwargs):
        self.__dict__.update(self._defaults) # set up default values
        self.__dict__.update(kwargs) # and update with user overrides
        self.class_names = self._get_class()
        self.anchors = self._get_anchors()
        self.sess = K.get_session()
        self.boxes, self.scores, self.classes = self.generate()

    def _get_class(self):
        classes_path = os.path.expanduser(self.classes_path)
        with open(classes_path) as f:
            class_names = f.readlines()
        class_names = [c.strip() for c in class_names]
        return class_names

    def _get_anchors(self):
        anchors_path = os.path.expanduser(self.anchors_path)
        with open(anchors_path) as f:
            anchors = f.readline()
        anchors = [float(x) for x in anchors.split(',')]
        return np.array(anchors).reshape(-1, 2)

    def generate(self):
        model_path = os.path.expanduser(self.model_path)
        assert model_path.endswith('.h5'), 'Keras model or weights must be a .h5 file.'

        # Load model, or construct model and load weights.
        num_anchors = len(self.anchors)
        num_classes = len(self.class_names)
        is_tiny_version = num_anchors==6 # default setting
        try:
            self.yolo_model = load_model(model_path, compile=False)
        except:
            self.yolo_model = tiny_yolo_body(Input(shape=(None,None,3)), num_anchors//2, num_classes) \
                if is_tiny_version else yolo_body(Input(shape=(None,None,3)), num_anchors//3, num_classes)
            self.yolo_model.load_weights(self.model_path) # make sure model, anchors and classes match
        else:
            assert self.yolo_model.layers[-1].output_shape[-1] == \
                num_anchors/len(self.yolo_model.output) * (num_classes + 5), \
                'Mismatch between model and given anchor and class sizes'

        print('{} model, anchors, and classes loaded.'.format(model_path))

        # Generate colors for drawing bounding boxes.
        hsv_tuples = [(x / len(self.class_names), 1., 1.)
                      for x in range(len(self.class_names))]
        self.colors = list(map(lambda x: colorsys.hsv_to_rgb(*x), hsv_tuples))
        self.colors = list(
            map(lambda x: (int(x[0] * 255), int(x[1] * 255), int(x[2] * 255)),
                self.colors))
        np.random.seed(10101)  # Fixed seed for consistent colors across runs.
        np.random.shuffle(self.colors)  # Shuffle colors to decorrelate adjacent classes.
        np.random.seed(None)  # Reset seed to default.

        # Generate output tensor targets for filtered bounding boxes.
        self.input_image_shape = K.placeholder(shape=(2, ))
        if self.gpu_num>=2:
            self.yolo_model = multi_gpu_model(self.yolo_model, gpus=self.gpu_num)
        boxes, scores, classes = yolo_eval(self.yolo_model.output, self.anchors,
                len(self.class_names), self.input_image_shape,
                score_threshold=self.score, iou_threshold=self.iou)
        return boxes, scores, classes

    def detect_image(self, image):
        start = timer()

        if self.model_image_size != (None, None):
            assert self.model_image_size[0]%32 == 0, 'Multiples of 32 required'
            assert self.model_image_size[1]%32 == 0, 'Multiples of 32 required'
            boxed_image = letterbox_image(image, tuple(reversed(self.model_image_size)))
        else:
            new_image_size = (image.width - (image.width % 32),
                              image.height - (image.height % 32))
            boxed_image = letterbox_image(image, new_image_size)
        image_data = np.array(boxed_image, dtype='float32')

        print(image_data.shape)
        image_data /= 255.
        image_data = np.expand_dims(image_data, 0)  # Add batch dimension.

        out_boxes, out_scores, out_classes = self.sess.run(
            [self.boxes, self.scores, self.classes],
            feed_dict={
                self.yolo_model.input: image_data,
                self.input_image_shape: [image.size[1], image.size[0]],
                K.learning_phase(): 0
            })

        print('Found {} boxes for {}'.format(len(out_boxes), 'img'))

        font = ImageFont.truetype(font='font/FiraMono-Medium.otf',
                    size=np.floor(3e-2 * image.size[1] + 0.5).astype('int32'))
        thickness = (image.size[0] + image.size[1]) // 300

        for i, c in reversed(list(enumerate(out_classes))):
            predicted_class = self.class_names[c]
            box = out_boxes[i]
            score = out_scores[i]

            label = '{} {:.2f}'.format(predicted_class, score)
            draw = ImageDraw.Draw(image)
            label_size = draw.textsize(label, font)

            top, left, bottom, right = box
            top = max(0, np.floor(top + 0.5).astype('int32'))
            left = max(0, np.floor(left + 0.5).astype('int32'))
            bottom = min(image.size[1], np.floor(bottom + 0.5).astype('int32'))
            right = min(image.size[0], np.floor(right + 0.5).astype('int32'))
            print(label, (left, top), (right, bottom))

            if top - label_size[1] >= 0:
                text_origin = np.array([left, top - label_size[1]])
            else:
                text_origin = np.array([left, top + 1])

            # My kingdom for a good redistributable image drawing library.
            for i in range(thickness):
                draw.rectangle(
                    [left + i, top + i, right - i, bottom - i],
                    outline=self.colors[c])
            draw.rectangle(
                [tuple(text_origin), tuple(text_origin + label_size)],
                fill=self.colors[c])
            draw.text(text_origin, label, fill=(0, 0, 0), font=font)
            del draw

        end = timer()
        print(end - start)
        return image

    def close_session(self):
        self.sess.close()

def detect_video(yolo, video_path, output_path=""):
    import cv2
    vid = cv2.VideoCapture(video_path)
    if not vid.isOpened():
        raise IOError("Couldn't open webcam or video")
    video_FourCC    = int(vid.get(cv2.CAP_PROP_FOURCC))
    video_fps       = vid.get(cv2.CAP_PROP_FPS)
    video_size      = (int(vid.get(cv2.CAP_PROP_FRAME_WIDTH)),
                        int(vid.get(cv2.CAP_PROP_FRAME_HEIGHT)))
    isOutput = True if output_path != "" else False
    if isOutput:
        print("!!! TYPE:", type(output_path), type(video_FourCC), type(video_fps), type(video_size))
        out = cv2.VideoWriter(output_path, video_FourCC, video_fps, video_size)
    accum_time = 0
    curr_fps = 0
    fps = "FPS: ??"
    prev_time = timer()
    while True:
        return_value, frame = vid.read()
        image = Image.fromarray(frame)
        image = yolo.detect_image(image)
        result = np.asarray(image)
        curr_time = timer()
        exec_time = curr_time - prev_time
        prev_time = curr_time
        accum_time = accum_time + exec_time
        curr_fps = curr_fps + 1
        if accum_time > 1:
            accum_time = accum_time - 1
            fps = "FPS: " + str(curr_fps)
            curr_fps = 0
        cv2.putText(result, text=fps, org=(3, 15), fontFace=cv2.FONT_HERSHEY_SIMPLEX,
                    fontScale=0.50, color=(255, 0, 0), thickness=2)
        cv2.namedWindow("result", cv2.WINDOW_NORMAL)
        cv2.imshow("result", result)
        if isOutput:
            out.write(result)
        if cv2.waitKey(1) & 0xFF == ord('q'):
            break
    yolo.close_session()
以下のコマンドで画像の物体検出ができます。
画像を指定してみます。
python yolo_video.py --image
うまくいっているようです。