1.Ubuntu インスタンスの作成
以下のインスタンスを作成します。
UCPは、7GB以上のメモリが必要となりますので、見合うインスタンスを作成します。
今回はGoogle Cloud Platformで行います。
| 項目 | 入力概要 |
|---|---|
| 名前 | instance-1 |
| ゾーン | asia-northeast1-a |
| マシンタイプ | n1-standard-2 |
| ブートディスク | Ubuntu 18.04 LTS ディスクサイズ30GB |
| ファイアウォール | HTTP トラフィックを許可する、HTTPS トラフィックを許可するの両方をチェックします。 |
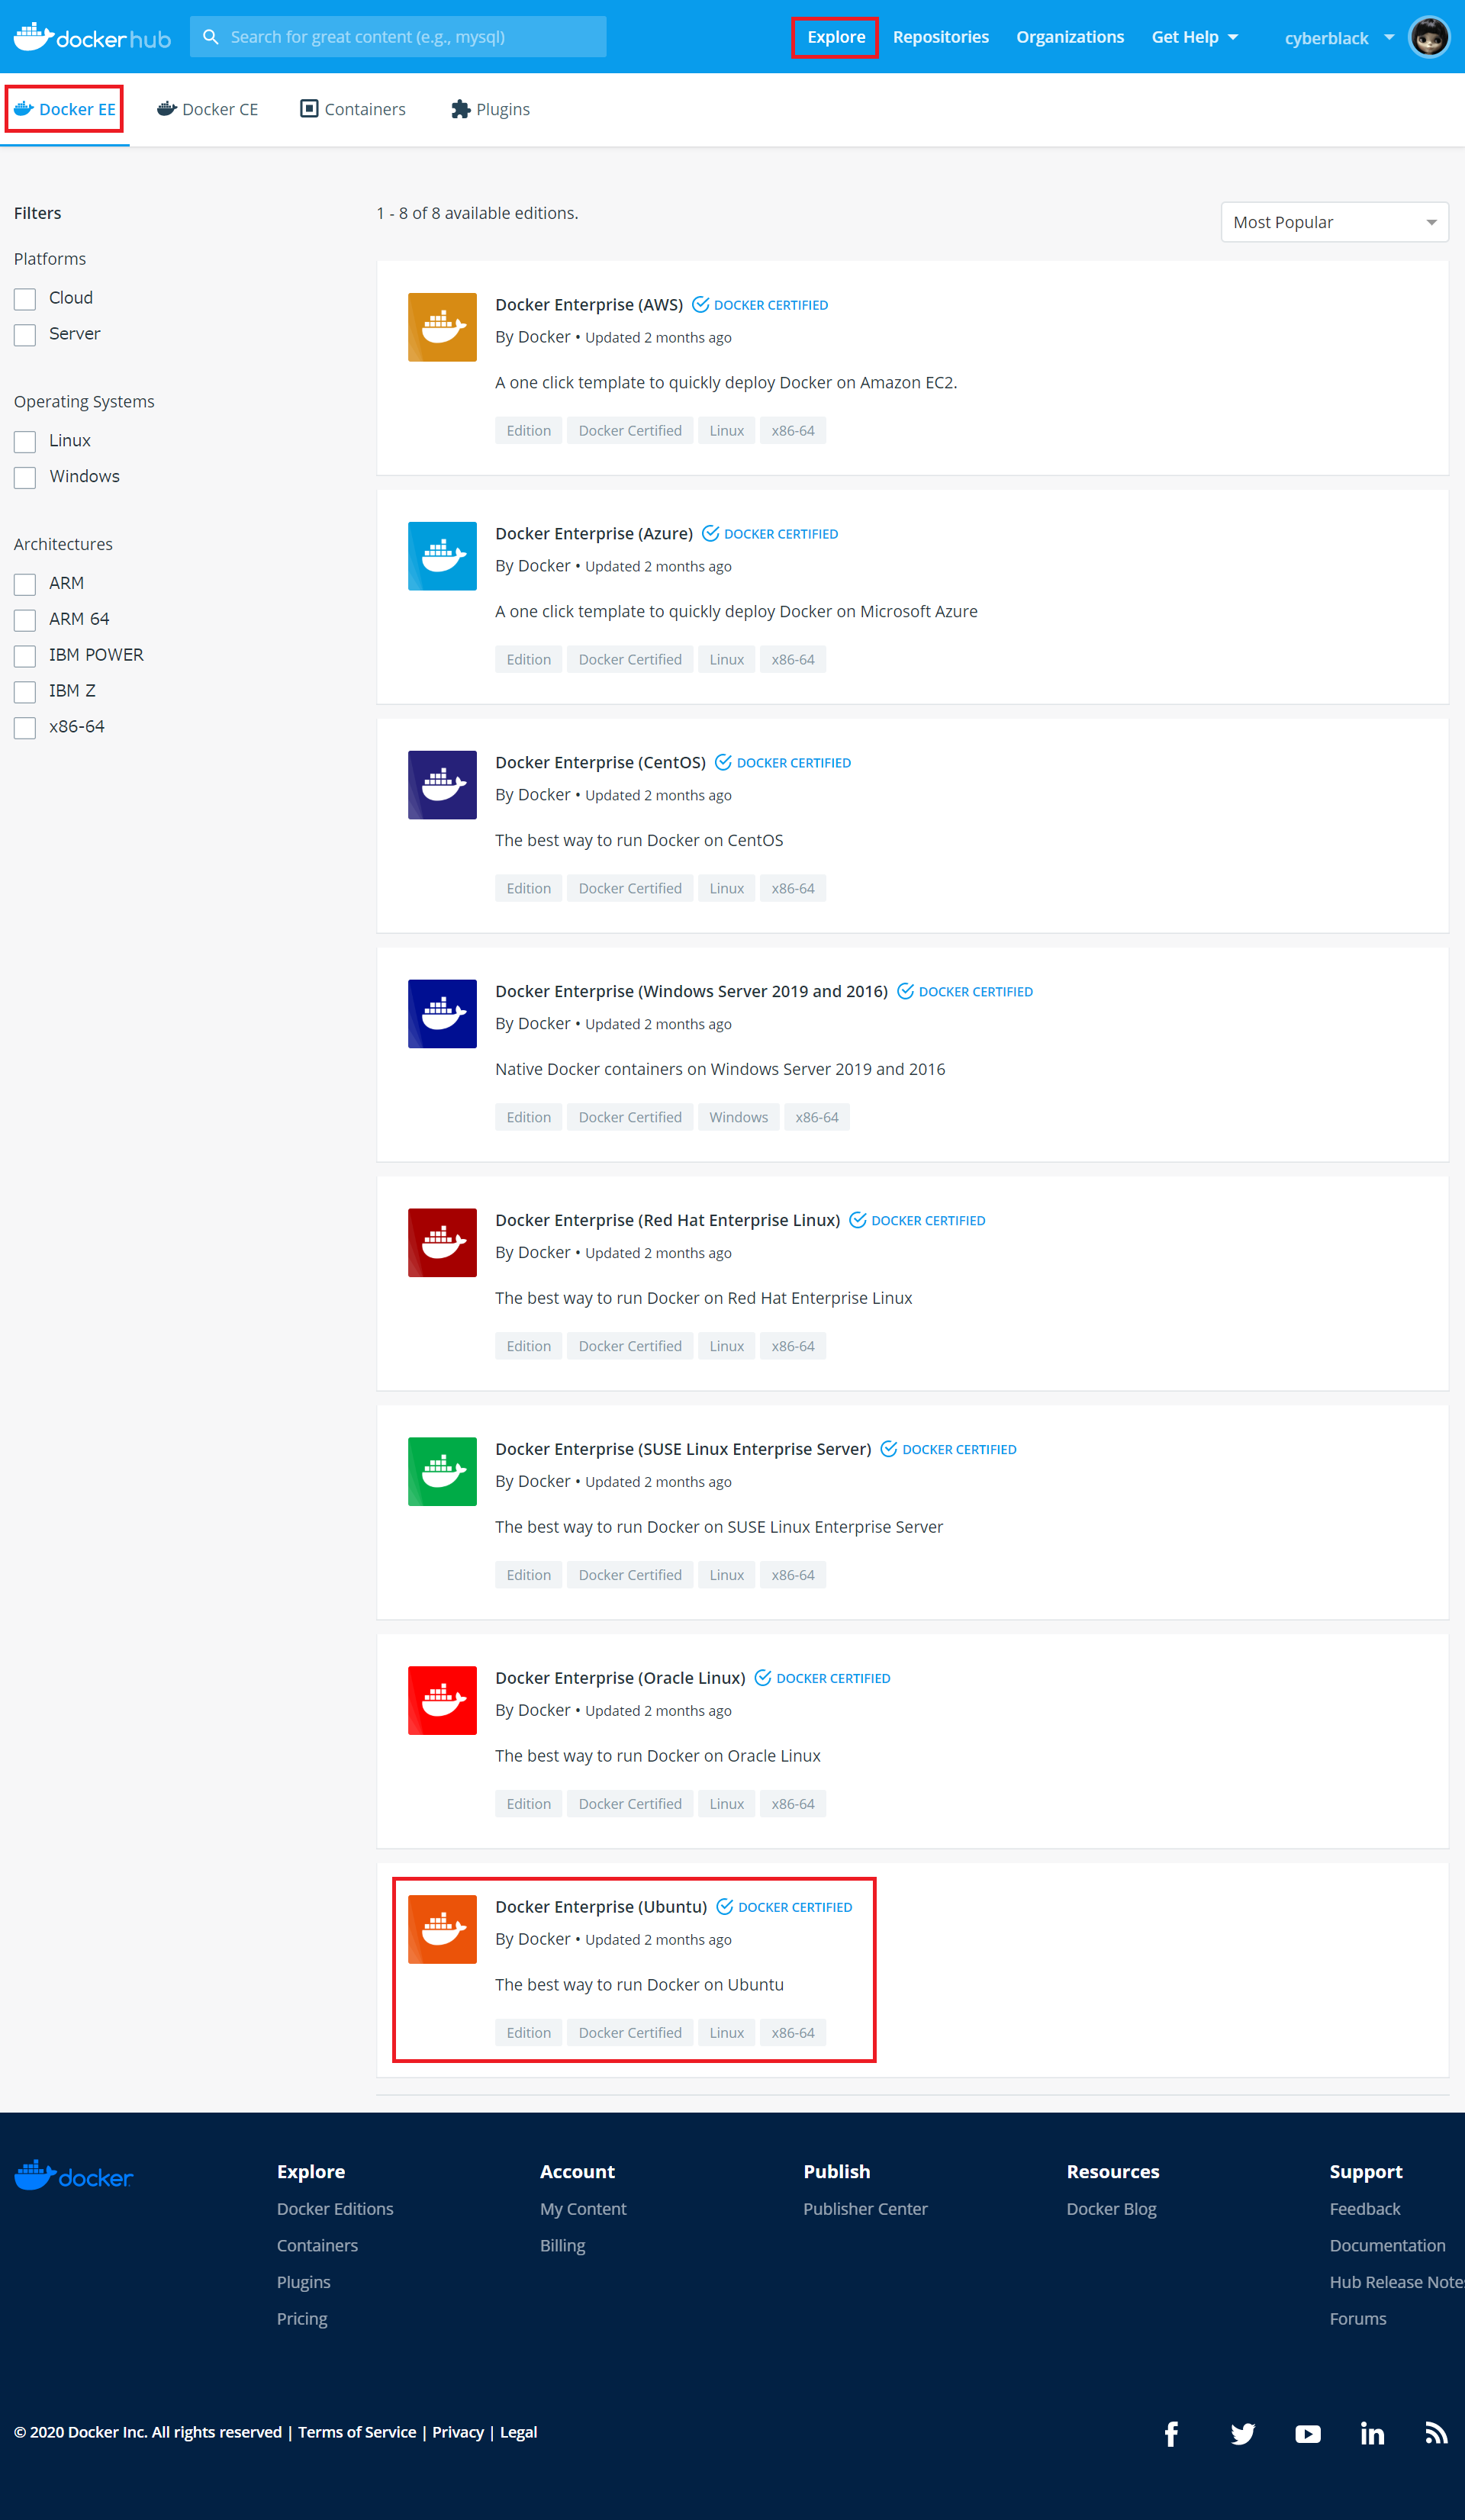
2.DockerHub
DockerHubのアカウントを作成後、「Explore」-「Docker EE」を選択し、「Docker Enterprise (Ubuntu)」を選択します。
「Start 1 Month Trial」ボタンをクリックすると、ユーザ情報を入力する画面に遷移するので、必要情報を入力します。
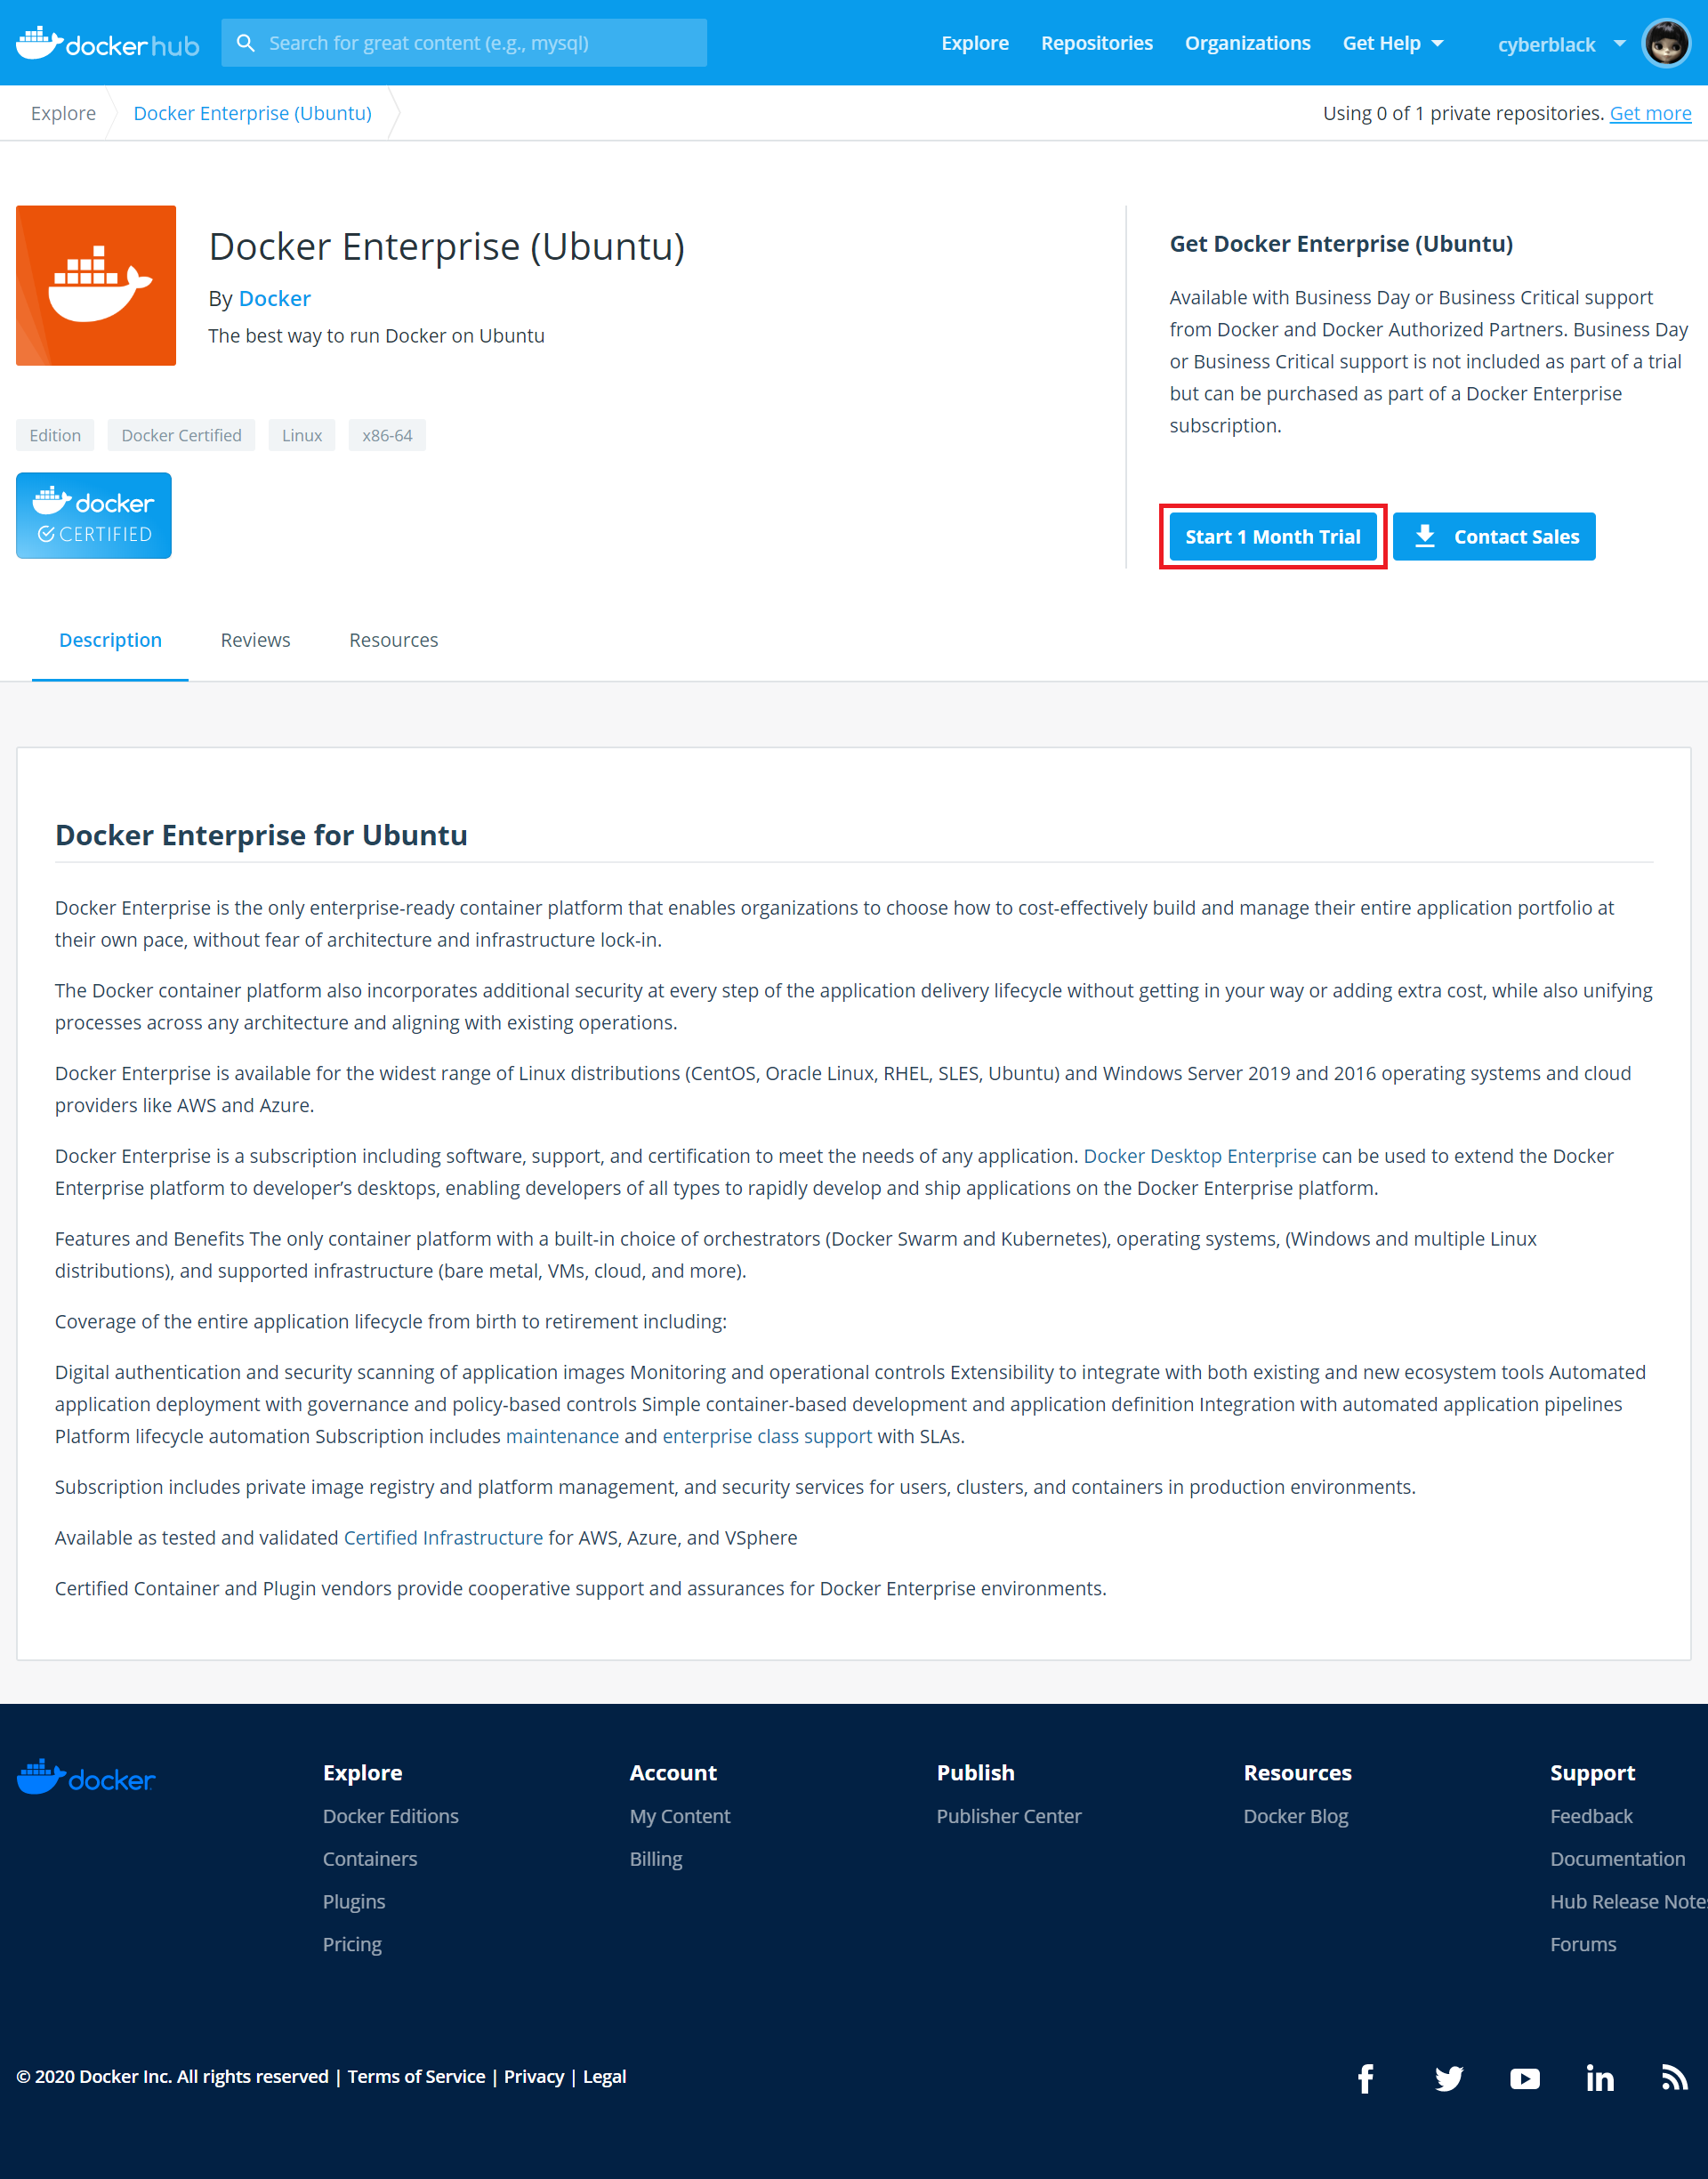
その後、サブスクリプション情報などを確認できるページに遷移します。
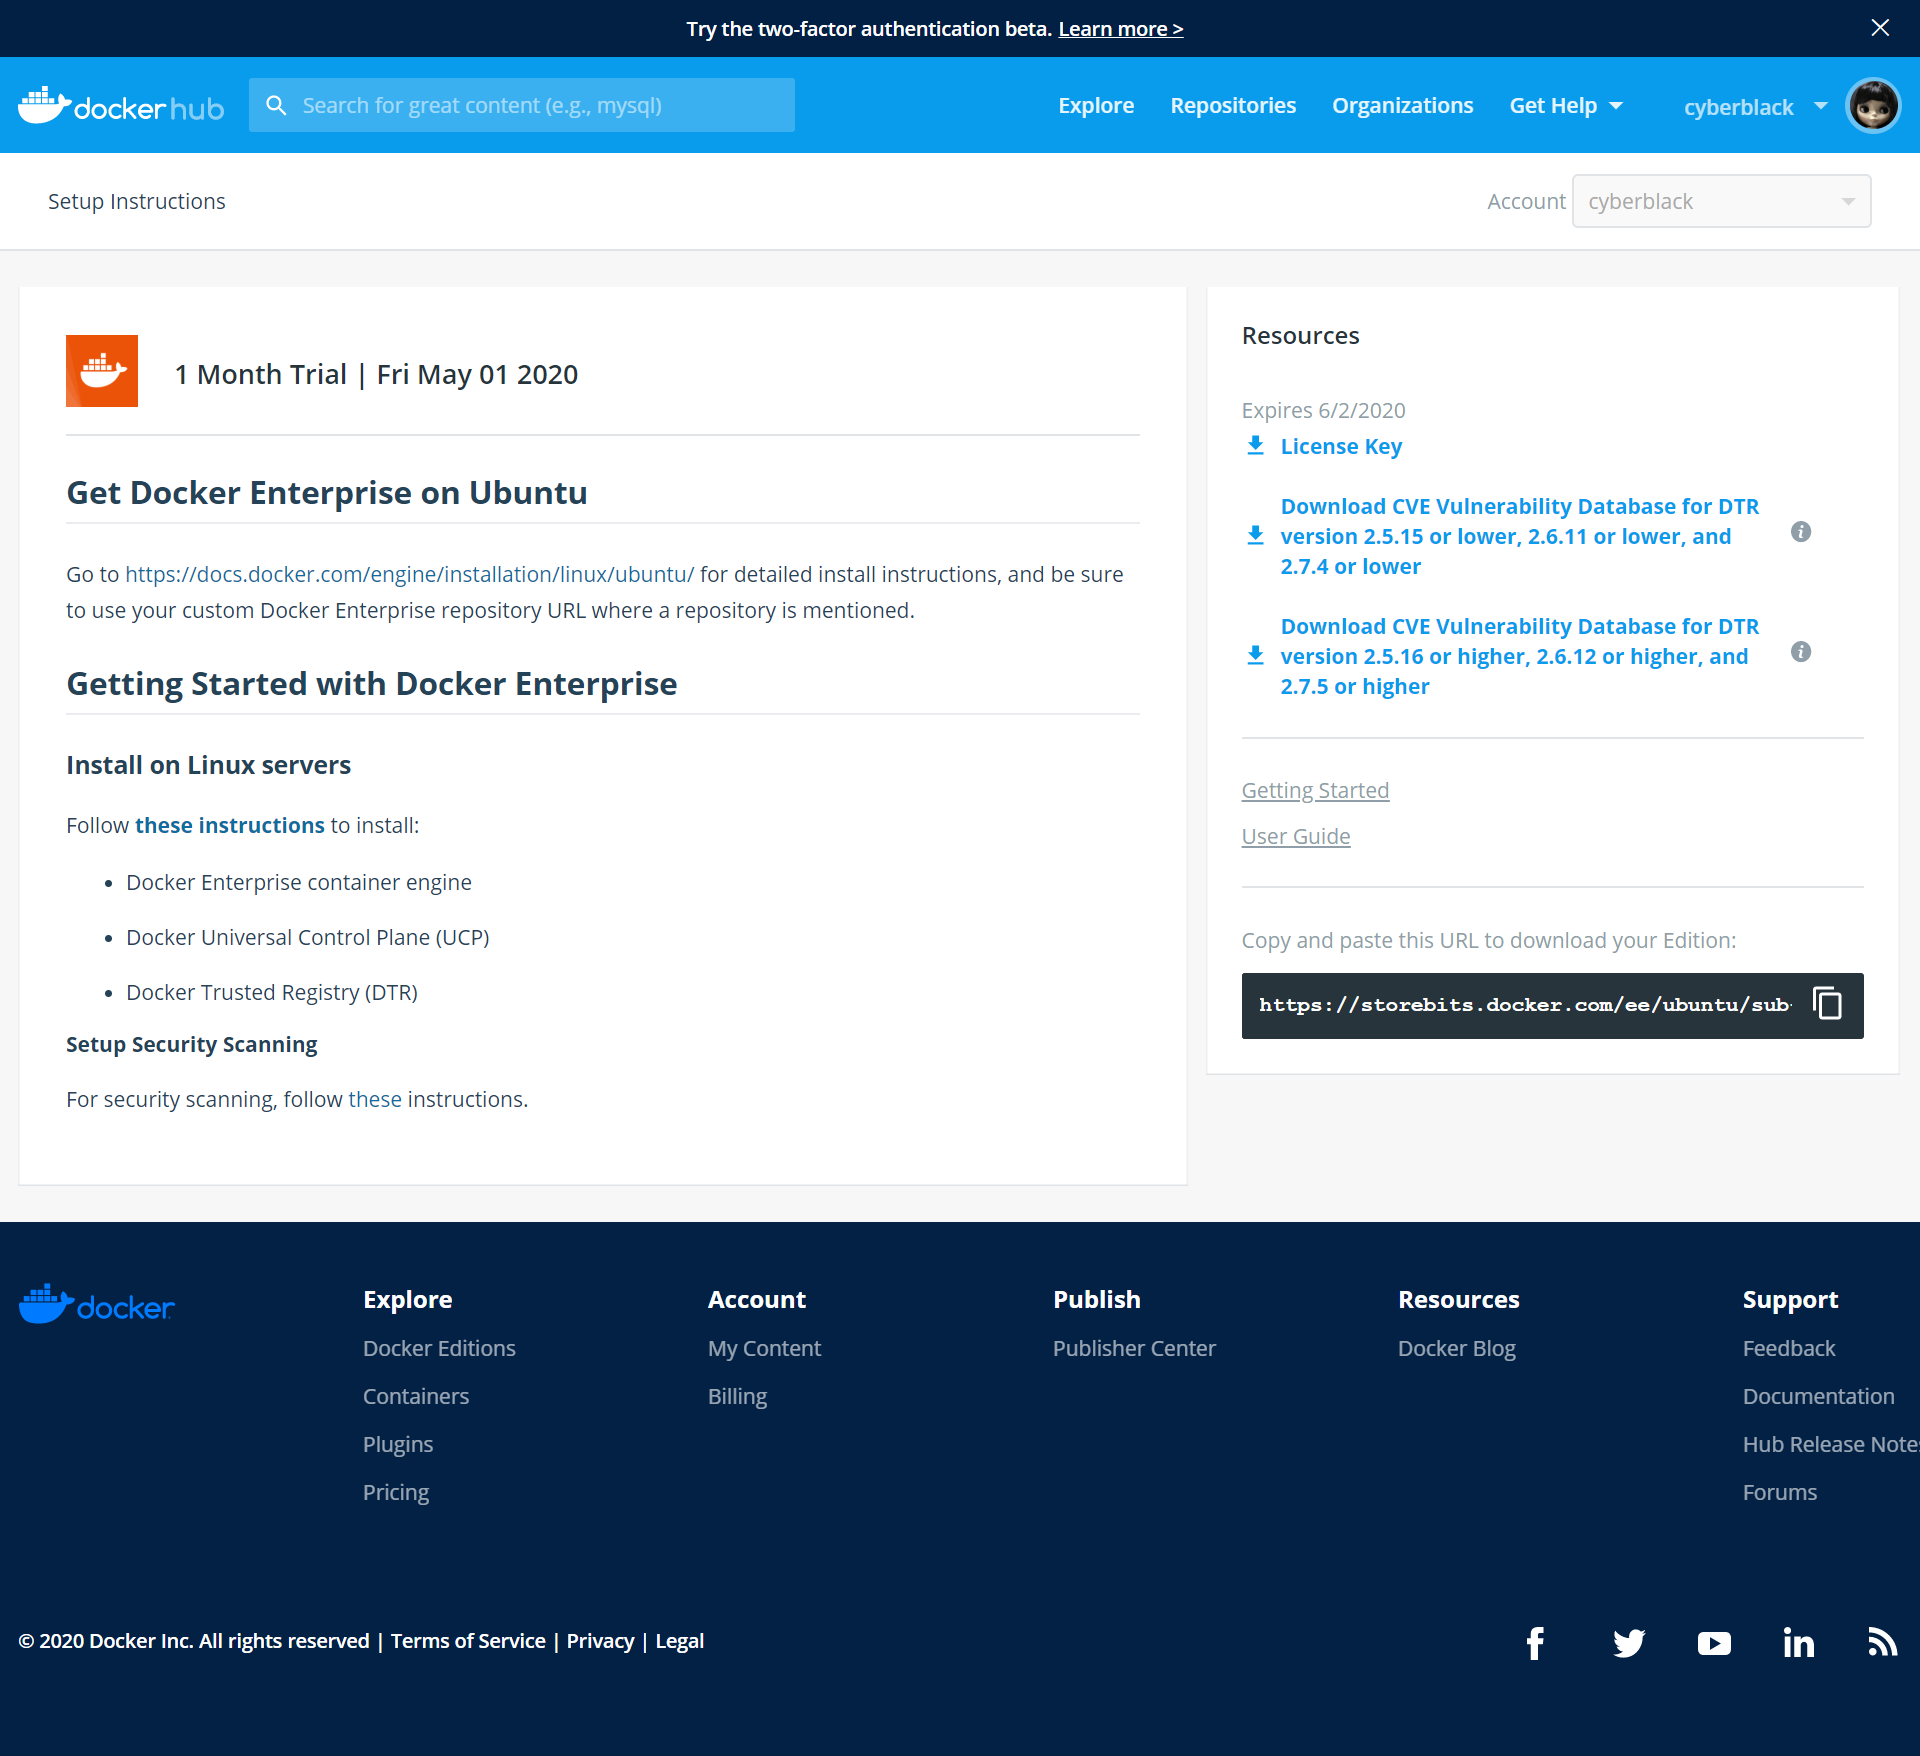
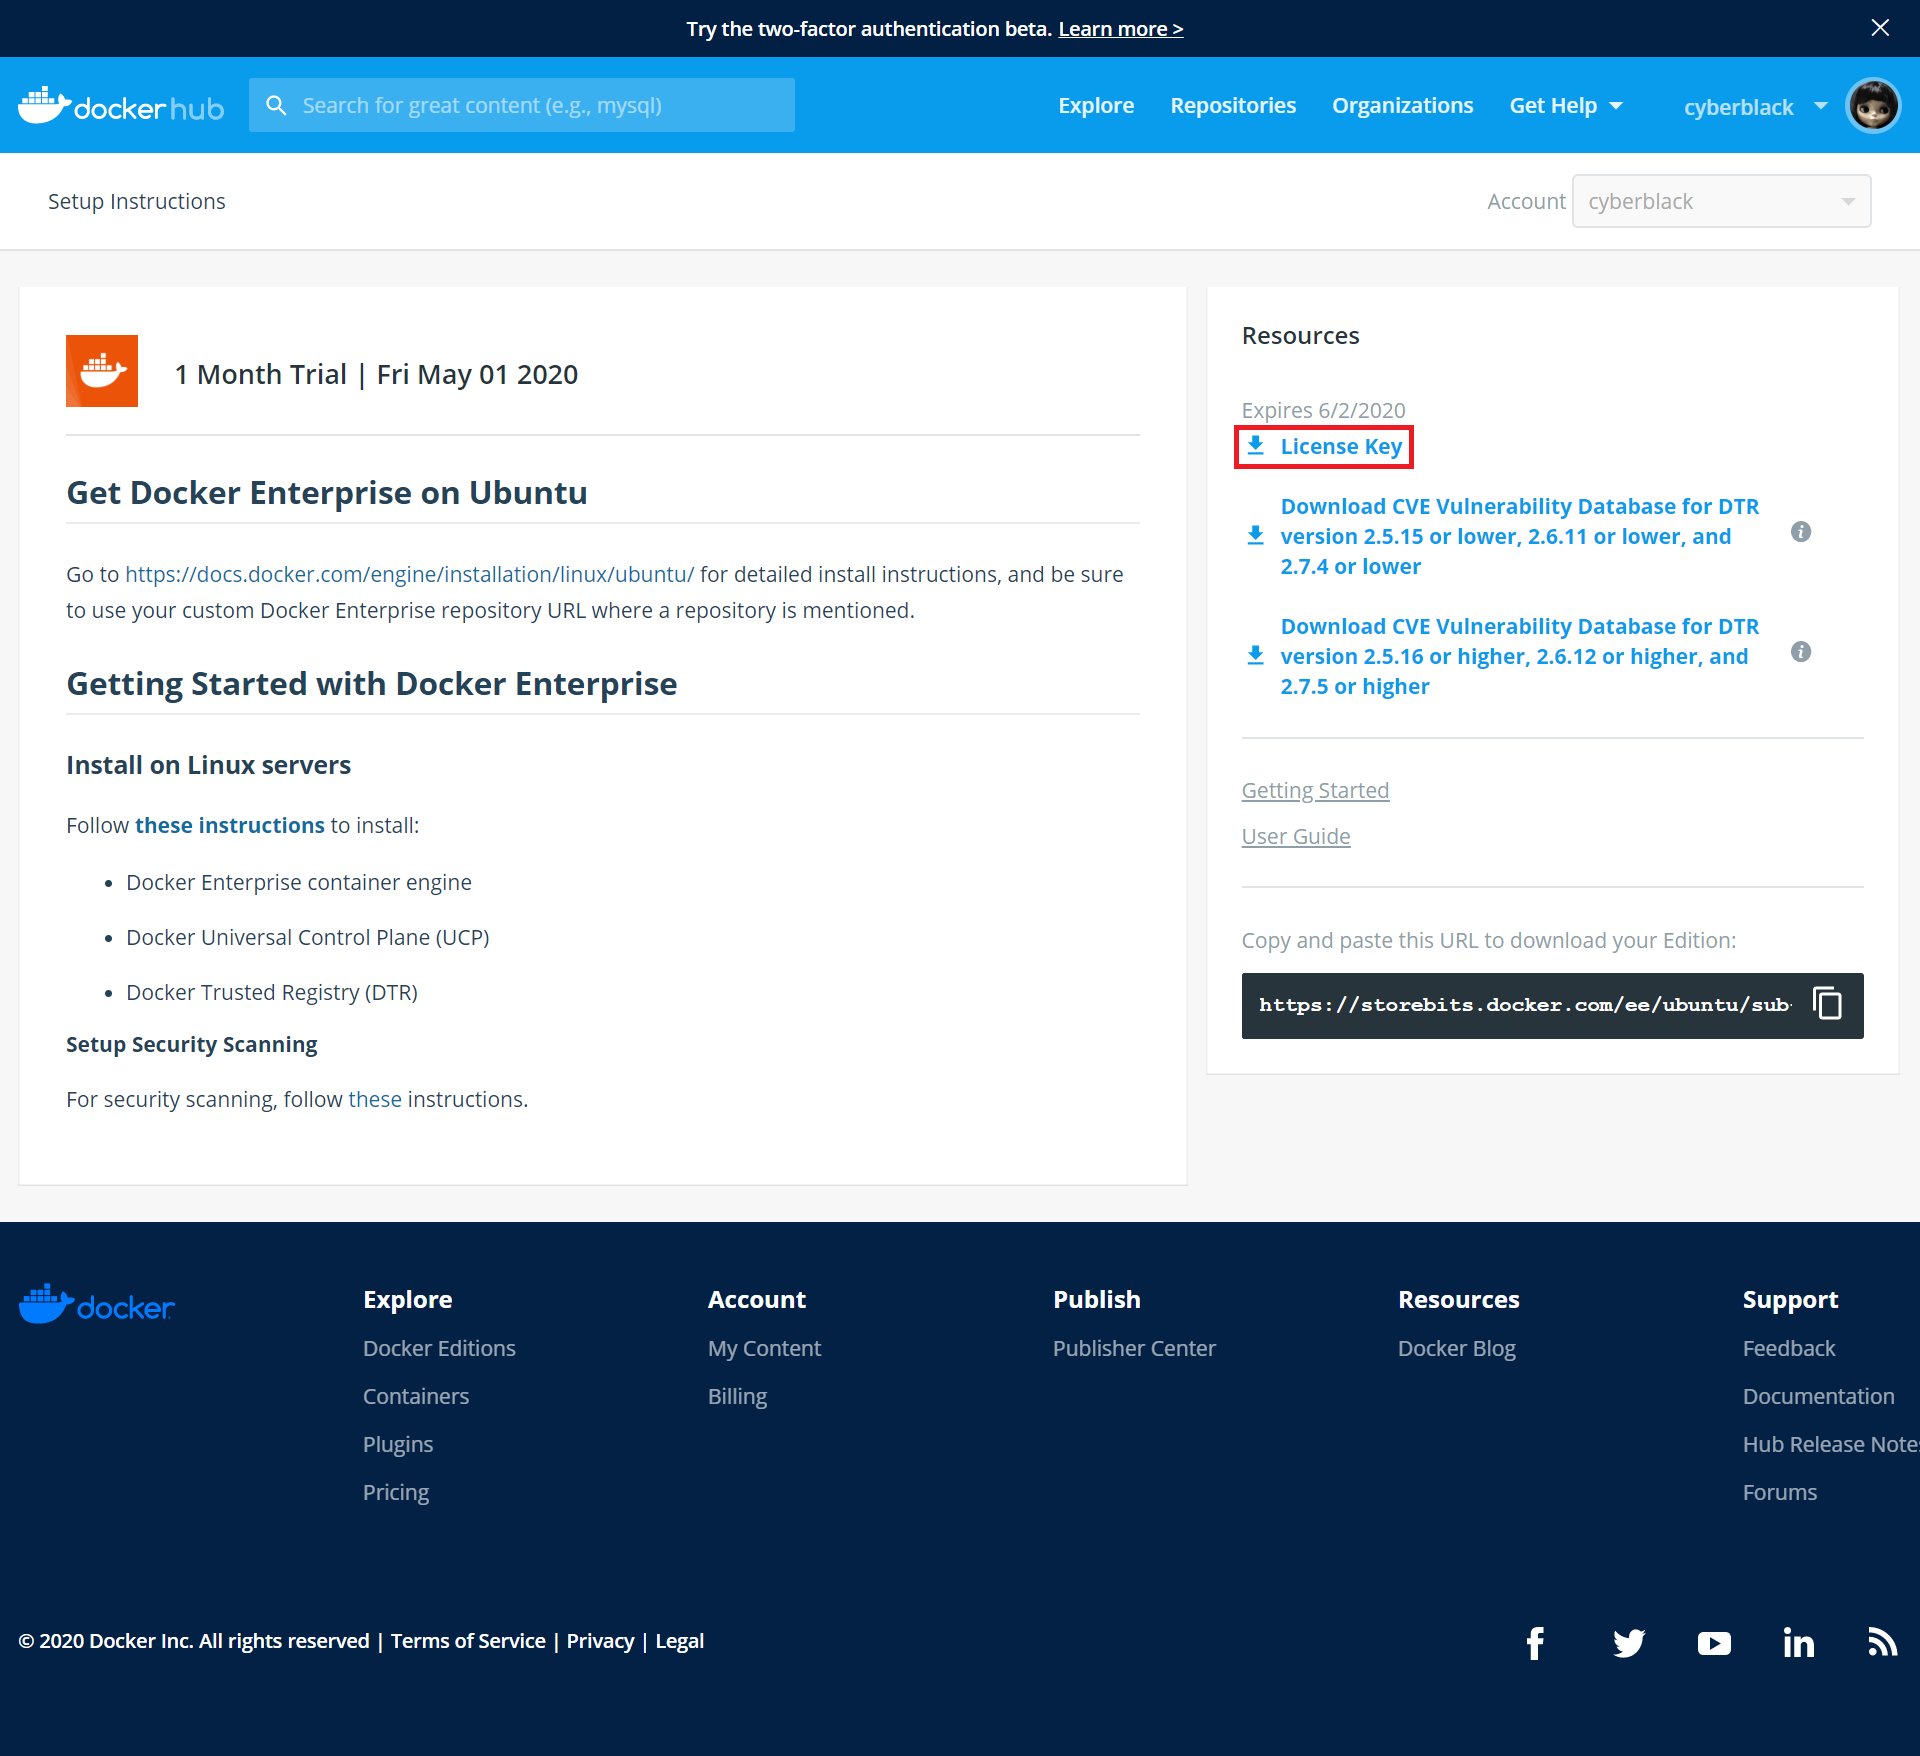
ライセンスファイルは、Universal Control Plane(UCP)インストール後に必要となるので、ダウンロードしておきます。
「License Key」をクリックします。
3.Docker EE Setup
1.aptパッケージのアップデート
$ sudo apt-get update
Hit:1 http://asia-northeast1.gce.archive.ubuntu.com/ubuntu bionic InRelease
Get:2 http://asia-northeast1.gce.archive.ubuntu.com/ubuntu bionic-updates InRelease [88.7 kB]
Get:3 http://asia-northeast1.gce.archive.ubuntu.com/ubuntu bionic-backports InRelease [74.6 kB]
Get:4 http://asia-northeast1.gce.archive.ubuntu.com/ubuntu bionic/universe amd64 Packages [8570 kB]
Get:5 http://security.ubuntu.com/ubuntu bionic-security InRelease [88.7 kB]
Get:6 http://asia-northeast1.gce.archive.ubuntu.com/ubuntu bionic/universe Translation-en [4941 kB]
Get:7 http://archive.canonical.com/ubuntu bionic InRelease [10.2 kB]
Get:8 http://asia-northeast1.gce.archive.ubuntu.com/ubuntu bionic/multiverse amd64 Packages [151 kB]
Get:9 http://asia-northeast1.gce.archive.ubuntu.com/ubuntu bionic/multiverse Translation-en [108 kB]
Get:10 http://asia-northeast1.gce.archive.ubuntu.com/ubuntu bionic-updates/main amd64 Packages [932 kB]
Get:11 http://asia-northeast1.gce.archive.ubuntu.com/ubuntu bionic-updates/restricted amd64 Packages [50.1 kB]
Get:12 http://asia-northeast1.gce.archive.ubuntu.com/ubuntu bionic-updates/universe amd64 Packages [1068 kB]
Get:13 http://asia-northeast1.gce.archive.ubuntu.com/ubuntu bionic-updates/universe Translation-en [332 kB]
Get:14 http://asia-northeast1.gce.archive.ubuntu.com/ubuntu bionic-updates/multiverse amd64 Packages [15.5 kB]
Get:15 http://asia-northeast1.gce.archive.ubuntu.com/ubuntu bionic-updates/multiverse Translation-en [6352 B]
Get:16 http://asia-northeast1.gce.archive.ubuntu.com/ubuntu bionic-backports/main amd64 Packages [7516 B]
Get:17 http://asia-northeast1.gce.archive.ubuntu.com/ubuntu bionic-backports/main Translation-en [4764 B]
Get:18 http://asia-northeast1.gce.archive.ubuntu.com/ubuntu bionic-backports/universe amd64 Packages [7484 B]
Get:19 http://asia-northeast1.gce.archive.ubuntu.com/ubuntu bionic-backports/universe Translation-en [4436 B]
Get:20 http://archive.canonical.com/ubuntu bionic/partner amd64 Packages [2300 B]
Get:21 http://archive.canonical.com/ubuntu bionic/partner Translation-en [1332 B]
Get:22 http://security.ubuntu.com/ubuntu bionic-security/main amd64 Packages [707 kB]
Get:23 http://security.ubuntu.com/ubuntu bionic-security/universe amd64 Packages [660 kB]
Get:24 http://security.ubuntu.com/ubuntu bionic-security/universe Translation-en [219 kB]
Get:25 http://security.ubuntu.com/ubuntu bionic-security/multiverse amd64 Packages [7392 B]
Get:26 http://security.ubuntu.com/ubuntu bionic-security/multiverse Translation-en [2788 B]
Fetched 18.1 MB in 4s (4565 kB/s)
Reading package lists... Done
2.パッケージのインストール
$ sudo apt-get install apt-transport-https ca-certificates curl software-properties-common
Reading package lists... Done
Building dependency tree
Reading state information... Done
ca-certificates is already the newest version (20180409).
ca-certificates set to manually installed.
curl is already the newest version (7.58.0-2ubuntu3.8).
curl set to manually installed.
software-properties-common is already the newest version (0.96.24.32.12).
software-properties-common set to manually installed.
The following packages were automatically installed and are no longer required:
  grub-pc-bin libnuma1
Use 'sudo apt autoremove' to remove them.
The following NEW packages will be installed:
  apt-transport-https
0 upgraded, 1 newly installed, 0 to remove and 2 not upgraded.
Need to get 1692 B of archives.
After this operation, 153 kB of additional disk space will be used.
Do you want to continue? [Y/n] Y
Get:1 http://asia-northeast1.gce.archive.ubuntu.com/ubuntu bionic-updates/universe amd64 apt-transport-https all 1.6.12 [1692 B]
Fetched 1692 B in 0s (10.3 kB/s)
Selecting previously unselected package apt-transport-https.
(Reading database ... 65406 files and directories currently installed.)
Preparing to unpack .../apt-transport-https_1.6.12_all.deb ...
Unpacking apt-transport-https (1.6.12) ...
Setting up apt-transport-https (1.6.12) ...
3.環境変数作成
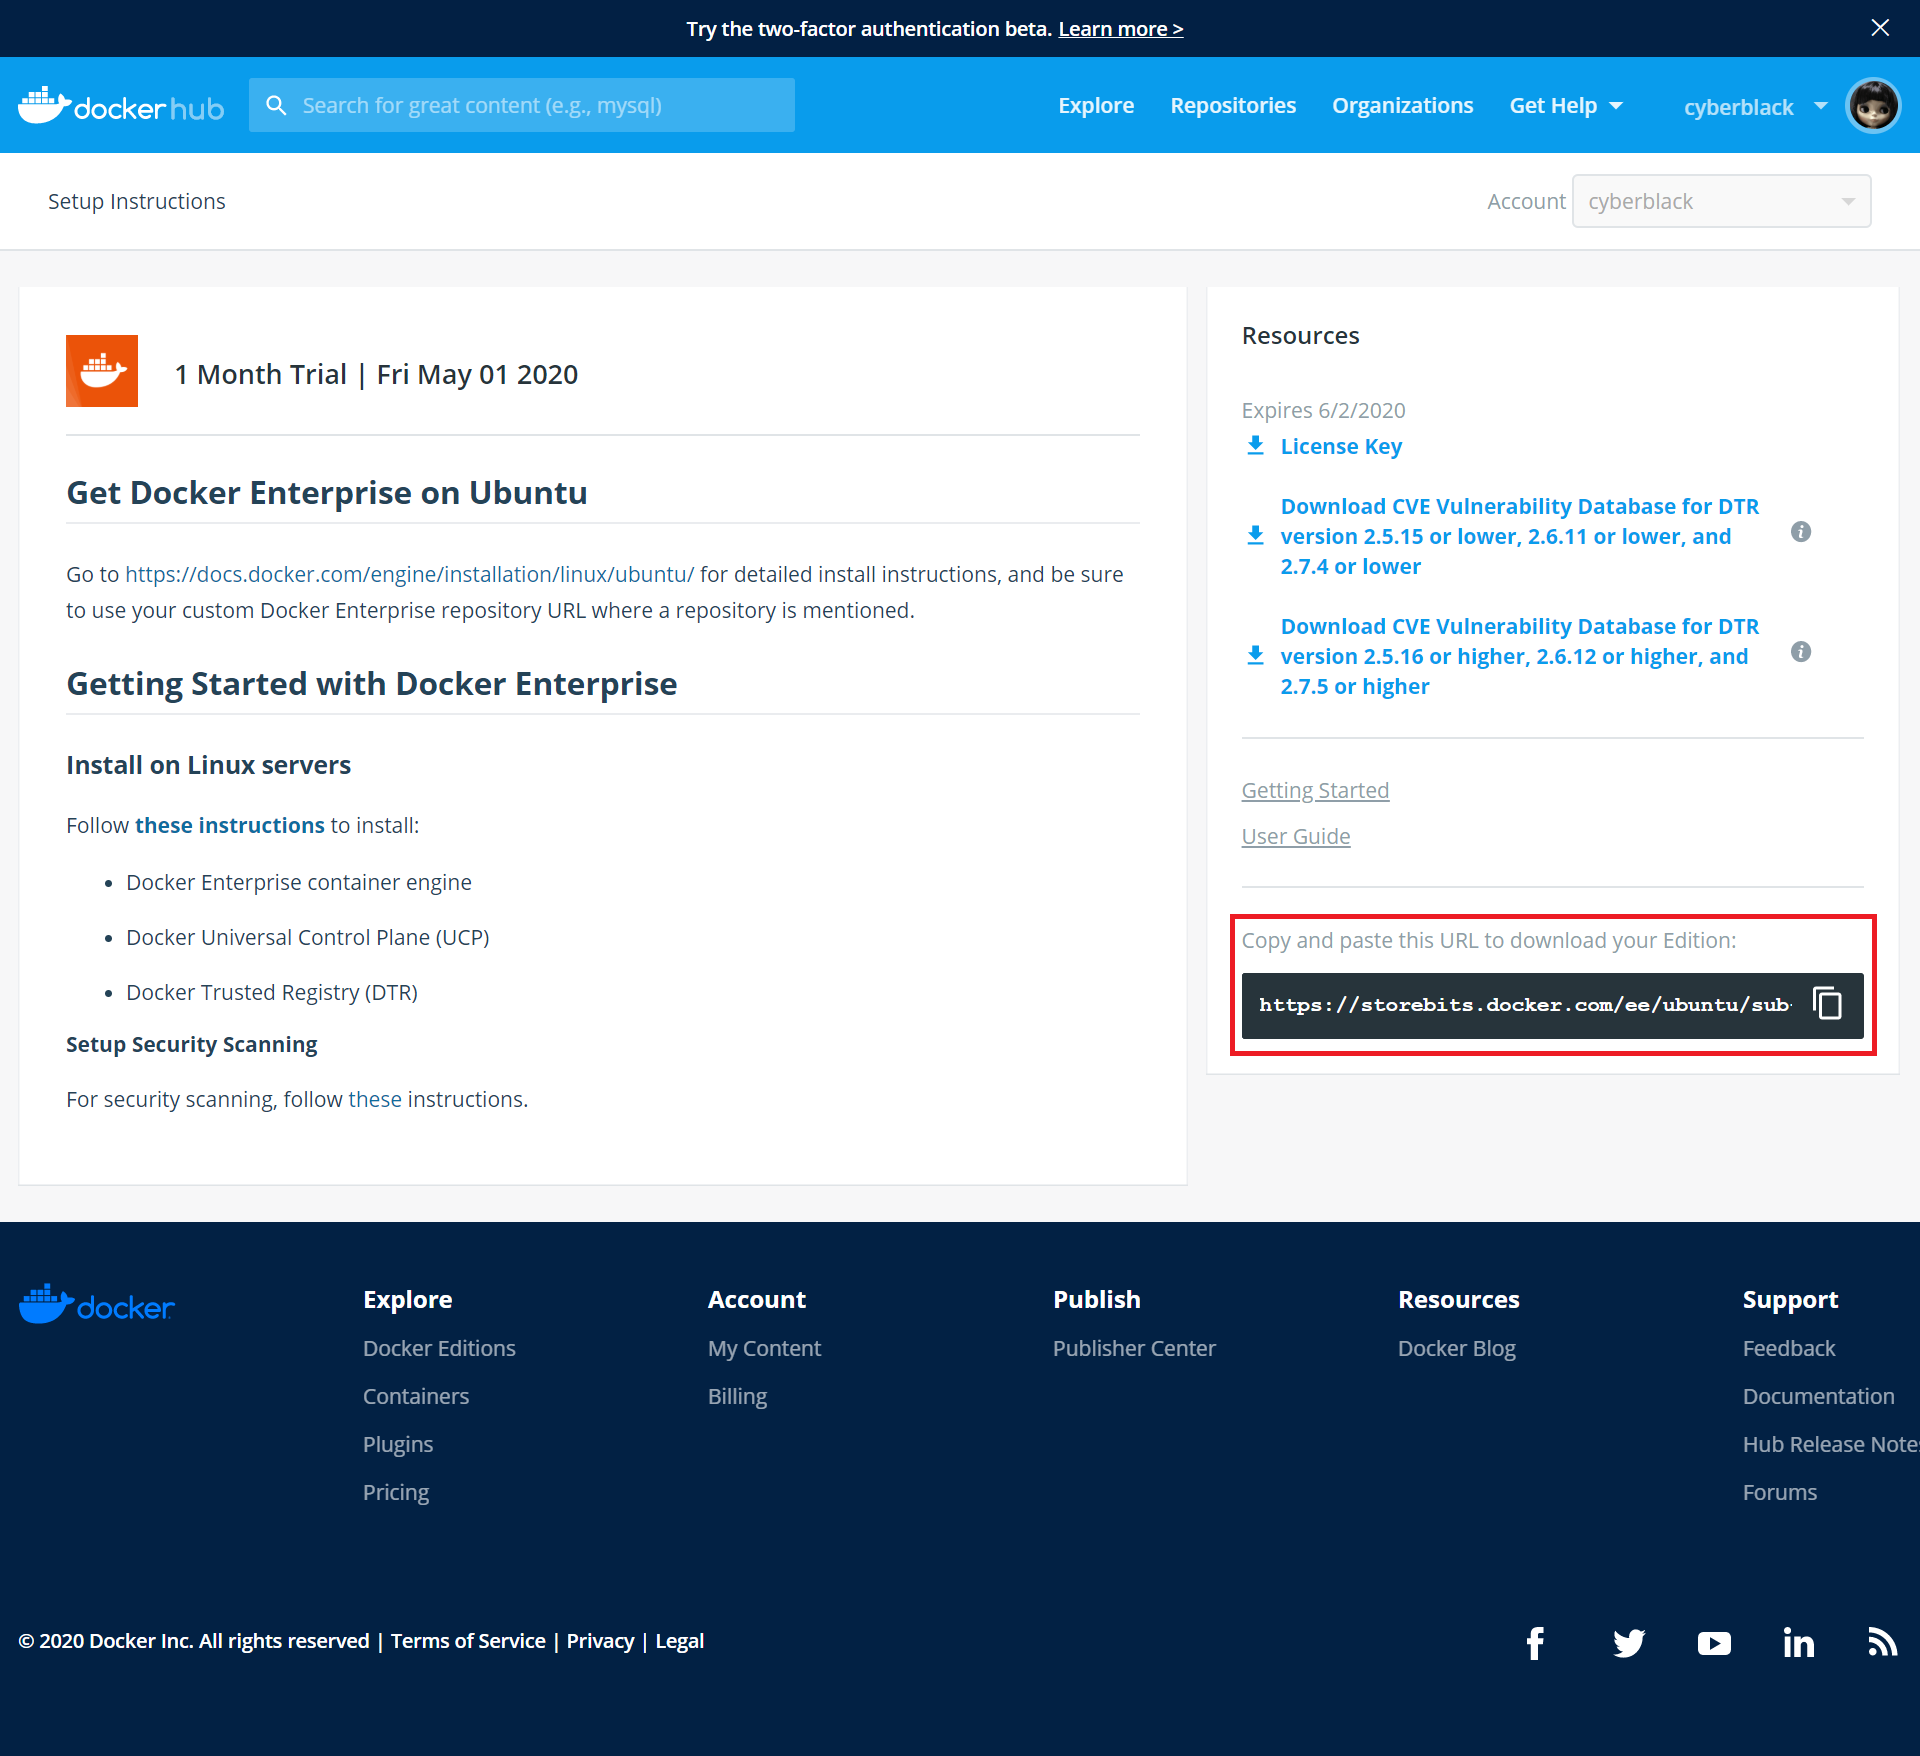
サブスクリプション情報を含むDocker EE URLの環境変数を作成します。
$ DOCKER_EE_URL="https://storebits.docker.com/ee/ubuntu/sub-xxxxxxxx-xxxx-xxxx-xxxx-xxxxxxxxxxxx"
サブスクリプション情報は、DockerHubで確認できます。
Dockerのバージョンの環境変数を作成します。
$ DOCKER_EE_VERSION=19.03
4.GPGキーの追加
GPGキーの追加を追加します。
$ curl -fsSL "${DOCKER_EE_URL}/ubuntu/gpg" | sudo apt-key add -
OK
追加したGPGキーのフィンガープリントがDD91 1E99 5A64 A202 E859 07D6 BC14 F10B 6D08 5F96であることを確認します。
$ sudo apt-key fingerprint 6D085F96
pub   rsa4096 2017-02-22 [SCEA]
      DD91 1E99 5A64 A202 E859  07D6 BC14 F10B 6D08 5F96
uid           [ unknown] Docker Release (EE deb) <docker@docker.com>
sub   rsa4096 2017-02-22 [S]
5.Stableレポジトリ設定
Stableレポジトリの」設定をします。
$ sudo add-apt-repository "deb [arch=$(dpkg --print-architecture)] $DOCKER_EE_URL/ubuntu $(lsb_release -cs) stable-$DOCKER_EE_VERSION"
Hit:1 http://asia-northeast1.gce.archive.ubuntu.com/ubuntu bionic InRelease
Hit:2 http://asia-northeast1.gce.archive.ubuntu.com/ubuntu bionic-updates InRelease
Hit:3 http://asia-northeast1.gce.archive.ubuntu.com/ubuntu bionic-backports InRelease
Hit:4 http://archive.canonical.com/ubuntu bionic InRelease
Hit:5 http://security.ubuntu.com/ubuntu bionic-security InRelease
Get:6 https://storebits.docker.com/ee/ubuntu/sub-69f12d40-35d8-44e6-ae75-640b618b3867/ubuntu bionic InRelease [116 kB]
Get:7 https://storebits.docker.com/ee/ubuntu/sub-69f12d40-35d8-44e6-ae75-640b618b3867/ubuntu bionic/stable-19.03 amd64 Packages [3919 B]
Fetched 120 kB in 3s (40.1 kB/s)
Reading package lists... Done
6.Docker Engine (Enterprise) インストール
パッケージをアップデートします。
$ sudo apt-get update
Hit:1 http://asia-northeast1.gce.archive.ubuntu.com/ubuntu bionic InRelease
Hit:2 http://asia-northeast1.gce.archive.ubuntu.com/ubuntu bionic-updates InRelease
Hit:3 http://asia-northeast1.gce.archive.ubuntu.com/ubuntu bionic-backports InRelease
Hit:4 http://security.ubuntu.com/ubuntu bionic-security InRelease
Hit:5 http://archive.canonical.com/ubuntu bionic InRelease
Hit:6 https://storebits.docker.com/ee/ubuntu/sub-69f12d40-35d8-44e6-ae75-640b618b3867/ubuntu bionic InRelease
Reading package lists... Done
Docker Engineをインストールします。
$ sudo apt-get install docker-ee docker-ee-cli containerd.io
Reading package lists... Done
Building dependency tree
Reading state information... Done
The following packages were automatically installed and are no longer required:
  grub-pc-bin libnuma1
Use 'sudo apt autoremove' to remove them.
The following additional packages will be installed:
  aufs-tools cgroupfs-mount libltdl7 pigz
The following NEW packages will be installed:
  aufs-tools cgroupfs-mount containerd.io docker-ee docker-ee-cli libltdl7 pigz
0 upgraded, 7 newly installed, 0 to remove and 2 not upgraded.
Need to get 149 MB of archives.
After this operation, 627 MB of additional disk space will be used.
Do you want to continue? [Y/n] Y
Get:1 http://asia-northeast1.gce.archive.ubuntu.com/ubuntu bionic/universe amd64 pigz amd64 2.4-1 [57.4 kB]
Get:2 http://asia-northeast1.gce.archive.ubuntu.com/ubuntu bionic/universe amd64 aufs-tools amd64 1:4.9+20170918-1ubuntu1 [104 kB]
Get:3 http://asia-northeast1.gce.archive.ubuntu.com/ubuntu bionic/universe amd64 cgroupfs-mount all 1.4 [6320 B]
Get:4 http://asia-northeast1.gce.archive.ubuntu.com/ubuntu bionic/main amd64 libltdl7 amd64 2.4.6-2 [38.8 kB]
Get:5 https://storebits.docker.com/ee/ubuntu/sub-69f12d40-35d8-44e6-ae75-640b618b3867/ubuntu bionic/stable-19.03 amd64 containerd.io amd64 1.2.6-3 [22.6 MB]
Get:6 https://storebits.docker.com/ee/ubuntu/sub-69f12d40-35d8-44e6-ae75-640b618b3867/ubuntu bionic/stable-19.03 amd64 docker-ee-cli amd64 5:19.03.5~3-0~ubuntu-bionic [102 MB]
Get:7 https://storebits.docker.com/ee/ubuntu/sub-69f12d40-35d8-44e6-ae75-640b618b3867/ubuntu bionic/stable-19.03 amd64 docker-ee amd64 5:19.03.5~3-0~ubuntu-bionic [24.8 MB]
Fetched 149 MB in 18s (8298 kB/s)
Selecting previously unselected package pigz.
(Reading database ... 65410 files and directories currently installed.)
Preparing to unpack .../0-pigz_2.4-1_amd64.deb ...
Unpacking pigz (2.4-1) ...
Selecting previously unselected package aufs-tools.
Preparing to unpack .../1-aufs-tools_1%3a4.9+20170918-1ubuntu1_amd64.deb ...
Unpacking aufs-tools (1:4.9+20170918-1ubuntu1) ...
Selecting previously unselected package cgroupfs-mount.
Preparing to unpack .../2-cgroupfs-mount_1.4_all.deb ...
Unpacking cgroupfs-mount (1.4) ...
Selecting previously unselected package containerd.io.
Preparing to unpack .../3-containerd.io_1.2.6-3_amd64.deb ...
Unpacking containerd.io (1.2.6-3) ...
Selecting previously unselected package docker-ee-cli.
Preparing to unpack .../4-docker-ee-cli_5%3a19.03.5~3-0~ubuntu-bionic_amd64.deb ...
Unpacking docker-ee-cli (5:19.03.5~3-0~ubuntu-bionic) ...
Selecting previously unselected package docker-ee.
Preparing to unpack .../5-docker-ee_5%3a19.03.5~3-0~ubuntu-bionic_amd64.deb ...
Unpacking docker-ee (5:19.03.5~3-0~ubuntu-bionic) ...
Selecting previously unselected package libltdl7:amd64.
Preparing to unpack .../6-libltdl7_2.4.6-2_amd64.deb ...
Unpacking libltdl7:amd64 (2.4.6-2) ...
Setting up aufs-tools (1:4.9+20170918-1ubuntu1) ...
Setting up containerd.io (1.2.6-3) ...
Created symlink /etc/systemd/system/multi-user.target.wants/containerd.service → /lib/systemd/system/containerd.service.
Setting up cgroupfs-mount (1.4) ...
Setting up docker-ee-cli (5:19.03.5~3-0~ubuntu-bionic) ...
Setting up libltdl7:amd64 (2.4.6-2) ...
Setting up docker-ee (5:19.03.5~3-0~ubuntu-bionic) ...
Created symlink /etc/systemd/system/multi-user.target.wants/docker.service → /lib/systemd/system/docker.service.
Created symlink /etc/systemd/system/sockets.target.wants/docker.socket → /lib/systemd/system/docker.socket.
Setting up pigz (2.4-1) ...
Processing triggers for libc-bin (2.27-3ubuntu1) ...
Processing triggers for systemd (237-3ubuntu10.39) ...
Processing triggers for man-db (2.8.3-2ubuntu0.1) ...
Processing triggers for ureadahead (0.100.0-21) ...
インストールできていることを確認します。
$ sudo docker version
Client: Docker Engine - Enterprise
 Version:           19.03.5
 API version:       1.40
 Go version:        go1.12.12
 Git commit:        2ee0c57608
 Built:             Wed Nov 13 07:45:31 2019
 OS/Arch:           linux/amd64
 Experimental:      false

Server: Docker Engine - Enterprise
 Engine:
  Version:          19.03.5
  API version:      1.40 (minimum version 1.12)
  Go version:       go1.12.12
  Git commit:       2ee0c57608
  Built:            Wed Nov 13 07:43:49 2019
  OS/Arch:          linux/amd64
  Experimental:     false
 containerd:
  Version:          1.2.6
  GitCommit:        894b81a4b802e4eb2a91d1ce216b8817763c29fb
 runc:
  Version:          1.0.0-rc8
  GitCommit:        425e105d5a03fabd737a126ad93d62a9eeede87f
 docker-init:
  Version:          0.18.0
  GitCommit:        fec3683
sudoなしでdockerコマンドを実行する場合は、以下コマンドを実行して、再ログインします。
$ sudo usermod -aG docker $USER
$ exit
2.Universal Control Plane(UCP)のインストール
host-addressにUCPをインストールするインスタンスのURLまたはIPアドレスを入力します。
今回はGCPで行います。GCPの場合、host-addressには内部IPを入力します。外部IPではエラーとなります。
「Admin Username:」と「Admin Password:」では、任意のものを入力します。UCP管理画面のログインIDとPASSになります。
「Additional aliases:」は、Enterキーを押します。
$ docker container run --rm -it --name ucp -v /var/run/docker.sock:/var/run/docker.sock docker/ucp:3.2.6 install --host-address 10.146.0.16 --interactive
Unable to find image 'docker/ucp:3.2.6' locally
3.2.6: Pulling from docker/ucp
4167d3e14976: Pull complete
af325902296c: Pull complete
1c053272dca9: Pull complete
Digest: sha256:8ef41e8fa4b40ede84fc8633a28f61ed0bae009e293aad9f1a9fb042fcab8688
Status: Downloaded newer image for docker/ucp:3.2.6
INFO[0000] Your Docker daemon version 19.03.5, build 2ee0c57608 (5.3.0-1018-gcp) is compatible with UCP 3.2.6 (04ac981)
INFO[0000] Initializing New Docker Swarm
Admin Username: admin
Admin Password:
Confirm Admin Password:
WARN[0022] None of the Subject Alternative Names we'll be using in the UCP certificates ["instance-1"] contain a domain component. Your generated certs may fail TLS validation unless you only use one of these shortnames or IP addresses to connect. You can use the --san flag to add more aliases

You may enter additional aliases (SANs) now or press enter to proceed with the above list.
Additional aliases:
INFO[0033] Checking required ports for connectivity
INFO[0048] Checking required container images
INFO[0048] Pulling required images... (this may take a while)
INFO[0048] Pulling image: docker/ucp-agent:3.2.6
INFO[0052] Pulling image: docker/ucp-auth:3.2.6
INFO[0056] Pulling image: docker/ucp-auth-store:3.2.6
INFO[0063] Pulling image: docker/ucp-azure-ip-allocator:3.2.6
INFO[0067] Pulling image: docker/ucp-calico-cni:3.2.6
INFO[0073] Pulling image: docker/ucp-calico-kube-controllers:3.2.6
INFO[0078] Pulling image: docker/ucp-calico-node:3.2.6
INFO[0084] Pulling image: docker/ucp-cfssl:3.2.6
INFO[0088] Pulling image: docker/ucp-compose:3.2.6
INFO[0102] Pulling image: docker/ucp-controller:3.2.6
INFO[0112] Pulling image: docker/ucp-dsinfo:3.2.6
INFO[0115] Pulling image: docker/ucp-etcd:3.2.6
INFO[0121] Pulling image: docker/ucp-hyperkube:3.2.6
INFO[0134] Pulling image: docker/ucp-interlock:3.2.6
INFO[0137] Pulling image: docker/ucp-interlock-extension:3.2.6
INFO[0143] Pulling image: docker/ucp-interlock-proxy:3.2.6
INFO[0147] Pulling image: docker/ucp-interlock-config:3.2.6
INFO[0151] Pulling image: docker/ucp-kube-compose:3.2.6
INFO[0154] Pulling image: docker/ucp-kube-compose-api:3.2.6
INFO[0157] Pulling image: docker/ucp-kube-dns:3.2.6
INFO[0161] Pulling image: docker/ucp-kube-dns-dnsmasq-nanny:3.2.6
INFO[0165] Pulling image: docker/ucp-kube-dns-sidecar:3.2.6
INFO[0169] Pulling image: docker/ucp-metrics:3.2.6
INFO[0174] Pulling image: docker/ucp-pause:3.2.6
INFO[0177] Pulling image: docker/ucp-swarm:3.2.6
INFO[0180] Completed pulling required images
INFO[0180] Running install agent container ...
INFO[0000] Loading install configuration
INFO[0000] Running Installation Steps
INFO[0000] Step 1 of 35: [Setup Internal Cluster CA]
INFO[0003] Step 2 of 35: [Setup Internal Client CA]
INFO[0003] Step 3 of 35: [Initialize etcd Cluster]
INFO[0007] Step 4 of 35: [Set Initial Config in etcd]
INFO[0007] Step 5 of 35: [Deploy RethinkDB Server]
INFO[0009] Step 6 of 35: [Initialize RethinkDB Tables]
INFO[0015] Step 7 of 35: [Create Auth Service Encryption Key Secret]
INFO[0015] Step 8 of 35: [Deploy Auth API Server]
INFO[0019] Step 9 of 35: [Setup Auth Configuration]
INFO[0020] Step 10 of 35: [Deploy Auth Worker Server]
INFO[0023] Step 11 of 35: [Deploy UCP Proxy Server]
INFO[0024] Step 12 of 35: [Initialize Swarm v1 Node Inventory]
INFO[0024] Step 13 of 35: [Deploy Swarm v1 Manager Server]
INFO[0025] Step 14 of 35: [Deploy Internal Cluster CA Server]
INFO[0026] Step 15 of 35: [Deploy Internal Client CA Server]
INFO[0027] Step 16 of 35: [Deploy UCP Controller Server]
INFO[0036] Step 17 of 35: [Deploy Kubernetes API Server]
INFO[0046] Step 18 of 35: [Deploy Kubernetes Controller Manager]
INFO[0050] Step 19 of 35: [Deploy Kubernetes Scheduler]
INFO[0055] Step 20 of 35: [Deploy Kubelet]
INFO[0056] Step 21 of 35: [Deploy Kubernetes Proxy]
INFO[0057] Step 22 of 35: [Wait for Healthy UCP Controller and Kubernetes API]
INFO[0057] Step 23 of 35: [Create Kubernetes Pod Security Policies]
INFO[0062] Step 24 of 35: [Install Kubernetes CNI Plugin]
INFO[0080] Step 25 of 35: [Install KubeDNS]
INFO[0083] Step 26 of 35: [Create UCP Controller Kubernetes Service Endpoints]
INFO[0091] Step 27 of 35: [Install Metrics Plugin]
INFO[0100] Step 28 of 35: [Install Kubernetes Compose Plugin]
INFO[0115] Step 29 of 35: [Deploy Manager Node Agent Service]
INFO[0115] Step 30 of 35: [Deploy Worker Node Agent Service]
INFO[0115] Step 31 of 35: [Deploy Windows Worker Node Agent Service]
INFO[0115] Step 32 of 35: [Deploy Cluster Agent Service]
INFO[0115] Step 33 of 35: [Set License]
INFO[0115] Step 34 of 35: [Set Registry CA Certificates]
INFO[0115] Step 35 of 35: [Wait for All Nodes to be Ready]
INFO[0120]     Waiting for 1 nodes to be ready
INFO[0126] All Installation Steps Completed
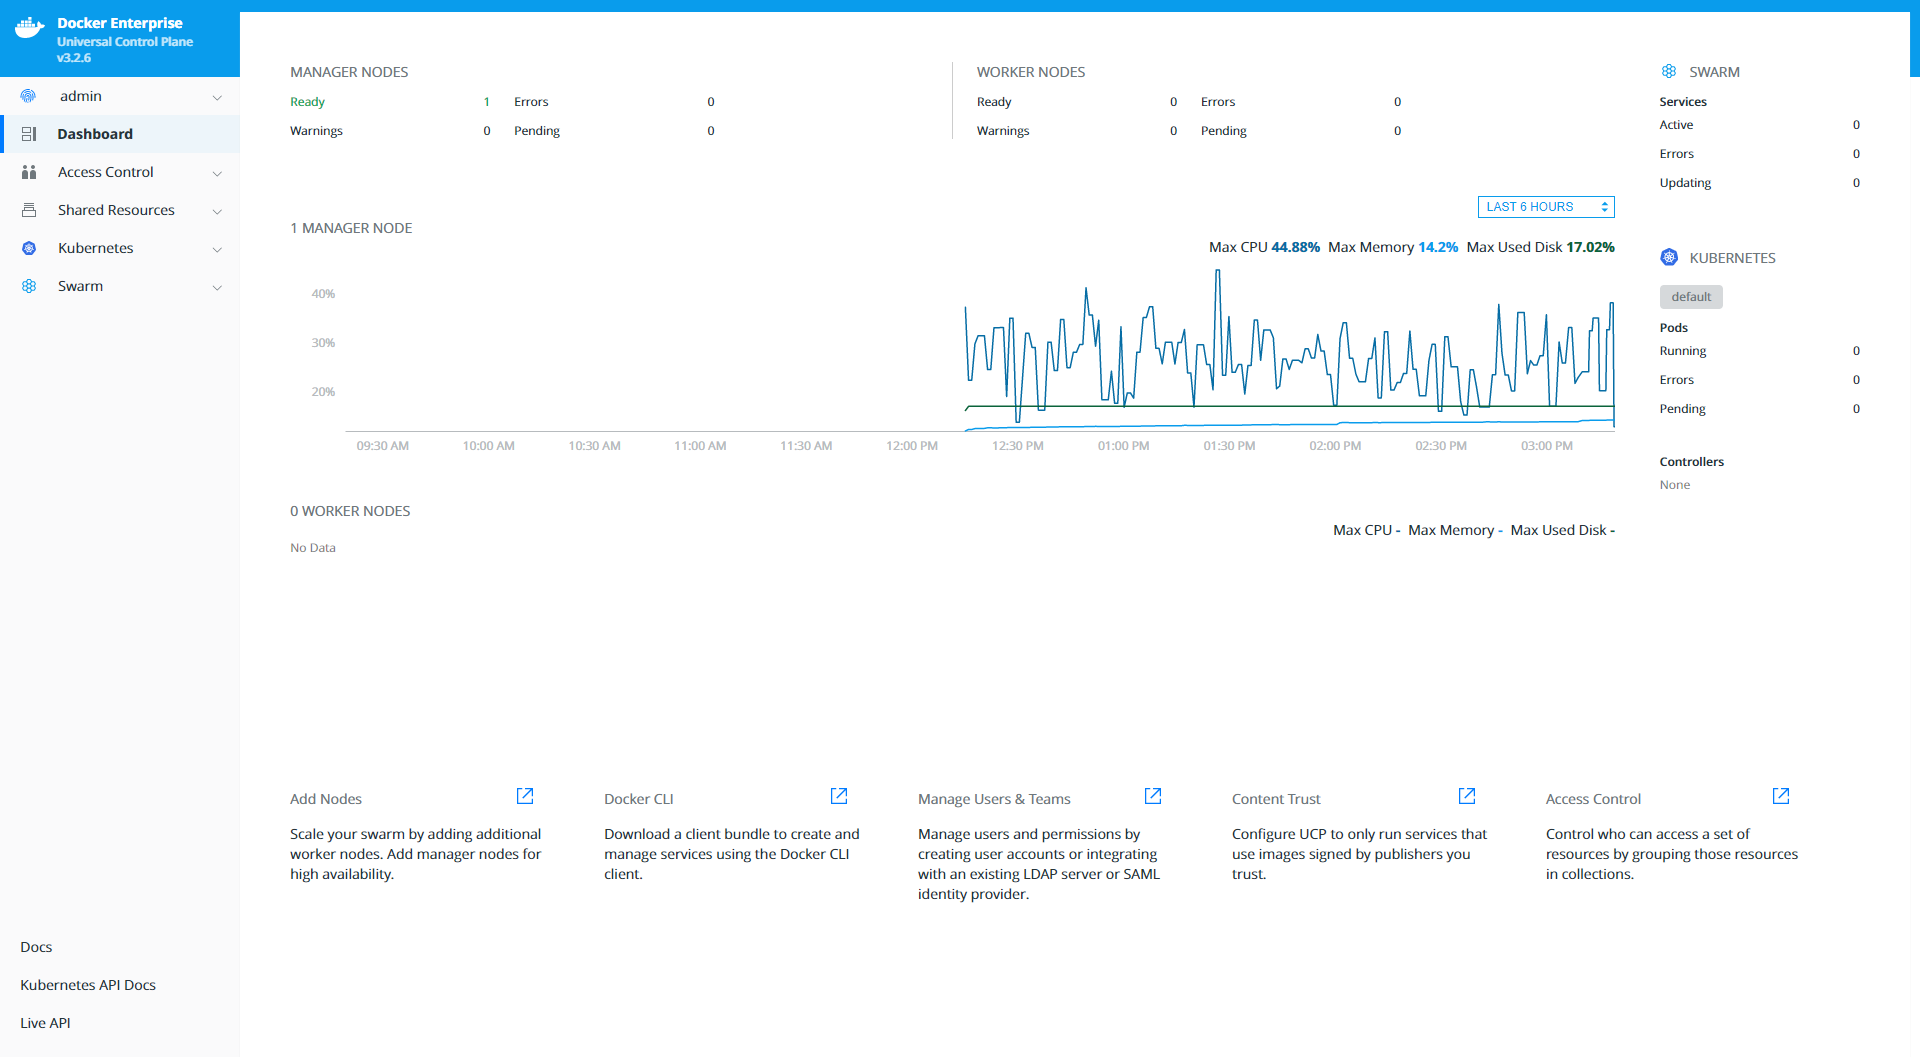
8.UCPアクセス
ブラウザを起動して、インスタンスの外部IPアドレスにアクセスして、インストール時に設定した、UsernameとPasswordでログインします。
「Upload License」ボタンをクリックして、事前にダウンロードしたライセンスファイルを選択します。
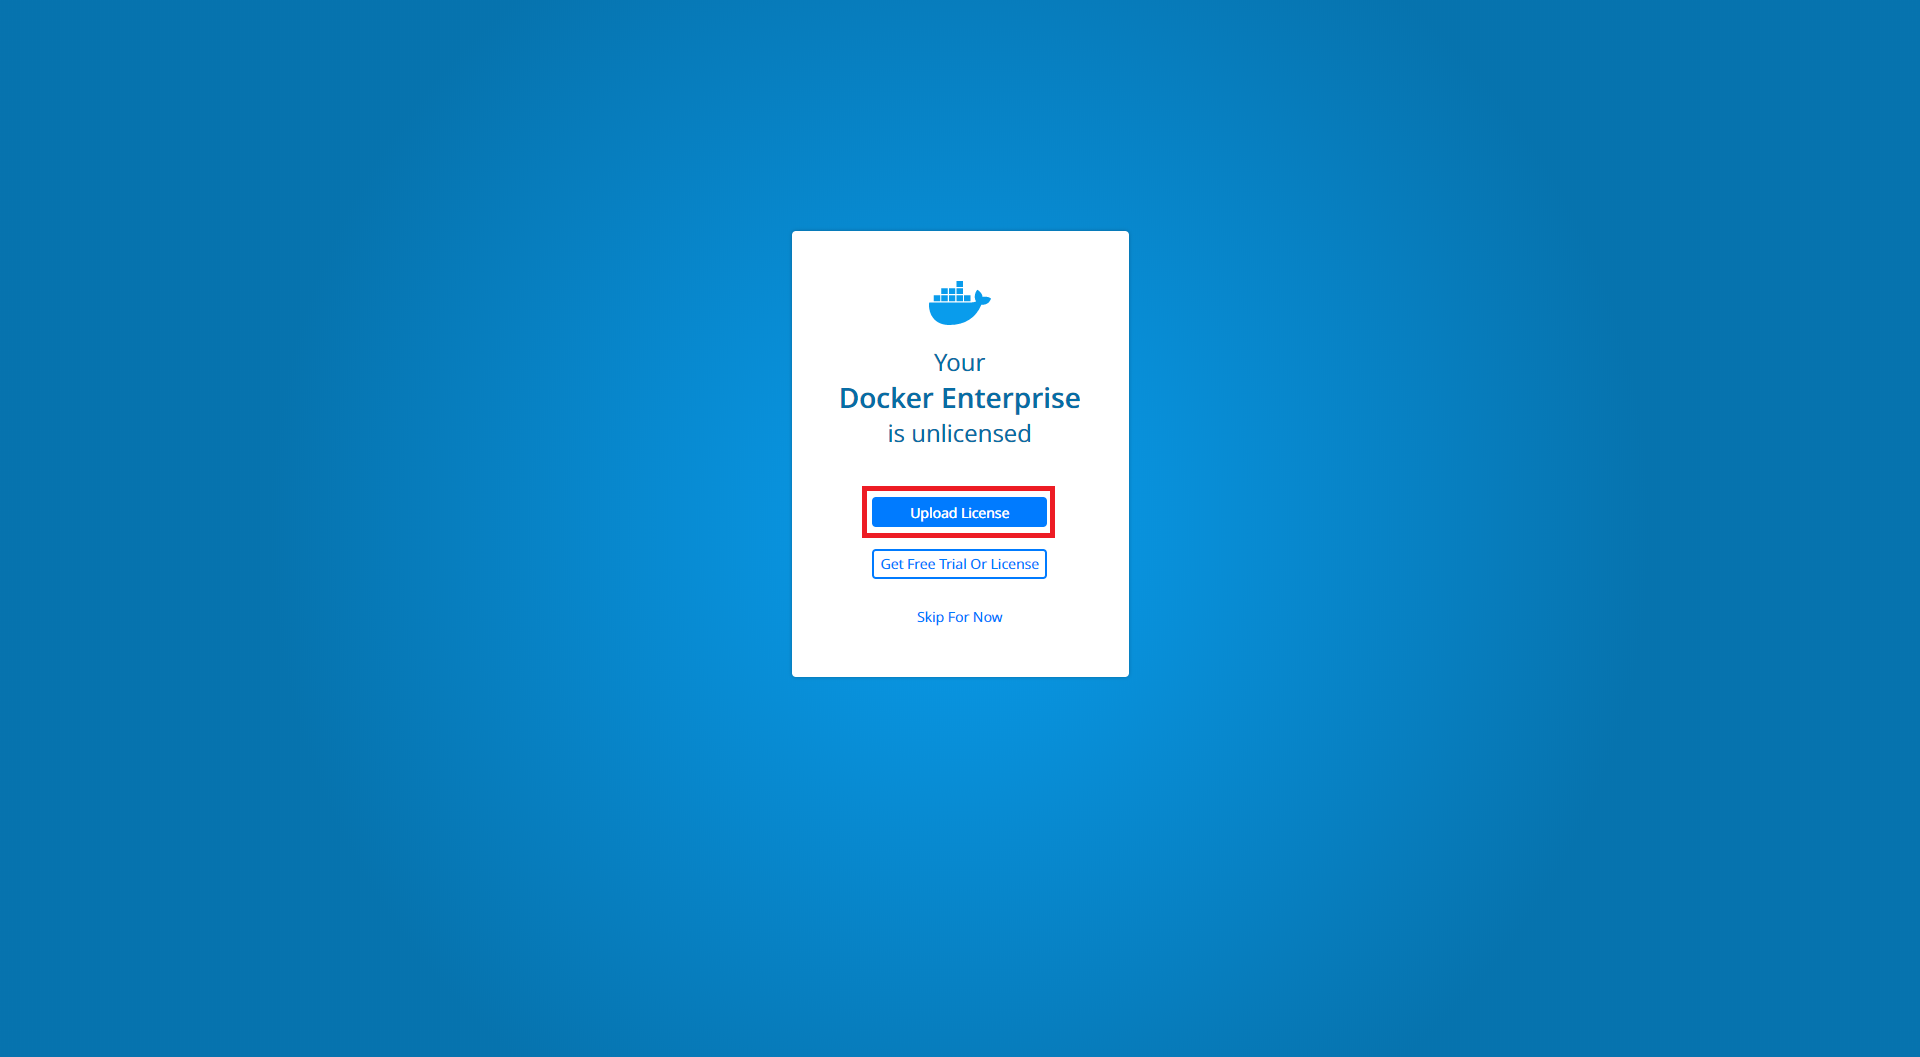
ログイン完了となります。