
2019年11月にCNCF(Cloud Native Computing Foundation)のプロジェクトとして8番目にGraduationしたVitessを試していきたいと思います。まずは環境構築から。
Vitessについては、KubeCon CloudNativeCon NA 2018,2019でRecapした資料がありますのでご参照いただければ幸いです。
- KubeCon CloudNativeCon 2018 Seattle Recap 〜Vitess〜
- KubeCon CloudNativeCon 2019 SanDiego Recap 〜Vitess〜
Vitess公式サイトのチュートリアルはminikubeをベースとしているので、GKE上に構築してみたいと思います。
1.事前準備
操作は、Cloud Shellを利用します。事前にkubernetesクラスタ、kubectl、go、helmが必要となります。Cloud Shellには、helm以外はインストールされているのでhelmをインストールします。
a.kubernetesクラスタ構築
GCPダッシュボードからKubernetesクラスタを構築します。その際のプロビジョニング内容としては以下となります。
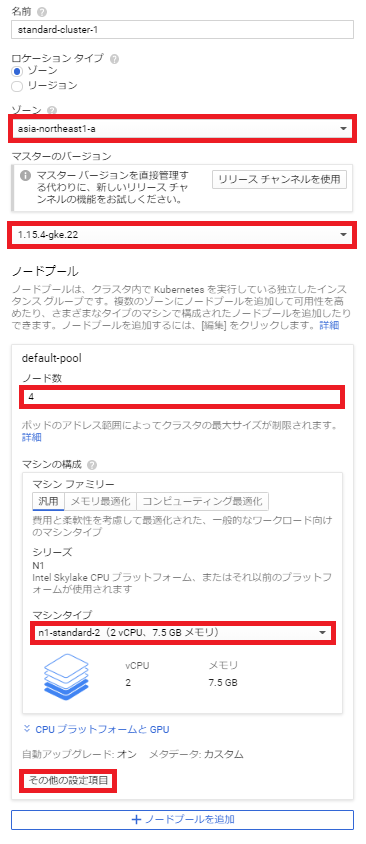
「その他の設定項目」ボタンをクリック後、ノードで「Ubuntu」を選択します。そして、「保存」ボタンをクリックします。

最後に「作成」ボタンをクリックします。
クラスタ構築完了後、「接続」ボタンをクリックしてCloud Shellを起動します。

「Cloud Shellで実行」ボタンをクリック
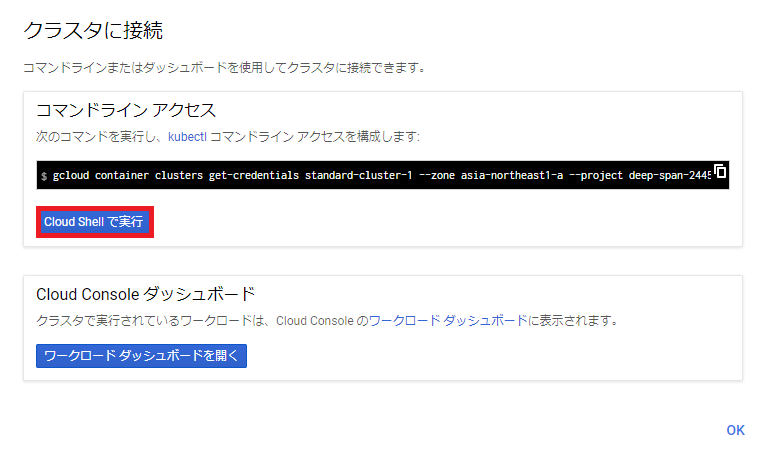
Enterキーを押します。
Welcome to Cloud Shell! Type "help" to get started.
iyutaka2019@cloudshell:~$ gcloud container clusters get-credentials standard-cluster-1 --zone asia-northeast1-a --project xxxxxxxxxxxxxxxxxx
Fetching cluster endpoint and auth data.
kubeconfig entry generated for standard-cluster-1.
b.helmインストール
1.インストールスクリプトのダウンロード
$ curl https://raw.githubusercontent.com/kubernetes/helm/master/scripts/get > get_helm.sh
  % Total    % Received % Xferd  Average Speed   Time    Time     Time  Current
                                 Dload  Upload   Total   Spent    Left  Speed
100  7164  100  7164    0     0  18587      0 --:--:-- --:--:-- --:--:-- 18559
2.スクリプトファイルに権限の付与
$ chmod 700 get_helm.sh
3.スクリプトの実行
$ ./get_helm.sh
Downloading https://get.helm.sh/helm-v2.16.1-linux-amd64.tar.gz
Preparing to install helm and tiller into /usr/local/bin
helm installed into /usr/local/bin/helm
tiller installed into /usr/local/bin/tiller
Run 'helm init' to configure helm.
4.「rbac.yml」の作成
$ vim rbac.yml
----------------------------------------------------
apiVersion: v1
kind: ServiceAccount
metadata:
  name: tiller
  namespace: kube-system
---
kind: ClusterRoleBinding
apiVersion: rbac.authorization.k8s.io/v1beta1
metadata:
  name: tiller-clusterrolebinding
subjects:
- kind: ServiceAccount
  name: tiller
  namespace: kube-system
roleRef:
  kind: ClusterRole
  name: cluster-admin
  apiGroup: ""
----------------------------------------------------
Esc + :wq
5.「rbac.yml」の適用
$ kubectl create -f rbac.yml
serviceaccount/tiller created
clusterrolebinding.rbac.authorization.k8s.io/tiller-clusterrolebinding created
6.初期化処理
$ helm init --service-account tiller --upgrade
Creating /home/iyutaka2019/.helm
Creating /home/iyutaka2019/.helm/repository
Creating /home/iyutaka2019/.helm/repository/cache
Creating /home/iyutaka2019/.helm/repository/local
Creating /home/iyutaka2019/.helm/plugins
Creating /home/iyutaka2019/.helm/starters
Creating /home/iyutaka2019/.helm/cache/archive
Creating /home/iyutaka2019/.helm/repository/repositories.yaml
Adding stable repo with URL: https://kubernetes-charts.storage.googleapis.com
Adding local repo with URL: http://127.0.0.1:8879/charts
$HELM_HOME has been configured at /home/iyutaka2019/.helm.

Tiller (the Helm server-side component) has been installed into your Kubernetes Cluster.

Please note: by default, Tiller is deployed with an insecure 'allow unauthenticated users' policy.
To prevent this, run `helm init` with the --tiller-tls-verify flag.
For more information on securing your installation see: https://docs.helm.sh/using_helm/#securing-your-helm-installation
7.helmコマンドの実行
$ helm version
Client: &version.Version{SemVer:"v2.16.1", GitCommit:"bbdfe5e7803a12bbdf97e94cd847859890cf4050", GitTreeState:"clean"}
Server: &version.Version{SemVer:"v2.16.1", GitCommit:"bbdfe5e7803a12bbdf97e94cd847859890cf4050", GitTreeState:"clean"}
2.Vitessクラスタ構築
a.vtctlclientのダウンロード
gopathは、ホームディレクトリのgopathディレクトリとなります。
$ go get vitess.io/vitess/go/cmd/vtctlclient
$ echo $GOPATH
/home/iyutaka2019/gopath:/google/gopath
b.etcd-operatorのインストール
etcd-operatorが必要となりますので、Helmを利用してインストールします。
$ helm install stable/etcd-operator --name etcd-operator
NAME:   etcd-operator
LAST DEPLOYED: Sun Dec 15 16:22:02 2019
NAMESPACE: default
STATUS: DEPLOYED

RESOURCES:
==> v1/ClusterRole
NAME                                       AGE
etcd-operator-etcd-operator-etcd-operator  1s

==> v1/ClusterRoleBinding
NAME                                       AGE
etcd-operator-etcd-operator-etcd-operator  1s

==> v1/Deployment
NAME                                               AGE
etcd-operator-etcd-operator-etcd-backup-operator   1s
etcd-operator-etcd-operator-etcd-operator          1s
etcd-operator-etcd-operator-etcd-restore-operator  1s

==> v1/Pod(related)
NAME                                                             AGE
etcd-operator-etcd-operator-etcd-backup-operator-66f459f68gxk9k  0s
etcd-operator-etcd-operator-etcd-operator-9f59bcb44-4f65g        0s
etcd-operator-etcd-operator-etcd-restore-operator-5f78c8d422svp  0s

==> v1/Service
NAME                   AGE
etcd-restore-operator  1s

==> v1/ServiceAccount
NAME                                       AGE
etcd-operator-etcd-operator-etcd-operator  1s


NOTES:
1. etcd-operator deployed.
  If you would like to deploy an etcd-cluster set 'customResources.createEtcdClusterCRD' to true in values.yaml
  Check the etcd-operator logs
    export POD=$(kubectl get pods -l app=etcd-operator-etcd-operator-etcd-operator --namespace default --output name)
    kubectl logs $POD --namespace=default
状況を確認します。
$ kubectl get pod
NAME                                                              READY   STATUS    RESTARTS   AGE
etcd-operator-etcd-operator-etcd-backup-operator-66f459f68gxk9k   1/1     Running   0          81s
etcd-operator-etcd-operator-etcd-operator-9f59bcb44-4f65g         1/1     Running   0          81s
etcd-operator-etcd-operator-etcd-restore-operator-5f78c8d422svp   1/1     Running   0          81s
c.オリジナルの「values.yaml」を作成
Vitessクラスタを作成する際に、どういうクラスタにするかを定義する「values.yaml」が必要となります。
雛形は、「/home/iyutaka2019/gopath/src/vitess/vitess.io/helm/vitess」にあります。
今回は必要最低限のオリジナルのマニフェストファイルを作成します。
雛形をベースに理想とするクラスタ定義を作成できます。
$ cd /home/iyutaka2019/gopath/src/vitess/vitess.io/helm/vitess
$ vim original-values.yaml
--------------------------------------------------------------
topology:
  cells:
    - name: "zone1"
      etcd:
        replicas: 3
      vtctld:
        replicas: 1
      vtgate:
        replicas: 3
      mysqlProtocol:
        enabled: true
        authType: "none"
      keyspaces:
        - name: "mysqldb"
          shards:
            - name: "0"
              tablets:
                - type: "replica"
                  vttablet:
                    replicas: 2

etcd:
  replicas: 1
  resources:

vtctld:
  serviceType: "NodePort"
  resources:

vtgate:
  serviceType: "NodePort"
  resources:

vttablet:
  mysqlSize: "prod"
  resources:
  mysqlResources:

vtworker:
  resources:

pmm:
  enabled: false

orchestrator:
  enabled: false
--------------------------------------------------------------
Esc + :wq
Helmを利用してインストールします。
$ helm install . -f original-values.yaml
NAME:   sweet-garfish
LAST DEPLOYED: Sun Dec 15 16:34:48 2019
NAMESPACE: default
STATUS: DEPLOYED

RESOURCES:
==> v1/ConfigMap
NAME       AGE
vitess-cm  1s

==> v1/Job
NAME                               AGE
zone1-mysqldb-0-init-shard-master  1s

==> v1/Pod(related)
NAME                                     AGE
vtctld-8547867c9c-vngjj                  1s
vtgate-zone1-5999cbcd49-66x7z            1s
vtgate-zone1-5999cbcd49-jkz4n            1s
vtgate-zone1-5999cbcd49-mk2hp            1s
zone1-mysqldb-0-init-shard-master-fckb6  1s
zone1-mysqldb-0-replica-0                1s
zone1-mysqldb-0-replica-1                0s

==> v1/Service
NAME          AGE
vtctld        1s
vtgate-zone1  1s
vttablet      1s

==> v1beta1/Deployment
NAME          AGE
vtctld        1s
vtgate-zone1  1s

==> v1beta1/PodDisruptionBudget
NAME                     AGE
vtgate-zone1             1s
zone1-mysqldb-0-replica  1s

==> v1beta1/StatefulSet
NAME                     AGE
zone1-mysqldb-0-replica  1s

==> v1beta2/EtcdCluster
NAME         AGE
etcd-global  1s
etcd-zone1   1s


NOTES:
Release name: sweet-garfish

To access administrative web pages, start a proxy with:
  kubectl proxy --port=8001

Then use the following URLs:

      vtctld: http://localhost:8001/api/v1/namespaces/default/services/vtctld:web/proxy/app/
      vtgate: http://localhost:8001/api/v1/namespaces/default/services/vtgate-zone1:web/proxy/
状況を確認します。
$ kubectl get pod,job
NAME                                                                  READY   STATUS      RESTARTS   AGE
pod/etcd-global-zg454xvc4v                                            1/1     Running     0          2m9s
pod/etcd-operator-etcd-operator-etcd-backup-operator-66f459f68gxk9k   1/1     Running     0          14m
pod/etcd-operator-etcd-operator-etcd-operator-9f59bcb44-4f65g         1/1     Running     0          14m
pod/etcd-operator-etcd-operator-etcd-restore-operator-5f78c8d422svp   1/1     Running     0          14m
pod/etcd-zone1-9fs8jzsvs7                                             1/1     Running     0          88s
pod/etcd-zone1-tdkkpt5cdk                                             1/1     Running     0          2m9s
pod/etcd-zone1-zcm8h9h8x6                                             1/1     Running     0          112s
pod/vtctld-8547867c9c-vngjj                                           1/1     Running     1          2m9s
pod/vtgate-zone1-5999cbcd49-66x7z                                     1/1     Running     2          2m9s
pod/vtgate-zone1-5999cbcd49-jkz4n                                     1/1     Running     3          2m9s
pod/vtgate-zone1-5999cbcd49-mk2hp                                     1/1     Running     2          2m9s
pod/zone1-mysqldb-0-init-shard-master-fckb6                           0/1     Completed   0          2m9s
pod/zone1-mysqldb-0-replica-0                                         6/6     Running     0          2m9s
pod/zone1-mysqldb-0-replica-1                                         6/6     Running     0          2m8s

NAME                                          COMPLETIONS   DURATION   AGE
job.batch/zone1-mysqldb-0-init-shard-master   1/1           68s        2m10s
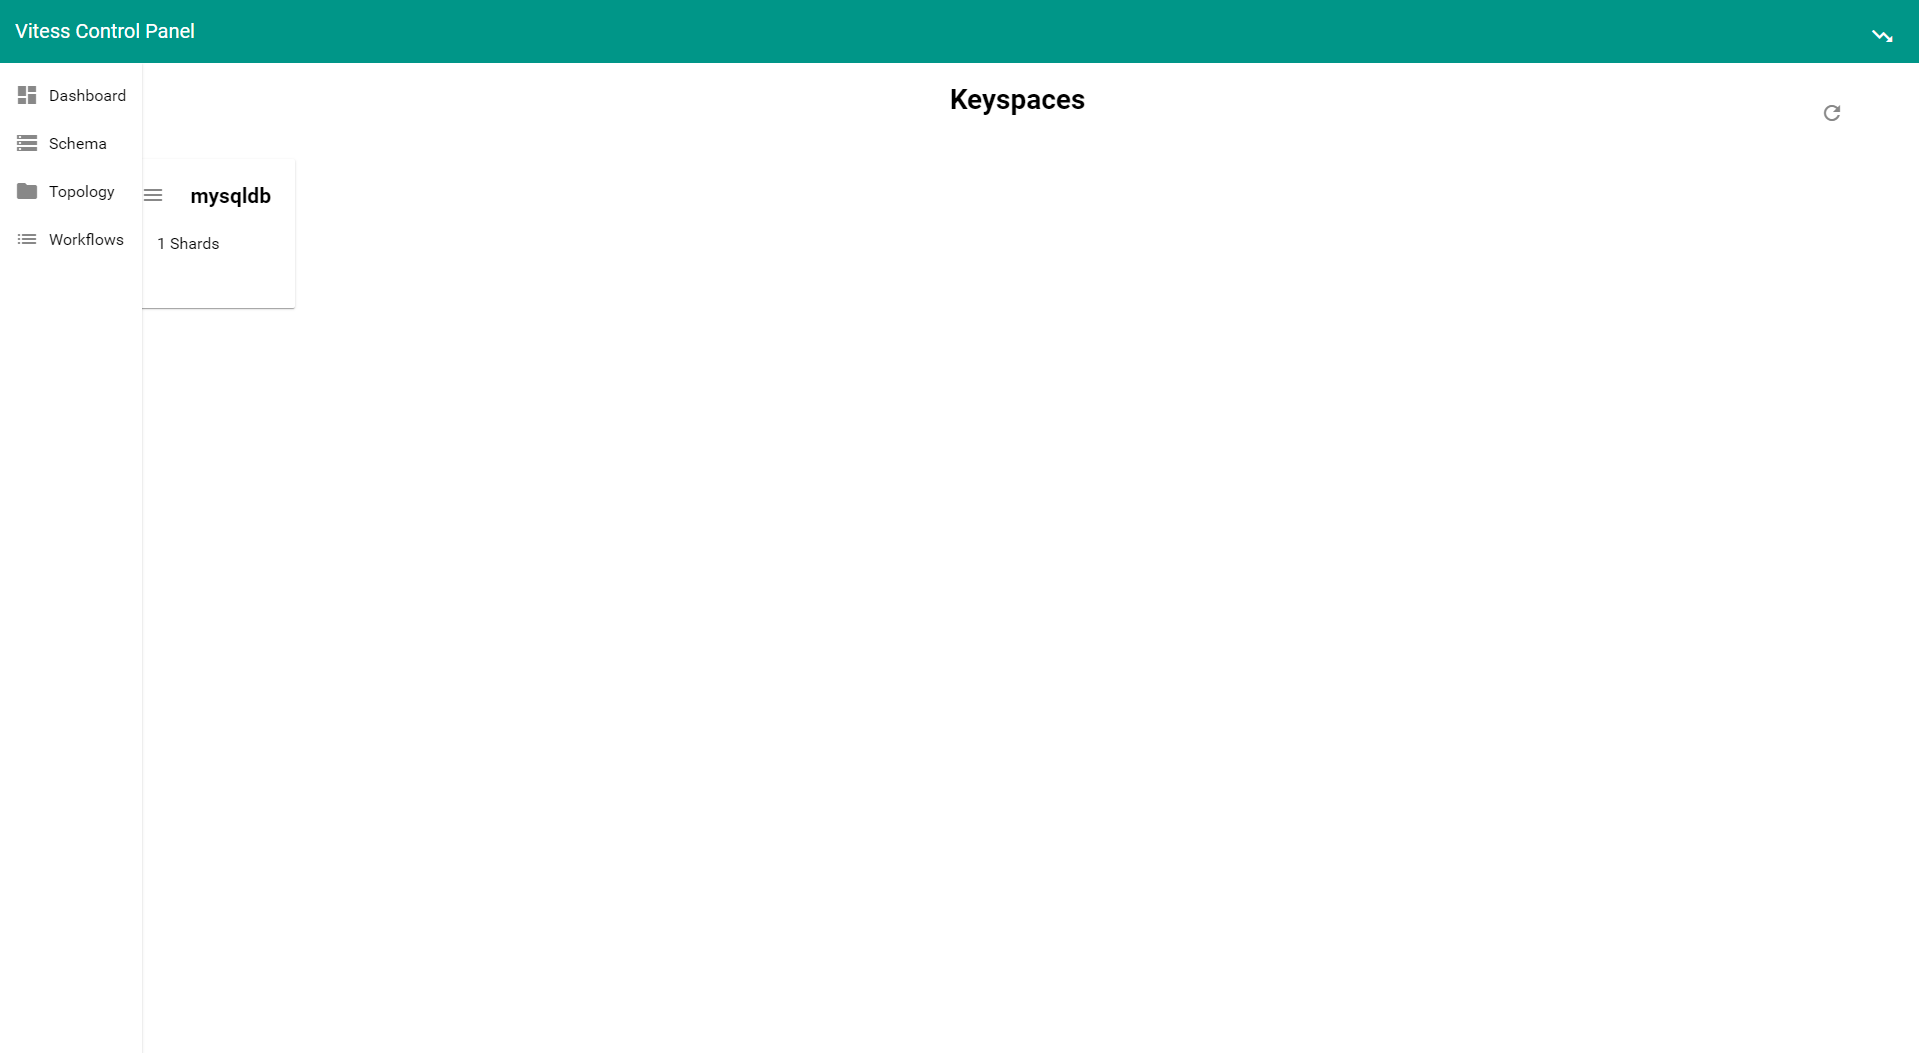
d.Vitessダッシュボード
Vitessにはブラウザで利用できるvtctldダッシュボードがあります。Serviceを確認してみるとvtctldがNodePortでポートが32132となっているので、4ノードのどれか一つの「EXTERNAL-IP:32132」にブラウザでアクセスしてみます。
EXTERNAL-IPは、GCPダッシュボードから左メニュー「Compute Engine」-「VMインスタンス」で表示される4ノードの外部IPリスト確認できます。
※NodePortはランダム生成されるので構築の都度変わります。
$ kubectl get svc
NAME                    TYPE        CLUSTER-IP    EXTERNAL-IP   PORT(S)                                          AGE
etcd-global             ClusterIP   None          <none>        2379/TCP,2380/TCP                                7m12s
etcd-global-client      ClusterIP   10.4.1.122    <none>        2379/TCP                                         7m13s
etcd-restore-operator   ClusterIP   10.4.8.27     <none>        19999/TCP                                        19m
etcd-zone1              ClusterIP   None          <none>        2379/TCP,2380/TCP                                7m12s
etcd-zone1-client       ClusterIP   10.4.4.96     <none>        2379/TCP                                         7m13s
kubernetes              ClusterIP   10.4.0.1      <none>        443/TCP                                          39m
vtctld                  NodePort    10.4.5.153    <none>        15000:32132/TCP,15999:31100/TCP                  7m13s
vtgate-zone1            NodePort    10.4.14.125   <none>        15001:30100/TCP,15991:32685/TCP,3306:30148/TCP   7m13s
vttablet                ClusterIP   None          <none>        15002/TCP,16002/TCP                              7m13s
http://EXTERNAL-IP:vtctld NodePort Number/
e.MySQLクライアント
mysql-clientのPodを作成してデータベースを確認してみます。
MySQLのIPアドレスは、vtgate-zone1のClusterIPとなります。前項で確認した内容だと10.4.14.125です。
$ kubectl run mysql-client --image=imega/mysql-client --restart=Never -it --rm -- sh
If you don't see a command prompt, try pressing enter.
/ # mysql -h 10.4.14.125
Welcome to the MariaDB monitor.  Commands end with ; or \g.
Your MySQL connection id is 1
Server version: 5.7.9-Vitess Percona Server (GPL), Release 29, Revision 11ad961

Copyright (c) 2000, 2018, Oracle, MariaDB Corporation Ab and others.

Type 'help;' or '\h' for help. Type '\c' to clear the current input statement.

MySQL [(none)]> show databases;
+-----------+
| Databases |
+-----------+
| mysqldb   |
+-----------+
1 row in set (0.002 sec)

MySQL [(none)]> exit
Bye
/ # exit
pod "mysql-client" deleted
※mysql-clientのPodはexitすると「--rm」オプションによりdeleteされます。
今回は、環境構築編としてここまでとします。次回はアプリケーションと連携してみたいと思います。
あと、PlanetScale社が提供するCNDb(Vitess as a Service)を利用して簡単に構築もできる感じですね!