RKE(Rancher Kubernetes Engine) を使用して、Kubernetesクラスタを構築して、WordPressをデプロイします。HostPathによるPV,PVCの作成、WordPressのPodを削除してセルフヒーリングされるか、replicas数を変更してスケールアウトできるかなど確認してみたいと思います。
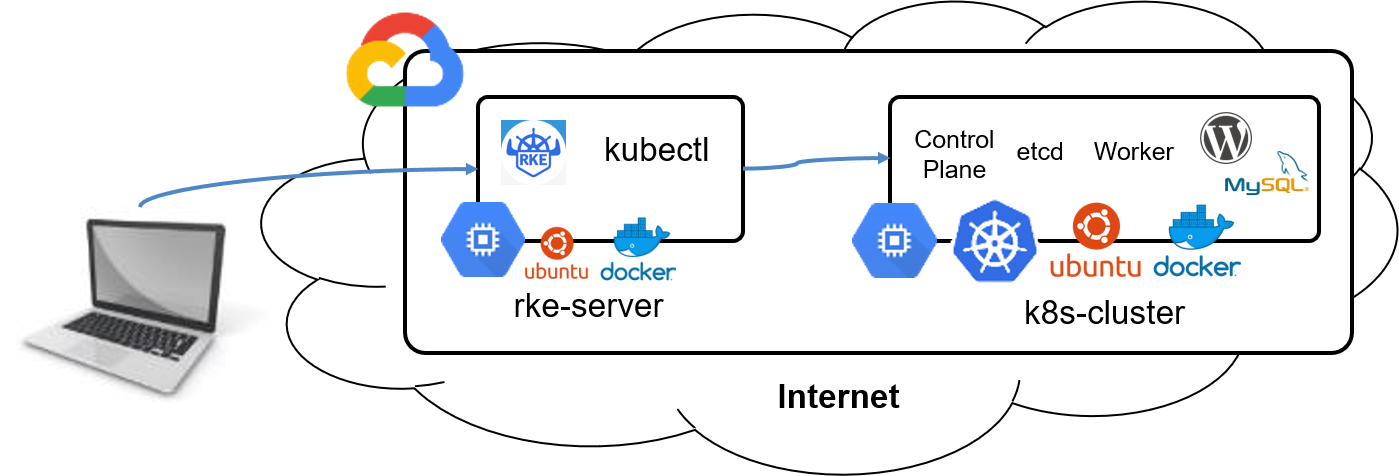
1.RKE(Rancher Kubernetes Engine) Serverの構築
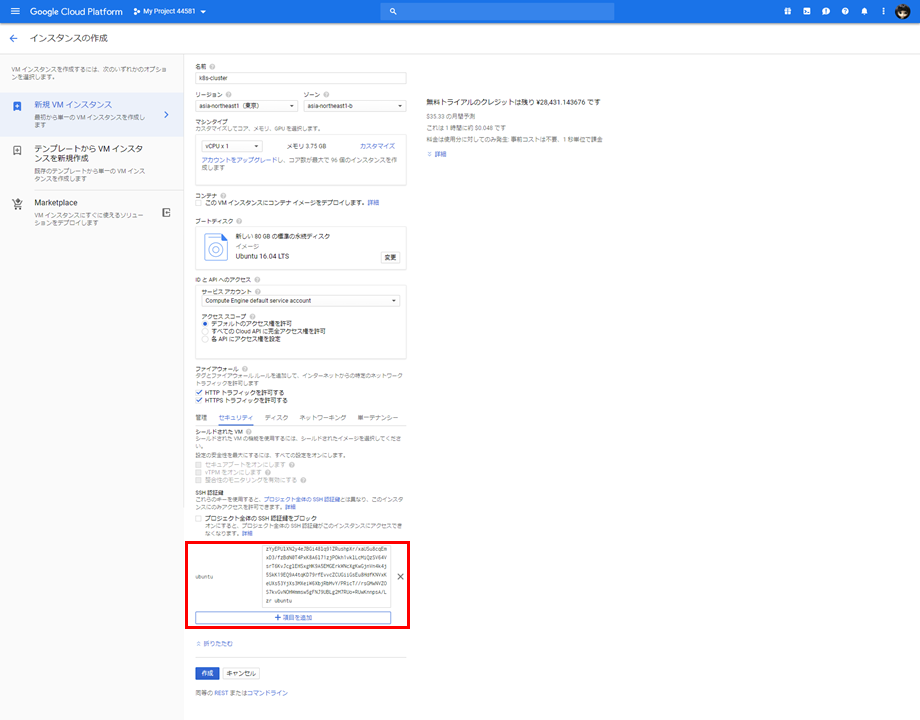
1.Instance(rke-server)準備
| 項目 | 入力概要 |
|---|---|
| 名前 | rke-server |
| リージョン | asia-northeast1(東京) |
| ゾーン | asia-northeast1-b |
| マシンタイプ | vCPUx1 |
| ブートディスク | Ubuntu 16.04 LTS ディスクサイズ80GB |
| ファイアウォール | HTTP トラフィックを許可する、HTTPS トラフィックを許可するの両方をチェックします。 |
2.Kubernetes ClusterのNode用鍵ペア(公開鍵と秘密鍵)の作成
作成したインスタンスのLinuxサーバにログインして、以下のコマンドを実行します。
パスフレーズは何も入れず、Enterキーを押下します。
コマンド
$ ssh-keygen -t rsa -f ~/.ssh/id_rsa -C ubuntu
Generating public/private rsa key pair.
Enter passphrase (empty for no passphrase):
Enter same passphrase again:
Your identification has been saved in /root/.ssh/id_rsa.
Your public key has been saved in /root/.ssh/id_rsa.pub.
The key fingerprint is:
SHA256:1oC/51l1s4p/KI9Nq5S4g/us8jmKok5rJw7F10ZuA78 root
The key's randomart image is:
+---[RSA 2048]----+
|                 |
|       .         |
|    . o .        |
| .   * . o       |
|  o . B S .   ...|
| . . o + .. .. .o|
|..    E o..o.... |
|o+.... oo+o+=.o. |
|*++. .+==+++=*.  |
+----[SHA256]-----+
3.秘密鍵のパーミッション変更
コマンド
$ chmod 600 .ssh/id_rsa
4.公開鍵の確認
コマンド
$ cat .ssh/id_rsa.pub
ssh-rsa AAAAB3NzaC1yc2EAAAADAQABAAABAQCnt8H8BHO3+klKBaf8dR6X6wPsNbMZQe1Zp+BTMV34oNd724V9bhu3P0UV8JjzSdI6ocZCxX8kwaMOY+c9Km8PBjzYyEPUlXN2y4eJBGi48lq91ZRushpXr/xaUSu8cqEmxD3/fzBdN0T4PxK8A6l71zjPOkh1vklLcMiQzSV64VsrT6KvJcglEHSxgHK9A5EMGErkWNcXgKwGjnVn4k4j5SkK19EQ9A4tqKD79rfEvvcZCUGiiGsEu8HdfKNVxKeUXs53YjXs3MXeiW6XbjRbMvY/PRicT//rsGMwNVZOS7kvGvNOHWmmsw5gFNJ9UBLg2M7RUo+RUwKnnpsA/Lzr ubuntu
※公開鍵の内容を別途テキスト保存しておきましょう。
※こちらのものではなく各自の公開鍵を利用します。
2.k8s-clusterサーバの構築
1.Instance(k8s-cluster)準備
| 項目 | 入力概要 |
|---|---|
| 名前 | k8s-cluster |
| リージョン | asia-northeast1(東京) |
| ゾーン | asia-northeast1-b |
| マシンタイプ | vCPUx1 |
| ブートディスク | Ubuntu 16.04 LTS ディスクサイズ80GB |
| ファイアウォール | HTTP トラフィックを許可する、HTTPS トラフィックを許可するの両方をチェックします。 |
GCP(Google Cloud Platform)のGCE(Google Compute Engine)でインスタンスを作成する際に、公開鍵を登録できるので利用します。
※他のクラウドでも同じことができる場合は利用してください。こうした設定がない場合はサーバ起動後に公開鍵を登録してください。
2.rke-serverからk8s-clusterへリモート接続
コマンド
$ ssh -l ubuntu k8s-clusterサーバのグローバルIPアドレス
sts.
Welcome to Ubuntu 16.04.5 LTS (GNU/Linux 4.15.0-1025-gcp x86_64)

 * Documentation:  https://help.ubuntu.com
 * Management:     https://landscape.canonical.com
 * Support:        https://ubuntu.com/advantage

  Get cloud support with Ubuntu Advantage Cloud Guest:
    http://www.ubuntu.com/business/services/cloud

0 packages can be updated.
0 updates are security updates.

New release '18.04.1 LTS' available.
Run 'do-release-upgrade' to upgrade to it.


The programs included with the Ubuntu system are free software;
the exact distribution terms for each program are described in the
individual files in /usr/share/doc/*/copyright.

Ubuntu comes with ABSOLUTELY NO WARRANTY, to the extent permitted by
applicable law.

To run a command as administrator (user "root"), use "sudo <command>".
See "man sudo_root" for details.
ubuntu@k8s-cluster:~$
3.Dockerをインストール
コマンド
$ curl https://releases.rancher.com/install-docker/17.03.sh | sh
・
・省略
・
 Go version:   go1.7.5
 Git commit:   f5ec1e2
 Built:        Tue Jun 27 03:35:14 2017
 OS/Arch:      linux/amd64
Server:
 Version:      17.03.2-ce
 API version:  1.27 (minimum version 1.12)
 Go version:   go1.7.5
 Git commit:   f5ec1e2
 Built:        Tue Jun 27 03:35:14 2017
 OS/Arch:      linux/amd64
 Experimental: false
If you would like to use Docker as a non-root user, you should now consider
adding your user to the "docker" group with something like:
  sudo usermod -aG docker ubuntu
Remember that you will have to log out and back in for this to take effect!
WARNING: Adding a user to the "docker" group will grant the ability to run
         containers which can be used to obtain root privileges on the
         docker host.
         Refer to https://docs.docker.com/engine/security/security/#docker-
daemon-attack-surface
         for more information.
4.sudo無効化
コマンド
$ sudo usermod -aG docker ubuntu
5.リモートログインサーバからexitします。
コマンド
$ exit
logout
Connection to 104.198.89.202 closed.
3.RKE環境の構築
1.RKEのインストール
a.GitHubからRKEをダウンロード
コマンド
$ wget https://github.com/rancher/rke/releases/download/v0.1.13/rke_linux-amd64
256&X-Amz-Credential=AKIAIWNJYAX4CSVEH53A%2F20181208%2Fus-east-1%2Fs3%2Faws4_request&X-Amz-Date=20181208T133911Z&X-Amz-Expires=300&X-Amz-Signature=17ad3b2d3405c18337928d6294f22bb6026bfc6eb37399677ba843829246a6da&X-Amz-SignedHeaders=host&actor_id=0&response-content-disposition=attachment%3B%20filename%3Drke_linux-amd64&response-content-type=application%2Foctet-stream [following]
--2018-12-08 13:39:11--  https://github-production-release-asset-2e65be.s3.amazonaws.com/108337180/f04efa00-f806-11e8-8975-37ab922b79cb?X-Amz-Algorithm=AWS4-HMAC-SHA256&X-Amz-Credential=AKIAIWNJYAX4CSVEH53A%2F20181208%2Fus-east-1%2Fs3%2Faws4_request&X-Amz-Date=20181208T133911Z&X-Amz-Expires=300&X-Amz-Signature=17ad3b2d3405c18337928d6294f22bb6026bfc6eb37399677ba843829246a6da&X-Amz-SignedHeaders=host&actor_id=0&response-content-disposition=attachment%3B%20filename%3Drke_linux-amd64&response-content-type=application%2Foctet-stream
Resolving github-production-release-asset-2e65be.s3.amazonaws.com (github-production-release-asset-2e65be.s3.amazonaws.com)... 52.216.169.211
Connecting to github-production-release-asset-2e65be.s3.amazonaws.com (github-production-release-asset-2e65be.s3.amazonaws.com)|52.216.169.211|:443... connected.
HTTP request sent, awaiting response... 200 OK
Length: 32536526 (31M) [application/octet-stream]
Saving to: ‘rke_linux-amd64’

rke_linux-amd64    100%[===============>]  31.03M  11.8MB/s    in 2.6s

2018-12-08 13:39:15 (11.8 MB/s) - ‘rke_linux-amd64’ saved [32536526/32536526]
b.rke_linux-amd64ファイルのリネーム
コマンド
$ mv rke_linux-amd64 rke
c.rkeファイルに実行権を付与
コマンド
# chmod +x rke
d.rkeコマンドの実行
コマンド
# ./rke
NAME:
   rke - Rancher Kubernetes Engine, an extremely simple, lightning fast Kubernetes installer that works everywhere

USAGE:
   rke [global options] command [command options] [arguments...]

VERSION:
   v0.1.13

AUTHOR(S):
   Rancher Labs, Inc.

COMMANDS:
     up       Bring the cluster up
     remove   Teardown the cluster and clean cluster nodes
     version  Show cluster Kubernetes version
     config   Setup cluster configuration
     etcd     etcd snapshot save/restore operations in k8s cluster
     help, h  Shows a list of commands or help for one command

GLOBAL OPTIONS:
   --debug, -d    Debug logging
   --help, -h     show help
   --version, -v  print the version
4.RKEでkubernetesクラスタの構築
1.cluster.ymlの作成
コマンド
# vim cluster.yml
----------------------------------------------------
nodes:
    - address: k8s-clusterのクローバルIPアドレス
      user: root
      role:
        - controlplane
        - etcd
        - worker
network:
    plugin: canal
ingress:
    provider: nginx
----------------------------------------------------
Esc + :wq
2.kubernetes clusterの構築
コマンド
# ./rke up
INFO[0000] Building Kubernetes cluster
・
・省略
・
INFO[0153] Finished building Kubernetes cluster successfully
3.kubectl configの準備
コマンド
# mkdir .kube
# cp kube_config_cluster.yml ~/.kube/config
5.kubectlコマンドのインストール
1.kubectl(linux用)をダウンロード
コマンド
$ curl -LO https://storage.googleapis.com/kubernetes-release/release/$(curl -s https://storage.googleapis.com/kubernetes-release/release/stable.txt)/bin/linux/amd64/kubectl
  % Total    % Received % Xferd  Average Speed   Time    Time     Time  Current
                                 Dload  Upload   Total   Spent    Left  Speed
100 54.6M  100 54.6M    0     0  38.9M      0  0:00:01  0:00:01 --:--:-- 38.9M
2.実行権限の付与
コマンド
$ chmod +x ./kubectl
3.kubectlファイルの移動
コマンド
$ sudo mv ./kubectl /usr/local/bin/kubectl
4.kubectlコマンドの実行
コマンド
$ kubectl version
Client Version: version.Info{Major:"1", Minor:"13", GitVersion:"v1.13.0", GitCommit:"ddf47ac13c1a9483ea035a79cd7c10005ff21a6d", GitTreeState:"clean", BuildDate:"2018-12-03T21:04:45Z", GoVersion:"go1.11.2", Compiler:"gc", Platform:"linux/amd64"}
Server Version: version.Info{Major:"1", Minor:"11", GitVersion:"v1.11.5", GitCommit:"753b2dbc622f5cc417845f0ff8a77f539a4213ea", GitTreeState:"clean", BuildDate:"2018-11-26T14:31:35Z", GoVersion:"go1.10.3", Compiler:"gc", Platform:"linux/amd64"}
5.kubernetes clusterのNode確認
コマンド
$ kubectl get nodes
NAME             STATUS   ROLES                      AGE   VERSION
104.198.89.202   Ready    controlplane,etcd,worker   8m    v1.11.5
6.WordPress on Kubernetes
1.MySQLのデプロイ
a.データベースのパスワードを格納する Kubernetes シークレットを作成
passwordには、任意のパスワードを指定します。
コマンド
# kubectl create secret generic mysql --from-literal=password=wordpress123@@@
secret/mysql created
b.「mysql-pv.yml」の作成
コマンド
# vim mysql-pv.yml
-----------------------------------------------------
apiVersion: v1
kind: PersistentVolume
metadata:
  name: mysql-pv
  labels:
    type: local
spec:
  capacity:
    storage: 20Gi
  accessModes:
    - ReadWriteOnce
  persistentVolumeReclaimPolicy: Recycle
  hostPath:
    path: /tmp/data/mysql
-----------------------------------------------------
Esc + :wq
c.pvの作成
コマンド
# kubectl create -f mysql-pv.yml
persistentvolume/mysql-pv created
d.「mysql-pvc.yml」の作成
コマンド
# vim mysql-pvc.yml
-----------------------------------------------------
apiVersion: v1
kind: PersistentVolumeClaim
metadata:
  name: mysql-pvc
  labels:
    app: wordpress
    tier: mysql
spec:
  accessModes:
    - ReadWriteOnce
  resources:
    requests:
      storage: 20Gi
-----------------------------------------------------
Esc + :wq
e.pvcの作成
コマンド
# kubectl create -f mysql-pvc.yml
persistentvolumeclaim/mysql-pvc created
f.pvとpvcの確認
コマンド
# kubectl get pvc,pv
NAME                              STATUS   VOLUME     CAPACITY   ACCESS MODES   STORAGECLASS   AGE
persistentvolumeclaim/mysql-pvc   Bound    mysql-pv   20Gi       RWO                           2m

NAME                        CAPACITY   ACCESS MODES   RECLAIM POLICY   STATUS   CLAIM               STORAGECLASS   REASON   AGE
persistentvolume/mysql-pv   20Gi       RWO            Recycle          Bound    default/mysql-pvc                           2m
g.「mysql.yml」の作成
コマンド
# vim mysql.yml
-----------------------------------------------------
apiVersion: extensions/v1beta1
kind: Deployment
metadata:
  name: mysql
  labels:
    app: mysql
spec:
  replicas: 1
  selector:
    matchLabels:
      app: mysql
  template:
    metadata:
      labels:
        app: mysql
    spec:
      containers:
        - image: mysql:5.7
          name: mysql
          env:
            - name: MYSQL_ROOT_PASSWORD
              valueFrom:
                secretKeyRef:
                  name: mysql
                  key: password
          ports:
            - containerPort: 3306
              name: mysql
          volumeMounts:
            - name: mysql-local-storage
              mountPath: /var/lib/mysql
      volumes:
        - name: mysql-local-storage
          persistentVolumeClaim:
            claimName: mysql-pvc
-----------------------------------------------------
Esc + :wq
h.MySQLのdeploymentの作成
コマンド
# kubectl create -f mysql.yml
deployment.extensions/mysql created
i.podの確認
コマンド
# kubectl get pod -l app=mysql
NAME                     READY   STATUS    RESTARTS   AGE
mysql-7fb595fb84-dnn9w   1/1     Running   0          14s
j.「mysql-service.yml」の作成
コマンド
# vim mysql-service.yml
-----------------------------------------------------
apiVersion: v1
kind: Service
metadata:
  name: mysql
  labels:
    app: mysql
spec:
  type: ClusterIP
  ports:
    - port: 3306
  selector:
    app: mysql
-----------------------------------------------------
Esc + :wq
k.serviceの作成
コマンド
kubectl create -f mysql-service.yml
service/mysql created
l.serviceの確認
コマンド
# kubectl get service mysql
NAME    TYPE        CLUSTER-IP     EXTERNAL-IP   PORT(S)    AGE
mysql   ClusterIP   10.43.82.149   <none>        3306/TCP   47s
2.WordPressのデプロイ
a.「wordpress-pv.yml」の作成
コマンド
# vim wordpress-pv.yml
-----------------------------------------------------
apiVersion: v1
kind: PersistentVolume
metadata:
  name: wordpress-pv
  labels:
    type: local
spec:
  capacity:
    storage: 20Gi
  accessModes:
    - ReadWriteOnce
  persistentVolumeReclaimPolicy: Recycle
  hostPath:
    path: /tmp/data/wordpress
-----------------------------------------------------
Esc + :wq
b.pvの作成
コマンド
# kubectl create -f wordpress-pv.yml
persistentvolume/wordpress-pv created
c.「wordpress-pvc.yml」の作成
コマンド
# vim wordpress-pvc.yml
-----------------------------------------------------
apiVersion: v1
kind: PersistentVolumeClaim
metadata:
  name: wordpress-pvc
  labels:
    app: wordpress
    tier: wordpress
spec:
  accessModes:
    - ReadWriteOnce
  resources:
    requests:
      storage: 20Gi
-----------------------------------------------------
Esc + :wq
d.pvcの作成
コマンド
# kubectl create -f wordpress-pvc.yml
persistentvolumeclaim/wordpress-pvc created
e.pvとpvcの確認
コマンド
# kubectl get pvc,pv
NAME                                  STATUS   VOLUME         CAPACITY   ACCESS MODES   STORAGECLASS   AGE
persistentvolumeclaim/mysql-pvc       Bound    mysql-pv       20Gi       RWO                           12m
persistentvolumeclaim/wordpress-pvc   Bound    wordpress-pv   20Gi       RWO                           1m

NAME                            CAPACITY   ACCESS MODES   RECLAIM POLICY   STATUS   CLAIM                   STORAGECLASS   REASON   AGE
persistentvolume/mysql-pv       20Gi       RWO            Recycle          Bound    default/mysql-pvc                               12m
persistentvolume/wordpress-pv   20Gi       RWO            Recycle          Bound    default/wordpress-pvc                           3m
f.「wordpress.yml」の作成
コマンド
# vim wordpress.yml
-----------------------------------------------------
apiVersion: extensions/v1beta1
kind: Deployment
metadata:
  name: wordpress
  labels:
    app: wordpress
spec:
  replicas: 1
  selector:
    matchLabels:
      app: wordpress
  template:
    metadata:
      labels:
        app: wordpress
    spec:
      containers:
        - image: wordpress
          name: wordpress
          env:
          - name: WORDPRESS_DB_HOST
            value: mysql:3306
          - name: WORDPRESS_DB_PASSWORD
            valueFrom:
              secretKeyRef:
                name: mysql
                key: password
          ports:
            - containerPort: 80
              name: wordpress
          volumeMounts:
            - name: wordpress-local-storage
              mountPath: /var/www/html
      volumes:
        - name: wordpress-local-storage
          persistentVolumeClaim:
            claimName: wordpress-pvc
-----------------------------------------------------
Esc + :wq
g.WordPressのdeploymentの作成
コマンド
# kubectl create -f wordpress.yml
deployment.extensions/wordpress created
h.podの確認
コマンド
# kubectl get pod -l app=wordpress
NAME                        READY   STATUS    RESTARTS   AGE
wordpress-f5db5bccc-42z6p   1/1     Running   0          41s
i.「wordpress-service.yml」の作成
コマンド
# vim wordpress-service.yml
-----------------------------------------------------
apiVersion: v1
kind: Service
metadata:
  labels:
    app: wordpress
  name: wordpress
spec:
  type: NodePort
  ports:
    - port: 80
      targetPort: 80
      protocol: TCP
  selector:
    app: wordpress
-----------------------------------------------------
Esc + :wq
j.serviceの作成
コマンド
# kubectl create -f wordpress-service.yml
service/wordpress created
k.serviceの確認
コマンド
# kubectl get svc -l app=wordpress
NAME        TYPE           CLUSTER-IP      EXTERNAL-IP   PORT(S)        AGE
wordpress   LoadBalancer   10.43.102.184   <pending>     80:30983/TCP   2m
この後、ブラウザでアクセスする際に利用するNodePortは、80:の後のポート番号になります。
3.WordPressにアクセス
a.Kubernetes MasterIPの確認
コマンド
# kubectl cluster-info
Kubernetes master is running at https://133.223.1.160:6443
KubeDNS is running at https://133.223.1.160:6443/api/v1/namespaces/kube-system/services/kube-dns:dns/proxy

To further debug and diagnose cluster problems, use 'kubectl cluster-info dump'.
b.Chromeブラウザを起動してアクセス
4.Podの自動修復(セルフヒーリング)
a.WordPressのPod状況を確認
コマンド
# kubectl get pod
NAME                        READY   STATUS    RESTARTS   AGE
mysql-7fb595fb84-q4csx      1/1     Running   0          20m
wordpress-f5db5bccc-5hgc5   1/1     Running   0          19m
b.WordPressのPodを削除
コマンド
# kubectl delete pod -l app=wordpress
pod "wordpress-f5db5bccc-5hgc5" deleted
c.WordPressのPod名の確認
Pod削除前と名前が変わり、新たなPodが作られています。
コマンド
# kubectl get pod
NAME                        READY   STATUS    RESTARTS   AGE
mysql-7fb595fb84-q4csx      1/1     Running   0          23m
wordpress-f5db5bccc-ds8wk   1/1     Running   0          1m
5.Podのスケールアウト
a.WordPressのPodを10個増やす
コマンド
# kubectl scale deployment wordpress --replicas 10
deployment.extensions/wordpress scaled
b.WordPressのPod状況を確認
コマンド
# kubectl get pod
NAME                        READY   STATUS    RESTARTS   AGE
mysql-7fb595fb84-q4csx      1/1     Running   0          30m
wordpress-f5db5bccc-95pwv   1/1     Running   0          37s
wordpress-f5db5bccc-dr44d   1/1     Running   0          36s
wordpress-f5db5bccc-ds8wk   1/1     Running   0          7m
wordpress-f5db5bccc-dx8xs   1/1     Running   0          37s
wordpress-f5db5bccc-hfqpc   1/1     Running   0          37s
wordpress-f5db5bccc-jcz7t   1/1     Running   0          36s
wordpress-f5db5bccc-l5vq9   1/1     Running   0          36s
wordpress-f5db5bccc-lf24s   1/1     Running   0          36s
wordpress-f5db5bccc-pznkd   1/1     Running   0          36s
wordpress-f5db5bccc-qg6kk   1/1     Running   0          36s
「wordpress.yml」内のreplicasの数値を変更して、kubectl applyコマンドを実行しても同じ結果となります。
6.クリーンアップ
a.deploymentの削除
コマンド
# kubectl delete -f wordpress.yml
deployment.extensions "wordpress" deleted
# kubectl delete -f mysql.yml
deployment.extensions "mysql" deleted
b.serviceの削除
コマンド
# kubectl delete -f wordpress-service.yml
service "wordpress" deleted
# kubectl delete -f mysql-service.yml
service "mysql" deleted
d.pvcの削除
コマンド
# kubectl delete -f wordpress-pvc.yml
persistentvolumeclaim "wordpress-pvc" deleted
# kubectl delete -f mysql-pvc.yml
persistentvolumeclaim "mysql-pvc" deleted
f.pvの削除
コマンド
# kubectl delete -f wordpress-pv.yml
persistentvolume "wordpress-pv" deleted
# kubectl delete -f mysql-pv.yml
persistentvolume "mysql-pv" deleted
g.podの確認
コマンド
# kubectl get pod -l app=wordpress
No resources found.
# kubectl get pod -l app=mysql
No resources found.
h.serviceの確認
コマンド
# kubectl get svc -l app=wordpress
No resources found.
# kubectl get svc -l app=mysql
No resources found.
i.pv,pvcの確認
コマンド
# kubectl get pvc,pv
No resources found.