JupyterHubを構築する
みなさまはPythonのコーディング環境、なにを使っていますか?
Jupyter Notebookという人も意外と多いと思います。
Jupyter NotebookはWebブラウザで使うコーディング環境で、プラグインを使うことでPython以外にもJavaやR等のコーディング環境にもなります。
Jupyter Notebookだけではユーザ管理はできず、グループで開発を行うときに不便です。
JupyterHubを使えばJupyter Notebookにユーザ認証のインターフェイスを付けることができるので、その構築方法を紹介します。
※ Jupyter NotebookはAnacondaでインストールするのが簡単です。
https://www.continuum.io/downloads
※ JupyterHub
http://jupyterhub.readthedocs.io/en/latest/index.html
環境
今回紹介する構築環境は以下です。
- OS:CentOS7.3
- Anaconda4.3.0
- Python3.5
- 基盤:AWS EC2
事前設定
まずは事前にAnaconda4.3.0をインストールしましょう。
AnacondaのLinux用インストールシェルをダウンロードします。
# 以降、rootユーザで操作しますが、実際には使用可能なユーザを使ってください。
sudo su -
cd ~
wget https://repo.continuum.io/archive/Anaconda3-4.2.0-Linux-x86_64.sh
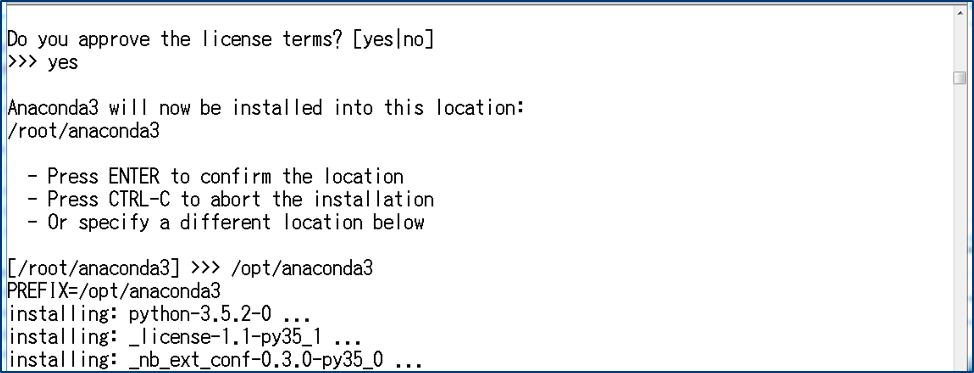
Anacondaをインストールします。
インストール中に色々きかれますが、基本的にyesで良いです。
ただし、一つだけ注意点があります。
インストールディレクトリはひとまず/opt/anaconda3/にします。
インストールディレクトリはデフォルトだと/root/anaconda3/になってしまいますが、これだとroot以外のユーザがAnacondaを使えません。
非rootユーザ(sudo権限あってもなくても)がJupyterHubを使う場合は、そのユーザもアクセス可能なディレクトリにインストールしましょう。
bash Anaconda3-4.2.0-Linux-x86_64.sh
これでAnacondaはインストールされました。
Jupyter NotebookのConfigは不要なので、いよいよJupyterHubのインストールを行います。
JupyterHubのインストール
AnacondaをインストールするとAnaconda用パッケージやPythonモジュールをconda installコマンドでインストールできるようになります。
JupyterHubもconda installでインストールします。
# JupyterHubをインストール
conda install -c conda-forge jupyterhub
# JupyterHubのnotebookをインストール
conda install notebook
これでJupyterHubをインストールしNotebookを起動できるようになりました。
次はConfigファイルを作成し、設定を行います。
JupyterHubのConfigファイルを作成
JupyterHubのConfigファイルは以下コマンドで生成します。
cd /opt/
jupyterhub --generate-config
このようにjupyterhub_config.pyというファイルが作られます。

JupyterHubの設定
JupyterHubではプロキシやTLS証明書、ユーザ、管理ユーザ等、多様な設定を行うことが可能です。
今回は最低限、管理ユーザ、ユーザ、ユーザのNotebookディレクトリのみ設定します。
jupyterhub_config.pyをエディターで開きます。
vi jupyterhub_config.py
以下の設定値を変更します。
まずはNotebookディレクトリです。
各ユーザのホームディレクトリ配下に~/notebook/ディレクトリを作成し、そこをNotebookディレクトリにします。
## Path to the notebook directory for the single-user server.
#
#  The user sees a file listing of this directory when the notebook interface is
#  started. The current interface does not easily allow browsing beyond the
#  subdirectories in this directory's tree.
#
#  `~` will be expanded to the home directory of the user, and {username} will be
#  replaced with the name of the user.
#
#  Note that this does *not* prevent users from accessing files outside of this
#  path! They can do so with many other means.
# c.Spawner.notebook_dir = ''
# 以下を追記
c.Spawner.notebook_dir = '~/notebook'
次にJupyterHubの使用ユーザです。
これはWhitelistとして設定します。
## Whitelist of usernames that are allowed to log in.
#
#  Use this with supported authenticators to restrict which users can log in.
#  This is an additional whitelist that further restricts users, beyond whatever
#  restrictions the authenticator has in place.
#
#  If empty, does not perform any additional restriction.
# c.Authenticator.whitelist = set()
# 以下を追加
c.Authenticator.whitelist = {'user01', 'user02'}
最後に管理ユーザです。
## Set of users that will have admin rights on this JupyterHub.
#
#  Admin users have extra privilages:
#   - Use the admin panel to see list of users logged in
#   - Add / remove users in some authenticators
#   - Restart / halt the hub
#   - Start / stop users' single-user servers
#   - Can access each individual users' single-user server (if configured)
#
#  Admin access should be treated the same way root access is.
#
#  Defaults to an empty set, in which case no user has admin access.
# c.Authenticator.admin_users = set()
# 以下を追加
c.Authenticator.admin_users = {'user00'}
これで最低限の設定は完了です。
他の設定値については以下を参照してください。
http://jupyterhub.readthedocs.io/en/latest/getting-started.html#configuration
各ユーザのNotebookを作成
JupyterHubを使用するユーザ用にNotebookを作成します。
mkdir -p /home/user01/notebook
chown user01:usergr /home/user01/notebook
JupyterHub起動
JupyterHubはデフォルトでHTTPSで起動しますが、今回はTLS証明書を設定していません。
自己署名証明書(オレオレ証明書)でも良いのですが、面倒なので、--no-sslオプションをつけてHTTPで起動します。
jupyterhub --no-ssl
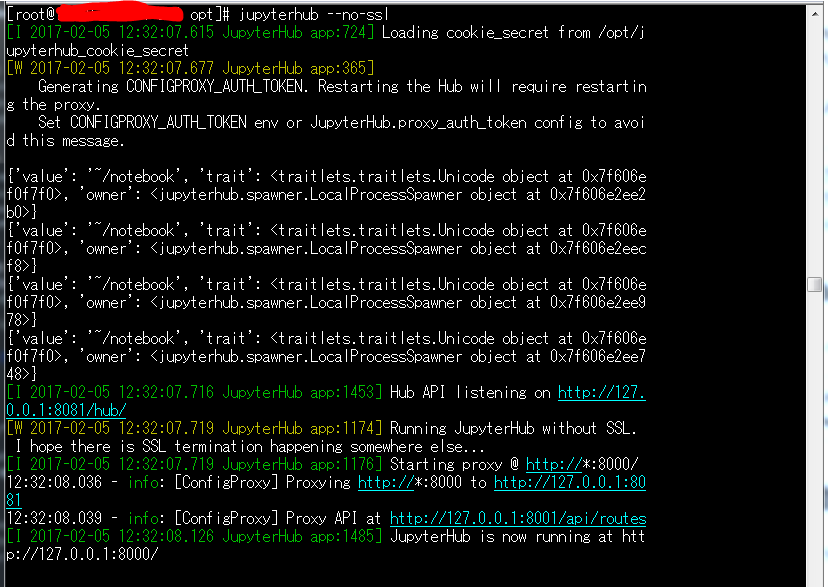
これで起動します。
JupyterHubはポート番号8000、HTTPで公開されます。
余談ですが、このコマンドはnohupと&で挟んでOSバックグラウンド起動にすることをお奨めします。
nohup jupyterhub --no-ssl &
JupyterHubにアクセス
PCでWebブラウザからJupyterHubにアクセスします。
URLは http://:8000/ です。

HTTPSにしろよごら(# ゚Д゚) とメッセージが出ています。
あとでオレオレ証明書を作りましょう(^_^;)。
(2018/04/27追記:証明書はletsencryptでもOKなようです。
https://jupyterhub.readthedocs.io/en/0.7.2/getting-started.html#ssl-encryption)
ユーザ名とパスワードを入力してログインします。
以降Jupyter Notebook同様に使用可能ですので、割愛します。
参考URL:
http://jupyterhub.readthedocs.io/en/latest/index.html
https://www.continuum.io/downloads