複数の分類を出力するディープラーニング
猫は哺乳類であり、動物です。飛行機は人工物であり、空を飛びます。
世の中の殆どのモノには複数の属性や分類があり、それらの属性は排他的であるとは限りません。
蛙は船同様に水辺にあり、犬同様に生物です。
機械学習の分類問題では多くの場合、一つのモノに一つのラベルをつけて分類しますが、そのモノを全ての人がそのラベルで認識するとは限りません。
今回はKerasを使ったディープラーニングの画像分類で、一つのモノ(=一入力データ)に複数のラベル(=出力データ)を付与し、同時に複数のラベルを推論するモデルを作ります。
コード全文はこちらです。
https://github.com/shibuiwilliam/KerasCNNwithMultiClass
データとラベル
入力データにはCifar10を使います。
Cifar10には標準で10種類のデータ(飛行機、自動車、鳥、猫、鹿、犬、蛙、馬、船、トラック)がラベル付けされて用意されています。
| initial label | object |
|---|---|
| 0 | airplane |
| 1 | automobile |
| 2 | bird |
| 3 | cat |
| 4 | deer |
| 5 | dog |
| 6 | frog |
| 7 | horse |
| 8 | ship |
| 9 | truck |
これらに第2、第3、第4のラベルを付与します。
- 第2のラベル:人工物(0)と自然物(1)
- 第3のラベル:車(0)、哺乳類(1)、飛ぶもの(2)、水関連(3)
- 第4のラベル:暗い画像(0)、明るい画像(1)
これに伴い、以下のようにラベルを追加します。
| initial label | initial object | second label | third label |
|---|---|---|---|
| 0 | airplane | 0(artifact) | 2(flying object) |
| 1 | automobile | 0(artifact) | 0(car) |
| 2 | bird | 1(natural object) | 2(flying object) |
| 3 | cat | 1(natural object) | 1(mammals) |
| 4 | deer | 1(natural object) | 1(mammals) |
| 5 | dog | 1(natural object) | 1(mammals) |
| 6 | frog | 1(natural object) | 3(water related) |
| 7 | horse | 1(natural object) | 1(mammals) |
| 8 | ship | 0(artifact) | 3(water related) |
| 9 | truck | 0(artifact) | 0(car) |
第4のラベルは画像のRGB値の平均値を算出し、分類します。
- RGB平均値が128より小さい:ラベル0(暗い画像)
- RGB平均値が128以上:ラベル1(明るい画像)
飛行機には初期ラベルとして0、第2のラベルとして1、第3のラベルとして2がつきます。飛行機は飛行機で、人工物で、飛ぶものという分類です。
また、その画像が暗ければ第4のラベルとして0、明るければ第4のラベルとして1を付与します。
(第2、第3、第4のラベル付けはプログラミングしやすかったために作った恣意的なものです。
人間の手でがんばればもっと色々なラベルを付けられるでしょうが、私には画像60,000枚のラベル付けをする根性がありませんでした)
データのロードとラベル付けのプログラムは以下のとおりです。
# load dataset
(x_train, y_train), (x_test, y_test) = cifar10.load_data()
print('x_train shape:', x_train.shape)
print(x_train.shape[0], 'train samples')
print(x_test.shape[0], 'test samples')
# prepare x dataset
x_train = x_train.astype('float32')
x_test = x_test.astype('float32')
x_train /= 255
x_test /= 255
# give a name to each label
label1 = {0:"airplane",
1:"automobile",
2:"bird",
3:"cat",
4:"deer",
5:"dog",
6:"frog",
7:"horse",
8:"ship",
9:"truck"}
label2 = {0:"artifact", #0,1,8,9
1:"animal"} #2,3,4,5,6,7
label3 = {0:"car", #1,9
1:"mammal", #3,4,5,7
2:"fly", #0,2
3:"water"} #6,8
label4 = {0:"dark", #if average pixel is below 128
1:"bright"} #if average pixel is over 128
# defining y_train2 and y_test2, with inorganic objects as 0 and organic objects as 1
def modLabel2(y):
y2 = copy.deepcopy(y)
for i in range(len(y)):
if y2[i] in [0,1,8,9]:
y2[i] = 0
else:
y2[i] = 1
return y2
y_train2 = modLabel2(y_train)
y_test2 = modLabel2(y_test)
# defining y_train3 and y_test3 with 4 labels
def modLabel3(y):
y3 = copy.deepcopy(y)
for i in range(len(y)):
if y3[i] in [1,9]:
y3[i] = 0
elif y3[i] in [3,4,5,7]:
y3[i] = 1
elif y3[i] in [0,2]:
y3[i] = 2
else:
y3[i] = 3
return y3
y_train3 = modLabel3(y_train)
y_test3 = modLabel3(y_test)
# defining y_train3 and y_test4 with 2 labels
def genLabel4(x):
y4 = []
for i in range(len(x)):
brightness = np.average(x[i].ravel())
if brightness < 0.5:
y4.append([0])
elif brightness >= 0.5:
y4.append([1])
return np.array(y4)
y_train4 = genLabel4(x_train)
y_test4 = genLabel4(x_test)
# Convert class vectors to binary class matrices.
y_train1 = keras.utils.to_categorical(y_train, num_classes1)
y_test1 = keras.utils.to_categorical(y_test, num_classes1)
y_train2 = keras.utils.to_categorical(y_train2, num_classes2)
y_test2 = keras.utils.to_categorical(y_test2, num_classes2)
y_train3 = keras.utils.to_categorical(y_train3, num_classes3)
y_test3 = keras.utils.to_categorical(y_test3, num_classes3)
y_train4 = keras.utils.to_categorical(y_train4, num_classes4)
y_test4 = keras.utils.to_categorical(y_test4, num_classes4)
print("y train1:{0}\ny test1:{1}\ny train2:{2}\ny test2:{3}\ny train3:{4}\ny test3:{5}\ny train4:{6}\ny test4:{7}".format(
y_train1.shape, y_test1.shape, y_train2.shape, y_test2.shape, y_train3.shape, y_test3.shape, y_train4.shape, y_test4.shape))
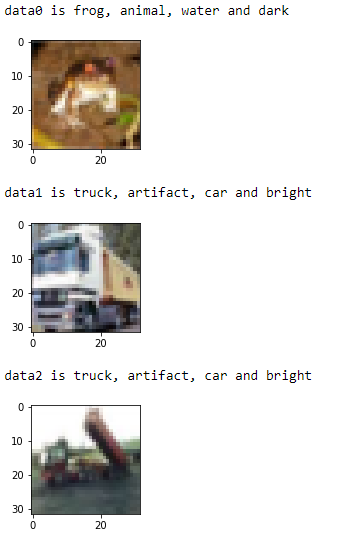
for i in range(10):
plt.figure(figsize=(2, 2))
print("data{0} is {1}, {2}, {3} and {4}".format(
i,label1[np.argmax(y_train1[i])], label2[np.argmax(y_train2[i])], label3[np.argmax(y_train3[i])], label4[np.argmax(y_train4[i])]))
plt.imshow(x_train[i].reshape(32, 32, 3))
plt.show()
こんな感じで、1画像に複数のラベルが設定されています。
複数の分類を行うニューラルネットワーク
Kerasで複数の入出力を行うニューラルネットワークの書き方は以下公式ドキュメントで説明されています。
https://keras.io/getting-started/functional-api-guide/#multi-input-and-multi-output-models
上記はLSTMで2入力2出力を行う方法ですが、今回はCNNで1入力4出力を行うニューラルネットワークを作ります。
構成は以下のようにします。
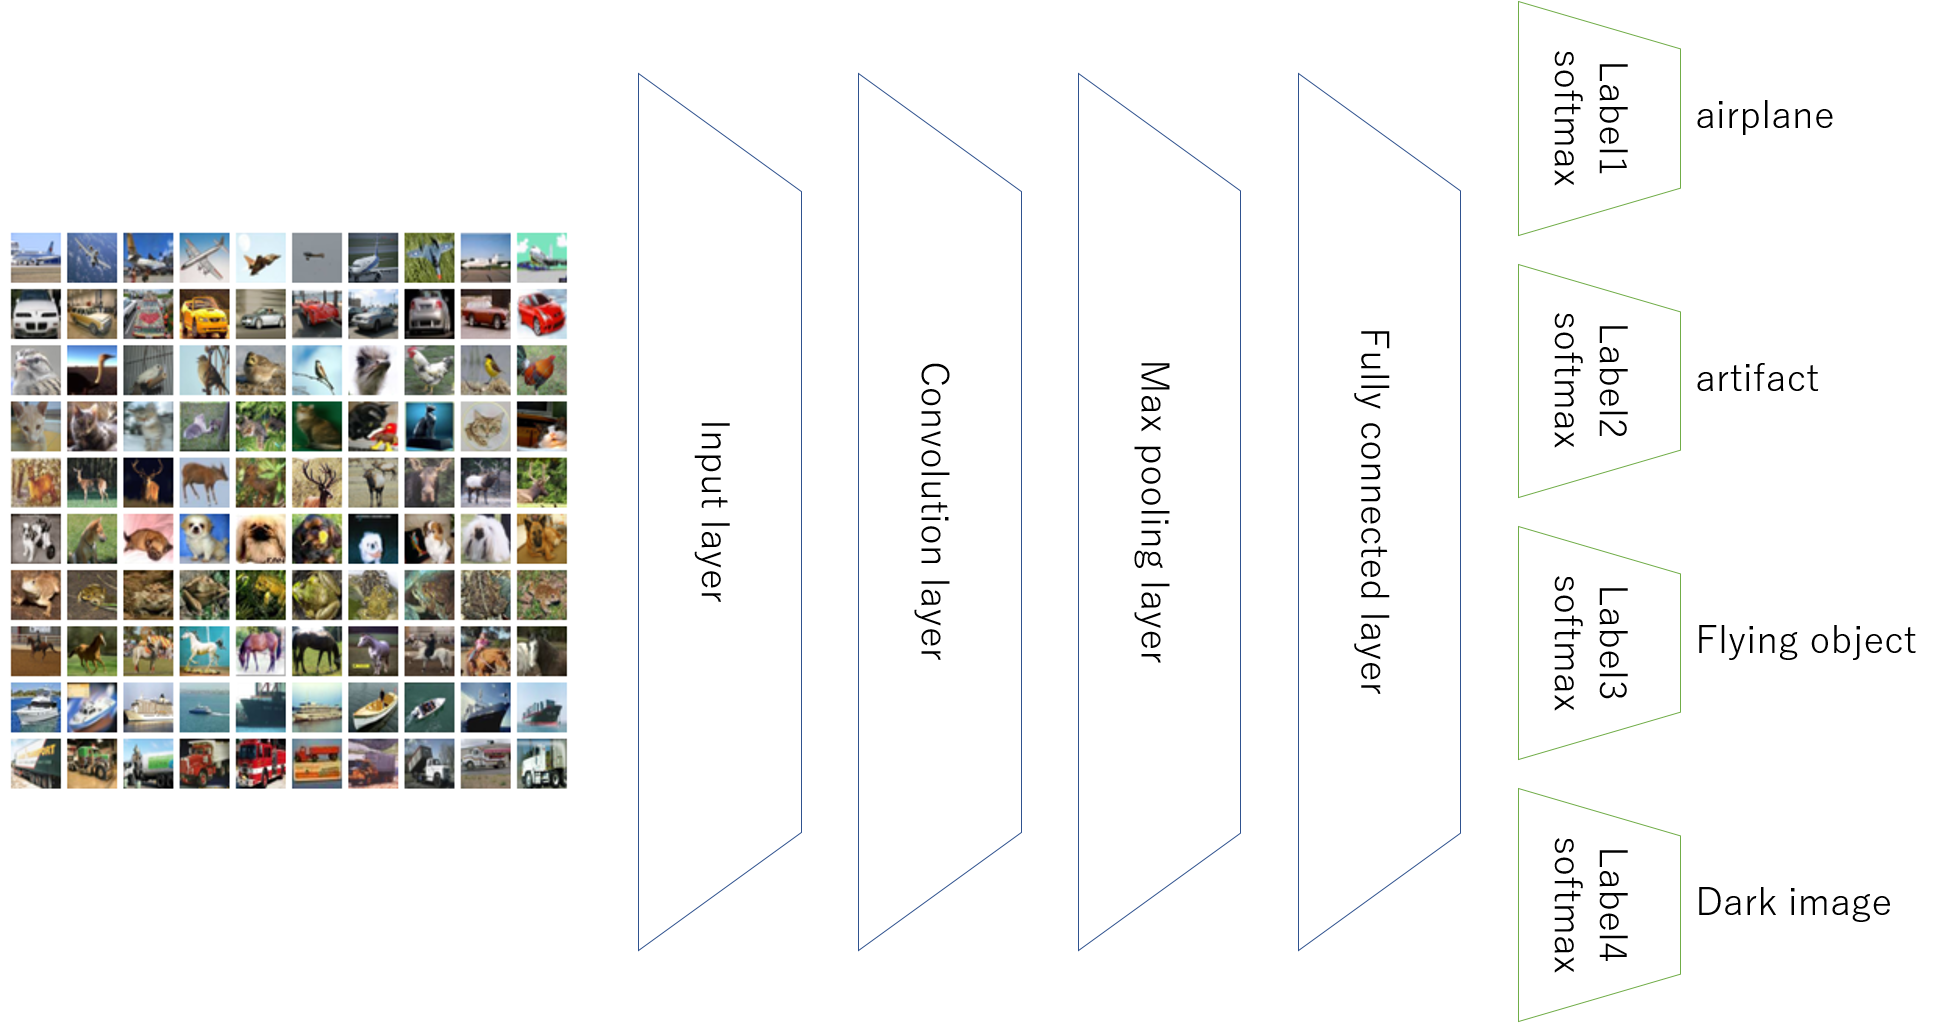
ニューラルネットワークの構造はVGGの超簡易版にしました。
入力はCifar10の画像になり、32323のデータになります。
隠れ層はConvolution→Convolution→MaxPoolingのセットを2回繰り返します。
全結合層は512ニューロンです。
出力層(分類層)はSoftmax層を4種類用意します。
- 標準の第1ラベル:出力数10
- 第2のラベル:出力数2
- 第3のラベル:出力数4
- 第4のラベル:出力数2
最適化関数はAdamで、損失関数はcategorical_crossentropyで、4つの損失を計算します。
# input layer
cifarInput = Input(shape=(x_train.shape[1:]))

# convolution and max pooling layers
x = Conv2D(32, (3, 3), padding='same', activation='relu')(cifarInput)
x = Conv2D(32, (3, 3), padding='same', activation='relu')(x)
x = MaxPooling2D(pool_size=(2,2))(x)
x = Dropout(0.25)(x)
x = Conv2D(64, (3, 3), padding='same', activation='relu')(x)
x = Conv2D(64, (3, 3), padding='same', activation='relu')(x)
x = MaxPooling2D(pool_size=(2,2))(x)
x = Dropout(0.25)(x)

# classification layers
x = Flatten()(x)
x = Dense(512, activation='relu')(x)
x = Dropout(0.5)(x)
# original labels, 0 to 9, as output1
output1 = Dense(num_classes1, activation='softmax', name='output1')(x)
# second labels, 0 or 1, as output2
output2 = Dense(num_classes2, activation='softmax', name='output2')(x)
# third labels, 0 to 3, as output3
output3 = Dense(num_classes3, activation='softmax', name='output3')(x)
# fourth labels, 0 or 1, as output4
output4 = Dense(num_classes4, activation='softmax', name='output4')(x)

multiModel = Model(cifarInput, [output1, output2, output3, output4])

# initiate Adam optimizer
opt = keras.optimizers.adam(lr=0.0001, decay=1e-6)

# Let's train the model using Adam
multiModel.compile(loss={'output1': 'categorical_crossentropy',
                         'output2': 'categorical_crossentropy',
                         'output3': 'categorical_crossentropy',
                         'output4': 'categorical_crossentropy'},
                   optimizer=opt,
                   metrics=['accuracy'])

# early stopping and model checkpoint
es_cb = EarlyStopping(monitor='val_loss', patience=3, verbose=1, mode='auto')
chkpt = os.path.join(saveDir, 'MultiCifar10_.{epoch:02d}-{val_loss:.2f}-{val_output1_loss:.2f}-{val_output2_loss:.2f}-{val_output3_loss:.2f}-{val_output4_loss:.2f}.hdf5')
cp_cb = ModelCheckpoint(filepath = chkpt, monitor='val_loss', verbose=1, save_best_only=True, mode='auto')


# train model
history = multiModel.fit(x_train,
                         {'output1': y_train1,
                          'output2': y_train2,
                          'output3': y_train3,
                          'output4': y_train4},
                         batch_size=batch_size,
                         epochs=epochs,
                         validation_data=(x_test,
                                          {'output1': y_test1,
                                           'output2': y_test2,
                                           'output3': y_test3,
                                           'output4': y_test4}),
                         callbacks=[es_cb, cp_cb])
トレーニング過程では4ラベルの損失が評価され、収束を目指します。
全結合層以上の特徴抽出部分は共有しているため、4ラベルだからといって収束が4倍遅くなるということはありません。
Convolution→全結合の間に特徴が抽出され、その特徴に対して4つの分類を行っているイメージです。
結果
テストデータに対する評価は以下のとおりです。
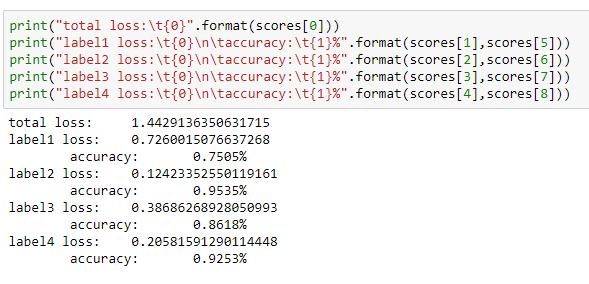
Cifar10の標準ラベルが75%、第2、第3、第4のラベルが86~95%程度のAccuracyでした。
このモデルを通すことで、同時に複数種類のラベルを出力することができます。
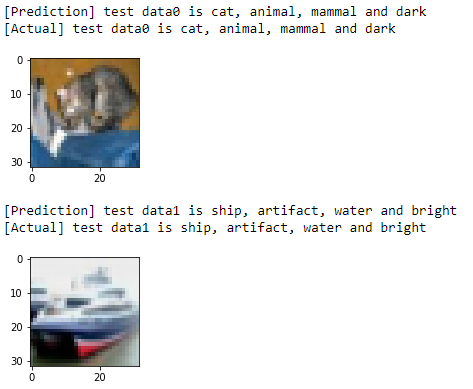
各判定器の精度はまちまちなため、第1のラベルが間違っていても他のラベルは正解している、ということもあります。
