WebAssembly
前回記事を書いてから状況が変化して、以前の手順のままではうまくゆかなくなってしまいました。
Fortran で WebAssembly ~または地獄めぐり~
しかしながら、llvm-8 で llvm が WebAssembly に対応するなどの事情もあって、以前より楽に環境構築できるようになりましたので、その手順についてまとめておきたいと思います。
まだ Fortran のランタイムなどの対応はなされていないので、I/O、数学関数の類、allocable 等は使えませんが、将来的には他言語のようにランタイムそのものを WebAssembly にするなどの対応が可能かもしれません。(また中間形式を C 言語に変換してそこで修正ののち emscripten に送るというアイデアをネットで見たこともあります。)
手順
おおよそ3段階に分かれます。時間がかかるのは flang の用意です。
- flang の用意
- llvm-8 の導入
- WebAseembly 実行の用意
Windows10 の WSL ubuntu18.04 のまっさらな状態から導入しました。
flang の用意
GitHub 上の flang 公式の Building Flang のページの指示に従って作ります。以前に比べて少し親切になりました。
llvm-7 系統から branch しているので、WebAssembly に対応するようなオプションを加えます。(-DLLVM_EXPERIMENTAL_TARGETS_TO_BUILD=WebAssembly)公式バイナリはこのオプションが有効化されていないので、自分でコンパイルする必要があります。
前準備
make/cmake gcc/g++ が必要になるので導入します。
sudo apt update
sudo apt upgrade
sudo apt autoremove

sudo apt install g++
sudo apt install make
sudo apt install cmake
本番
flang 公式の指示は4段階に分かれています。前半二つは gcc/g++ でコンパイルし、後半二つは前半で生成した clang/clang++ でコンパイルします。
0 環境変数の設定
前準備として環境変数をセットします。いま ~/llvm/install の個人局所環境にバイナリをインストールすることにします。指示に従いディレクトリを作り cmake 用の環境変数をセットします。ここで忘れずに 『 -DLLVM_EXPERIMENTAL_TARGETS_TO_BUILD=WebAssembly』 を加えておきます。これを忘れると、すべてが徒労に終わります。
mkdir llvm
cd llvm
mkdir install
export INSTALL_PREFIX=`pwd`/install

CMAKE_OPTIONS="-DCMAKE_INSTALL_PREFIX=$INSTALL_PREFIX \
    -DLLVM_CONFIG=$INSTALL_PREFIX/bin/llvm-config \
    -DCMAKE_CXX_COMPILER=$INSTALL_PREFIX/bin/clang++ \
    -DCMAKE_C_COMPILER=$INSTALL_PREFIX/bin/clang \
    -DCMAKE_Fortran_COMPILER=$INSTALL_PREFIX/bin/flang \
    -DLLVM_TARGETS_TO_BUILD=X86         \
    -DLLVM_EXPERIMENTAL_TARGETS_TO_BUILD=WebAssembly"
リリース・オプションをつけてもいいかもしれません。 -DCMAKE_BUILD_TYPE=Release
1 llvm-7
すごく時間がかかります。make -j n で n スレッド並列で実行してくれますが、タイミングで出来上がる順番が間に合わなくてエラー終了することがあります。何度か繰り返すと何とかなります。
git clone https://github.com/flang-compiler/llvm.git
cd llvm && git checkout release_70
mkdir -p build && cd build
cmake $CMAKE_OPTIONS -DCMAKE_C_COMPILER=/usr/bin/gcc -DCMAKE_CXX_COMPILER=/usr/bin/g++ ..
make -j 8
make install
cd ../..
2 flang-driver
git clone https://github.com/flang-compiler/flang-driver.git
cd flang-driver && git checkout release_70
mkdir -p build && cd build
cmake $CMAKE_OPTIONS -DCMAKE_C_COMPILER=/usr/bin/gcc -DCMAKE_CXX_COMPILER=/usr/bin/g++ ..
make -j 8
make install
cd ../..
3 openmp
2 のステップで 0 のステップで設定した環境変数 INSTALL_PREFIX の下に clang 等が生成されているので、ここに PATH を通しておきます。以降はこれらのコンパイラを使用します。gcc/g++ でやると失敗します。
export PATH=$INSTALL_PREFIX/bin:$PATH

git clone https://github.com/llvm-mirror/openmp.git
cd openmp && git checkout release_70
mkdir -p build && cd build
cmake $CMAKE_OPTIONS -DCMAKE_C_COMPILER=/usr/bin/gcc -DCMAKE_CXX_COMPILER=/usr/bin/g++ ..
make -j 8
make install
cd ../..
なんか警告が出るので、気になる人は各人調べてください。ここでは気にしないことにします。
4 flang compiler
二段階に分かれています。初めに flang 用のランタイムを生成します(ただし x86 用)。次に本体を生成します。ここも時間がかかります。
4-a runtime
cd flang/runtime/libpgmath
mkdir -p build && cd build
cmake $CMAKE_OPTIONS ..
make -j 8
make install
cd ../../..
4-b flang 本体
mkdir -p build && cd build
cmake $CMAKE_OPTIONS ..
make -j 8
make install
llvm-8 の導入
公式バイナリを導入します。https://releases.llvm.org/download.html#8.0.0
wget https://releases.llvm.org/8.0.0/clang+llvm-8.0.0-x86_64-linux-gnu-ubuntu-18.04.tar.xz
xz -dv clang+llvm-8.0.0-x86_64-linux-gnu-ubuntu-18.04.tar.xz
tar xfv clang+llvm-8.0.0-x86_64-linux-gnu-ubuntu-18.04.tar
PATH を通しておきます。ここで、先ほど flang 用に生成した llvm ツールは ver.7 系列なので、こちらの 8 系列が優先されるような PATH の並びが必要です。念のため llc --version などを実行してみて ver.8 系列が動いていることを確認してみてください。
export PATH=~/llvm/clang+llvm-8.0.0-x86_64-linux-gnu-ubuntu-18.04/bin:$PATH
WebAseembly 実行の用意
Fortran ソースコードから wasm ファイルへの変換は llvm-8 を用いると以前より簡単化されます。以下のサイトがとても参考になります。
[Compiling C to WebAssembly without Emscripten]
(https://dassur.ma/things/c-to-webassembly/)
wasm の生成
flang --target=wasm32 -emit-llvm -c -S -Oz test.f90
llc --march=wasm32 -filetype=obj test.ll
wasm-ld --no-entry --export-all -o test.wasm test.o
function test() result(ires) bind(c, name = 'test')
    integer :: ires
    ires = 2
end function test
html ファイルの準備
html ファイルとして上記サイトの例を用いる場合、wasm を MIME タイプとして登録しておく必要があります。
Incorrect response MIME type. Expected 'application/wasm' エラーの 対応
sudo vi /etc/mime.types
 適当なところに追加 ==>  application/wasm wasm
<!DOCTYPE html>

<script type="module">
  async function init() {
    const { instance } = await WebAssembly.instantiateStreaming(
      fetch("./test.wasm")
    );
    console.log(instance.exports.test());
  }
  init();
</script>
サーバー起動
python を使うことにします。
pythonでローカルwebサーバを立ち上げる
sudo apt install python

python -m SimpleHTTPServer 8080
ここでブラウザを立ち上げて、http://localhost:8080/test.html に接続し、F12 でツールを開いて console タブを見ると 2 と書かれているはずです。
http://localhost:8080/test.html
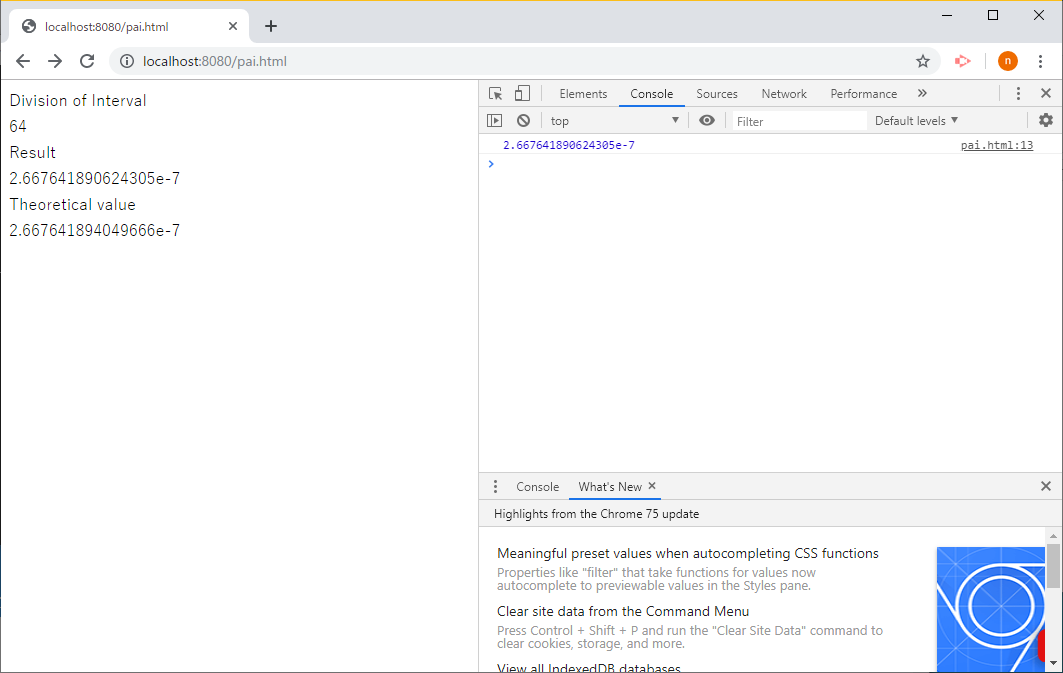
実行例 円周率 pi と近似値 355/113 の差
$$ \int_0^1{x^8(1-x)^8(25+816x^2)\over3164(1+x^2)}dx = {355\over113}-\pi$$
台形積分で積分を計算し、左辺と右辺の値を求めて出力します。
注:実行時にはランタイム・ライブラリの問題で数学関数は使えませんが、コンパイル時の定数の計算には使えます。
      module m_pai
          implicit none
          integer, parameter :: kd = kind(1.0d0)
          real(kd), parameter :: pi = 4 * atan(1.0_kd)
      contains
          real(kd) function pai(n) bind(c, name = 'pai')
              integer, value :: n
              real(kd) :: x(129), y(129), h
              integer :: i
              h = 1.0_kd / (n - 1)
              forall (i = 1:n) x(i) = (i - 1) * h
              y = f(x(1:n))
              pai = h * ( sum(y(1:n)) - 0.5_kd *(y(1) + y(n)) )
          end function pai


          real(kd) pure elemental function f(x)
              real(kd), intent(in) :: x
              f = x**8 * (1.0_kd - x)**8 * (25.0_kd + 816.0_kd * x**2) / (3164.0_kd * (1.0_kd + x**2))
          end function f


          real(kd) function pai2() bind(c, name = 'pai2')
              pai2 = 355.0_kd / 113.0_kd - pi
          end function pai2
      end module m_pai
flang --target=wasm32 -emit-llvm -c -S -Oz pai.f90
llc --march=wasm32 -filetype=obj pai.ll
wasm-ld --no-entry --export-all -o pai.wasm pai.o
<!DOCTYPE html>
<html>
<body>
<script type="module">
    async function init() {
        const { instance } = await WebAssembly.instantiateStreaming(
        fetch("./pai.wasm")
    );
    const ex = instance.exports
    const n = 64
    const result = ex.pai(n + 1)
    const theory = ex.pai2()
    console.log(result);
    document.querySelector("#n_div").innerHTML = n
    document.querySelector("#result").innerHTML = result
    document.querySelector("#theory").innerHTML = theory
    }
    init();
</script>
Division of Interval
<div id="n_div"></div>

Result
<div id="result"></div>

Theoretical value
<div id="theory"></div>

</body>
</html>
