最近よく聞くAstro。
そんなAstroを初めて使ってみたときの備忘録です。
気になるけどどんな感じかな?と思っている方に雰囲気が伝わればうれしいです。
私と同じくコーダー業がメインで、これから何かやってみたいという方の参考になればうれしいです。
※ 使い方やAstroの説明というより、とりあえず手を動かして使ってみた雰囲気の
備忘録になります!
※ Astroの本当の機能面やすごいところなどは触れていません、あくまで一番最初の雰囲気だけです
※ 細かくメモとして記載しているので、読み飛ばしてください。
何より先に、やってみた感想!
直感で色々わかる感じがしてとても使いやすい!
実際にAstroのドキュメントにも以下のようにあります。
Astroの目標は、すべてのウェブ開発者が利用できることです。 Astroは、ウェブ開発のスキルレベルや過去の経験に関係なく、親しみやすいと感じられるように設計されています。
これは本当にそうだなと今回実感しました。
この記事では深いことはやっていなく本当に触りだけでしたが、「気になるけど難しそう」という方は是非読んでみて、「思ったより簡単に始められそう!」という気持ちになってくれたらうれしいです。
私スペック
- 普段はコーダー業務(HTML/CSSをデザインから起こす)がメイン
- その他はLaravel/Wordpress、時折Vue.js
- JSは普通のHPで使う程度の知識
環境
Node.js: v22.12.0
WSL2で実行
今回やってみる事、この記事ではやらないこと
-
やってみること
インストールからページの追加、簡単な構文について触れる。 -
やらないこと
Astroの本格的な使い方や、優れている点などの紹介はしません。
あくまでも、全く知らない入門者が触ってみた本当の「感想」がメインです。
さっそくインストール
コマンド的には簡単で
npm create astro@latest
これだけでインストールできる。
実際に実行してみるといくつか質問されるので答えていく
-
どこにプロジェクトを作成するか?(Where should we create your new project?)
プロジェクトルートになるディレクトリの名前を好きにつけてあげてください。
今回は「astro-first-sample」としました。 -
何かテンプレートを使うか?(How would you like to start your new project?)
私の場合3つ程候補がありましたが、とりあえず最小構成のA basic, minimal starterを選択しました。
色々テンプレートはあるらしく、テンプレートを指定してのプロジェクト作成などもできるみたいです。
詳しくはこちら↓
テーマやスターターテンプレートを使用する - Astro公式 -
npmの依存関係をインストールするか?(Install dependencies?)
依存関係のものまでインストールを行ってくれる設定の様です。これは「yes」でいいと思います。 -
Gitをどうするか?(Initialize a new git repository?)
基本的にはGitで管理することがほとんどだと思うのでこれも「yes」でいいと思います。
以下がそのログです
npm create astro@latest

> npx
> create-astro


 astro   Launch sequence initiated.

   dir   Where should we create your new project?
         ./astro-first-sample

  tmpl   How would you like to start your new project?
         A basic, minimal starter

  deps   Install dependencies?
         Yes

   git   Initialize a new git repository?
         Yes

      ✔  Project initialized!
         ■ Template copied
         ■ Dependencies installed
         ■ Git initialized

  next   Liftoff confirmed. Explore your project!

         Enter your project directory using cd ./astro-first-sample
         Run npm run dev to start the dev server. CTRL+C to stop.
         Add frameworks like react or tailwind using astro add.

         Stuck? Join us at https://astro.build/chat

╭─────╮  Houston:
│ ◠ ◡ ◠  Good luck out there, astronaut! 🚀
╰─────╯
完了するとディレクトリが生成されているのでログにもある通りcd ./astro-first-sampleで移動します。
インストールで生成されたものたち
生成されたディレクトリ構成はこのような感じでした
astro-first-sample/
  ├ .git/
  ├ .gitignore
  ├ .vscode/
  ├ README.md
  ├ astro.config.mjs
  ├ node_modules/
  ├ package-lock.json
  ├ package.json
  ├ public/
  ├ src/
  └ tsconfig.json
package.jsonはこんな感じ
{
  "name": "astro-first-sample",
  "type": "module",
  "version": "0.0.1",
  "scripts": {
    "dev": "astro dev",
    "build": "astro build",
    "preview": "astro preview",
    "astro": "astro"
  },
  "dependencies": {
    "astro": "^5.1.3"
  }
}
バージョン5.1.3が入っていました。
scriptもいくつか既に設定されています。
Astroには、プロジェクト開発に必要な機能がすべてが備わっている、組み込みの開発サーバーが付属しています。astro dev CLIコマンドを実行するとローカル開発サーバーが起動するため、新しいウェブサイトを最初の段階から動作確認できます。
すべてのスターターテンプレートには、astro devを実行するための設定済みスクリプトが付属しています。プロジェクトディレクトリに移動してから、好みのパッケージマネージャを使用してこのコマンドを実行し、Astro開発サーバーを起動します。
とのことなので、設定されているnpm run devを実行してみます
npm run devでさっそく実行
npm run dev

> astro-first-sample@0.0.1 dev
> astro dev

▶ Astro collects anonymous usage data.
  This information helps us improve Astro.
  Run "astro telemetry disable" to opt-out.
  https://astro.build/telemetry

16:41:53 [types] Generated 0ms
16:41:53 [content] Syncing content
16:41:53 [content] Synced content

 astro  v5.1.3 ready in 146 ms

┃ Local    http://localhost:4321/
┃ Network  use --host to expose

16:41:53 watching for file changes...
記載のあるhttp://localhost:4321/にアクセスしてみると無事画面が表示されました!
ファイルの中身を見てみる
現在のsrcディレクトリ構成を見てみる
src/
  ├ assets/
  ├ components/
  │ └ Welcome.astro
  ├ layouts/
  │ └ layout.astro
  ├ pages/
  └ └ index.astro
まずは表示されている「To get started, open the src/pages directory in your project.」の文字がどこかにあるはずだから探しつつ構造を見てみます。
いちばんそれっぽいpages/index.astroを見てみると
---
import Welcome from '../components/Welcome.astro';
import Layout from '../layouts/Layout.astro';

// Welcome to Astro! Wondering what to do next? Check out the Astro documentation at https://docs.astro.build
// Don't want to use any of this? Delete everything in this file, the `assets`, `components`, and `layouts` directories, and start fresh.
---

<Layout>
	<Welcome />
</Layout>
このようになっていた。
求めているものはWelcomeの方にありそうだけど、一旦layoutsの方を見てみる。
<!doctype html>
<html lang="en">
	<head>
		<meta charset="UTF-8" />
		<meta name="viewport" content="width=device-width" />
		<link rel="icon" type="image/svg+xml" href="/favicon.svg" />
		<meta name="generator" content={Astro.generator} />
		<title>Astro Basics</title>
	</head>
	<body>
		<slot />
	</body>
</html>

<style>
	html,
	body {
		margin: 0;
		width: 100%;
		height: 100%;
	}
</style>
大枠が見えた。
<slot />が先ほどの<Welcome />が入る部分の様だ。
次は本命のwelcomeを見てみる
---
import astroLogo from '../assets/astro.svg';
import background from '../assets/background.svg';
---

<div id="container">
	<img id="background" src={background.src} alt="" fetchpriority="high" />
	<main>
		<section id="hero">
			<a href="https://astro.build"
				><img src={astroLogo.src} width="115" height="48" alt="Astro Homepage" /></a
			>
			<h1>
				To get started, open the <code><pre>src/pages</pre></code> directory in your project.
			</h1>
			<section id="links">
				<a class="button" href="https://docs.astro.build">Read our docs</a>
				<a href="https://astro.build/chat"
					>Join our Discord <svg xmlns="http://www.w3.org/2000/svg" viewBox="0 0 127.14 96.36"
						><path
							fill="currentColor"
							d="M107.7 8.07A105.15 105.15 0 0 0 81.47 0a72.06 72.06 0 0 0-3.36 6.83 97.68 97.68 0 0 0-29.11 0A72.37 72.37 0 0 0 45.64 0a105.89 105.89 0 0 0-26.25 8.09C2.79 32.65-1.71 56.6.54 80.21a105.73 105.73 0 0 0 32.17 16.15 77.7 77.7 0 0 0 6.89-11.11 68.42 68.42 0 0 1-10.85-5.18c.91-.66 1.8-1.34 2.66-2a75.57 75.57 0 0 0 64.32 0c.87.71 1.76 1.39 2.66 2a68.68 68.68 0 0 1-10.87 5.19 77 77 0 0 0 6.89 11.1 105.25 105.25 0 0 0 32.19-16.14c2.64-27.38-4.51-51.11-18.9-72.15ZM42.45 65.69C36.18 65.69 31 60 31 53s5-12.74 11.43-12.74S54 46 53.89 53s-5.05 12.69-11.44 12.69Zm42.24 0C78.41 65.69 73.25 60 73.25 53s5-12.74 11.44-12.74S96.23 46 96.12 53s-5.04 12.69-11.43 12.69Z"
						></path></svg
					>
				</a>
			</section>
		</section>
	</main>

	<a href="https://astro.build/blog/astro-5/" id="news" class="box">
		<svg width="32" height="32" fill="none" xmlns="http://www.w3.org/2000/svg"
			><path
				d="M24.667 12c1.333 1.414 2 3.192 2 5.334 0 4.62-4.934 5.7-7.334 12C18.444 28.567 18 27.456 18 26c0-4.642 6.667-7.053 6.667-14Zm-5.334-5.333c1.6 1.65 2.4 3.43 2.4 5.333 0 6.602-8.06 7.59-6.4 17.334C13.111 27.787 12 25.564 12 22.666c0-4.434 7.333-8 7.333-16Zm-6-5.333C15.111 3.555 16 5.556 16 7.333c0 8.333-11.333 10.962-5.333 22-3.488-.774-6-4-6-8 0-8.667 8.666-10 8.666-20Z"
				fill="#111827"></path></svg
		>
		<h2>What's New in Astro 5.0?</h2>
		<p>
			From content layers to server islands, click to learn more about the new features and
			improvements in Astro 5.0
		</p>
	</a>
</div>

<style>
	#background {
		position: fixed;
		top: 0;
		left: 0;
		width: 100%;
		height: 100%;
		z-index: -1;
		filter: blur(100px);
	}

    ...
その他のCSSは省略
</style>
やっぱりここにいましたね
早速文言を変えてみます

保存したらブラウザ側で即時反映されました。HMR的なやつかな?
公式によると
Astroはsrc/ディレクトリ内のファイル変更をリアルタイムで監視し、開発中に変更を加えるとサイトのプレビューを更新します。開発中に変更を加えるたびにサーバーを再起動する必要はありません。開発サーバーが起動しているときにブラウザでサイトを表示すれば、常に最新のバージョンを確認できます。
ということなので、この辺は便利ですね!
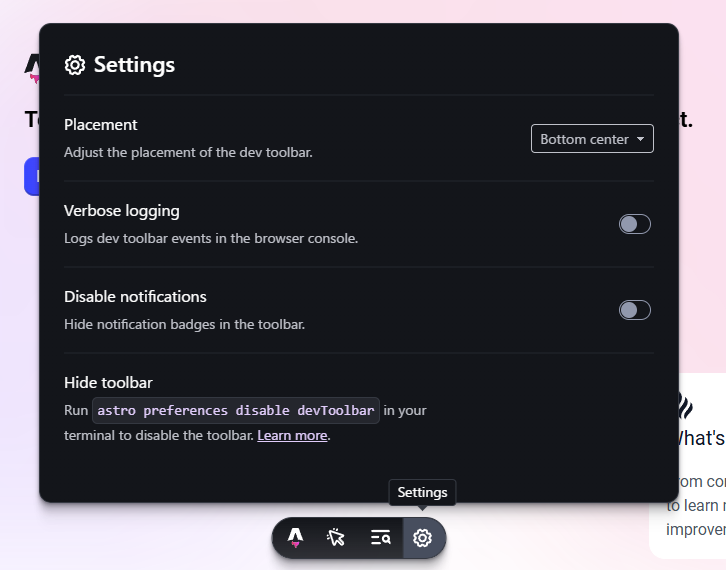
画面下部にいる謎のバー
さっきソースを見ていた時にはこんな記述はなかった。
DevToolsで見てみると

こんな感じ。
一応ソースでdev-toolbar-rootを検索してみてもヒットしない。
名前的にきっとデバッグ用のツールだと思うが項目的には


色々検証できそう?
VueのDevToolsのブラウザバージョンみたいな感じなのかな?
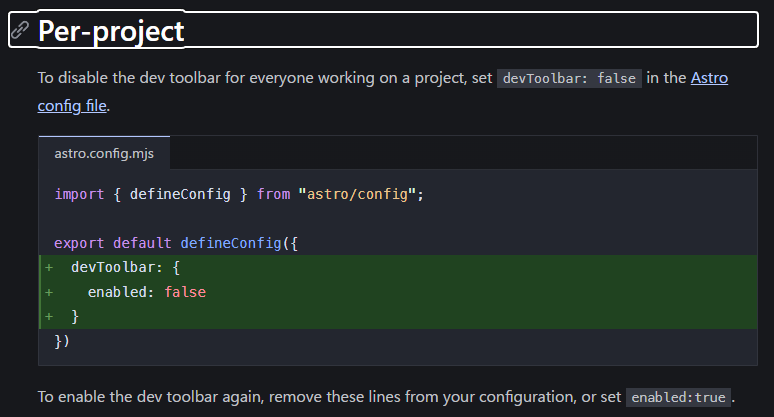
調べてみると
試しにOFF設定してみる
記載場所はルート直下にあるastro.config.mjsファイル
// @ts-check
import { defineConfig } from 'astro/config';

// https://astro.build/config
export default defineConfig({
  devToolbar: {
    enabled: false
  }
})
↑で実行してみると消えたので間違いなさそう
このバーは色々使えそうですが、Astroの原理を理解してからの方が良さそうなので後で検証してみます。
ページを増やしてみる
ソースを見た感じも、トップページの記載内容をみても

pagesディレクトリにファイルを追加するとページになる感じがするので試しに追加してみる。
今のところルーティングしている箇所は見つかっていないのでとりあえず追加してみる。
test.astroを追加する。
---
import Layout from '../layouts/Layout.astro';

// Welcome to Astro! Wondering what to do next? Check out the Astro documentation at https://docs.astro.build
// Don't want to use any of this? Delete everything in this file, the `assets`, `components`, and `layouts` directories, and start fresh.
---

<Layout>
	TEST
</Layout>
それからhttp://localhost:4321/testを開いてみると

本当に表示された。
ルーティングしなくてもいいのか?
試しにpages/dir1というディレクトリを追加して、さらにsample.astroを追加してみた
---
import Layout from '../../layouts/Layout.astro';

// Welcome to Astro! Wondering what to do next? Check out the Astro documentation at https://docs.astro.build
// Don't want to use any of this? Delete everything in this file, the `assets`, `components`, and `layouts` directories, and start fresh.
---

<Layout>
	sample
</Layout>
importのパスは階層が深くなった分合わせた。
それからhttp://localhost:4321/dir1/sampleを開いてみると

これはすごい。
いちいちルーティングしなくてもいいし、直感で生成していけるのでとってもわかりやすい。
記述方法
ずっと気になっていたこの.astroのファイルの記述のされ方。
例えば、JSが入るサイトだったら<script>タグで囲うし、Laravelとかでも独自のタグがありそれを使って記述していく。
しかし、この.astroはその境目を感じない。
---
import Welcome from '../components/Welcome.astro';
import Layout from '../layouts/Layout.astro';

// Welcome to Astro! Wondering what to do next? Check out the Astro documentation at https://docs.astro.build
// Don't want to use any of this? Delete everything in this file, the `assets`, `components`, and `layouts` directories, and start fresh.
---

<Layout>
	<Welcome />
</Layout>
例えばこのindexページだと、importの行と<Latout>に境目を感じない。
components/Welcome.astroを見ても同じ
---
import astroLogo from '../assets/astro.svg';
import background from '../assets/background.svg';
---

<div id="container">
	<img id="background" src={background.src} alt="" fetchpriority="high" />
	<main>
		<section id="hero">
			<a href="https://astro.build"
				><img src={astroLogo.src} width="115" height="48" alt="Astro Homepage" /></a
			>
			<h1>
				To get started, open the <code><pre>src/pages</pre></code> directory in your project.
			</h1>

		... 以下省略
HTMLとJSの境目を感じない。
ここでふと---が気になった。
もしかして、まさか?と思い消してみると


おお・・・!
試しに上の---も消してみる。


実のところ、実際消してみた瞬間、VSCodeのハイライトがおかしくなったのでダメだとは気づいたが、やっぱりこれが必要だったのか!
ということで改めて調べてみる
コードフェンス(---)について
公式ドキュメントによると
Astroコンポーネントのフロントマターのコードフェンス(---)の間に、JavaScriptのローカル変数を定義できます。そして、JSXライクな式を使って、変数をコンポーネントのHTMLテンプレートに注入できます。
難しいことはおいておいて、この---で囲ったコードフェンスの間に普段使っているようなJSを書くことができるというイメージでいい気がする。
そしてそれをコードフェンス外で使う時には{} 波括弧を使うと出力できるみたい。
例えば
---
import Layout from '../../layouts/Layout.astro';
const date = new Date();
const items = ['Astroを', '初めて', '触った']
---

<Layout>
	{ date.toLocaleDateString() } わたしは {
        items.map((item) => (
            <span>{ item }</span>
        ))
    }
</Layout>
とこんな感じになります。
終わりに
さてここまで見て頂いてどうでしたでしょうか?
Astroの本来の使い道とか凄さには触れることはまだできていないとは思いますが、コーダーでもAstro使えそう!という気持ちになって頂けたらこの記事の目的は達成できたのかな?と思います。
冒頭でもお伝えしたように、個人的にはとってもとっつきやすい!というイメージでした。
その分、気をつけなければならない事、またAstroの特性だったり特有のものもあると思うのでそこはじっくり学んでいきたいと思います。
また別の記事でも紹介したり備忘録を残してみるので、よかったらまた読んでみてください!
参考サイト


