はじめに
本記事では、RAG検索に必要なベクトルデータベースの作成・更新を自動化するための仕組みをご紹介します。
Boxの利用を前提としていますので、そのままでは他の環境に流用するのは難しいかもしれませんが、自動化の仕組みづくりのヒントになれば幸いです。
RAG (Retrieval-Augmented Generation)とは
「検索拡張生成」などと訳されます。
従来の生成AIは、既存の大規模言語モデル(LLM)に対して質問することで回答を得ますが、モデルに学習されていない知識については回答できません。そのため質問文だけでなく、ユーザの質問に関連する外部情報を併せてLLMに与えることで、モデルに学習されていない知識についても回答できます。
より詳細な内容は以下の記事などを参照してください。
ベクトルデータベースとは
各データを多次元のベクトルで表現して格納するデータベースです。従来のリレーショナルデータベースの場合は構造化されたデータの格納が主になりますが、ベクトルデータベースの場合は非構造化データを容易に扱えます。また類似性検索ができるため、曖昧な問い合わせに対しても検索結果を返すことができます。
RAGを利用する際、ベクトルデータベースを用いて外部情報を保持することが多いようです。
より詳細な内容は以下の記事などを参照してください。
ここまでのイメージを簡単にまとめると以下のようになります。
まずは事前に外部情報をベクトル化しベクトルDBに格納しておきます。
その後ユーザが外部情報に関する質問をすると、類似度検索で質問内容に関連する外部情報が検索されます。
最後に検索された外部情報を、質問文とセットでLLMに送ることで、回答を得ます。

実際の使用例として、外部情報に非公開情報(社内情報など)を入れることで、社内情報についてLLMに回答させる、などが多い感覚です。
やりたいこと
上記の通りRAGの利用には、外部情報を適切な形式(今回の場合はベクトル)でデータベースに格納することが必要です。外部情報が長期間不変のものであれば手動でベクトル化処理をしてしまえば良いですが、実際には日々変化することが大半でしょう。
その度に手動で処理するのは現実的でないため、今回は
「情報が更新されるとデータベースも自動で更新される」
ことを目指しました。
仕組み
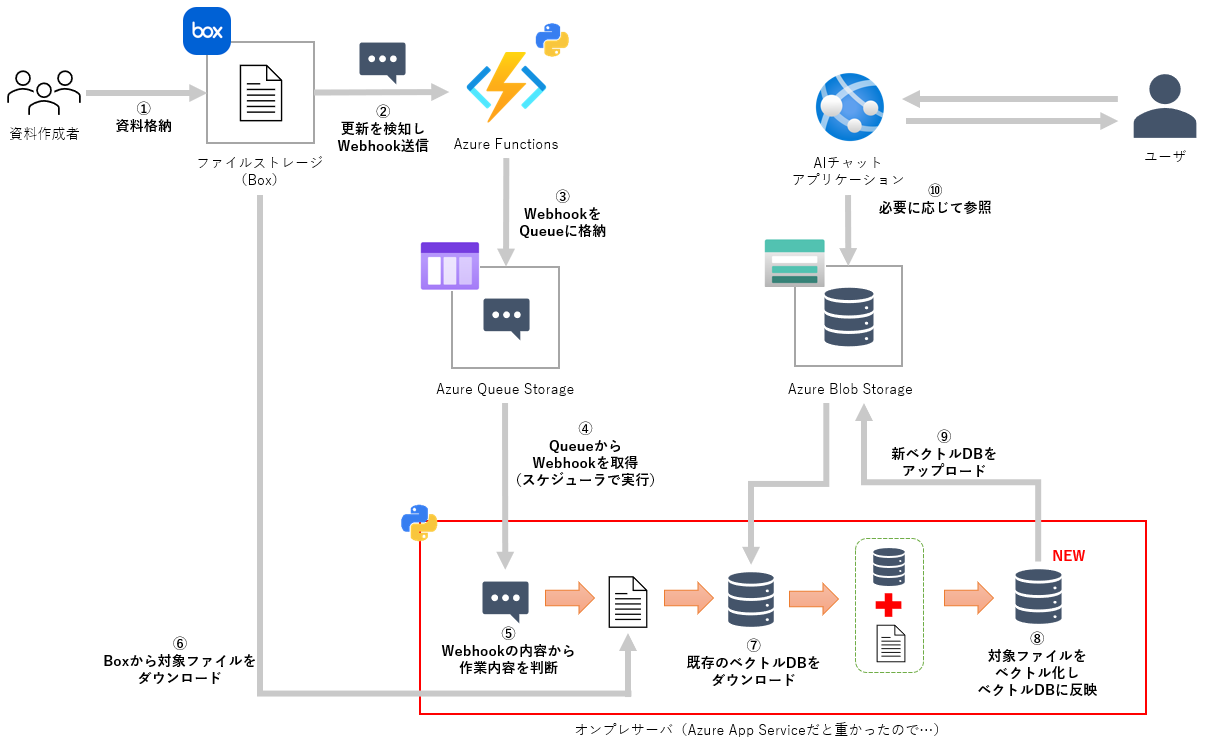
全体像は以下のイメージ絵の通りです。
私の所属するctcではクラウドストレージとしてBoxを採用していますので、ベクトル化したいファイルはBox上に保存されることを前提として仕組みを構築しています。またBoxはファイルの状態が変化(新規追加・削除・移動など)した際に、それぞれの操作に応じたWebhookを送ってくれるため、活用します。
送信されたWebhookはAzure Functions上にデプロイしたPython関数が橋渡しをして、キューに貯めていきます。その上でメインプログラムがスケジューラでキュー内のWebhookを取得し、その種類ごとに処理を分岐させ、ベクトルデータベースを更新しています。
メインとなるベクトルデータベースの更新部分(上図赤枠部分)はPython、キューやベクトルデータベースの格納はAzure Queue StorageとAzure Blob Storage、Webhookの検知はAzure Functions上にデプロイしたPythonプログラムが担うため、同じ構成は比較的作りやすいかと思います。
クラウドストレージは組織により様々だと思いますが、ストレージ上の操作に応じたWebhookを流すことができれば置き換え可能かと思います。
実装
ベクトルデータベースの更新処理について実装の一部をご紹介します。
実際のコードを紹介用に抜粋・改変しているため、そのままでは動作しません。
あくまで参考程度にご覧ください。
キューからWebhookを取得
Azure Queue StorageからWebhookメッセージを取得します(クライアントは別途作成)。
またctcでは複数のベクトルデータベースが存在しており、Webhookメッセージには特定のキーが含まれているため、処理対象のベクトルデータベースを特定する処理も行っています。
def process_queue():
    try:
        # Queueから最大10件のメッセージを取得(大量処理の防止)
        messages = queue_client.receive_messages(max_messages=10)
        messages_list = list(messages)

        if not messages_list:
            logger.info("キューにメッセージはありません。")
            return

        logger.info(f"取得したメッセージ数: {len(messages_list)}")

        # メッセージリストから処理が必要なベクトルデータベースを特定
        vectorstore_map = get_vector_stores_to_process(messages_list)
        logger.info(f"処理対象のベクトルストア: {vectorstore_map.keys()}")

        # 以降の処理...
    finally:
        # スケジューラで関数を実行するため、処理終了後にロックを解放
        processing_lock.release()
        logger.info('ロックを解放しました。')
既存のベクトルデータベースをダウンロード
Azure Blob Storageから既存のベクトルデータベースをダウンロードし、ローカルで読み込みます。なおベクトルデータベースはFaissライブラリを利用し作成しています。
Faissはデータベース単位毎にスタンドアロンでファイルが作成されるため、ファイルのダウンロード・アップロードが必要です。
他のライブラリを使用する場合は処理を変更してください。
(例:pgvectorの場合は、チャンクとベクトルをデータベースに書き込む処理)
vector_store_client = VectorStoreClient()

for vectorstore_name in vectorstore_map.keys():
    vector_path = os.path.join(Config.TMP_DIR_PATH, vectorstore_name)
    get_vectorstore(vector_store_path=vector_path, vector_index_name=vectorstore_name)
    if os.path.exists(vector_path):
        latest_vectors[vectorstore_name] = vector_store_client.load_local(vector_path)
    else:
        latest_vectors[vectorstore_name] = vector_store_client.create_empty_vectorstore()
    logger.info(f'{vectorstore_name}の既存チャンク数: {len(latest_vectors[vectorstore_name].docstore._dict)}')
なおVectorStoreClientクラスは別ソースで以下のように実装しています。create_from_documents、load_localはこの後使用します。
import time

from langchain_community.vectorstores.faiss import FAISS
from langchain_openai import AzureOpenAIEmbeddings

class VectorStoreClient:
    def __init__(self):
        self.embeddings = AzureOpenAIEmbeddings(
            azure_deployment=Config.AZURE_OPENAI_EMBEDDING_DEPLOYMENT_NAME,
            api_version=Config.AZURE_OPENAI_API_VERSION,
            api_key=Config.AZURE_OPENAI_KEY,
            azure_endpoint=Config.AZURE_OPENAI_ENDPOINT,
        )

    # 空のベクトルストアを作成
    def create_empty_vectorstore(self):
        try:
            # ダミーデータを入れたベクトルストアを作成
            vector = FAISS.from_texts([""], self.embeddings)
            # ダミーデータ削除
            vector.delete(ids=list(vector.docstore._dict))

            return vector

        except Exception as e:
            print(f'Create Vector Error: {e} - {e.args}')
            return None

    def create_from_documents(self, documents):
        try:
            vector = FAISS.from_documents(documents[:50], self.embeddings)
            for i in range(50, len(documents), 50):
                time.sleep(1)
                sublist = documents[i:i+50]
                vector.add_documents(sublist)
            return vector
        except Exception as e:
            print(f'Create Vector Error: {documents} - {e} - {e.args}')
            return None

    def load_local(self, path):
        try:
            return FAISS.load_local(path, self.embeddings, allow_dangerous_deserialization=True)
        except Exception as e:
            print(f'Load Vector Error: {path} - {e} - {e.args}')
            return None
Webhookの種類を判断
Webhookの種類に応じて、適切な処理を行います。今回はファイルの新規追加部分についてのみ記載します。
for vector_name, message_list in vectorstore_map.items():
    for message in message_list:
        webhook = json.loads(message.content)
        webhook_id = webhook.get('id')

        if webhook['trigger'] == 'FILE.UPLOADED':
            logger.info("ファイルの新規追加が検知されました。")
            try:
                latest_vectors[vector_name] = webhook_handler.handle_file_uploaded(
                    webhook, latest_vectors[vector_name])
                success_message_list.append(message)
        except Exception as e:
            logger.error(f'ファイル追加処理中にエラーが発生しました: {e}')
ベクトルデータベースの更新
ファイル新規追加時のベクトルデータベースの更新は、以下の手順から成り立っています
- 既存ベクトルデータベースから古いエントリを削除
- Boxからファイルを一時ダウンロード
- 文章の前処理
- ベクトルDBへの反映
今回はhandle_file_uploaded関数として、別ソースにこれらの処理を纏めています。
class WebhookHandler:
    def __init__(self, box_client, vector_store_client):
        self.box_client = box_client
        self.vector_store_client = vector_store_client

    def handle_file_uploaded(self, webhook, latest_vector: FAISS):
        """ファイルアップロードを処理する"""
        #create_file_pathはファイルIDからファイルパスを作成する関数
        try:
            box_file_id = webhook['source']['id']
            box_file_path = self.create_file_path(box_file_id)
            box_file_extension = box_file_path.split(".")[-1]

            # delete_existing_vectorsは既存のベクトルデータベースから同じファイルIDを持つレコードを削除する関数
            self.delete_existing_vectors(latest_vector, box_file_id)

            # Boxからファイルを一時領域にダウンロード
            with NamedTemporaryFile('wb', delete=False, suffix=f".{box_file_extension}") as tmp:
                self.box_client.file(box_file_id).download_to(tmp)

            # ドキュメントの前処理(テキスト化、チャンク化)
            processor = DocumentProcessor(
                box_file_id, box_file_path, tmp.name)
            documents = processor.preprocess()

            # チャンク化済データをベクトル化して最新のベクトルストアに追加
            new_vector = self.vector_store_client.create_from_documents(
                documents)
            if new_vector:
                latest_vector.merge_from(new_vector)

            # 一時ファイルを削除
            os.remove(tmp.name)
            return latest_vector

        except UnsupportedFileTypeException as e:
            os.remove(tmp.name)
            raise

        except Exception as e:
            logger.error(f"Error handling file upload: {e}")
            raise
        finally:
            for f in glob.glob('/tmp/tmp*'):
                os.remove(f)
なおDocumentProcessorクラスは以下のように別ソースで実装しています。このクラスはダウンロードしたファイルの前処理とチャンク化を担当します。ファイルの種類に応じて適切なローダーを選択し、テキストを抽出後、指定された方法でチャンク化します。
import pymupdf4llm
from langchain.text_splitter import RecursiveCharacterTextSplitter
from langchain_community.document_loaders import (
    TextLoader,
    UnstructuredPowerPointLoader,
    UnstructuredWordDocumentLoader,
)
from langchain_core.documents import Document
from app.utils.error_notification import UnsupportedFileTypeException
from app.utils.logger import get_logger

logger = get_logger(__name__)

class JapaneseCharacterTextSplitter(RecursiveCharacterTextSplitter):
    """日本語用のTextSplitter。句読点も句切り文字に含める"""

    def __init__(self, **kwargs: Any):
        separators = [
            "\n\n",
            "\n",
            "。",
            "、",
            " ",
            "",
            "#",
            "##",
            "###",
            "```\n\n-----\n\n```",
        ]
        super().__init__(separators=separators, **kwargs)

class DocumentProcessor:
    def __init__(self, box_file_id, box_file_path, local_file_path):
        self.box_file_id = box_file_id
        self.box_file_path = box_file_path
        self.local_file_path = local_file_path
        self.file_name = box_file_path.split("/")[-1]
        self.file_extension = box_file_path.split(".")[-1]

    def _get_text(self):
        if self.file_extension in ['docx', 'doc']:
            loader = UnstructuredWordDocumentLoader(self.local_file_path)
            data = loader.load()
            return data
        elif self.file_extension in ['pptx']:
            loader = UnstructuredPowerPointLoader(self.local_file_path)
            data = loader.load()
            return data
        elif self.file_extension in ['pdf']:
            text = pymupdf4llm.to_markdown(
                self.local_file_path, force_text=True, show_progress=False)
            data = [Document(page_content=text)]
            return data
        elif self.file_extension in ['txt', 'md']:
            loader = TextLoader(self.local_file_path, autodetect_encoding=True)
            data = loader.load()
            return data
        else:
            raise UnsupportedFileTypeException(
                f'Unsupported file format: {self.file_extension}')

    def preprocess(self):
        try:
            # ファイル読込、テキスト化
            data = self._get_text()

            # チャンク化
            text_splitter = JapaneseCharacterTextSplitter(
                chunk_size=768, chunk_overlap=192, strip_whitespace=True, add_start_index=False)
            documents = text_splitter.split_documents(data)

            logger.info("ドキュメントの前処理が完了しました。")
            return documents

        except UnsupportedFileTypeException as e:
            logger.error(f'サポートされていないファイル形式: {e}')
            raise
        except Exception as e:
            logger.error(
                f'Document Load/Split Error: {self.box_file_path} - {e} - {e.args}')
            raise
ベクトルデータベースのアップロード
更新されたベクトルデータベースをAzure Blob Storageにアップロードします。
try:
    for vector_name, latest_vector in latest_vectors.items():
        vector_path = os.path.join(Config.TMP_DIR_PATH, vector_name)
        latest_vector.save_local(vector_path)
        logger.info(f"{vector_name}をBlob Storageにアップロード中...")
        upload_vectorstore(vector_store_path=vector_path, vector_index_name=vector_name)
except Exception as e:
    logger.error(f'ベクトルアップロード中にエラーが発生しました: {e}')
    raise ValueError('ベクトルストアのアップロードに失敗しました')
おわりに
組織でRAGを利用する際、どのように資料の更新に追従させるかは大きな課題の一つだと思います。
同じ悩みをお持ちの方は、ぜひ参考にしてみてください。
お知らせ
こちらの記事はctc Advent Calendar 2024の記事となります。
ctc(中部テレコミュニケーション株式会社)のメンバーが技術にまつわる知見を投稿していますので、よろしければ他の記事もご覧ください。

