Next.js Route HandlersでTODOアプリを構築する
Next.js 13以降のApp RouterのRoute Handlersを使用し、Supabase(PostgreSQLベースのBaaS)とPrisma(型安全なORM)を活用して簡易的なTODOアプリを構築します。完成したアプリはVercelにデプロイし、Supabaseのデータベースにデータを保存します。
※私はNext.jsを勉強中の初心者ですので、解説に誤りある可能性があります。
事前準備
- Node.js
- Git
プロジェクトのセットアップ
プロジェクト作成
Next.jsプロジェクトを初期化します:
npx create-next-app@latest todo-app-next
プロンプトではTailwind CSSを選択してください。
Prismaのインストール
Prismaをインストールし、初期化します:
npm install prisma --save-dev
npm install @prisma/client
npx prisma init
Prismaの設定
prisma/schema.prismaを以下のように設定します:
generator client {
  provider = "prisma-client-js"
}

datasource db {
  provider = "postgresql"
  url      = env("DATABASE_URL")
}

model Todo {
  id        String   @id @default(uuid())
  title     String
  completed Boolean  @default(false)
  createdAt DateTime @default(now())
}
.envにローカルDBの接続情報を追加します(例: ローカルPostgreSQLを使用する場合):
DATABASE_URL="postgresql://postgres:password@localhost:5432/todoapp?schema=public"
データベース作成
モデルをデータベースに反映します:
npx prisma db push
データベース確認
Prisma Studioでテーブルを確認します:
npx prisma studio
ブラウザでモデルが表示されれば成功です。
Route Handlersでデータベース操作を実装
/app/api/todosフォルダを作成し、route.jsを以下のように実装します。
import { NextResponse } from "next/server";
import { PrismaClient } from "@prisma/client";

// PrismaClientをシングルトンで管理
const prisma = global.prisma || new PrismaClient();
if (process.env.NODE_ENV !== "production") global.prisma = prisma;

// GET: 未完了タスクを優先し、作成日時の新しい順にTodo一覧を取得
export async function GET() {
  try {
    const todos = await prisma.todo.findMany({
      orderBy: [
        { completed: "asc" },
        { createdAt: "desc" },
      ],
    });
    return NextResponse.json(todos);
  } catch (error) {
    return NextResponse.json({ error: "Failed to fetch todos" }, { status: 500 });
  }
}

// POST: 新しいTodoを作成
export async function POST(req) {
  try {
    const { title } = await req.json();
    if (!title?.trim()) {
      return NextResponse.json({ error: "Title is required" }, { status: 400 });
    }
    const newTodo = await prisma.todo.create({
      data: { title },
    });
    return NextResponse.json(newTodo, { status: 201 });
  } catch (error) {
    return NextResponse.json({ error: "Failed to create todo" }, { status: 500 });
  }
}

// PATCH: Todoの完了状態を更新
export async function PATCH(req) {
  try {
    const { id, completed } = await req.json();
    if (!id || typeof completed !== "boolean") {
      return NextResponse.json({ error: "Invalid input" }, { status: 400 });
    }
    const updatedTodo = await prisma.todo.update({
      where: { id },
      data: { completed },
    });
    return NextResponse.json(updatedTodo);
  } catch (error) {
    return NextResponse.json({ error: "Failed to update todo" }, { status: 500 });
  }
}

// DELETE: Todoを削除
export async function DELETE(req) {
  try {
    const { id } = await req.json();
    if (!id) {
      return NextResponse.json({ error: "ID is required" }, { status: 400 });
    }
    await prisma.todo.delete({ where: { id } });
    return NextResponse.json({ message: "Todo deleted" });
  } catch (error) {
    return NextResponse.json({ error: "Failed to delete todo" }, { status: 500 });
  }
}
DB操作の説明
-
GET:
findManyで全タスクを取得し、未完了タスクを優先してソート。 -
POST:
createで新しいタスクを追加。 -
PATCH:
updateで完了状態を更新。 -
DELETE:
deleteでタスクを削除。
フロントエンドの実装
layout.js
import './globals.css';

export default function RootLayout({ children }) {
  return (
    <html lang="en">
      <body>
        <main className="max-w-2xl mx-auto p-8">{children}</main>
      </body>
    </html>
  );
}
page.js
"use client";
import { useState, useEffect } from "react";

export default function TodoList() {
  const [todos, setTodos] = useState([]);
  const [newTodo, setNewTodo] = useState("");

  // TodoリストをAPIから取得
  async function fetchTodos() {
    try {
      const res = await fetch("/api/todos");
      if (!res.ok) throw new Error("Failed to fetch");
      const data = await res.json();
      setTodos(data);
    } catch (error) {
      alert("Failed to load todos");
    }
  }

  // 初回レンダリング時に取得
  useEffect(() => {
    fetchTodos();
  }, []);

  // Todoを追加
  async function addTodo() {
    if (!newTodo.trim()) return;
    const tempId = crypto.randomUUID();
    const optimisticTodo = { id: tempId, title: newTodo, completed: false };
    setTodos([...todos, optimisticTodo]);
    setNewTodo("");
    try {
      const res = await fetch("/api/todos", {
        method: "POST",
        body: JSON.stringify({ title: newTodo }),
        headers: { "Content-Type": "application/json" },
      });
      if (!res.ok) throw new Error("Failed to add");
    } catch (error) {
      setTodos(todos.filter((todo) => todo.id !== tempId));
      alert("Failed to add todo");
    }
  }

  // 完了状態を切り替え
  async function toggleComplete(id, completed) {
    setTodos(todos.map((todo) => (todo.id === id ? { ...todo, completed: !completed } : todo)));
    try {
      const res = await fetch("/api/todos", {
        method: "PATCH",
        body: JSON.stringify({ id, completed: !completed }),
        headers: { "Content-Type": "application/json" },
      });
      if (!res.ok) throw new Error("Failed to update");
    } catch (error) {
      setTodos(todos.map((todo) => (todo.id === id ? { ...todo, completed } : todo)));
      alert("Failed to update todo");
    }
  }

  // Todoを削除
  async function deleteTodo(id) {
    setTodos(todos.filter((todo) => todo.id !== id));
    try {
      const res = await fetch("/api/todos", {
        method: "DELETE",
        body: JSON.stringify({ id }),
        headers: { "Content-Type": "application/json" },
      });
      if (!res.ok) throw new Error("Failed to delete");
    } catch (error) {
      setTodos([...todos, todos.find((todo) => todo.id === id)]);
      alert("Failed to delete todo");
    }
  }

  return (
    <div className="max-w-lg mx-auto mt-10 p-6 bg-white space-y-6">
      <h1 className="text-2xl font-bold text-center">Todo List</h1>
      <div className="flex gap-2">
        <input
          type="text"
          value={newTodo}
          onChange={(e) => setNewTodo(e.target.value)}
          className="flex-grow border border-gray-300 rounded px-3 py-1 focus:outline-none focus:ring-2 focus:ring-blue-500"
          placeholder="Add a new todo..."
        />
        <button
          onClick={addTodo}
          className="bg-blue-500 text-white px-4 py-2 rounded hover:bg-blue-600"
        >
          Add
        </button>
      </div>
      <ul className="space-y-4">
        {todos.map((todo) => (
          <li key={todo.id} className="flex items-center px-2 py-2 rounded gap-3">
            <input
              type="checkbox"
              checked={todo.completed}
              onChange={() => toggleComplete(todo.id, todo.completed)}
              className="h-5 w-5 text-blue-500 rounded focus:ring-blue-500"
            />
            <span className={`flex-1 ${todo.completed ? "line-through text-gray-400" : ""}`}>
              {todo.title}
            </span>
            <button
              onClick={() => deleteTodo(todo.id)}
              className="bg-red-500 text-white px-2 py-1 rounded hover:bg-red-600"
            >
              DELETE
            </button>
          </li>
        ))}
      </ul>
    </div>
  );
}
アプリ起動
npm run dev
http://localhost:3000にアクセスし、タスクの追加/更新/削除が動作することを確認します。

Vercelへのデプロイ
GitHubへのコミット
プロジェクトをGitHubリポジトリにアップロードします:
git init
git add .
git commit -m "コミットメッセージ"
git remote add origin https://github.com/<username>/<repository>.git
git branch -M main
git push -u origin main
Vercelの設定
- VercelにGitHubアカウントでサインアップ(Hobbyプランを選択)。
- ダッシュボードで「Add New > Project」を選択。
- Import Git RepositoryからGitHubリポジトリをインポートし、「Deploy」をクリック。
Supabaseの設定
- Supabaseのダッシュボード新プロジェクトを作成。
- Connect タブから ORM の Prisma を選択。
- 中身をそのまま.evnにコピーして貼り付け。元のDATABASE_URLの設定はコメントアウト。
# Connect to Supabase via connection pooling with Supavisor.
DATABASE_URL="postgresql://postgres.xxxxxxxxxxxxxxxxxxxx:[password]@aws-0-ap-northeast-1.pooler.supabase.com:6543/postgres?pgbouncer=true"

# Direct connection to the database. Used for migrations.
DIRECT_URL="postgresql://postgres.xxxxxxxxxxxxxxxxxxxx:[password]@aws-0-ap-northeast-1.pooler.supabase.com:6543/postgres?pgbouncer=true"
スキーマ更新
prisma/schema.prismaをSupabase用に修正:
datasource db {
  provider = "postgresql"
  url      = env("DATABASE_URL")
  directUrl = env("DIRECT_URL")
}
モデルを反映:
npx prisma db push
データベース確認:
Supabaseダッシュボードで「Table Editor」を開き、Todoテーブルが作成されていることを確認。
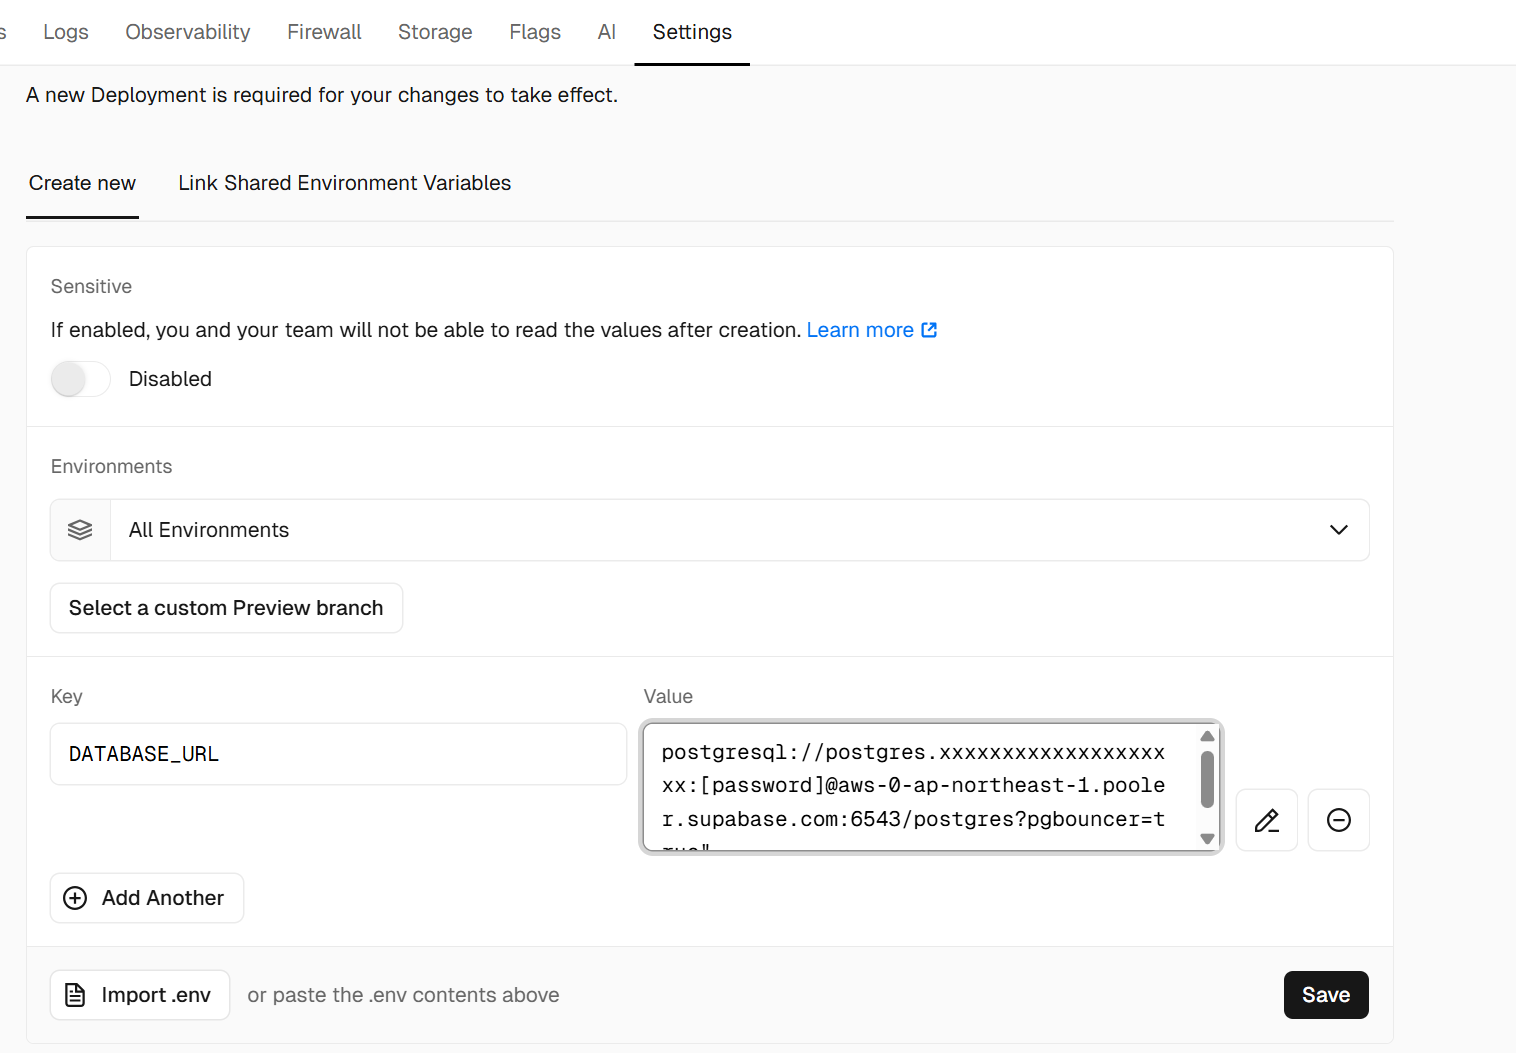
Supabaseダッシュボードから取得した接続情報をVercelに設定:
Vercelのダッシュボードでtodo-app-nextを選択。
Settings > Environment Variablesを開く。
先ほどの本番環境のDBへのDATABASE_URLとDIRECT_URLをそれぞれ設定。
DATABASE_URL="postgresql://postgres.xxxxxxxxxxxxxxxxxxxx:[password]@aws-0-ap-northeast-1.pooler.supabase.com:6543/postgres?pgbouncer=true"
DIRECT_URL="postgresql://postgres.xxxxxxxxxxxxxxxxxxxx:[password]@aws-0-ap-northeast-1.pooler.supabase.com:6543/postgres?pgbouncer=true"
接続確認
Vercelでデプロイした際に発行されたドメインにアクセスし、タスクの追加/更新/削除が動作することを確認します。

所感
今回は簡易的なNext.jsアプリケーションをVercel + Supabase + Prismaを作成してみました。
私はこれまでバックエンド言語しか触ってこなかったのですが、JavaScriptでここまでできるとは思っていませんでした。もう少し勉強してログイン機能やローディングアイコンなどを追加してみようと思います。