前回と同じようにDirectWriteを使い文字を描画していきます。
今回はTextLayoutという、もう少し細かく表示方法を調整できる方法に関して
説明します。
・ID2D1Factoryの作成
・ID2D1HwndRenderTargetの作成
・IDWriteFactoryの作成
・IDWriteTextFormatでフォントを作成
・IDWriteTextLayoutを作成
・DrawTextLayout(~)で描画
ソースコード
#include <Windows.h>
#include <tchar.h>
#include <iostream>
//	Direct2DのHeader
#include <d2d1.h>
//	DirectWriteのHeader
#include <dwrite.h>
// lib	Direct2D
#pragma comment( lib, "d2d1.lib" )
//	lib DirectWrite
#pragma comment( lib, "dwrite.lib" )

#define WINDOW_WIDTH  1080
#define WINDOW_HEIGHT 720

LRESULT CALLBACK    WndProc(HWND hwnd, UINT msg, WPARAM wParam, LPARAM lParam);
#define CLASS_NAME  "CLASS TEST01"
#define PROC_NAME   "test01"


template<class T>
inline void safe_release(T& p) {
	if (p) {
		p->Release();
		p = nullptr;
	}
}

// グローバル変数として定義
//	Direct2D用のファクトリ
ID2D1Factory* g_pD2d1Factory = nullptr;
//	RenderTarget
ID2D1HwndRenderTarget* g_pRenderTarget = nullptr;
//	DirectWrite用のファクトリー
IDWriteFactory* g_pDWFactory = nullptr;


int APIENTRY _tWinMain(HINSTANCE hInstance, HINSTANCE hPreInst, LPTSTR lpCmdLine, int nCmdShow)
{
	HWND            hwnd;
	MSG             msg;
	if (!hPreInst) {
		WNDCLASS    my_prog;
		my_prog.style = CS_HREDRAW | CS_VREDRAW;
		my_prog.lpfnWndProc = WndProc;
		my_prog.cbClsExtra = 0;
		my_prog.cbWndExtra = 0;
		my_prog.hInstance = hInstance;
		my_prog.hIcon = NULL;
		my_prog.hCursor = LoadCursor(NULL, IDC_ARROW);
		my_prog.hbrBackground = NULL;
		my_prog.lpszMenuName = NULL;
		my_prog.lpszClassName = _T(CLASS_NAME);

		if (!RegisterClass(&my_prog)) {
			return FALSE;
		}
	}

	RECT rect = {
		static_cast<LONG>(0),
		static_cast<LONG>(0),
		static_cast<LONG>(WINDOW_WIDTH),
		static_cast<LONG>(WINDOW_HEIGHT)
	};
	AdjustWindowRect(
		&rect,                                    // クライアント矩形
		WS_OVERLAPPED | WS_SYSMENU | WS_CAPTION,  // ウィンドウスタイル
		FALSE                                     // メニューフラグ
	);
	hwnd = CreateWindow(_T(CLASS_NAME),
		_T(PROC_NAME),
		WS_OVERLAPPED | WS_CAPTION | WS_SYSMENU | WS_MINIMIZEBOX | WS_THICKFRAME | WS_MAXIMIZEBOX,
		CW_USEDEFAULT,
		CW_USEDEFAULT,
		rect.right - rect.left,           // ウィンドウの幅
		rect.bottom - rect.top,           // ウィンドウの高さ
		NULL,
		NULL,
		hInstance,
		NULL);

	ShowWindow(hwnd, nCmdShow);
	UpdateWindow(hwnd);

	do {
		if (PeekMessage(&msg, NULL, 0U, 0U, PM_REMOVE)) {
			TranslateMessage(&msg);
			DispatchMessage(&msg);
		}
	} while (msg.message != WM_QUIT);
	return (int)(msg.wParam);
}

LRESULT CALLBACK WndProc(HWND hwnd, UINT msg, WPARAM wParam, LPARAM lParam)
{
	switch (msg) {

	case WM_SIZE: {

		D2D1_SIZE_U oPixelSize = { LOWORD(lParam), HIWORD(lParam) };
		// ターゲットリサイズ
		g_pRenderTarget->Resize(&oPixelSize);
		break;
	}

	case WM_DESTROY: {

		// ID2D1HwndRenderTargetの破棄
		safe_release(g_pRenderTarget);
		// ID2D1Factoryの破棄
		safe_release(g_pD2d1Factory);
		//	IDWriteFactoryの破棄
		safe_release(g_pDWFactory);
		PostQuitMessage(0);
		break;
	}
	case WM_CREATE: {
		CREATESTRUCT* tpCreateSt = (CREATESTRUCT*)lParam;
		HRESULT hResult = S_OK;

		//	Direct2D用のファクトリーの作成
		hResult = D2D1CreateFactory(D2D1_FACTORY_TYPE_MULTI_THREADED, &g_pD2d1Factory);

		if (SUCCEEDED(hResult)) {

			//	RenderTargetのサイズを指定
			D2D1_SIZE_U oPixelSize = {
								 static_cast<UINT32>(tpCreateSt->cx)
							   , static_cast<UINT32>(tpCreateSt->cy)
			};
			D2D1_RENDER_TARGET_PROPERTIES oRenderTargetProperties = D2D1::RenderTargetProperties();
			D2D1_HWND_RENDER_TARGET_PROPERTIES oHwndRenderTargetProperties = D2D1::HwndRenderTargetProperties(hwnd, oPixelSize);

			//	Direct2DのRenderTargetの作成
			hResult = g_pD2d1Factory->CreateHwndRenderTarget(
				oRenderTargetProperties
				, oHwndRenderTargetProperties
				, &g_pRenderTarget
			);
			//	DirectWriteのFactryを作成
			if (SUCCEEDED(hResult)) {
				hResult = DWriteCreateFactory(DWRITE_FACTORY_TYPE_SHARED, __uuidof(IDWriteFactory), reinterpret_cast<IUnknown**>(&g_pDWFactory));
			}
		}
		break;
	}
	case WM_PAINT: {


		D2D1_SIZE_F oTargetSize = g_pRenderTarget->GetSize();

		// 描画開始(Direct2D)
		g_pRenderTarget->BeginDraw();
		//	初期化マトリクスを行列にセット
		g_pRenderTarget->SetTransform(D2D1::Matrix3x2F::Identity());
		// 背景の色を赤でクリア
		D2D1_COLOR_F oBKColor = { 1.0f, 0.0f, 0.0f, 1.0f };
		g_pRenderTarget->Clear(oBKColor);

		//	テキストフォーマットの作成
		IDWriteTextFormat* pTextFormat = nullptr;

		g_pDWFactory->CreateTextFormat(
			L"Meiryo"
			, NULL
			, DWRITE_FONT_WEIGHT_NORMAL
			, DWRITE_FONT_STYLE_NORMAL//DWRITE_FONT_STYLE_OBLIQUE
			, DWRITE_FONT_STRETCH_NORMAL
			, 32
			, L""
			, &pTextFormat
		);

		std::wstring strText = L"コワーキングスペースでの開発";
		//	テキストレイアウトを作成
		IDWriteTextLayout* pTextLayout = nullptr;
		// IDWriteTextLayoutの取得
		g_pDWFactory->CreateTextLayout(
			strText.c_str()       // 文字列
			, strText.size()        // 表示する文字数
			, pTextFormat           // DWriteTextFormat
			, oTargetSize.width     // 枠の幅
			, oTargetSize.height    // 枠の高さ
			, &pTextLayout
		);


		//	ブラシの作成
		ID2D1SolidColorBrush* pFontBrush = nullptr;

		//	青いブラシを作成
		g_pRenderTarget->CreateSolidColorBrush(
			D2D1::ColorF(0.0f        // R
				, 0.0f                                          // G
				, 1.0f                                          // B
				, 1.0f                                          // A
			)
			, &pFontBrush
		);
		//	テキストレイアウトで文字を描画

		//	表示する個所を指定
		D2D1_POINT_2F points;
		points.x = oTargetSize.width/2;
		points.y = oTargetSize.height/2;

		//	下線を引く
		DWRITE_TEXT_RANGE textRange = { 0,	//	1文字目から
									   4 };	//	4番目までに下線
		//	下線を引く事を設定
		pTextLayout->SetUnderline(TRUE, textRange);
		//	テキストを表示
		g_pRenderTarget->DrawTextLayout(points, pTextLayout, pFontBrush);

		//	下線を引く設定の解除
		pTextLayout->SetUnderline(FALSE, textRange);

		//	下線を引いた所のテキストのBOLDにする
		pTextLayout->SetFontWeight(DWRITE_FONT_WEIGHT_BOLD, textRange);

		//	文字を40分、下にずらす
		points.y += 40.0f;
		//	テキストの表示
		g_pRenderTarget->DrawTextLayout(points, pTextLayout, pFontBrush);

		//	文字のBOLDを通常に戻す
		pTextLayout->SetFontWeight(DWRITE_FONT_WEIGHT_NORMAL, textRange);

		//	下線を引いた個所の文字の大きさを変更
		pTextLayout->SetFontSize(64.0f, textRange);
		//	文字を40分、下にずらす
		points.y += 40.0f;
		//	テキストの表示
		g_pRenderTarget->DrawTextLayout(points, pTextLayout, pFontBrush);

		// ブラシの破棄
		safe_release(pFontBrush);
		//	テキストレイアウトの破棄
		safe_release(pTextLayout);
		//	フォントの破棄
		safe_release(pTextFormat);
		//	描画終了(Direct2D)
		g_pRenderTarget->EndDraw();

		break;
	}
	default:
		return(DefWindowProc(hwnd, msg, wParam, lParam));
	}
	return (0L);
}
今回は、文字に下線を引く、文字の一部を太字にする、文字の一部を大きくする。
など、細かい指定をDrawTextLayoutを使用すると可能になります。
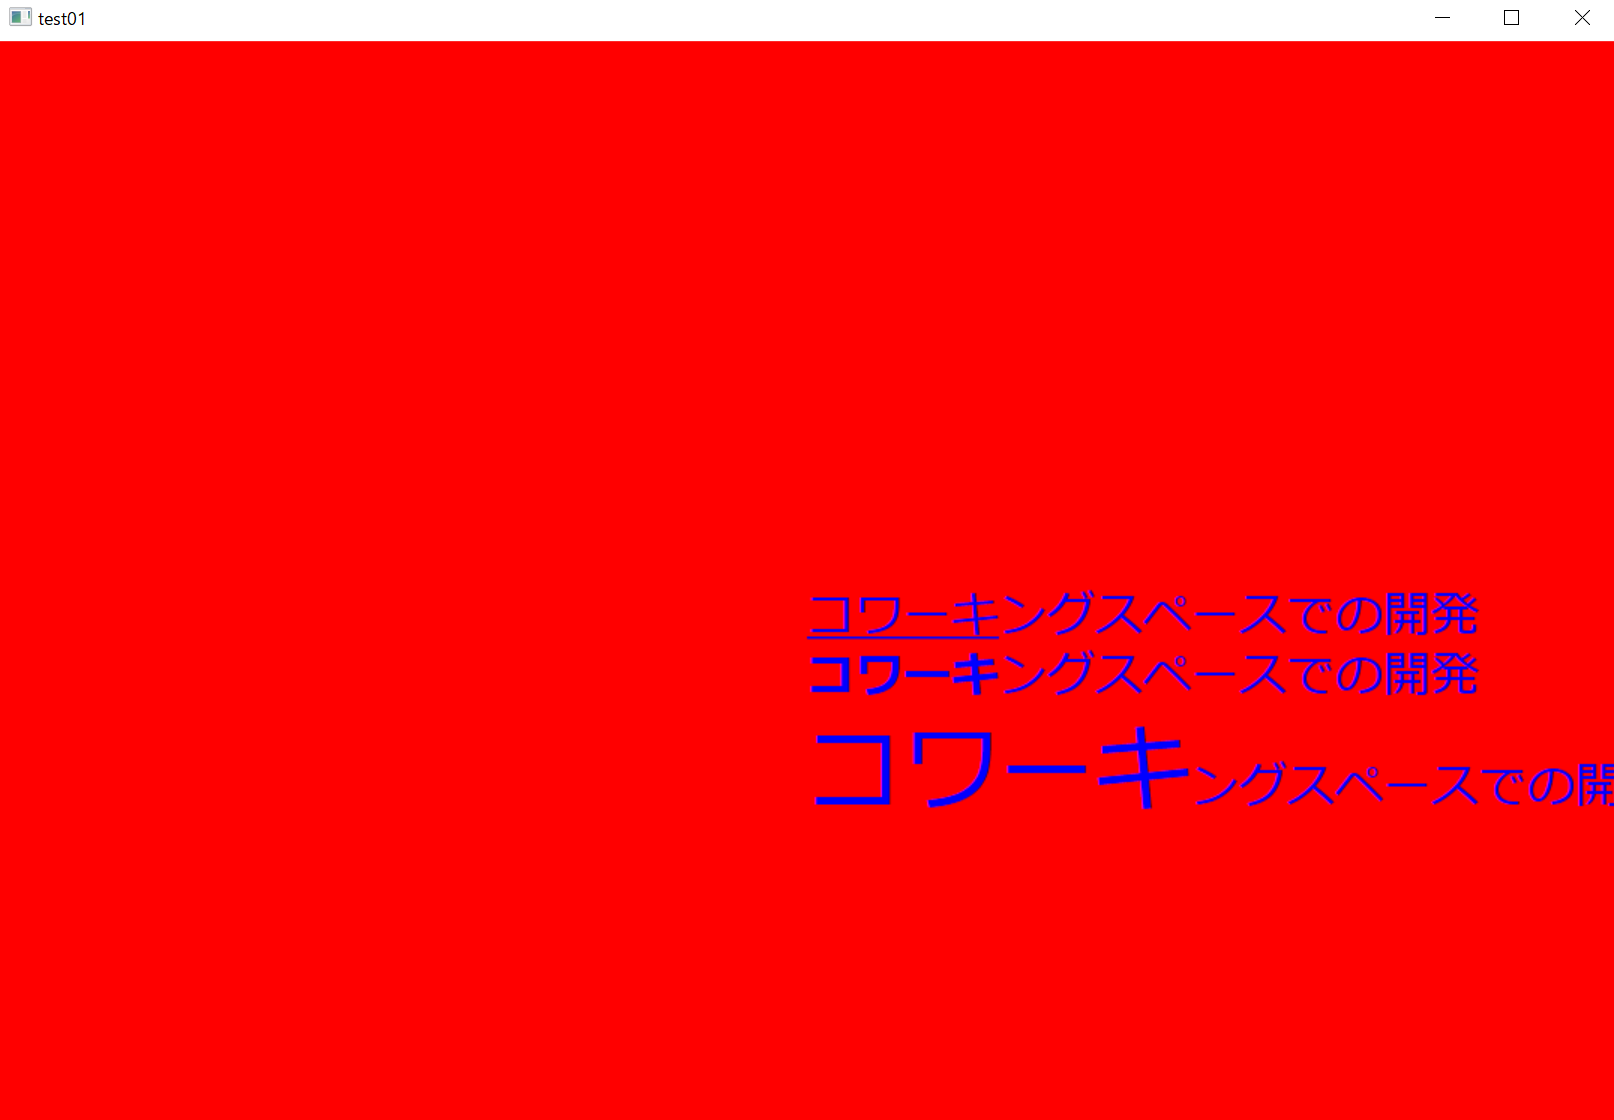
ソースをコンパイルすると以下のようになります。
下線、太字、文字の一部を大きくしています。ソースを見て参考にして下さい。